Witch Finger Cookies
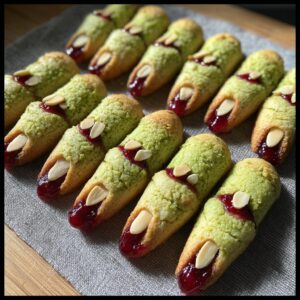
Create spooky and delicious witch finger cookies for Halloween. These buttery shortbread cookies are shaped like fingers, tinted green, and decorated with almond nails and jam ‘blood’ for a creepy, photo-worthy treat.
- Prep Time: 30 min
- Cook Time: 15 min
- Total Time: 45 min
- Yield: 18-24 cookies 1x
- Category: Dessert
- Method: Baking
- Cuisine: American
- Diet: Vegetarian
Ingredients
Scale
- 2 cups all-purpose flour
- 1 cup unsalted butter, softened
- 1/2 cup powdered sugar
- 1 large egg yolk
- 1 teaspoon vanilla extract
- 1/4 teaspoon salt
- Green food coloring (gel preferred for intensity)
- 1/2 cup blanched slivered almonds
- 2 tablespoons strawberry or raspberry jam, warmed
Instructions
- In a large bowl, cream together the softened butter and powdered sugar until light and fluffy.
- Beat in the egg yolk and vanilla extract until well combined.
- In a separate bowl, whisk together the flour and salt.
- Gradually add the dry ingredients to the wet ingredients, mixing until just combined.
- Add green food coloring, a little at a time, until you achieve your desired spooky green hue. Mix until the color is uniform.
- Wrap the dough in plastic wrap and chill for at least 30 minutes to make it easier to handle.
- Preheat your oven to 350°F (175°C). Line baking sheets with parchment paper.
- Take about 2 tablespoons of dough and shape it into a finger shape on the prepared baking sheet. Gently taper one end for the knuckle and flatten the other end for the palm.
- Use a knife or toothpick to score lines for knuckles.
- Press a slivered almond onto the tapered end for a fingernail.
- Repeat with the remaining dough, placing cookies about 2 inches apart.
- Bake for 12-15 minutes, or until the edges are lightly golden. Do not overbake, as this will make them spread.
- Let the cookies cool on the baking sheet for 5 minutes before transferring them to a wire rack to cool completely.
- Once cooled, gently insert a toothpick into the almond ‘nail’ and dip it into the warmed jam. Dab the jam around the nail and on the cookie to create a ‘bloody’ effect.
Notes
- For best results and to prevent spreading, ensure your butter is softened but not melted.
- Chilling the dough thoroughly will help the cookies hold their shape.
- Gel food coloring provides a more vibrant color without altering the dough consistency.
- If almonds are not sticking, you can use a tiny bit of the warmed jam as ‘glue’.
- For a more realistic bloody effect, use a toothpick to carefully apply the jam.
- These cookies can be made ahead and stored in an airtight container at room temperature for up to 5 days.
Nutrition
- Serving Size: 1 cookie
- Calories: 150
- Sugar: 8g
- Sodium: 30mg
- Fat: 9g
- Saturated Fat: 5g
- Unsaturated Fat: 4g
- Trans Fat: 0g
- Carbohydrates: 15g
- Fiber: 1g
- Protein: 2g
- Cholesterol: 30mg
Find it online: https://www.unfoldrecipes.com/witch-finger-cookies/