
Oh, Halloween! Is there anything more fun than whipping up some spooky, yummy treats for the kids (and let’s be real, for ourselves too)? If you’re anything like me, the kitchen becomes a magical place this time of year, filled with giggles and the sweet smell of something good baking. And when it comes to crowd-pleasing, super-easy Halloween Rice Krispie treats, you really can’t beat them! Here at Unfold Recipes, we’re all about making food that feels special without being fussy, much like Catherine’s approach to cooking. These treats are proof that you can have something wonderfully festive, incredibly soft, and perfect for little hands and party platters, all with just a few simple ingredients.
- Why You'll Love These Halloween Rice Krispie Treats
- The Secret to Soft Halloween Rice Krispie Treats
- Gather Your Ingredients for Halloween Rice Krispie Treats
- Step-by-Step Guide to Make Halloween Rice Krispie Treats
- Creative Halloween Shapes and Decorations
- Make Ahead and Storage for Halloween Parties
- Estimated Nutritional Information
- Frequently Asked Questions About Halloween Rice Krispie Treats
- Share Your Spooky Creations!
Why You’ll Love These Halloween Rice Krispie Treats
Seriously, these are going to be your new go-to for all things spooky and sweet! They are:
- Super Easy & Quick: You can totally whip these up in less than 30 minutes, which is a lifesaver when you’re juggling all the other Halloween prep.
- Totally Kid-Friendly: They’re the perfect activity to do with the kids and are always a huge hit at any classroom party or trick-or-treat event.
- Endlessly Customizable: Whether you’re going for cute pumpkins, spooky ghosts, or googly-eyed monsters, the possibilities are endless! They really are some of the most darling cute halloween snacks for kids you can find.
- No-Bake Magic: No oven needed means less fuss and less heat in the kitchen, making them ideal no bake spooky treats.
The Secret to Soft Halloween Rice Krispie Treats
Okay, let’s talk about the *most* important thing when it comes to Rice Krispie treats: keeping them soft and delightfully chewy! I swear, there’s nothing worse than biting into a stale, hard treat, especially when you’ve put in the effort to make them Halloween-themed. My grandma always had a trick up her sleeve for making sure hers stayed perfectly gooey, and it’s all about a couple of simple rules. If you ask me, learning how to keep rice krispie treats soft is practically a baking superpower, and it’s totally achievable with this recipe.
It really comes down to a few key things: the ratio of your ingredients, and knowing exactly when to stop cooking. Trust me, these little details make ALL the difference between a “meh” treat and a “WOW, these are amazing!” treat.
Perfect Marshmallow to Butter Ratio for Softness
So, the magic number here is about 10 ounces of marshmallows to 3 tablespoons of butter. This mix creates this wonderful, gooey base that just coats the cereal perfectly. More butter can make them a bit too greasy, and less can make them too dry and crumbly. It’s like a culinary balancing act! The butter helps everything melt smoothly, and the marshmallows are our sticky, wonderful main binder.
Avoiding Overcooking Marshmallows
This is where things can go sideways fast! You want to melt your marshmallows and butter over low heat, stirring *constantly*. As soon as they’re melted and smooth, pull them off the heat *immediately*. Don’t let it bubble or get super thick. If you cook them too long, especially after adding the cereal, that’s when they start to harden up like concrete. Just melting them until they’re smooth is the goal!
Gather Your Ingredients for Halloween Rice Krispie Treats
Alright, it’s time to gather everything we need for our super fun halloween rice krispie treats! It’s pretty straightforward, which is one of the things I love most about them. You’ll need some butter, a big bag of marshmallows (the regular-sized ones are perfect!), a splash of vanilla extract for flavor, and, of course, the star of the show: the Rice Krispies cereal. Oh, and don’t forget your spooky decorations – we’ll get to those!
Ingredient Notes and Substitutions
When it comes to our Halloween treats, the quality of your ingredients really shines through, but don’t worry, these are pretty forgiving! The recipe calls for 3 tablespoons of butter, and I always use unsalted, but salted works too if that’s what you have. For the marshmallows, a standard 10-ounce bag is your best bet – and please, use the big fluffy ones, not the mini ones if you can help it, as they melt so much more smoothly. We do add a teaspoon of vanilla extract, which really wakes up the flavor, but if you’re out, you can totally skip it. And of course, 6 cups of Rice Krispies cereal. You can absolutely swap out the Rice Krispies for other puffed rice cereals, or even crispy rice cereal like Krave or something with a different flavor, but the classic texture is hard to beat! For coloring, I usually grab gels because they’re potent, but liquid works too – just add it carefully.
Step-by-Step Guide to Make Halloween Rice Krispie Treats
Alright, let’s get down to business and make some awesome halloween rice krispie treats! It’s honestly so simple, you’ll want to make them all year round. First things first, grab a nice big saucepan, the bigger the better so you have room to stir everything together. You’re going to want to melt your butter over low heat. Keep that heat nice and low, trust me! Once the butter is all melty, toss in your marshmallows. Stir them gently until they’re completely smooth and gooey. This is the crucial step where you don’t want to rush things, just keep stirring!
As soon as those marshmallows are perfectly melted, take the pan off the heat. Stir in that teaspoon of vanilla extract – it adds just a little something extra to the flavor. Now, if you’re planning to color your treats (which, for Halloween, you totally should!), this is the time to divide your marshmallow mixture into separate bowls. Add your green and orange food coloring to each bowl, mixing until you get the perfect spooky shades. Carefully add the Rice Krispies cereal to each bowl with the colored marshmallow mixture and stir until every single piece is coated. Then, grab your prepared pan (a quick spread of butter or spray works wonders!) and spread the mixture evenly. If you’re shaping them, put them onto wax paper while they’re still warm enough to manage.
Pressing the Mixture Without Sticking
Okay, so pressing the gooey Rice Krispie mixture can get a little sticky, right? It’s the age-old struggle! The best trick my grandma taught me is to lightly grease your hands with butter or cooking spray before you touch the mixture. You can also use a silicone spatula or even the back of a spoon greased up. Just a little bit of that greasy goodness, and it’ll slide right off, making it super easy to press everything evenly into the pan or to shape your treats without sticking to yourself. It makes a world of difference!
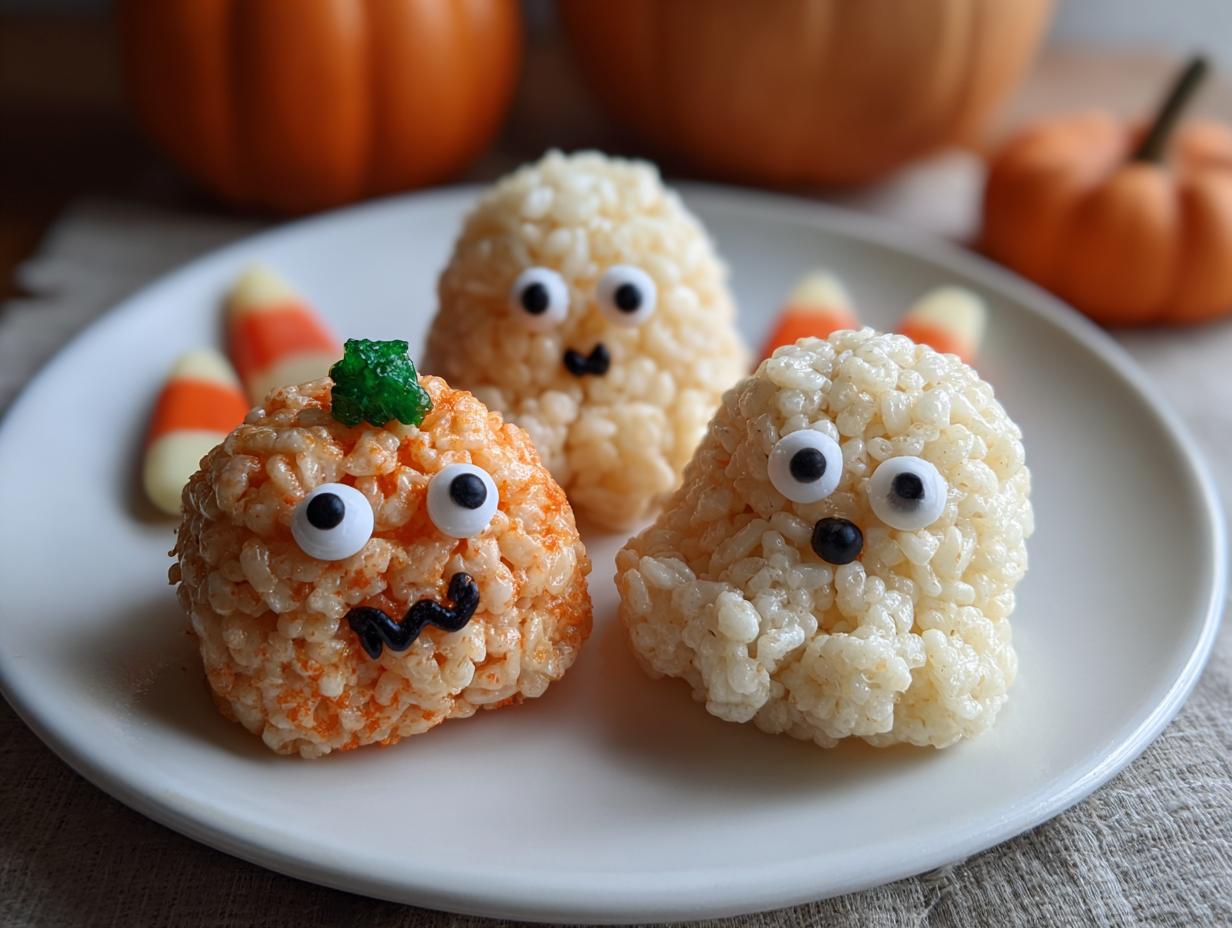
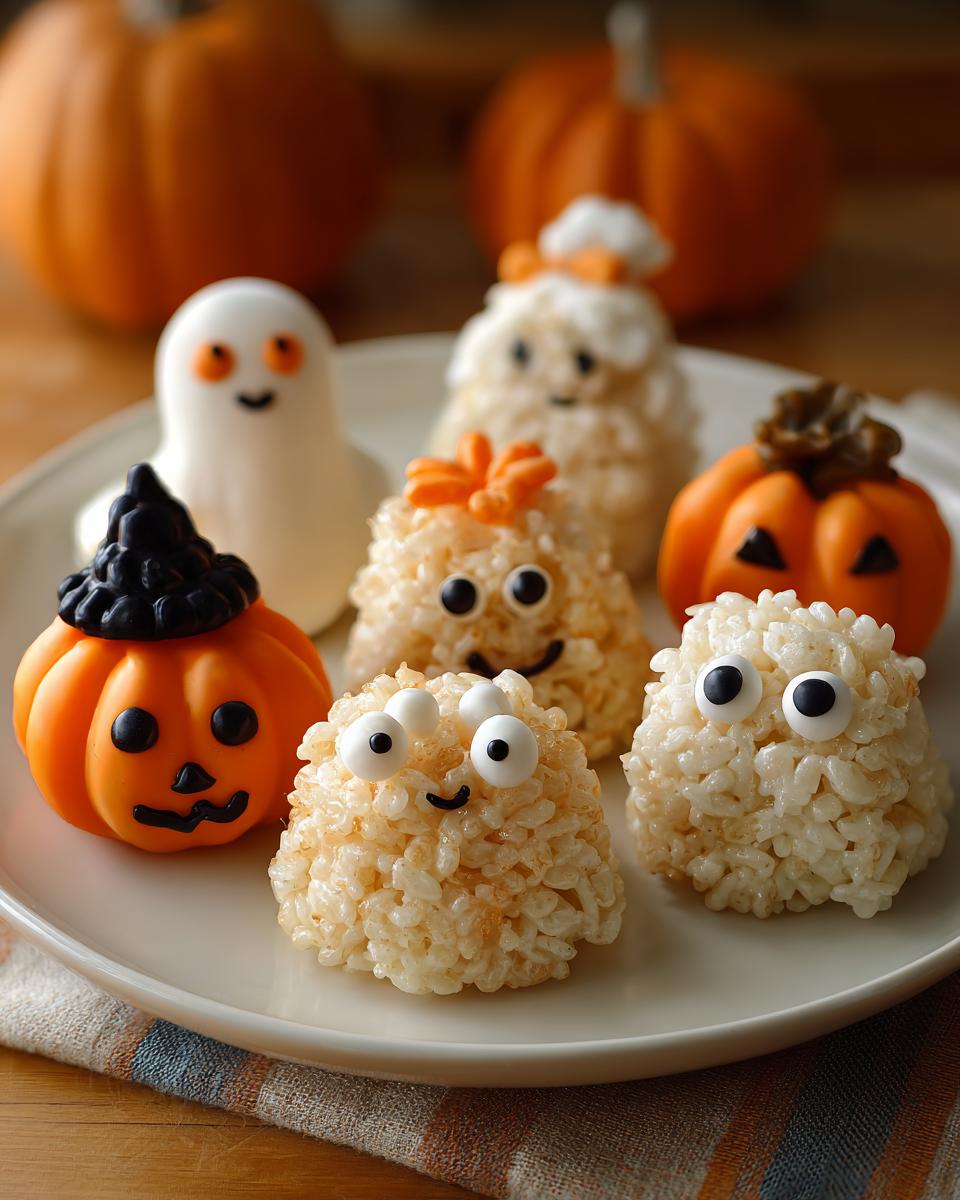
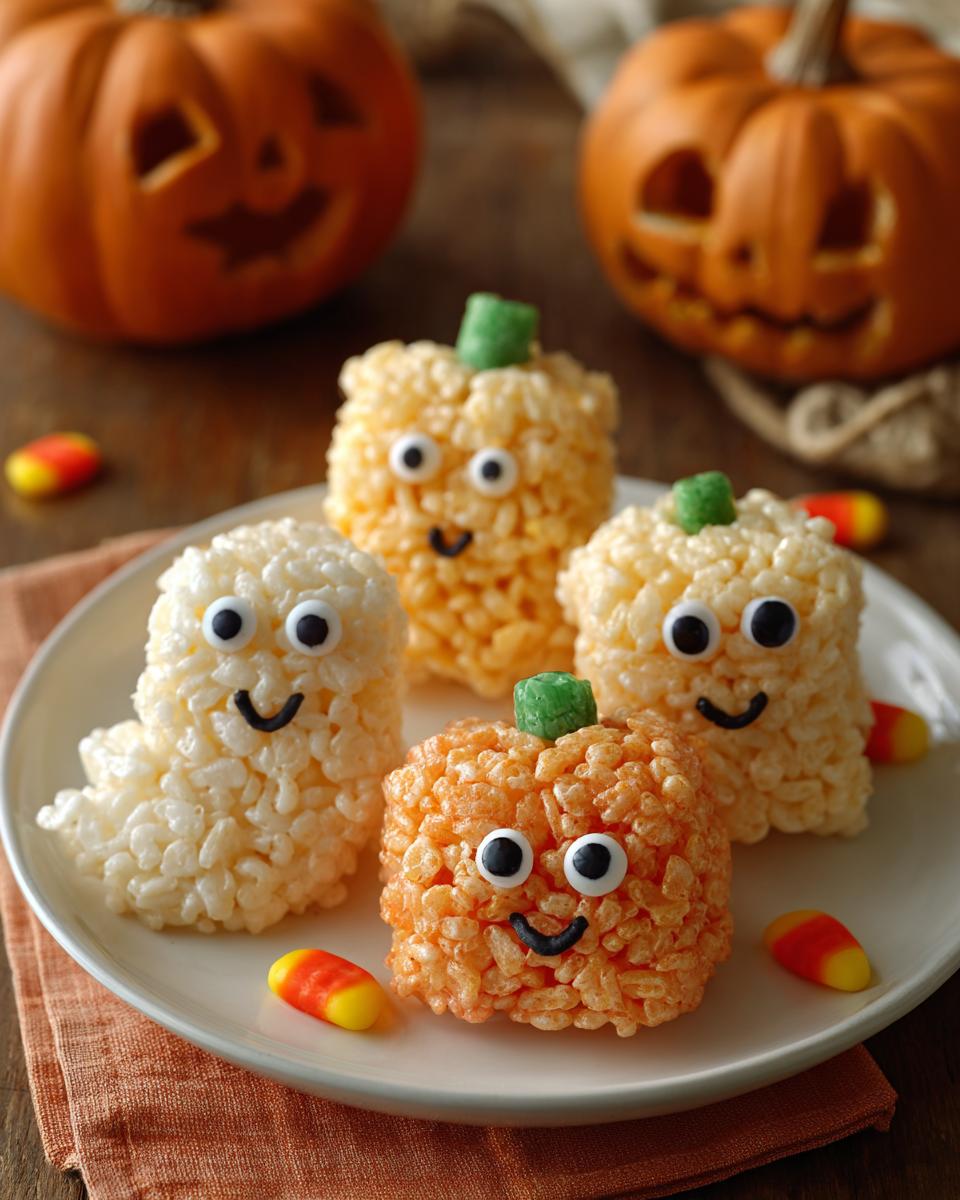
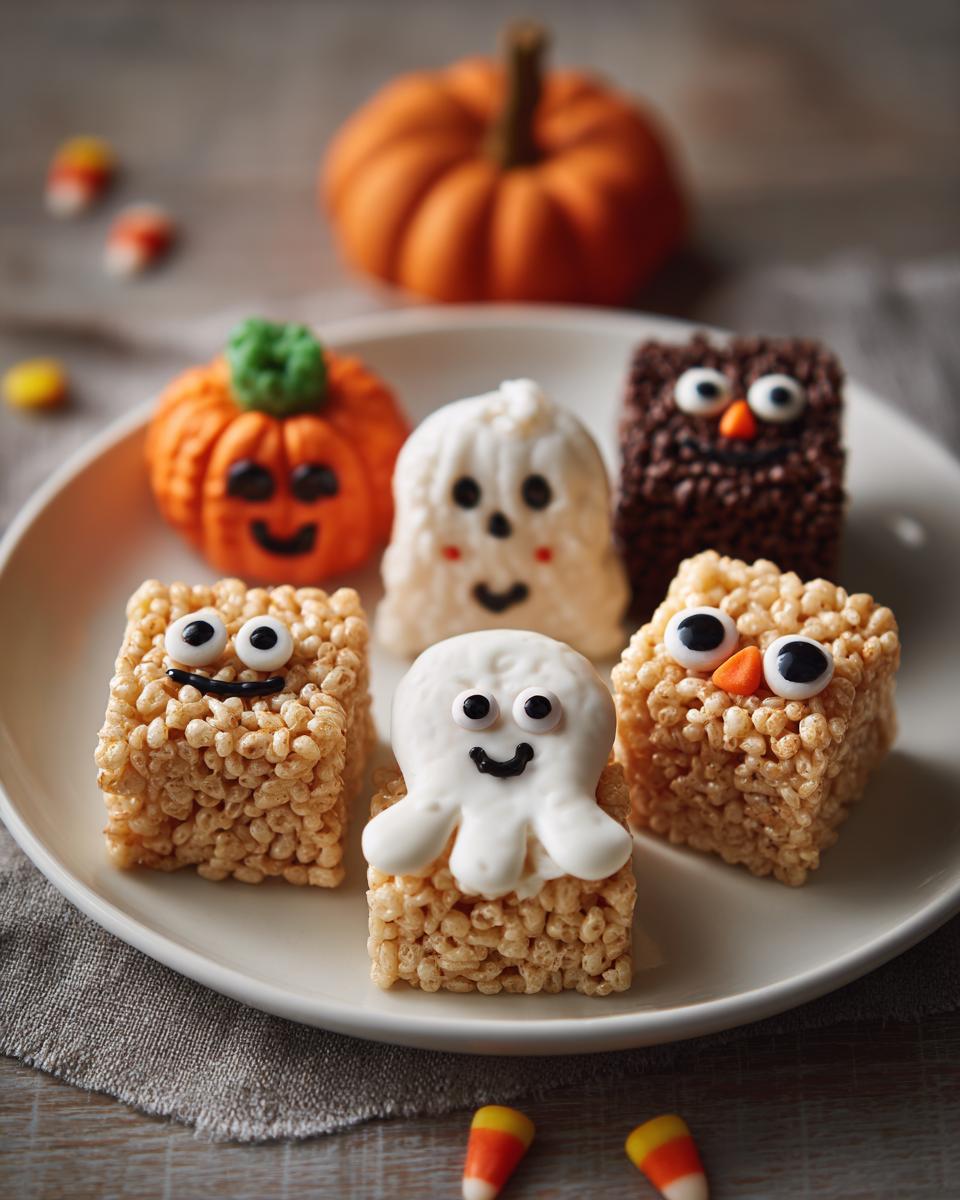
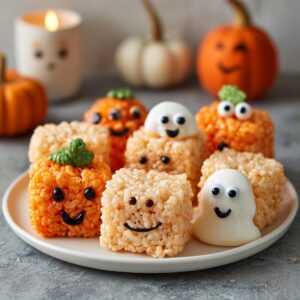
Creative Halloween Shapes and Decorations
Now for my favorite part – turning these delicious treats into adorable Halloween characters! It’s where we get to have some serious fun. Think of these as little canvases for your creativity. We want to make these extra special, you know, the kind that make kids’ eyes light up. You can totally channel Catherine’s eye for making things look impressive yet simple, turning these simple halloween rice krispie treats into some truly cute halloween snacks for kids. Whether you’re aiming for classic pumpkin rice krispie treats with candy eyes, some ghostly figures, or even little monsters, the possibilities are endless! Don’t forget to check out Catherine’s lovely pumpkin spice cake for more fall inspiration!
How to Color Halloween Rice Krispie Treats Safely
Coloring these treats is super easy and totally safe, especially when you’re doing it with kids! I’ve found that gel food coloring works best because it’s really concentrated, meaning you only need a tiny bit. Just divide your marshmallow mixture into bowls *before* you add the cereal, then add a drop or two of your chosen color. Mix it really well until you get that vibrant Halloween shade. Be careful not to add too much liquid coloring, as that can sometimes make the treats a little stiff. A little goes a long way, and you’ll get those perfect festive colors without any fuss!
Easy Pumpkin Rice Krispie Treats
For these adorable little pumpkins, you’ll want to start by coloring your marshmallow mixture a nice, bright orange. You can either press the whole batch into a parchment-lined pan and then use a round cookie cutter to make pumpkin shapes, or, even easier, just lightly grease your hands and roll the warm mixture into little balls! Once they’re shaped, you can add a small pretzel piece or a tiny bit of green candy in the center for a perfect stem. So cute, right? It reminds me of some of the fun pumpkin things we share, like these pumpkin pancakes or our pumpkin bread!

Spooky Ghost Rice Krispies
Ghosts are so easy and always a big hit! You can use a ghost-shaped cookie cutter to get those classic spooky silhouettes. Just press the white, uncolored (or lightly colored) Rice Krispie mixture into a lightly greased pan, then impress your cutter shapes into it while it’s still warm. For the eyes, those little candy eyeballs are perfect! Just press them gently into the treats before they set. If you don’t have a cutter, you can totally shape them freehand into little ghost blobs with your greased hands. They look so fun peeking out from a party platter!
Fun Monster Rice Krispies
Monsters are where you can really let your imagination run wild! Use different food colorings – green, purple, maybe some black or grey if you’re feeling extra spooky. Press the mixtures into the pan or shape little monster-like blobs. Then, go crazy with decorations! Add a bunch of candy eyes all over the place, use sprinkles for crazy hair, or even some chocolate chips for extra features. Each monster can be totally unique, which the kids absolutely adore. They’re like little edible works of art!
Make Ahead and Storage for Halloween Parties
You know, one of the best things about these halloween rice krispie treats is how perfectly they hold up when made ahead of time. Since we’re all juggling so much, especially around Halloween, being able to prepare these little delights a day or two in advance is a lifesaver! They are fantastic for stashing away until you need them for a school function or just a fun afternoon snack. Just make sure to store them properly to keep that lovely soft texture we worked so hard for! They’re truly ideal for any classroom halloween party food situation. It’s just like how we make certain things ahead for busy mornings, similar to our freezer breakfast burritos!
The trick to keeping them fresh is an airtight container, plain and simple. If you’ve shaped them, try to layer them with parchment paper in between so they don’t stick to each other. I often find they’re even better the next day, as the flavors really meld together beautifully. Think of it like this – you get one task done early, which means more time for spooky movie marathons or, let’s be honest, eating more treats!
Estimated Nutritional Information
Just so you know, these festive Halloween Rice Krispie treats are estimated to have about 150 calories per serving. Keep in mind, this might vary a touch depending on your exact ingredients and how you decorate them. It’s always good to remember these are just estimates, but it gives you a nice idea about this fun, practically no-bake dessert!
Frequently Asked Questions About Halloween Rice Krispie Treats
Got questions about making the best halloween rice krispie treats? I totally get it! We all want that perfect soft chew and fun spooky look. Let’s dive into some common things people ask, and I’ll share my best tips to keep those treats soft and delightful. It’s all about knowing the little secrets to keep rice krispie treats soft, and I’m happy to share them!
Can I use different types of cereal for Halloween Rice Krispie Treats?
Oh, absolutely! While classic Rice Krispies cereal gives you that signature texture, you can totally play around. Cereals like Chex or even Corn Flakes can work, but just know they might give a different crunch and density. Stick to puffed rice or similar cereals for the chewiest results!
How do I get clean cuts for my Halloween Rice Krispie Treats?
This is a pro tip you’ll thank me for! Make sure your treats are cooled slightly but still a little warm. Use a sharp knife, and here’s the magic bit: lightly grease the blade with butter or cooking spray. Wipe it clean and re-grease between cuts if needed. It makes such a difference for those super clean edges!
Are these treats suitable for a school Halloween party?
Definitely! These are practically *made* for school parties. They’re nut-free (just double-check your cereal and decorations!), super easy to handle, and you can customize them to fit any theme. Plus, they’re a total breeze to serve, making them a hit with teachers and kids alike!
Share Your Spooky Creations!
Now that you’ve made your amazing Halloween Rice Krispie treats, I just have to see them! Did yours turn out perfectly spooky? Were the kids obsessed? Did you try a unique monster design? I’d absolutely love it if you’d share your masterpieces with me! You can rate this recipe right down below, or tag me on social media so I can see all your creative fall dessert ideas come to life. Check out more fun recipes on the blog or browse our desserts section for more inspiration!
PrintHalloween Rice Krispie Treats
Create fun and festive Halloween-themed Rice Krispie treats. This recipe focuses on keeping them soft and provides ideas for shaping them into pumpkins, ghosts, and monsters using simple decorations like candy eyes and food coloring.
- Prep Time: 15 min
- Cook Time: 10 min
- Total Time: 25 min
- Yield: 12-16 servings 1x
- Category: Dessert
- Method: No Bake
- Cuisine: American
- Diet: Vegetarian
Ingredients
- 3 tablespoons butter
- 1 package (10 oz, about 40) marshmallows
- 1 teaspoon vanilla extract
- 6 cups Rice Krispies cereal
- Green and orange food coloring (optional)
- Candy eyes, sprinkles, or other edible decorations
Instructions
- Melt butter in a large saucepan over low heat.
- Add marshmallows and stir until completely melted and smooth. Remove from heat.
- Stir in vanilla extract.
- If coloring, divide the mixture into bowls and add food coloring to each, mixing well.
- Add Rice Krispies cereal to the marshmallow mixture and stir until well coated.
- Lightly grease a 9×13 inch pan or wax paper with butter or cooking spray.
- Press the mixture evenly into the prepared pan. For shapes, you can press onto wax paper and cut or shape while warm.
- Decorate with candy eyes, sprinkles, or other Halloween-themed decorations while the treats are still slightly warm.
- Let cool completely before cutting into squares or desired shapes.
Notes
- To keep treats soft, ensure you do not overcook the marshmallows.
- Lightly grease your hands or a spatula with butter or cooking spray when pressing the mixture to prevent sticking.
- For pumpkin shapes, press into a round pan or shape into balls and add a small piece of candy or pretzel for a stem.
- For ghost shapes, use a ghost cookie cutter or shape by hand. Add candy eyes.
- For monster shapes, use various food colorings and add candy eyes or sprinkles for features.
- Store treats in an airtight container at room temperature for up to 3 days.
Nutrition
- Serving Size: 1 treat
- Calories: 150
- Sugar: 15g
- Sodium: 100mg
- Fat: 3g
- Saturated Fat: 2g
- Unsaturated Fat: 1g
- Trans Fat: 0g
- Carbohydrates: 30g
- Fiber: 0g
- Protein: 1g
- Cholesterol: 5mg