
Oh, my dears, sometimes only a monumental combination of salty-sweet can truly satisfy that craving, right? When I need something that feels incredibly indulgent but still lets me put my feet up after a long day, I turn straight to this Ultimate No-Bake Chocolate Peanut Butter Pie with Oreo Crust. Forget the oven; this recipe is pure magic made simple. It’s about creating layers of texture and deep flavor that look like you spent hours laboring over them, but honestly, the most time this pie spends doing anything is chilling in the fridge!
This pie captures that perfect moment where elegance meets approachability. It’s the kind of dessert that will absolutely disappear at any gathering, whether it’s a fun potluck or just a quiet Tuesday night when you need a pick-me-up. I promise, mixing up this layered confection—which is truly one of my favorite desserts—will bring such a smile to your face. Let’s unfold this beautiful, decadent story together!
- Why This No-Bake Chocolate Peanut Butter Pie Recipe is a Keeper
- Ingredients for Your Ultimate No-Bake Chocolate Peanut Butter Pie
- Step-by-Step Instructions for the No-Bake Chocolate Peanut Butter Pie
- Tips for the Best Chocolate Peanut Butter Pie Success
- Ingredient Notes and Substitutions for Your No Bake Pie
- Storage and Make-Ahead Tips for Your Chocolate Peanut Butter Pie
- Serving Suggestions for This Layer Pie Recipe
- Frequently Asked Questions About Making a Chocolate Peanut Butter Pie
- Estimated Nutritional Data for This Decadent Pie
Why This No-Bake Chocolate Peanut Butter Pie Recipe is a Keeper
When I develop a recipe for the site, I want it to feel special without demanding my entire weekend. This chocolate peanut butter pie is the epitome of that goal. It’s straightforward, deeply satisfying, and handles a crowd with total grace. People always rave about it when I take it to gatherings!
- It’s a perfect potluck dessert because it travels beautifully when kept chilled.
- It satisfies that intense craving for something rich and indulgent!
- It just tastes better the next day, which is a huge win.
Effortless Assembly: The Joy of a No Oven Dessert
Honestly, this is the main reason you need this recipe in your book. We are talking about a total prep time of maybe 20 dedicated minutes. No preheating, no worrying about cracked tops, and certainly no sweating over a hot stove! It’s my favorite kind of magic—maximum flavor impact for minimal effort. You get all the luxury of a decadent sweet without needing to turn on the oven at all.
Decadent Layers: Achieving the Perfect Chocolate Peanut Butter Pie
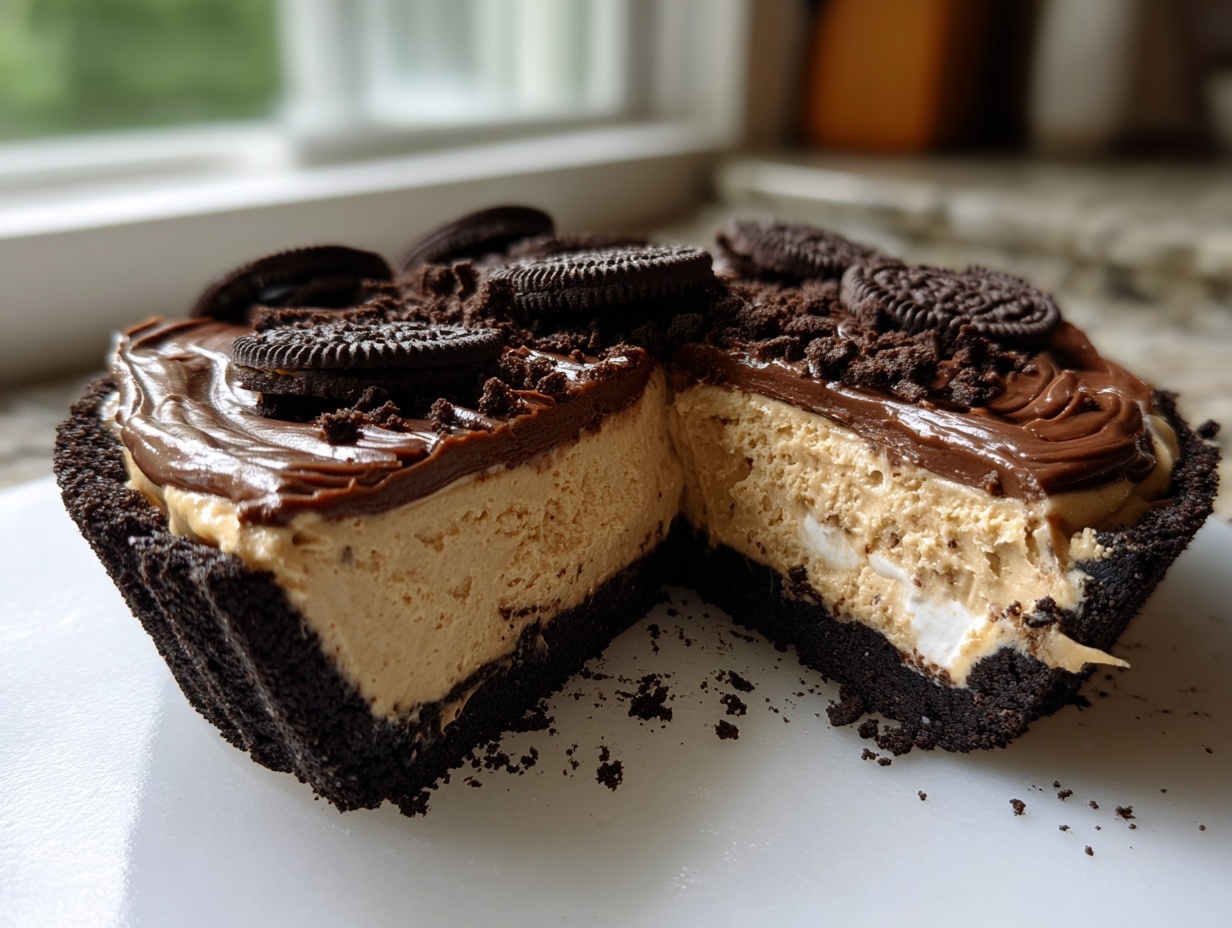
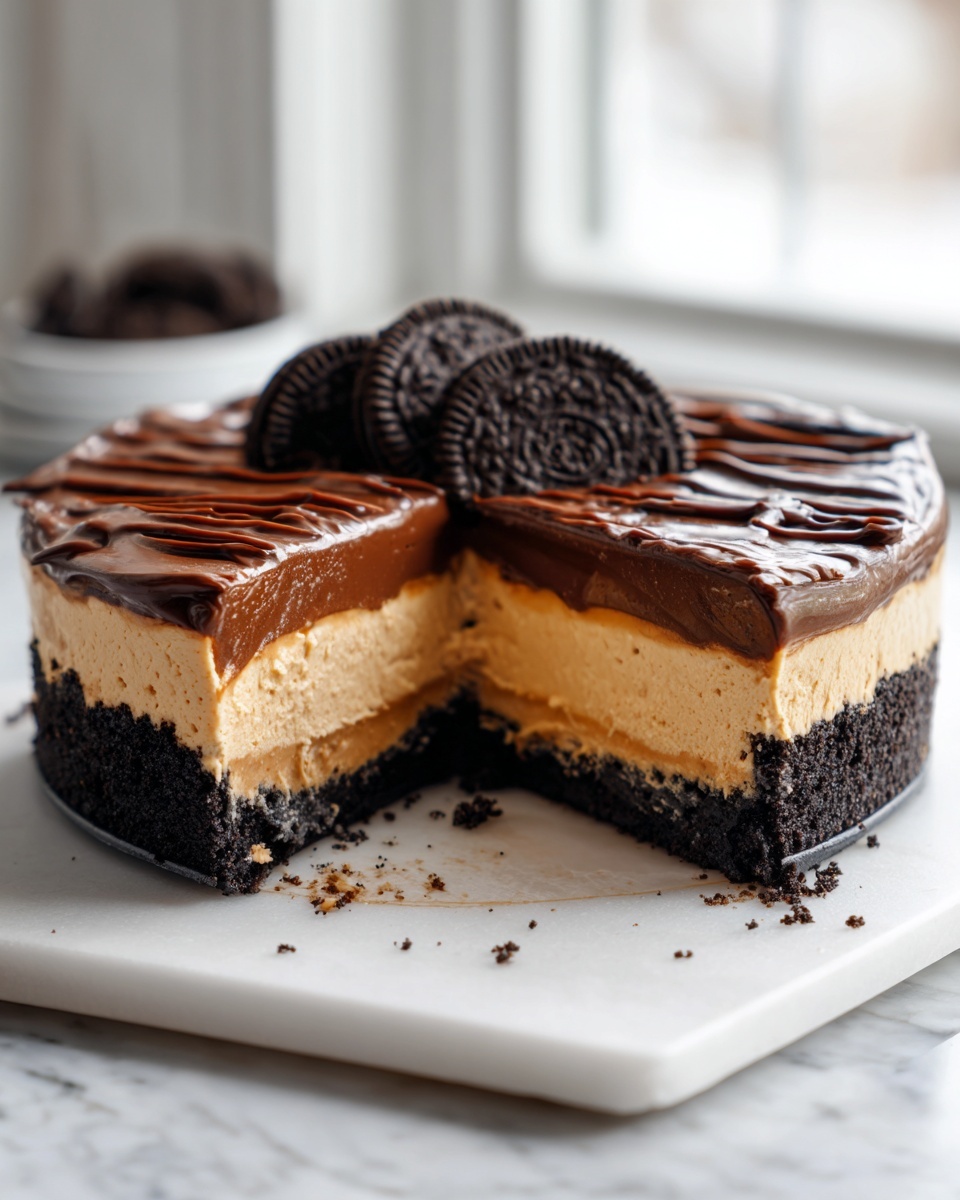
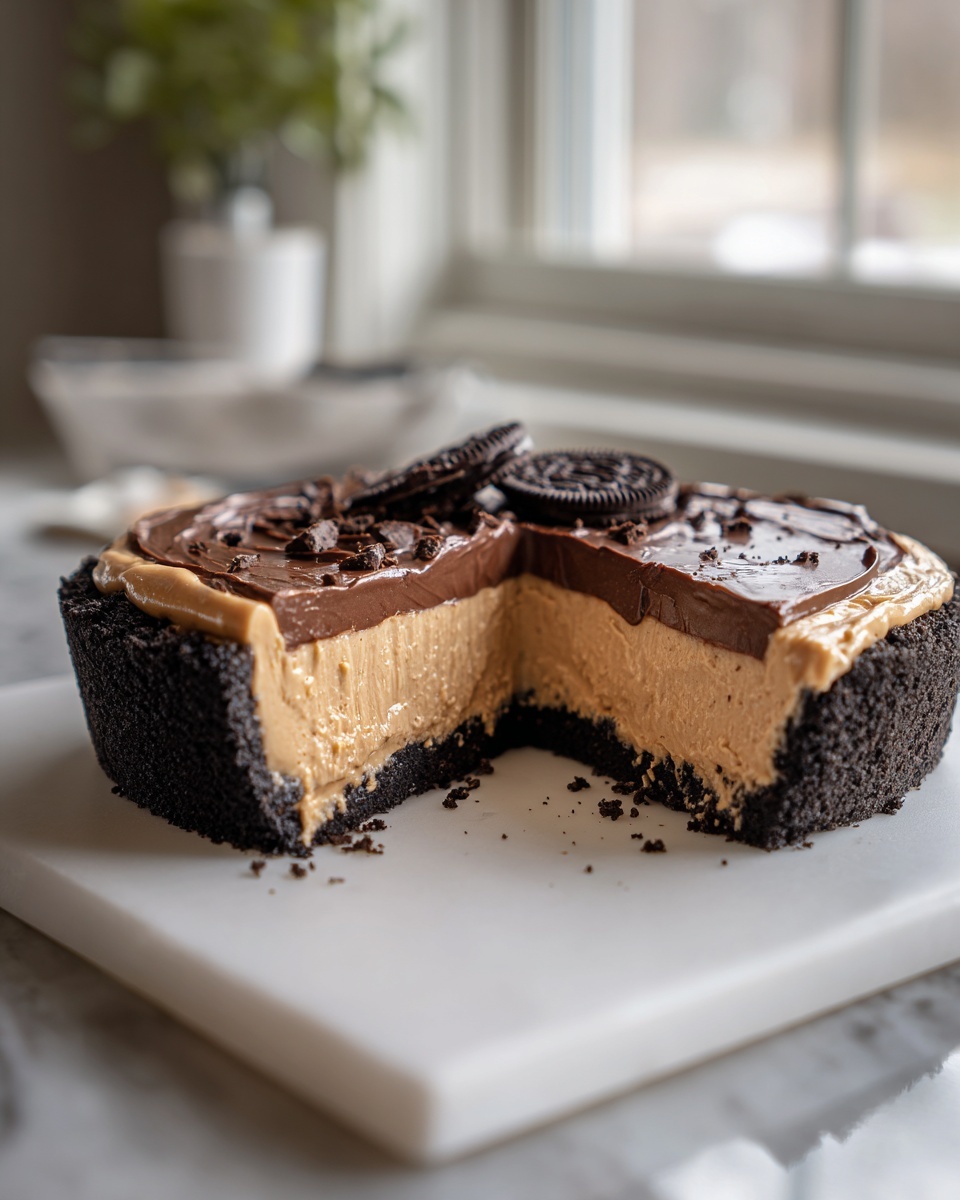
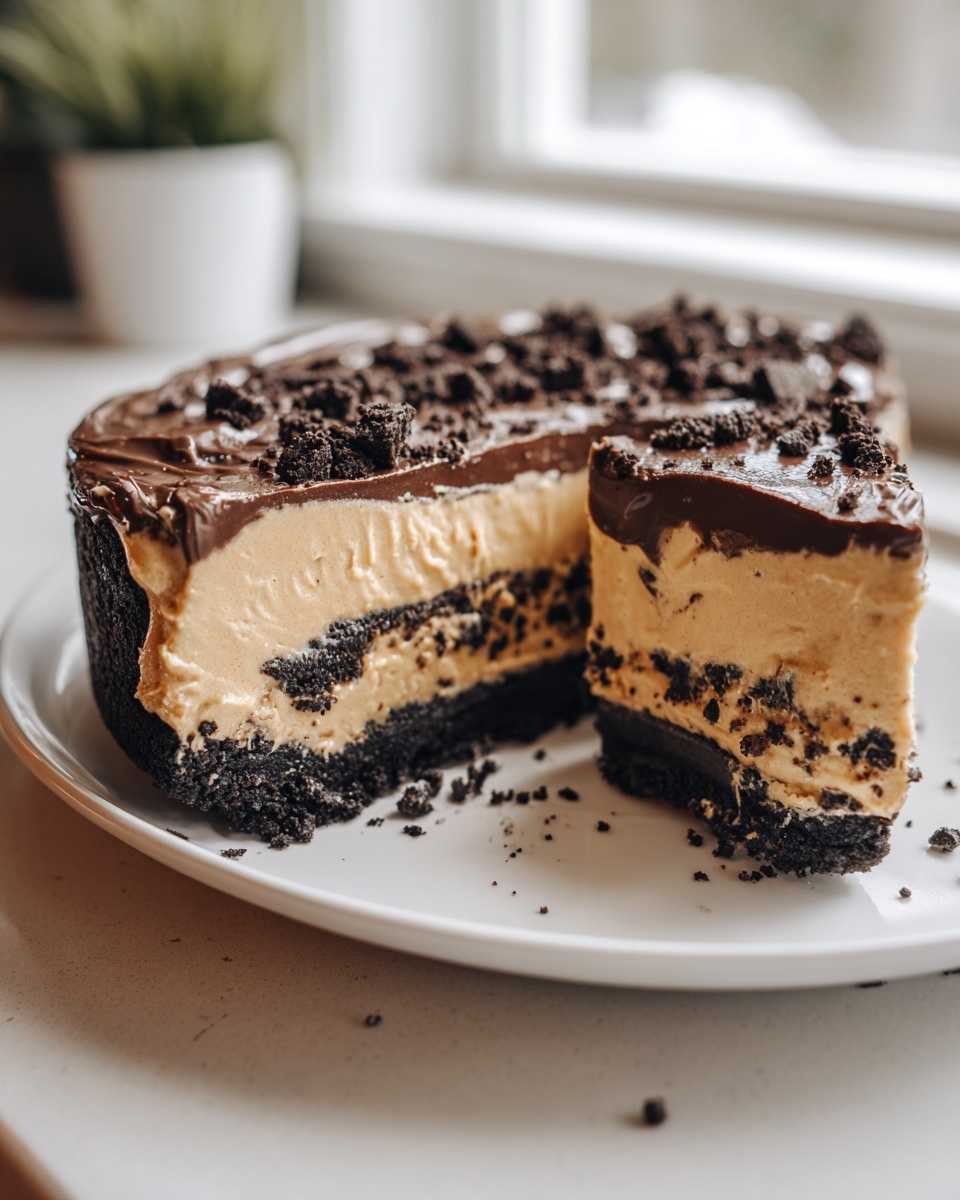
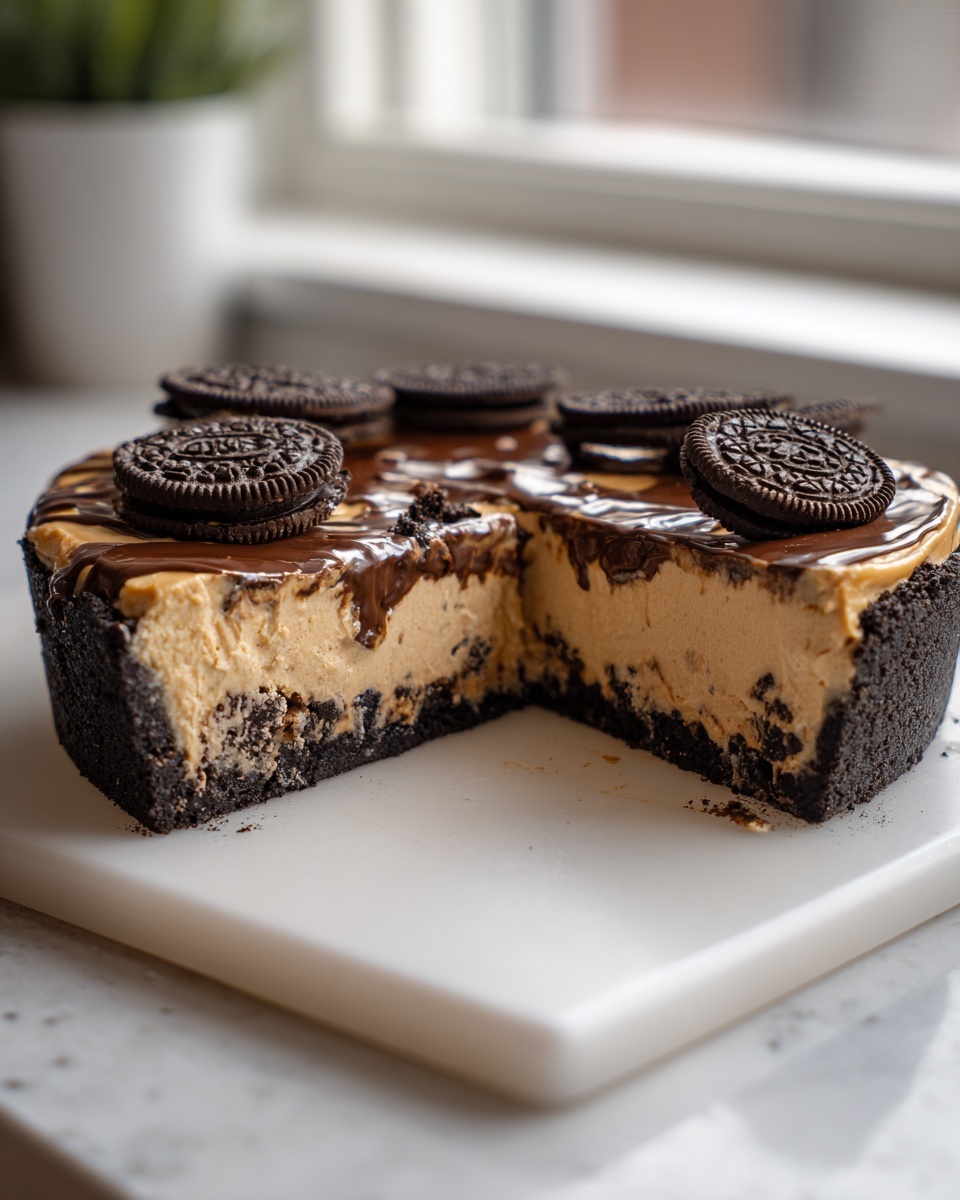
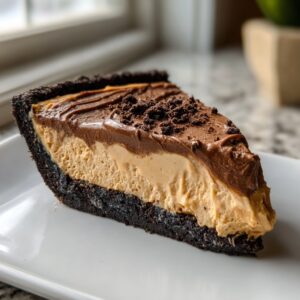
What makes this different from just mixing peanut butter and chocolate together? It’s the textural journey! You get that satisfying, almost shattering crunch from the oreo crust dessert base. Then, you sink into that cool, smooth peanut butter pie layer. Finally, that pillow-soft, velvety chocolate filling on top just brings it home. That contrast is heavenly, and it’s what elevates this from a simple treat to the ultimate no bake pie.
Ingredients for Your Ultimate No-Bake Chocolate Peanut Butter Pie
When you’re putting together such an impressive (yet easy!) chocolate peanut butter pie recipe, precision really does matter, especially since we aren’t baking anything to correct errors! Every component needs to be ready to go so we can assemble this beauty quickly. I’ve broken the list down based on which layer they belong to. Trust me, having everything measured out before you start whipping makes the assembly process feel smooth and stress-free. You’ll find that the use of quality ingredients here really makes this indulgent sweet sing!
Crust Components for the Chocolate Peanut Butter Pie
We start with the chocolatey base—I almost always use chocolate sandwich cookies instead of just plain graham crackers because that double dose of chocolate is necessary. For a classic pie crust, you’ll need:
- 1 3/4 cups chocolate sandwich cookie crumbs (that’s about 25 Oreos, don’t forget the filling!), finely processed.
- 6 tablespoons unsalted butter, melted until smooth.
The Creamy Peanut Butter Pie Filling
This is where the magic happens. Make sure your cream cheese is actually softened, or you’ll end up with little lumps you’ll never get out! For this luscious layer:
- 1 (8 ounce) package cream cheese, softened to room temperature.
- 1 cup creamy peanut butter—the standard shelf-stable stuff works best here for setting up properly.
- 1 1/2 cups powdered sugar, and please, sift it!
- 1 teaspoon vanilla extract.
- 1/2 cup cold heavy whipping cream.
Rich Chocolate Topping Ingredients
For the final blanket of chocolate goodness, we rely on instant mix magic here for speed, along with something light to keep it from getting too heavy.
- 1 (3.9 ounce) package instant chocolate pudding mix.
- 2 cups very cold milk.
- 1 cup thawed whipped topping (like Cool Whip).
- Optional: A sprinkle of chopped peanuts or chocolate shavings for garnish.
Step-by-Step Instructions for the No-Bake Chocolate Peanut Butter Pie
Okay, now that we have all our components ready, the actual construction of this incredible chocolate dessert goes surprisingly fast. The key here is managing the chill time correctly so those layers stay distinct and beautiful. Don’t rush the chilling steps—they are just as critical as the mixing!
Preparing and Chilling the Oreo Crust
First things first, we build the shell. Take your crumb and melted butter mixture and press it firmly into your 9-inch pie plate. I like to use the bottom of a dry measuring cup to really pack it down evenly along the bottom and up the edges. You want it tight! Once it’s pressed in, pop that crust into the freezer. We need it nice and cold while we work on the lovely fillings, so let it chill for at least 10 minutes while you grab your mixer.
Creating the Velvety Peanut Butter Layer
This layer needs to be completely smooth for the best texture in your final creamy peanut butter pie. In a big bowl, beat that softened cream cheese until it is absolutely flawless—no lumps allowed! Then, beat in your peanut butter, sifted powdered sugar, and vanilla until everything is just incorporated. The secret is next: gently fold in that 1/2 cup of cold heavy whipping cream by hand. Folding keeps the air in, and that air creates that delicious, light texture.
Assembling the Chocolate Peanut Butter Pie Layers
Pour that beautiful peanut butter filling right over your chilled crust and smooth the top out. Back into the freezer it goes for just 15 minutes—this quick chill helps prevent the next layer from immediately sinking into it. Now, for the chocolate! Whisk your instant chocolate pudding mix with 2 cups of cold milk until it starts to thicken up (about two minutes). After letting it sit for five minutes, gently fold in the cup of thawed whipped topping. Spoon this fluffy chocolate layer carefully over the set peanut butter filling.
Setting and Serving the Final Chocolate Dessert
This is the hardest part: waiting! Loosely cover the pie and move it to the refrigerator. You must let this beauty chill for a minimum of 4 hours, but truly, if you can wait overnight, you’ll be rewarded with the firmest, cleanest slices possible. When it’s time to serve your perfect chocolate peanut butter pie, I always use a knife dipped in hot water and wiped dry between each slice. It cuts through those firm layers like a dream!
Tips for the Best Chocolate Peanut Butter Pie Success
Even though this is a no-bake recipe, there are a few little secrets I’ve learned over the years that keep this beauty looking professional and tasting divine. If you follow these pointers, you’re going to achieve that perfect, rich, two-toned slice every single time. This is where we transition from just following steps to truly understanding *why* we do things, which is what building confidence in the kitchen is all about!
Ingredient Temperature Matters for Creamy Peanut Butter Pie
I can’t urge this enough: for the peanut butter layer, your cream cheese *must* be softened properly. If it’s even slightly cold, when you start mixing, those little bits of hard cheese won’t incorporate smoothly into the peanut butter and sugar. You’ll end up with a filling that has tiny, slightly rubbery clumps, and trust me, that ruins the silky texture we are aiming for in this creamy peanut butter pie. Leave it on the counter for at least an hour before you plan to start mixing!
Chocolate Layer Variations for Your Chocolate Peanut Butter Pie
While the instant pudding mix combined with whipped topping gives us a wonderfully light, airy topping perfect for a summer no oven dessert, sometimes you just need more depth, don’t you? If you are feeling extra decadent or perhaps making this for a major holiday gathering, try swapping it out for a simple ganache. You simply melt 6 ounces of good quality semi-sweet chocolate chips with 1/2 cup of heavy cream right on the stove (low heat!), let it cool for just a moment so it doesn’t melt the peanut butter layer, and then spoon it on top. It sets up beautifully fudgy and offers a much richer chocolate dessert experience.
It’s these little intentional tweaks that make a recipe your own. Pop over to my blog anytime you need more ideas on elevating simple classics!
Ingredient Notes and Substitutions for Your No Bake Pie
Whenever I share a truly fabulous graham cracker crust pie base, people always ask about tweaking things. This chocolate peanut butter pie is so flexible, but because there’s no baking happening, the ingredients need to behave exactly as expected to get that perfect structure. Let’s talk about how you can swap things around without sacrificing that creamy, set texture.
Crust Options: Oreo vs. Graham Cracker Crust Pie
I love the built-in chocolate flavor the Oreo crust gives us, but I totally get that sometimes you just want that classic, slightly lighter, buttery flavor from a graham cracker base. If you decide to switch, the basic ratio of crumbs to butter is roughly the same. You’ll need about 1 3/4 cups of graham cracker crumbs, and generally, you can follow the same 6 tablespoons of melted butter. The key difference is that graham cracker crumbs are a bit drier than Oreos, so feel free to add just one more teaspoon of melted butter if the mix seems crumbly. Either way, press it in firmly—that crust is doing a lot of heavy lifting here!
Peanut Butter Choice for This Indulgent Sweet
If you’re aiming for the silkiest, most stable creamy peanut butter pie filling that sets up beautifully when chilled, you need the right peanut butter. Please avoid the super-runny, natural peanut butter where the oil separates on top. That extra liquid content will essentially sabotage our efforts; the whole layer might turn soupy when it should be firm.
Stick to the standard, commercial creamy peanut butter. It has stabilizers that help the cream cheese and sugar bind perfectly together. This ensures that when you slice into this chocolate peanut butter pie, you get that clean, neat ribbon between the chocolate and the crust, not a puddle!
Storage and Make-Ahead Tips for Your Chocolate Peanut Butter Pie
The wonderful thing about this incredible no bake pie is that it actually improves with time! Since there’s no delicate meringue or custard that needs immediate eating, this is just about the most fantastic make-ahead dessert you could ask for. You want those layers to fully meld their flavors, and that only happens when you give it time to really chill out.
For the absolute best texture, I always aim to make this pie the day before I plan to serve it. Four hours works, but overnight resting in the refrigerator allows the peanut butter and chocolate layers to firm up beautifully so you get those gorgeous, clean slices we talked about. Just cover it loosely with plastic wrap—don’t let the wrap touch the top layer of chocolate, or you risk smearing your pretty garnish!
Now, can it be frozen? Absolutely! This is such a solid quick dessert for birthdays because you can stash it away. You need to make one important adjustment first: skip the whipped topping garnish altogether if you plan on freezing. Just have the pie fully set in its plate, cover it tightly with a layer of plastic wrap, and then a layer of aluminum foil. It keeps beautifully in the freezer for up to a month. Remember to transfer the whole thing to the fridge the day before you plan to serve it so it has ample time to thaw slowly. When it comes out, *then* you can add your fresh whipped cream or chopped peanuts.
Serving Suggestions for This Layer Pie Recipe
When you pull this gorgeous, deeply satisfying chocolate peanut butter pie out of the fridge, it already looks like a showstopper, doesn’t it? But sometimes, especially when entertaining or serving it as a grand finale to an elegant meal, a little extra something on the plate just elevates the whole experience. Since the pie itself is so rich and decadent, we want accompaniments that provide a lovely contrast in texture or flavor without overwhelming that amazing peanut butter and chocolate marriage.
Think about what feels light and bright next to something so creamy. A tiny dollop of fresh, unsweetened whipped cream on the side of the plate is wonderful. It cuts through the richness just perfectly. Another absolute favorite of mine when I’m looking to do a little something extra is a light drizzle of quality salted caramel sauce. Caramel loves both chocolate and peanut butter, and that little hint of salt really pops against the sweetness here. I even have a simple caramel recipe if you feel like brushing up on your sauce skills!
For something truly fresh, try serving tiny, crisp apple slices dusted lightly with cinnamon right next to the pie slice. The tartness of the apple provides the perfect palate cleanser after the sweet, dense layers of this layer pie recipe. It’s all about balance, dear reader! A little brightness makes the dark chocolate taste even deeper, making your very easy homemade dessert idea feel restaurant-worthy.
Frequently Asked Questions About Making a Chocolate Peanut Butter Pie
It’s totally natural to have questions when you’re diving into a show-stopping dessert like this! I get asked the same things every time this chocolate peanut butter pie pops up on my menu. Think of this as our quick chat segment where we iron out those final details to ensure you have the most streamlined path to dessert heaven. These questions usually crop up when people are planning ahead for parties or trying to figure out the best substitutions for their pantry staples. I’m here to tell you everything I know to make this the most satisfying quick dessert you’ve ever attempted!
Can I make this chocolate peanut butter pie ahead of time?
Oh, yes, please do! This is one of my favorite features of this recipe; it actually needs time to rest to achieve its best structure. While you *can* serve it after 4 hours of chilling, I highly, highly recommend making it the day before you plan to serve it. Overnight chilling allows those two fabulous layers to truly set up against the crust. When you pull it out the next day, you get those incredible, clean slices that look so professional. It makes serving a breeze!
What makes this the best peanut butter pie?
In my book, what truly makes this stand out as the best peanut butter pie recipe is the combination of supreme indulgence with extreme ease. We aren’t just getting one flavor profile; we get that deep, dark crunch from the crust, followed by the light, airy sweetness of the peanut butter filling, all topped with the rich, velvety chocolate. It’s that perfect textural contrast—creamy, crunchy, and deeply flavored—all achieved without ever heating up the oven. That’s hard to beat!
Can I use a traditional pie crust instead of the Oreo crust dessert base?
That’s a great question for anyone who might not have Oreos lurking in the pantry! Yes, you absolutely can substitute. If you wanted to use a traditional pastry crust, make sure you blind-bake it completely and let it cool down fully before you start layering anything inside. A hot or warm crust will melt your peanut butter filling instantly, leading to a soupy mess. If you’re keeping this a true no bake pie, the simplest switch is to use a standard graham cracker crust instead. They work wonderfully with these fillings, though you’ll miss that deep cocoa note the Oreos provide!
Can I use whipped topping instead of heavy cream in the peanut butter layer?
For the peanut butter layer, I specifically call for folding in 1/2 cup of *cold heavy whipping cream* because it introduces a lighter, slightly richer airiness to the mixture than using just more pre-made stabilized topping achieves. If you are against heavy cream or don’t have any, you can substitute the 1/2 cup of heavy cream with 1/2 cup of thawed whipped topping. Just treat it the same way—gentle folding! It will still set up nicely, but I find the dairy cream gives it a touch more elegance. This is a key component of making it a fantastic easy dessert that tastes gourmet!
Estimated Nutritional Data for This Decadent Pie
Now, let’s talk briefly about the numbers—because while this chocolate peanut butter pie is pure indulgence, I like to give you all the information you need to serve it confidently. Please remember that because this is a homemade treat, and depending on the exact brand of cream cheese or peanut butter you decide to use, these figures are just estimates. They give you a good ballpark idea of what one generous slice contains.
We all know this isn’t a light snack, ladies and gentlemen. This is a true decadent pie meant for celebrations and satisfying those serious sweet tooth moments! The richness comes from the cream cheese and the delicious chocolate layers. Here is the estimated breakdown for one slice:
- Calories: 480
- Total Fat: 30g
- Carbohydrates: 48g
- Protein: 10g
If you are substituting the Oreo crust for a graham cracker crust pie, your fat and carb counts will shift slightly. Similarly, if you opt for the ganache instead of the pudding, you might see a bump in the fat content compared to this version. Enjoy this rich reward for using your kitchen skills, and don’t worry too much about the details—just savor every bite!
PrintUltimate No-Bake Chocolate Peanut Butter Pie with Oreo Crust
Create a decadent, layered dessert that satisfies chocolate and peanut butter cravings instantly. This no-bake pie features a crunchy Oreo crust, a creamy peanut butter filling, and a rich chocolate topping, making it an easy, impressive treat for any gathering.
- Prep Time: 20 min
- Cook Time: 0 min
- Total Time: 4 hr 20 min
- Yield: 8 servings 1x
- Category: Dessert
- Method: No-Bake
- Cuisine: American
- Diet: Vegetarian
Ingredients
- 1 3/4 cups chocolate sandwich cookie crumbs (about 25 Oreos)
- 6 tablespoons unsalted butter, melted
- 1 (8 ounce) package cream cheese, softened
- 1 cup creamy peanut butter
- 1 1/2 cups powdered sugar, sifted
- 1 teaspoon vanilla extract
- 1/2 cup cold heavy whipping cream
- 1 (3.9 ounce) package instant chocolate pudding mix
- 2 cups cold milk
- 1 cup whipped topping (like Cool Whip), thawed, plus more for garnish
- 1/4 cup chopped peanuts or chocolate shavings, for topping
Instructions
- Prepare the crust: Combine the chocolate cookie crumbs and melted butter in a medium bowl. Press the mixture firmly and evenly into the bottom and up the sides of a 9-inch pie plate. Place the crust in the freezer while you prepare the filling.
- Make the peanut butter layer: In a large bowl, beat the softened cream cheese with an electric mixer until smooth. Add the peanut butter, powdered sugar, and vanilla extract. Beat until fully combined and creamy.
- Fold in the whipped cream: Gently fold the 1/2 cup of cold heavy whipping cream into the peanut butter mixture until just combined. Spread this peanut butter filling evenly over the chilled crust. Place the pie back in the freezer for 15 minutes to set slightly.
- Make the chocolate layer: In a separate bowl, whisk together the instant chocolate pudding mix and 2 cups of cold milk for about 2 minutes, until the mixture thickens. Let it stand for 5 minutes.
- Fold in the whipped topping: Gently fold the 1 cup of thawed whipped topping into the thickened chocolate pudding mixture.
- Assemble the pie: Carefully spoon the chocolate layer over the peanut butter layer in the pie shell. Smooth the top with a spatula.
- Chill: Cover the pie loosely with plastic wrap and refrigerate for at least 4 hours, or preferably overnight, to allow the layers to set completely.
- Serve: Before serving, top the pie with additional whipped topping, chopped peanuts, or chocolate shavings. Slice with a warm knife for clean cuts.
Notes
- For a Reese’s inspired dessert, use a pre-made graham cracker crust and layer the fillings as directed.
- If you prefer a richer chocolate topping, substitute the pudding mix with a simple chocolate ganache made from 6 ounces of semi-sweet chocolate chips melted with 1/2 cup of heavy cream.
- This no oven dessert is excellent for potlucks because it travels well when kept chilled.
Nutrition
- Serving Size: 1 slice
- Calories: 480
- Sugar: 35g
- Sodium: 310mg
- Fat: 30g
- Saturated Fat: 14g
- Unsaturated Fat: 16g
- Trans Fat: 0.5g
- Carbohydrates: 48g
- Fiber: 2g
- Protein: 10g
- Cholesterol: 55mg