

Oh, the holidays! Is there anything that just screams comfort and tradition quite like a perfectly golden, bubbling apple pie? Seriously, when that cinnamon and baked apple aroma starts wafting through the house, you just know something special is happening. It’s like a warm hug on a chilly evening, and it’s exactly the kind of magic I love to create in my kitchen. Here at Unfold Recipes, my goal is to help you tell your own delicious stories through food, and this classic American apple pie is an absolute heirloom recipe. It’s time-tested, totally impressive without being fussy, and honestly, it’s what holiday gatherings are made for. My culinary background really kicked in experimenting with this one, making sure it’s just right, so you can create a showstopper for your table! You can learn more about my story and approach to cooking here.
- Why You'll Love This Classic Apple Pie
- Gather Your Ingredients for the Perfect Apple Pie
- Mastering Your Apple Pie: Step-by-Step
- Tips for the Best Homemade Apple Pie
- Ingredient Notes and Substitutions for Apple Pie
- Serving and Storing Your Delicious Apple Pie
- Frequently Asked Questions about Apple Pie
- Nutritional Information
- Share Your Apple Pie Creations!
Why You’ll Love This Classic Apple Pie
Seriously, this apple pie is just pure magic! It tastes like a dream, and you’ll totally love how easy it is. Here’s why:
- It’s the quintessential homemade dessert that feels like a warm hug, totally perfect for any holiday gathering or cozy fall evening.
- You get that amazing, traditional apple pie flavor with just the right amount of spice, thanks to carefully selected spices and a touch of lemon juice.
- It’s surprisingly straightforward to whip up! Even if you’re new to baking pies, this recipe gives you all the steps you need to impress everyone.
- The golden, flaky crust and bubbly, sweet apple filling are just pure comfort on a plate. Trust me, it’s a crowd-pleaser!

Gather Your Ingredients for the Perfect Apple Pie
Okay, to make this amazing apple pie, you want to have everything ready to go. It makes the whole process so much smoother! Here’s what you’ll need:
- 1 recipe for double pie crust – you can totally use your favorite homemade one or a good quality store-bought one.
- 6 medium apples (about 3 pounds total). I love using a mix like Honeycrisp, Gala, or Fuji for that perfect sweet and slightly tart flavor. Peel them, take out the cores, and slice them about 1/4-inch thick.
- 3/4 cup granulated sugar.
- 2 tablespoons all-purpose flour – this helps thicken up those lovely apple juices.
- 1 teaspoon ground cinnamon, 1/4 teaspoon ground nutmeg, and 1/4 teaspoon ground allspice. This spice combo is just divine!
- 1 tablespoon lemon juice, which brightens up the flavors and stops the apples from browning too much.
- 2 tablespoons unsalted butter, cut into little pieces to dot over the filling.
- 1 large egg, beaten – this is for our beautiful egg wash that gives the crust that gorgeous golden sheen.
- 1 tablespoon turbinado sugar, if you want a little sparkle and crunch on top.
Mastering Your Apple Pie: Step-by-Step
Alright, let’s get this pie put together! It’s really not as intimidating as you might think, and honestly, watching it bake up golden and glorious is half the fun. Just follow along with me here, and we’ll have a masterpiece in no time. Think of it like following the steps to a perfect pie, kind of like how baking a pie can be a bit like a dump cake in its simplicity once you know the tricks!
Preparing the Pie Crust for Your Apple Pie
First things first, let’s get that bottom crust ready. On a nice, lightly floured surface, grab one of your pie dough disks and roll it out into about a 12-inch circle. Don’t worry if it’s not perfectly round, rustic is charming! Gently ease it into your 9-inch pie plate. You can trim any extra dough hanging over the edge and then make those pretty little crimps along the rim—whatever style you like best!
Creating the Perfect Apple Pie Filling
Now for the star of the show: the apples! In a big ol’ bowl, toss your sliced apples with the sugar, flour, cinnamon, nutmeg, allspice, and that little bit of lemon juice. Give it all a really gentle stir, making sure every single apple slice is coated. The lemon juice not only adds a lovely brightness but it also helps keep those apples looking fresh and prevents them from getting TOO brown in the filling. It reminds me a bit of how we handle fruits for apple fritters, keeping them looking their best before they hit the heat.
Assembling and Baking Your Apple Pie
Time to bring it all together! Pour that beautifully spiced apple mixture right into your prepared pie crust. Then, take your little pieces of butter and dot them all over the top of the apples. Seriously, this makes such a difference! Now, roll out your second disk of dough into an 11-inch circle. Carefully lay it over the apples. Trim the edges, leaving about a half-inch overhang. Fold that top crust edge under the bottom crust edge and crimp to seal everything up nice and tight. Don’t forget to cut a few slits in the top crust so steam can escape – it’s like giving the pie little breathing holes!
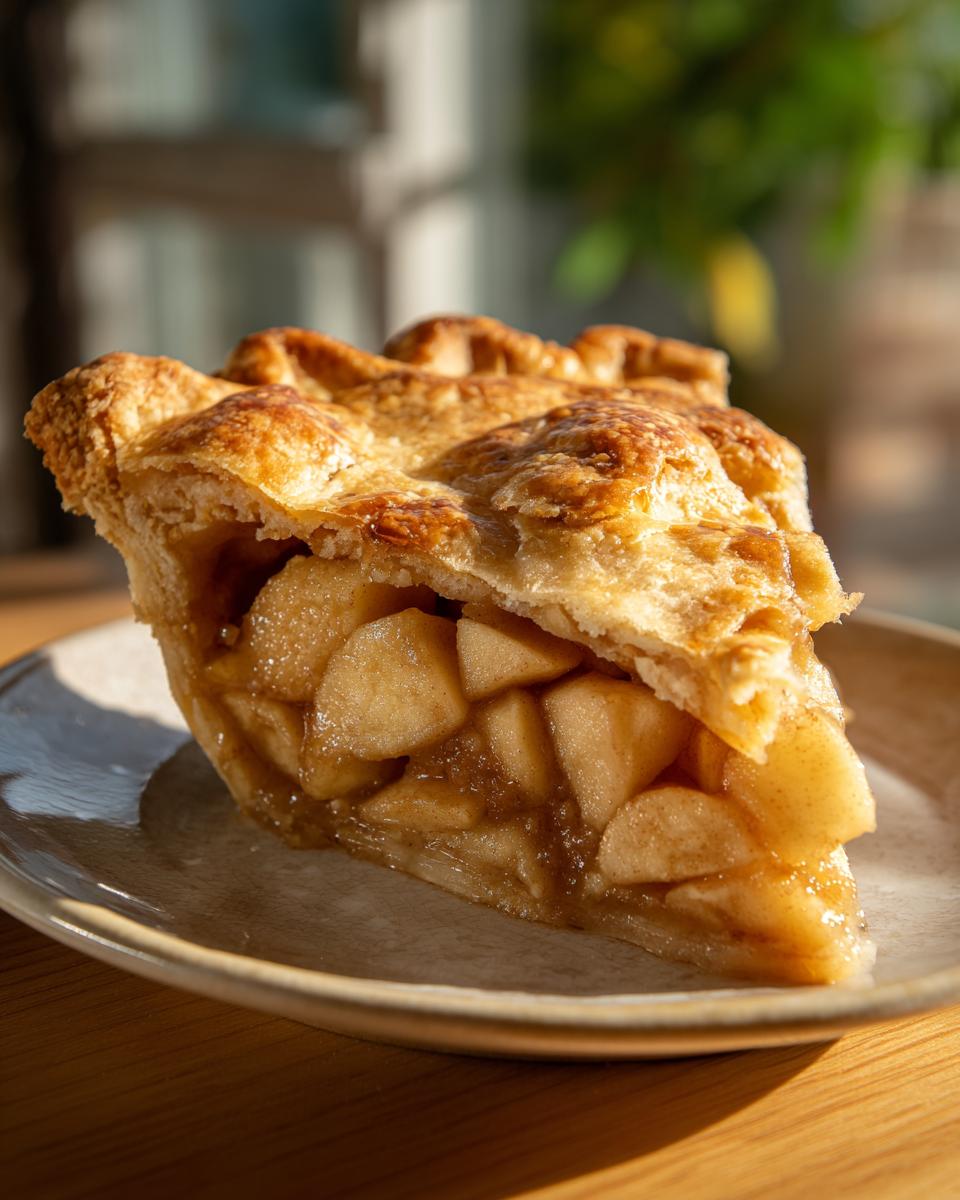
Now, for the gorgeous finish: brush the top with your beaten egg wash and sprinkle with that turbinado sugar if you’re using it. It gives it such a lovely sparkle and a little crunch! For baking, we’re going to start hot and fast. Preheat your oven to 425°F (220°C) and bake for 15 minutes. Then, reduce the heat to 375°F (190°C) and continue baking for another 35-45 minutes. You’re looking for that crust to be a beautiful golden brown and the filling to be nice and bubbly. If you notice the edges getting too dark, just loosely tent the pie with some aluminum foil. Trust me, it’s a lifesaver!

Tips for the Best Homemade Apple Pie
Making a truly knockout apple pie is all about a few little secrets. It’s not complicated, really, just a few things I’ve picked up over the years that make a huge difference. These little tricks ensure your pie is never soggy and always has that perfect, cozy flavor we all love!
First off, choose the right apples! I mentioned using a mix like Honeycrisp or Fuji, and that’s key because they hold their shape nicely and have a great balance of sweet and tart. Avoid apples that get mushy when baked, like Red Delicious. For a fantastic fallback, check out my apple cider donuts – they use similar flavor profiles!
Next, don’t skip the cooling time! I know it’s torture waiting when that pie is fresh out of the oven, but letting it sit for at least 2-3 hours is super important. It lets all those gorgeous apple juices thicken up so you don’t end up with a watery mess when you slice into it. Patience truly is a virtue here!
And one last little thing: if you’re worried about a soggy bottom crust – a common pie fear! – try pre-baking the bottom crust for about 10-15 minutes before adding the filling. Just prick it all over with a fork, line it with parchment paper and pie weights (or dried beans!), bake it, remove the weights and paper, and then proceed with the recipe as usual. It sounds like an extra step, but oh my goodness, it guarantees a perfectly crisp bottom!
Ingredient Notes and Substitutions for Apple Pie
Let’s chat ingredients for a sec, because sometimes you need a little flexibility or just want to know *why* we use what we use in my apple pie! For the apples themselves, I really love a mix. Honeycrisp gives you that perfect crisp texture and sweet-tart flavor, while Fuji or Gala are a bit sweeter and softer, which is also lovely. If you find yourself with all Granny Smith apples, they’re a little tart, so you might want to bump up the sugar just a touch. And hey, if you’re out of all-purpose flour for thickening, a tablespoon of cornstarch mixed with your spices before adding to the apples works like a charm!
As for the spices, if you don’t have allspice, you can just add a tiny bit more nutmeg and cinnamon. Or, if you’re feeling adventurous, a pinch of ground cloves can also be delicious. And if you happen to not have turbinado sugar for the topping, regular granulated sugar works just fine for that little bit of sparkle, though it won’t give quite the same crunch.
Serving and Storing Your Delicious Apple Pie
Okay, the hardest part is over – the pie is baked! Now, the absolute *most* crucial step for a perfect slice of apple pie is letting it cool. Seriously, give it at least 2 to 3 hours on a wire rack. This lets all those yummy juices settle and thicken up, so you get that perfect, sliceable texture. When it’s ready, serving it warm with a scoop of vanilla ice cream or a dollop of fresh whipped cream is just heavenly. If you happen to have any leftovers (which is rare in my house!), just wrap it up tightly or pop it into an airtight container and keep it in the fridge for about 3-4 days. To reheat, just pop a slice in a moderate oven for a few minutes until it’s warm all the way through. Perfection!

Frequently Asked Questions about Apple Pie
Got questions about making the perfect apple pie? I’ve got answers! Baking is all about practice and knowing those little tricks.
Can I use pre-made pie crust for this recipe?
Absolutely! While I adore a homemade crust, a good quality store-bought double pie crust is totally fine. Just make sure you handle it gently when rolling it out so it doesn’t crack. It’s a great shortcut if you’re short on time!
How do I prevent my apple pie from being watery?
This was always my biggest worry too! The keys are using a thickener like flour (or even a tablespoon of cornstarch added with the flour) and, super importantly, letting the pie cool completely for a good 2-3 hours. This allows the juices to set up beautifully. Also, make sure you aren’t using apples that get too mushy when baked!
What are the best apples for apple pie?
For the best texture and flavor balance, I love a mix! Honeycrisp apples are fantastic because they’re crisp and have that perfect sweet-tart taste. Fuji, Gala, or even Braeburn are also wonderful choices. A mix gives you complexity, but you can’t go wrong with just one type if that’s what you have!
Nutritional Information
Just a heads-up, the nutritional info for this classic apple pie is an estimate, okay? Things can change based on the exact apples you use or even how thick you slice ’em. But generally, you’re looking at about 350 calories per slice, with around 25g of sugar and 18g of fat. It’s definitely a treat that’s worth every delicious bite!
Share Your Apple Pie Creations!
So, did you make this amazing apple pie? I’d absolutely LOVE to hear all about it! Let me know how it turned out in the comments below, or even better, share your beautiful creation with me. You can reach out anytime through my contact page. Your baking stories make my day!
PrintClassic American Apple Pie

A time-tested recipe for a traditional homemade apple pie, perfect for holiday gatherings and everyday enjoyment.
- Prep Time: 30 min
- Cook Time: 50 min
- Total Time: 80 min
- Yield: 8 servings 1x
- Category: Dessert
- Method: Baking
- Cuisine: American
- Diet: Vegetarian
Ingredients
- 1 recipe for double pie crust
- 6 medium apples (about 3 pounds), such as Honeycrisp, Gala, or Fuji, peeled, cored, and sliced 1/4-inch thick
- 3/4 cup granulated sugar
- 2 tablespoons all-purpose flour
- 1 teaspoon ground cinnamon
- 1/4 teaspoon ground nutmeg
- 1/4 teaspoon ground allspice
- 1 tablespoon lemon juice
- 2 tablespoons unsalted butter, cut into small pieces
- 1 large egg, beaten (for egg wash)
- 1 tablespoon turbinado sugar (optional, for topping)
Instructions
- Preheat your oven to 425°F (220°C).
- On a lightly floured surface, roll out one disk of pie dough into a 12-inch circle. Carefully transfer it to a 9-inch pie plate. Trim and crimp the edges as desired.
- In a large bowl, combine the sliced apples, granulated sugar, flour, cinnamon, nutmeg, allspice, and lemon juice. Toss gently to coat the apples evenly.
- Pour the apple mixture into the prepared pie crust. Dot the top of the filling with the small pieces of butter.
- Roll out the second disk of pie dough into an 11-inch circle. Place it over the apple filling. Trim the edges, leaving about a 1/2-inch overhang. Fold the top crust edge under the bottom crust edge and crimp to seal. Cut several vents in the top crust to allow steam to escape.
- Brush the top crust with the beaten egg wash and sprinkle with turbinado sugar, if using.
- Bake for 15 minutes at 425°F (220°C).
- Reduce the oven temperature to 375°F (190°C) and continue baking for another 35-45 minutes, or until the crust is golden brown and the filling is bubbly. If the crust starts to brown too quickly, you can loosely tent the pie with aluminum foil.
- Let the pie cool on a wire rack for at least 2-3 hours before slicing and serving. This allows the filling to set properly.
Notes
- For a richer flavor, you can add 1 tablespoon of cornstarch along with the flour to help thicken the apple juices.
- If you prefer a softer apple texture, you can let the sliced apples sit in the sugar mixture for about 30 minutes before assembling the pie.
- Serve warm with vanilla ice cream or whipped cream for a classic dessert experience.
Nutrition
- Serving Size: 1 slice
- Calories: 350
- Sugar: 25g
- Sodium: 200mg
- Fat: 18g
- Saturated Fat: 10g
- Unsaturated Fat: 8g
- Trans Fat: 0g
- Carbohydrates: 45g
- Fiber: 3g
- Protein: 3g
- Cholesterol: 40mg