

There is just something magical about cutting into a dessert that looks flawlessly elegant but tastes like pure, sunlit happiness—and my favorite homemade lemon pie delivers that every single time. We’re making what I call “The Ultimate Zesty Lemon Meringue Pie.” Forget the flat, sad toppings you sometimes see; we are building towering, stable peaks that hug a filling so bright and tangy it wakes up your whole mouth. As someone who traded corporate storytelling for developing reliable recipes, I promise you, my training ensures this classic lemon pie looks impressive on your table but is completely manageable in your kitchen. Trust me on this one; it’s magnificent.
- Why This Classic Lemon Pie Recipe Deserves a Spot in Your Recipe Collection
- Gathering Ingredients for Your Homemade Lemon Pie
- Step-by-Step Instructions for the Best Lemon Pie
- Tips for Success When Making This Lemon Pie Recipe
- Serving Suggestions for Your Bright Citrus Pie
- Storage and Reheating Instructions for Lemon Pie
- Frequently Asked Questions About Making Lemon Pie
- Sharing Your Experience with This Classic Lemon Dessert
Why This Classic Lemon Pie Recipe Deserves a Spot in Your Recipe Collection
You know I only share recipes that truly change the game, and this one is hands-down the Best Lemon Pie I’ve ever developed. It ticks every box: that gorgeous, vibrant color, shocking zestiness, and textures that just melt in your mouth. If you’ve been scared off by runny fillings or weeping meringue, stick with me. I’ve ironed out all the fiddly parts so you get stunning results!
- The **Tangy Lemon Filling** sets up perfectly, giving you that satisfying slice every time.
- It delivers that bright, truly refreshing dessert experience everyone craves in summer.
- The final presentation is always worthy of a magazine cover, even though the steps are simple!
Achieving the Silky, Set Lemon Pie Filling
The biggest secret to that silky filling that never scrambles? Tempering the eggs, my friends! It sounds fancy, but it’s just slowly introducing heat to the yolks. You take a little bit of that hot sugar mixture and whisk it into your beaten yolks *before* adding them back to the main pot. This gently warms them up so they thicken beautifully instead of turning into scrambled lemon bits. It’s that simple bit of patience that earns you a truly smooth base for your lemon pie recipe.
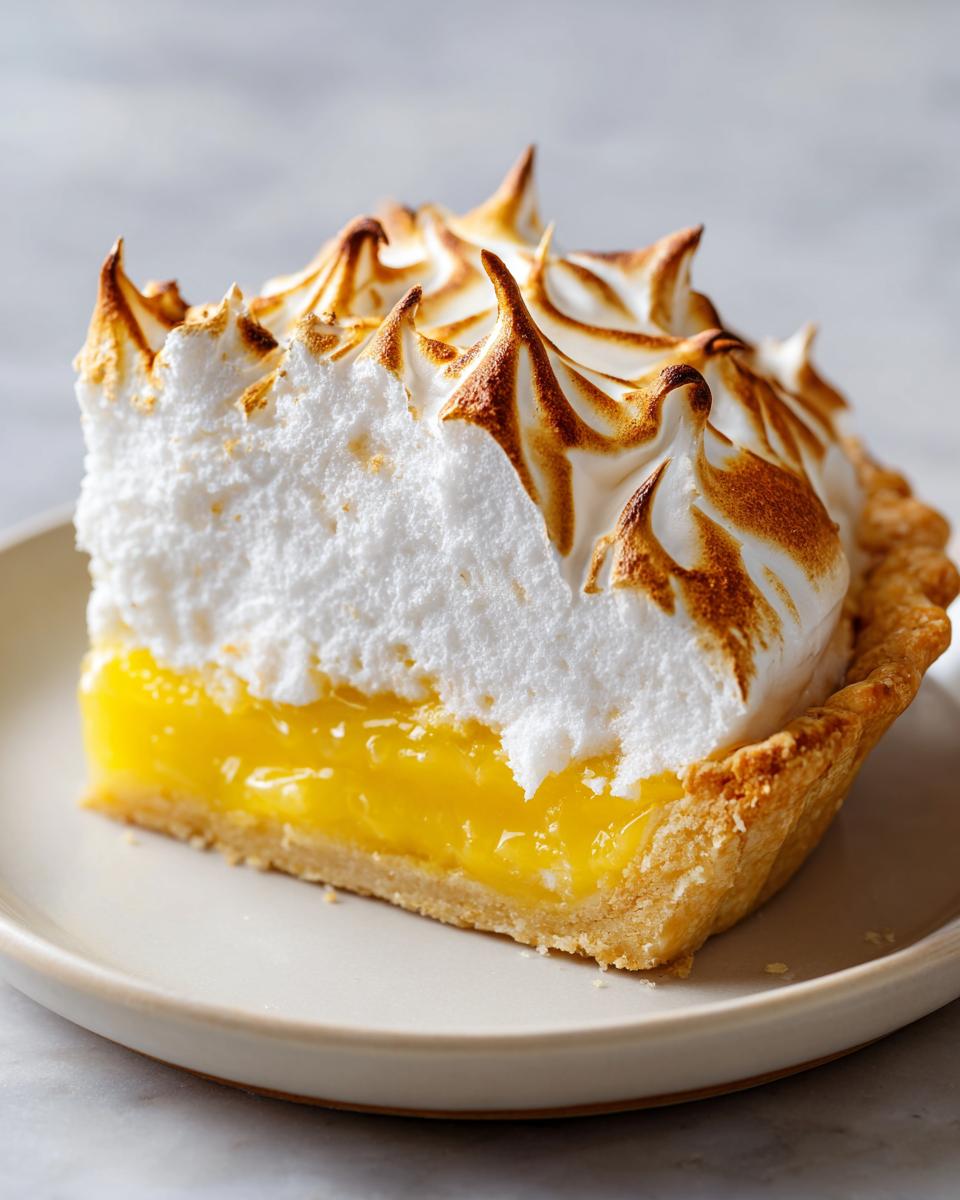
Mastering the Perfect Meringue Topping
If your meringue always sinks or leaks moisture—the dreaded “weeping”—I have your fix: cream of tartar! A tiny bit ensures that your egg whites whip up into firm, glossy peaks that stand tall and proud. This stability is key to achieving that Perfect Meringue Topping that browns beautifully in the oven without collapsing into a pool of sugar water. We want height and structure here!
Gathering Ingredients for Your Homemade Lemon Pie
Okay, let’s talk about what you need to create this show-stopping Homemade Lemon Pie. Since we’re aiming for that bright, sunny flavor, fresh ingredients are absolutely non-negotiable—especially the lemons! You will need one cooled, pre-baked 9-inch pie crust. That’s our sturdy foundation right there. The filling and meringue require a bit more organization, but every single item here plays a vital role in getting that perfect texture.
Ingredients for the Tangy Lemon Pie Filling
This is where the magic happens! Remember, we want zing! So please, reach for those fresh lemons, not the bottled stuff.
- 1 1/2 cups granulated sugar
- 1/3 cup cornstarch
- 1/4 teaspoon salt
- 1 1/2 cups cold water
- 4 large egg yolks, lightly beaten
- 1/2 cup fresh lemon juice (You can’t skip this!)
- 1 tablespoon lemon zest
- 2 tablespoons butter
Ingredients for the Stable Meringue Topping
For a meringue that stands tall and doesn’t weep on you, we need exactly these three items. Make sure those egg whites are at room temperature; it makes all the difference when whipping!
- 4 large egg whites, room temperature
- 1/2 teaspoon cream of tartar
- 6 tablespoons granulated sugar
Step-by-Step Instructions for the Best Lemon Pie
Alright, let’s get baking! Making this lemon pie truly comes down to following the order. We need a pre-baked, totally cooled crust ready before our hot filling is even finished, so pay attention to those cooling times. Once we nail the filling, the meringue process is surprisingly fast!
Preparing the Crust and Cooking the Lemon Pie Filling Base
First thing: preheat your oven to 350 degrees F (175 degrees C). Get that pie crust baked until it’s just lightly golden, checking the package directions for timing, and then you must let it cool completely. Seriously, if it’s warm at all, your filling will turn soupy! While it cools, grab a medium saucepan. Whisk together the 1 1/2 cups sugar, cornstarch, and salt until they look like powder. Now, slowly whisk in that cold water until everything is smooth as glass. Cook this over medium heat, stirring constantly like you mean it, until it gets thick and starts bubbling hard—that’s usually about five to eight minutes. That bubbling means the starch is activated!
Tempering Yolks and Finishing the Tangy Lemon Filling
This is the crucial step for that lemon pie filling safety! Take your four lightly beaten egg yolks into a separate small bowl. Now, very slowly, ladle about one cup of that hot sugar mixture right into the yolks while whisking non-stop. This is tempering—getting the yolks used to the heat gradually! Once tempered, pour that whole yolk mixture back into the saucepan with the rest of the hot mixture. Return it to medium heat and stir constantly for just two more minutes. You want it cooked, but please, don’t let it boil! Take it off the heat, stir in your fresh lemon juice, zest, and butter until that butter melts completely. Pour this beautiful filling into your cooled crust right now.

Creating and Applying the Perfect Meringue Topping
For the meringue, make sure that bowl and your beaters are sparkling clean—no grease allowed! Beat those room-temperature egg whites until they form soft peaks. Toss in the cream of tartar and keep beating. Now, sprinkle in those 6 tablespoons of sugar slowly, waiting until it dissolves a bit between additions. Beat until you have stiff, incredibly glossy peaks. Spread this meringue right over the hot filling. Make absolutely sure it touches the crust edges everywhere; this seals it up and stops shrinking. Swirl it nicely with the back of a spoon for that rustic, gorgeous look.
Baking and Setting Your Lemon Pie
Pop the whole thing back into that 350-degree oven for just 12 to 15 minutes, long enough to make those pretty peaks light brown. Then comes the hardest part: patience! You have to let the pie cool on a wire rack at room temperature for a minimum of four hours. Seriously, don’t rush this! That long, slow cooling process is what sets the filling so you get that perfect, clean slice.
Tips for Success When Making This Lemon Pie Recipe
Even the best recipes need a little love and fine-tuning based on your own kitchen’s quirks. Because I want you to nail that beautiful, zesty lemon dessert experience, I wanted to share the insights from my testing notes. These aren’t complicated fixes; they are just little nudges to ensure your pie tastes exactly as bright and vibrant as it should!
Ingredient Clarity for Zesty Lemon Desserts
If there’s one thing I harp on when clients ask for that ultimate summer flavor, it’s the juice! My notes emphasize using fresh lemon juice only, and I mean it! Bottled stuff often tastes flat or slightly metallic, and it completely changes the bright, sunny character we are aiming for in this Bright Citrus Pie. Freshly squeezed juice tastes cleaner and carries that wonderful aroma that only comes from grating the zest right off a perfect, unwaxed lemon. It makes the entire filling sing!

Troubleshooting Common Lemon Pie Issues
Let’s tackle the big two headaches: weeping meringue and filling that won’t set. For weeping, remember my rule: your mixing bowl and electric mixer beaters must be bone dry and grease-free. Any speck of fat or yolk will cause those unhappy beads of moisture to form on top of your meringue. If you are worried about over-browning the top, I totally get it—sometimes the oven heat is just too aggressive! In that case, skip the final 15 minutes of baking and pull out a kitchen torch instead. A torch lets you kiss those peaks with brown color quickly, giving you that dramatic look without dulling the lemon filling underneath.
Serving Suggestions for Your Bright Citrus Pie
After all that work perfecting that tangy lemon filling and that towering meringue, you want to serve it right! Because this Bright Citrus Pie is so intensely flavorful and refreshing, it doesn’t need much fuss. For a simple, stunning finish, a dollop of lightly sweetened, freshly whipped cream is just heavenly against the citrus punch. It cuts the tartness beautifully.

If you’re serving this at a gathering, I often arrange fresh raspberries or sliced strawberries around the edges of the serving plate. The red berries look incredibly vibrant against the yellow filling and white meringue. If you’re feeling extra fancy, perhaps a dusting of confectioners’ sugar over the top right before it hits the table completes the look. You can find more ideas for beautiful fruit pairings when you check out my tips for pairing fruit with desserts like my sugar cookie fruit pizza!
Storage and Reheating Instructions for Lemon Pie
Now, I know you want this gorgeous creation to last forever, but here’s the honest truth about meringue pies: they are absolutely, unequivocally best eaten the same day they are made. That beautiful, lofty topping is temperamental, and by day two, you might start seeing a little moisture forming, which is what we call weeping. So, if you can manage it, plan to serve this lemon pie within a few hours of cooling completely!
If you absolutely have leftovers (maybe you were just too full after dinner!), you need to treat it gently. Do not leave this pie sitting on the counter. Your **Homemade Lemon Pie** needs to go straight into the refrigerator. Because the filling is custard-based, keeping it cold helps keep that structure firm. Cover it loosely with plastic wrap, but make sure the plastic isn’t touching the meringue peaks, or you’ll deflate them! Honestly, even refrigerated, try to eat any leftovers within 24 hours for the best texture.
And reheating? Don’t even think about it! This is not a pie meant to be warmed up. The heat will instantly destroy the integrity of that careful meringue structure we worked so hard to achieve. Just let the refrigerated slice sit on the counter for about 30 minutes before slicing, just to take the deep chill off the filling, and enjoy it cold!
Frequently Asked Questions About Making Lemon Pie
I know once you get your hands on this recipe, you’ll start having all sorts of ideas! It’s natural to wonder about quick swaps or alternative textures, especially if you’re looking for an Easy Lemon Pie for a last-minute gathering. Here are the questions I get asked most often when folks are attempting a stunning, tangy filling!
Can I make this lemon pie recipe without baking the meringue?
Oh, absolutely! If you’re short on time or just prefer a lighter topping, you can definitely skip the baking step for the meringue and just spread it over the cooled filling. However, instead of baking, you’ll want to substitute the meringue entirely with a thick layer of stabilized whipped cream or even try making a truly Creamy Lemon Pie using sweetened condensed milk, which results in a delicious no-bake approach! If you skip baking the meringue, you’ll need to keep the pie chilled until serving.
What if I want a Graham Cracker Crust Pie instead?
That is a wonderful idea for swapping out the whole baking process for the crust! If you want to use a Graham Cracker Crust Pie base, go right ahead. Press your crumb mixture firmly into the pan, chill it well—or bake briefly if you prefer it toasted—and then pour in the hot lemon filling. If you use a graham cracker crust, you *must* be careful when baking the meringue topping, as the crust can sometimes brown too fast underneath. Many people who use this crust prefer the no-bake route entirely, and I have some great no-bake cookie tips that can inspire an alternate crust!
How long does the filling truly need to chill before slicing cleanly?
This is crucial because nobody wants pie soup! For this classic baked filling, you absolutely need that four-hour minimum cooling time at room temperature, just like I noted in the instructions. If you rush it, the cornstarch and egg matrix won’t fully set. If you need it faster, chilling it in the fridge *after* it has cooled mostly on the counter can speed things up slightly, but aim for those four hours for the best, cleanest slices.
Can I use lime or orange zest instead of lemon?
You totally can experiment with other bright citrus flavors! If you swap the lemon juice for lime juice, you’ll get a marvelous key lime-style experience. If you use orange, you’ll end up with a lovely, sweeter, less sharp pie. Just remember those flavor shifts will change how you perceive the overall sweetness, so maybe adjust the sugar in the filling slightly if you deviate wildly from the lemon!
Sharing Your Experience with This Classic Lemon Dessert
Now that you’ve unfolded the story of this incredible, zesty Classic Lemon Dessert in your own kitchen, I want to hear all about it! Did your meringue achieve magnificent heights? Are you already planning to make this the star of your next summer gathering?
Please don’t leave without telling me how it went! Head down to the comments section below and let me know what you thought. Did you serve it with whipped cream? Did you try the torch method on the meringue? Rating the recipe and leaving a quick note is genuinely helpful for me and for other home cooks looking to try something new.
Your successful bakes truly fuel my passion for creating accessible, yet elegant, recipes here at Unfold Recipes. If you loved this, I think you’ll also adore my recipe for chocolate cupcakes—it’s another dessert that looks fancy but is so easy to master!
PrintThe Ultimate Zesty Lemon Meringue Pie

This recipe delivers a classic, bright, and tangy lemon meringue pie. You achieve a perfectly set, silky lemon filling and a tall, stable meringue topping. It is an elegant dessert that is surprisingly straightforward for the home cook.
- Prep Time: 25 min
- Cook Time: 20 min
- Total Time: 4 hours 45 min
- Yield: 8 servings 1x
- Category: Dessert
- Method: Baking
- Cuisine: American
- Diet: Vegetarian
Ingredients
- 1 (9 inch) unbaked pie crust
- 1 1/2 cups granulated sugar
- 1/3 cup cornstarch
- 1/4 teaspoon salt
- 1 1/2 cups cold water
- 4 large egg yolks, lightly beaten
- 1/2 cup fresh lemon juice
- 1 tablespoon lemon zest
- 2 tablespoons butter
- 4 large egg whites, room temperature
- 1/2 teaspoon cream of tartar
- 6 tablespoons granulated sugar
Instructions
- Preheat your oven to 350 degrees F (175 degrees C). Bake the pie crust according to package directions until lightly golden. Let it cool completely.
- In a medium saucepan, whisk together the 1 1/2 cups sugar, cornstarch, and salt. Gradually whisk in the cold water until smooth.
- Cook the mixture over medium heat, stirring constantly, until it thickens significantly and begins to bubble. This takes about 5 to 8 minutes.
- Remove the saucepan from the heat. In a small bowl, lightly beat the egg yolks. Slowly temper the yolks by whisking about 1 cup of the hot sugar mixture into the yolks.
- Pour the tempered yolk mixture back into the saucepan with the remaining hot mixture. Return the pan to medium heat and cook, stirring constantly, for 2 more minutes. Do not let it boil.
- Remove from heat. Stir in the lemon juice, lemon zest, and butter until the butter melts and is fully incorporated.
- Pour the hot lemon filling into the cooled, prebaked pie crust.
- In a clean, grease-free bowl, beat the egg whites with an electric mixer until soft peaks form. Add the cream of tartar and continue beating. Gradually add the 6 tablespoons of sugar, beating until stiff, glossy peaks form. This creates your perfect meringue topping.
- Spread the meringue evenly over the hot lemon filling, making sure the meringue touches the edges of the crust all around to prevent shrinking. Create decorative swirls with the back of a spoon.
- Bake for 12 to 15 minutes, or until the meringue peaks are lightly golden brown.
- Cool the pie completely on a wire rack at room temperature for at least 4 hours before slicing. This allows the filling to set properly.
Notes
- For a truly zesty dessert, use fresh lemon juice only; bottled juice changes the flavor profile.
- To prevent the meringue from weeping (beading moisture), ensure your mixing bowl and beaters are completely free of any grease or egg yolk residue.
- If you prefer a less intense browning on the meringue, you can brown it briefly with a kitchen torch instead of baking.
Nutrition
- Serving Size: 1 slice
- Calories: 380
- Sugar: 45g
- Sodium: 210mg
- Fat: 16g
- Saturated Fat: 5g
- Unsaturated Fat: 11g
- Trans Fat: 0g
- Carbohydrates: 58g
- Fiber: 1g
- Protein: 6g
- Cholesterol: 110mg