
Oh my goodness, are you tired of turning on the oven when it’s already too hot outside, but still want something incredibly decadent for your gathering? I totally get it! That’s why nothing beats the thrill of whipping up a show-stopping, no-bake dessert in twenty minutes flat. Meet my absolute favorite: the butterfinger pie. It’s creamy, crunchy, full of that nostalgic candy flavor everyone adores, and honestly, it vanishes first at any party. You know I focus on recipes that strike that balance between looking elegant and being truly simple, just like I talk about over on my about page. This creamy candy pie is the perfect example of that philosophy coming to life right in your 9-inch dish!
- Why This No Bake Butterfinger Pie is Your New Favorite
- Gathering the Ingredients for Your Butterfinger Pie
- Step-by-Step Instructions for No Bake Butterfinger Pie
- Tips for the Ultimate Crunchy Peanut Butter Pie
- Making This Butterfinger Pie an Easy Potluck Desserts Star
- Variations for Your Nostalgic Candy Desserts
- Storage and Reheating Instructions for Your Butterfinger Pie
- Frequently Asked Questions About This Creamy Candy Pie
- Nutritional Estimates for Your Indulgent Dessert Ideas
Why This No Bake Butterfinger Pie is Your New Favorite
Honestly, once you see how fast this comes together, you’ll swap out half your standard desserts for this recipe. When I’m planning for a crowd or just need a sweet fix fast, this is my go-to. It really delivers on texture and flavor without any oven drama. It’s the kind of “make-ahead dessert” that people beg you for the recipe later!
- It’s completely No Bake Dessert bliss—just mixing and waiting!
- The texture is spot on: perfectly creamy base with that fantastic crunchy peanut butter pie element from the candy.
- It’s the ultimate recipe for Family Gathering Treats because everyone loves Butterfinger.
- You get that beautiful, decadent look for virtually zero actual cooking time.
Quick Dessert Ideas for Last-Minute Needs
This is where this recipe truly shines! You can have this whole thing assembled in about 20 minutes of actual work. Yep, just twenty minutes! If you suddenly realize you need something amazing for dessert tonight—maybe someone dropped by unexpectedly, or you forgot about the office potluck tomorrow—this recipe saves the day. You just pop it in the fridge after assembly and let time do the heavy lifting. It proves you don’t need hours of effort to pull off something truly impressive. If you love ultra-fast treats, be sure to check out my guide on no-bake cookies for more inspiration!
Gathering the Ingredients for Your Butterfinger Pie
Okay, getting ready for this is almost as fun as eating it! Since this is a No Bake Dessert, we really rely on the quality of our ingredients to deliver that rich, decadent flavor. You don’t need a crazy shopping list, but measuring correctly is key, especially for that creamy peanut butter dessert filling to set up beautifully. Trust me on this one tip: make sure your cream cheese is truly softened to room temperature. If it’s cold, you’ll end up with tiny, annoying lumps that your mixer just won’t conquer, and we want smooth elegance here!
Here is everything you need to gather before we start playing with the mixer. It’s a straightforward list, focusing on that salty-sweet combination we love.

Making the Chocolate Cookie Crust Pies Base
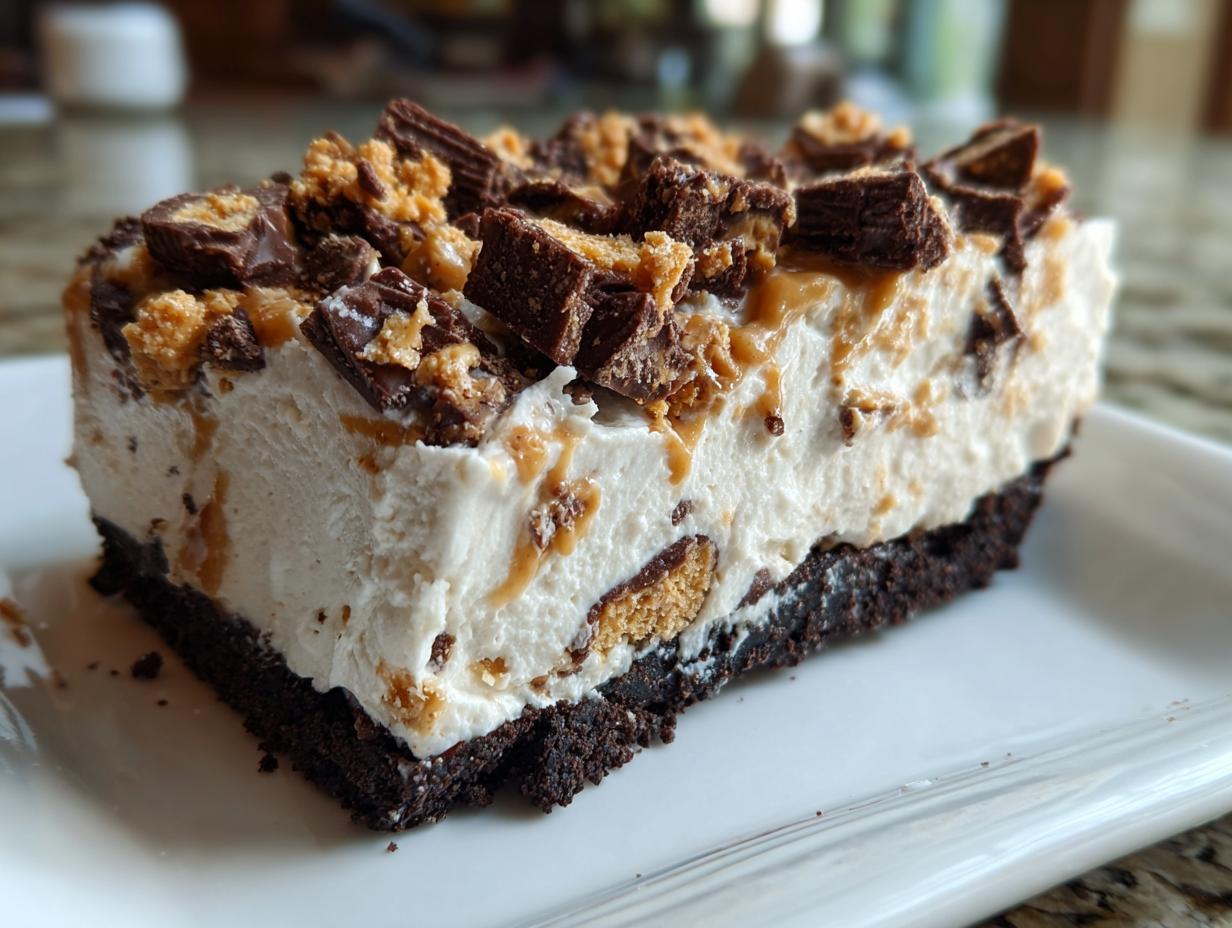
For the foundation of our Chocolate Cookie Crust Pies, simplicity rules. We crush up about 24 of those sandwich cookies—yes, the whole thing, filling and all! That’s what makes the crust so rich and dark. Then we mix in six tablespoons of melted unsalted butter. Once that’s done, you press it down firmly into your 9-inch dish. Don’t be shy here; use the flat bottom of a measuring cup if you need to get it nice and snug against the sides. That tight base is what holds our creamy interior!
The Creamy Candy Pie Filling Components
Now for the good stuff! You’ll need that softened cream cheese, a whole cup of creamy peanut butter (no chunky, please, we want the filling smooth!), powdered sugar to sweeten just right, and just a touch of vanilla. The game-changer ingredient that brings the crunch is one cup of crushed Butterfinger candy bars; make sure you save some extra for sprinkling on top later!
And pay attention here: for the volume in the filling, you need one cup of heavy whipping cream. It must be cold—I mean, straight-from-the-fridge cold. If it’s warm, it just won’t turn into those stiff, beautiful peaks we absolutely need to fold into the base mixture!
Step-by-Step Instructions for No Bake Butterfinger Pie
Now that you have all your components ready, it’s time to put this amazing creation together! Don’t worry, this part really is fast—it’s all about assembly since this butterfinger pie is totally hands-off after we mix! We move methodically to make sure that creamy filling sets up perfectly, so stick with the structure, even though it feels super simple.
Preparing the Chocolate Cookie Crust Pies Shell
Remember Step 1? Take those crumbs and melted butter and mix them up good. You need to press that mixture down tight into your pie plate. Seriously, press hard! A loose crust crumbles when you try to slice it later, and we can’t have that. Once it’s tightly packed on the bottom and slightly up the sides, pop that whole thing into the freezer for about 15 minutes. This chilling step firms up the butter so your crust is ready to accept the creamy filling without getting soggy or messy. Now, if you’re short on time, you can totally use one of those pre-made frozen chocolate cookie crusts—no shame in that shortcut!
Creating the Creamy Peanut Butter Dessert Filling
This is two little mini-steps merged into one glorious sequence. First, just beat your cream cheese, peanut butter, powdered sugar, and vanilla until it’s smooth as silk. Don’t worry about overmixing this base; you want it all blended. Next, move to a totally separate, clean bowl, and whip your heavy cream until you get those beautiful, stiff peaks. This is important for the airy texture! Once you have your peaks, gently fold that whipped cream into the peanut butter base—and I mean gently! We want to keep all that air we just whipped in there. Finally, fold in your crushed Butterfinger pieces. Think of it like tossing a salad; you just want to incorporate everything without squishing the volume out of it.

Chilling and Serving Your Butterfinger Pie
Okay, shell is cold, filling is mixed—time to assemble! Pour all that gorgeous, creamy filling right into your prepared crust and smooth the top off nicely. Now comes the hardest part: walking away! You need to cover this loosely and let it chill in the refrigerator for at least four hours. If you are truly desperate, you can speed it up in the freezer for about two hours, which turns it into a wonderfully firm frozen pie recipe. Once it’s firm, top it with whipped topping and a final shower of those crunchy Butterfinger bits. Slice, serve, and accept all the compliments!
Tips for the Ultimate Crunchy Peanut Butter Pie
If you want this Butterfinger Pie to reach legendary status—the kind people talk about for weeks—you need to nail a couple of tiny details that separate good from absolutely phenomenal. Achieving that perfect texture isn’t just luck; it’s technique, even for a no-bake beauty like this!
First, let’s talk about crushing the candy bars. If the pieces are too fine, they just dissolve into the filling, and you lose the satisfying crunch. You want varied sizes—some powdery dust, some little shards. I like to put the bars in a sturdy zip-top bag and give them a few good whacks with a rolling pin. That rough crush gives you the best texture for a truly Crunchy Peanut Butter Pie!

Second, remember when we whipped the cream? Seriously, make sure your bowl and whisk attachment are cold. Cold fat whips up faster and holds its structure better. If you see your whipped cream starting to look a bit droopy while folding it into the peanut butter base, stop immediately! Fold much slower, or you’ll deflate all that lovely air we worked so hard to incorporate. That trapped air floating between the peanut butter and the cream is what makes this pie feel light instead of dense!
Making This Butterfinger Pie an Easy Potluck Desserts Star
If you’re bringing a dessert to a big gathering, I always recommend something that travels well and doesn’t require last-minute fussing, right? That’s why this Butterfinger Pie is my secret weapon for any event. Because it’s a no-bake, chilled dessert, it holds its shape beautifully once it’s been set in the fridge. It slides right into the cooler or dessert carrier without fear of melting or things shifting around.
This is the perfect example of one of those Make Ahead Desserts you can finish the day before your event, which buys you so much sanity on party day! Since it only needs four hours of chilling minimum, you can easily whip it together after dinner the night before. Honestly, when placed next to heavy sheet cakes or delicate pastries, my creamy candy pie always disappears first. It simply sings as an Easy Potluck Desserts star. If you need other reliable party snacks that travel well, check out my recipe for sausage cheese balls—another potluck champion!
Variations for Your Nostalgic Candy Desserts
While I am completely devoted to the classic Butterfinger flavor we built this pie around, the beauty of this creamy base is how adaptable it is! If you happen to have other candy bars lying around, please don’t hesitate to experiment. This is where your own family storytelling comes in!
You can swap out the Butterfinger for roughly the same amount of chopped Heath bars—that toffee crunch adds a completely different, buttery dimension to these Nostalgic Candy Desserts. Snickers also work beautifully if you want a bit of caramel and nougat in the mix!
Also, think about that crust! If you aren’t a chocolate cookie fan, you can easily substitute the crumbs for vanilla wafers or even graham crackers. Just make sure you use enough melted butter to bind them! When I want something totally different, I sometimes toss in some crunchy caramel pieces alongside the candy for my caramel popcorn recipe, so you know a little extra crunch never hurts!
Storage and Reheating Instructions for Your Butterfinger Pie
The best part about this Butterfinger Pie, besides how easy it is to make, is that it’s absolutely fantastic for leftovers! Since it’s a chilled, no-bake recipe relying on heavy cream and cream cheese to set, we need to treat it nicely in the fridge. Good news: it holds up like a champion!
For short-term storage, I recommend keeping any leftovers covered tightly in the refrigerator. Wrap the pie dish loosely with plastic wrap or use a proper pie carrier if you have one. Because of that rich filling, this pie stays incredibly fresh for up to three full days. That means you can make it on Tuesday, and it’s still perfect for a Friday night treat!

If you are the kind of planner that likes to get things made well in advance—maybe preparing for a big holiday week, for example—you can definitely look at freezing this pie. Remember when I mentioned you could freeze it for two hours to speed up setting? You can actually leave it frozen much longer than that! Keep it wrapped securely in plastic wrap and then maybe another layer of foil to protect against freezer burn. You can easily keep this make ahead dessert frozen for up to a month.
When you want to serve it from frozen, just pull it out about 30 to 45 minutes before you plan to eat it. That gives the peanut butter filling just enough time to soften slightly so you can actually slice it without a battle. If you enjoy preparing meals ahead of time, you should bookmark my full collection of make ahead desserts for more stress-free entertaining!
Frequently Asked Questions About This Creamy Candy Pie
I know when you find an amazing Peanut Butter Dessert Recipe like this, you’ve got questions about swapping things around or timing things precisely! I’ve collected the ones I get most often right here, so you can get that perfect pie set up hassle-free. Making this pie is truly simple, but knowing these little tricks ensures that creamy candy pie texture is spot on every single time!
Can I use a store-bought Oreo Crust for this butterfinger pie?
Absolutely, yes! Do not feel guilty about taking that shortcut. When you’re whipping up this butterfinger pie on a tight schedule, using a pre-made crust saves you those precious 15 minutes of crumb mixing and freezer time. You can use either a store-bought chocolate cookie crust or even a pre-made graham cracker crust if you want to change the flavor profile slightly. Just make sure that crust is nice and cold before you pour in your filling!
Is this a Frozen Pie Recipe or just refrigerated?
That’s the beauty of this dessert—it works perfectly both ways, depending on when you need it! If you refrigerate it for the full four hours, you get a thick, smooth, and sliceable pie that is wonderfully cold. If you are in a rush and want something closer to an ice cream consistency—making it a true Frozen Pie Recipe—pop it in the freezer for about two hours. It will firm up much faster, though it might need about 10 minutes on the counter before serving so you can cut through those thick layers. Either way, it’s a winner!
If you’re looking for more reliable recipes and general kitchen inspiration, feel free to dig through my main blog page!
Nutritional Estimates for Your Indulgent Dessert Ideas
Now, I know we are talking about pure indulgence here—this is our ultimate Indulgent Dessert Idea designed for taste, not for counting macros! But because I believe in giving you all the information you need to feel confident serving this amazing butterfinger pie, here are the general nutritional estimates.
Keep in mind that these numbers are based on the exact ingredients I listed and assume 8 even servings. If you cut slightly larger pieces (and trust me, sometimes you’ll want to!), those numbers will shift a tiny bit. Also, since we are using specific brands of peanut butter or cookies, the final count can vary widely! This is just a general guide for you.
- Serving Size: 1 slice
- Calories: 450
- Sugar: 35g
- Sodium: 320mg
- Fat: 30g
- Saturated Fat: 12g
- Carbohydrates: 40g
- Protein: 9g
See? A perfectly reasonable price to pay for a creamy, crunchy slice of heaven! Don’t let the numbers scare you away from enjoying this fantastic No Bake Dessert. It’s meant to be celebrated!
PrintNo Bake Creamy Butterfinger Pie

Make this simple, no-bake Butterfinger Pie featuring a chocolate cookie crust, a creamy peanut butter filling, and crushed Butterfinger candy bars for a nostalgic, crowd-pleasing dessert.
- Prep Time: 20 min
- Cook Time: 0 min
- Total Time: 4 hr 20 min
- Yield: 8 servings 1x
- Category: Dessert
- Method: No Bake
- Cuisine: American
- Diet: Vegetarian
Ingredients
- 1 1/2 cups chocolate sandwich cookie crumbs (about 24 cookies)
- 6 tablespoons unsalted butter, melted
- 1 (8 ounce) package cream cheese, softened
- 1 cup creamy peanut butter
- 1 cup powdered sugar
- 1 teaspoon vanilla extract
- 1 cup heavy whipping cream, cold
- 1 cup crushed Butterfinger candy bars (about 6–8 standard bars)
- Whipped topping, for garnish
- Extra crushed Butterfinger, for garnish
Instructions
- Prepare the crust: Combine the chocolate cookie crumbs and melted butter in a medium bowl. Press the mixture firmly into the bottom and up the sides of a 9-inch pie dish. Chill the crust in the freezer for 15 minutes while you prepare the filling.
- Make the filling base: In a large bowl, beat the softened cream cheese, peanut butter, powdered sugar, and vanilla extract until smooth and creamy. Scrape down the sides of the bowl as needed.
- Whip the cream: In a separate, clean bowl, beat the cold heavy whipping cream until stiff peaks form.
- Combine fillings: Gently fold the whipped cream into the peanut butter mixture until just combined. Do not overmix.
- Fold in candy: Gently fold in the 1 cup of crushed Butterfinger candy bars.
- Assemble the pie: Pour the filling into the chilled chocolate cookie crust and spread evenly.
- Chill: Cover the pie loosely with plastic wrap and refrigerate for at least 4 hours, or until firm. For faster setting, you can freeze it for 2 hours.
- Garnish and serve: Before serving, top the pie with whipped topping and sprinkle with extra crushed Butterfinger pieces. Slice and serve cold.
Notes
- For an even easier crust, you can use a store-bought frozen chocolate pie crust.
- If you are planning ahead, this pie holds up well in the refrigerator for up to 3 days.
- This recipe is a great option when you are looking for simple summer pies that do not require turning on the oven.
Nutrition
- Serving Size: 1 slice
- Calories: 450
- Sugar: 35g
- Sodium: 320mg
- Fat: 30g
- Saturated Fat: 12g
- Unsaturated Fat: 18g
- Trans Fat: 0.5g
- Carbohydrates: 40g
- Fiber: 2g
- Protein: 9g
- Cholesterol: 45mg