

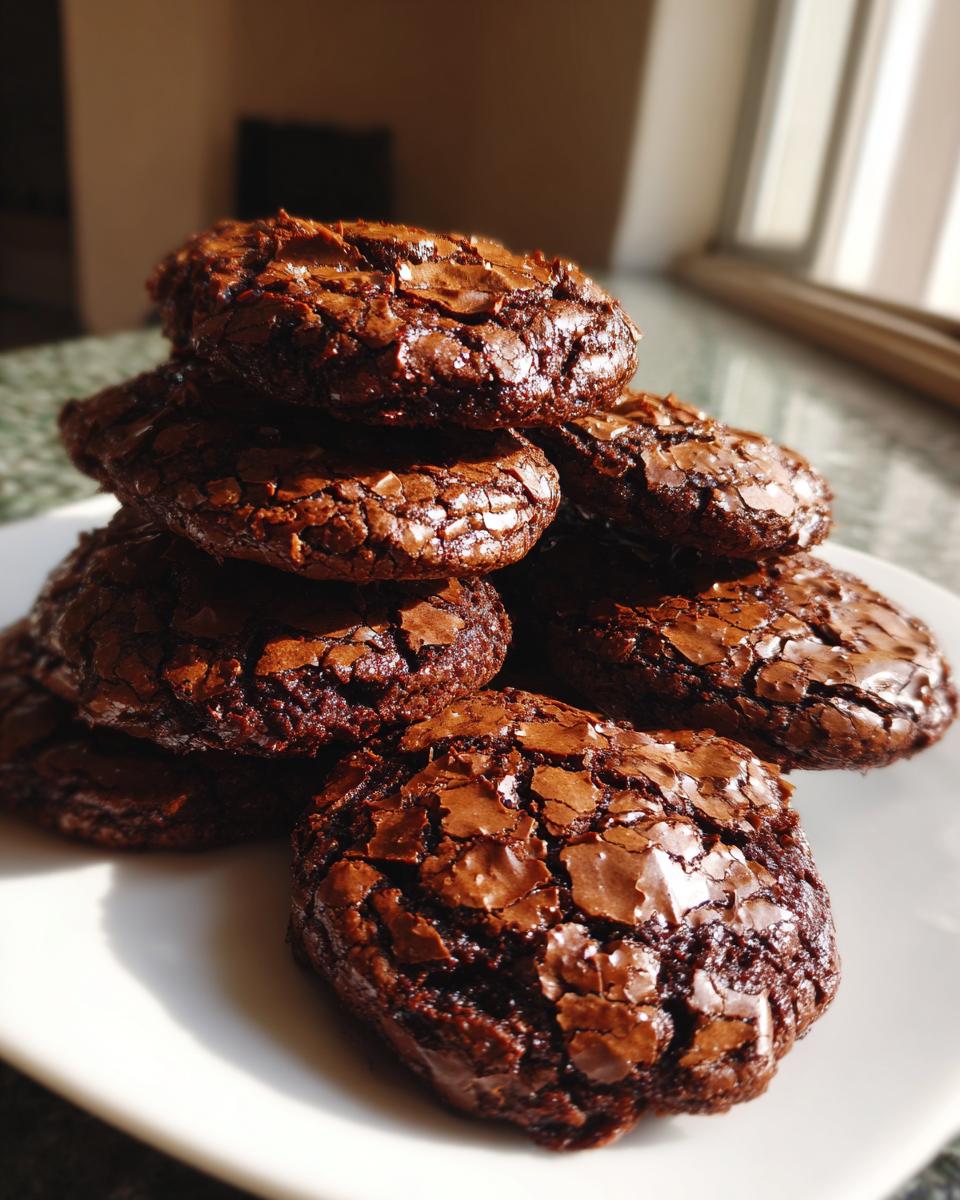
There are desserts you enjoy, and then there are desserts that redefine what you thought was possible in baking. For me, this recipe falls firmly into that second category. I’m obsessed with the magic that happens when you perfectly merge two classics, and that’s exactly what we’re doing here: creating the ultimate chocolate brownie cookies.
When my husband asks for ‘just one’ after dinner, I know I’ve hit that sweet spot—achieving that intensely fudgy interior you crave from a brownie, wrapped up in the satisfying chewiness of a perfect edge-to-edge cookie. This isn’t just a recipe; it’s my benchmark for rich chocolate baking. I test every variation, but this one, with its signature crackly top, always wins. It’s proof that approachable elegance in the kitchen can bring out the most decadent flavors.
- Why You Will Love These Fudgy Chocolate Brownie Cookies
- The Best Brownie Cookie Recipe Ingredients
- How to Make Perfect Chocolate Brownie Cookies with a Crackly Top
- Tips for Achieving Bakery Style Brownie Cookies
- Variations for Your Chocolate Brownie Cookies
- Serving Suggestions for Irresistible Chocolate Bake
- Storing and Freezing Homemade Brownie Style Cookies
- Frequently Asked Questions About Chocolate Brownie Cookies
- Sharing Your Decadent Chocolate Treats
Why You Will Love These Fudgy Chocolate Brownie Cookies
I’m telling you, this recipe delivers every single time. When I developed this, I was focused on conquering the texture puzzle, and I think I nailed it.
- The interior is unbelievably fudgy—just like the best part of a fresh-from-the-oven brownie.
- They possess that perfect, satisfying chewiness that separates a good cookie from a great one.
- That signature, slightly shiny, crackly top? Yes, we get that too! It’s pure bakery magic.
- And because we use melted butter, these come together so fast. We’re talking about incredible results in under 30 minutes total, which you can read more about over on my latest blog post if you need some baking inspiration!
The Best Brownie Cookie Recipe Ingredients
When you’re aiming for something this decadent, you absolutely have to start with quality ingredients. These aren’t the cookies you use up the last bits of old baking chocolate for; these are stars! The texture of these chocolate brownie cookies relies on how the fat and sugar interact, so I’m very particular here. I used a good 60% bittersweet chocolate when I tested this for the blog, and the depth of flavor was just incredible for that rich chocolate baking experience.
Using a high-quality cocoa powder is also non-negotiable if you want that deep, almost dark-chocolate richness. Trust me, your end result will thank you for paying attention to these details!
For the Ultimate Chocolate Brownie Cookies
Here is exactly what you’ll need to whip up a batch of these chewy delights. Make sure your baking powder is fresh; it plays a little role in getting that lovely crackle on top!
- 1/2 cup (1 stick) unsalted butter, melted
- 1 cup granulated sugar
- 1/2 cup packed light brown sugar
- 2 large eggs
- 1 teaspoon vanilla extract
- 3/4 cup all-purpose flour
- 1/2 cup unsweetened cocoa powder
- 1/2 teaspoon salt
- 1/4 teaspoon baking powder
- 4 ounces bittersweet chocolate, chopped (or chocolate chips)
- Flaky sea salt, for sprinkling (optional)
How to Make Perfect Chocolate Brownie Cookies with a Crackly Top
The beauty of these chocolate brownie cookies is how quickly they come together. We’re often looking for these decadent treats in under 30 minutes, and this method is absolutely perfect for those quick chocolate fixes!
Preparing the Dough for Chewy Chocolate Cookies
First things first, get your oven hot—350°F (175°C)—and line those baking sheets with parchment paper so cleanup is a breeze. Heat helps set the structure, which is important for that chewy texture we’re after.
In a large bowl, whisk your melted butter vigorously with both sugars until they completely combine. Next, add the two eggs one at a time, whisking really well after each addition. This is a key step! You want that mixture to get glossy and a little lighter in color; that sheen you see is what helps create that shiny, beautiful top later on. If you want to dive deep into getting that incredible shiny top, I have a whole post dedicated to fudgy brownies achieving that perfect look!
Once you stir in the vanilla, switch to gentle mixing. In a separate bowl, whisk your dry ingredients—flour, cocoa, salt, baking powder. Now, add those dry bits to the wet, mixing slowly or by hand until it’s just combined. Seriously, stop mixing right when you can’t see any more dry streaks. Overmixing flour is the fastest way to lose that soft, Chewy Chocolate Cookies texture we worked so hard to build.
Finally, fold in that chopped bittersweet chocolate gently. You want chunks of melty goodness distributed throughout, not broken down into dust.
Baking for Signature Crackly Top Cookies
Now for the fun part: scoop rounded spoons of dough onto your sheets, leaving some breathing room between them. If you’re feeling fancy, sprinkle a little flaky sea salt right on top—it really pops the chocolate flavor!

Bake them for a short window, just 10 to 12 minutes. This is important: Do NOT fully cook them! The edges should look set and firm, but the very center needs to look a little soft and almost underdone when you pull them out. They look too soft, honestly, but trust the process.
Leave them sitting on that hot baking sheet for a full 5 minutes before you even think about moving them. That residual heat is doing crucial work, setting up those gorgeous, thin layers that become your signature Crackly Top Cookies as they cool. Then, transfer them carefully to the rack and let them finish setting up!
Tips for Achieving Bakery Style Brownie Cookies
If you want these to taste like they came straight from a high-end bakery—you know, those unbelievably rich, almost dense Gourmet Browkies—there are a couple of secrets that go beyond just following the steps. It really comes down to understanding how your ingredients behave.
Controlling Spread and Texture in Your Chocolate Brownie Cookies
You might notice that this recipe calls for melted butter, not softened butter creamed with sugar like a traditional cookie. That’s the whole secret to achieving that fudgy interior! Creamed butter incorporates air, which results in a lighter, cakier texture. When you use melted butter, you reduce the structure, forcing the cookie to rely on the eggs and chocolate for lift, which yields that wonderfully dense, brownie-like crumb we are looking for.
However, melted butter also means the dough is softer, and if your kitchen is warm, they might spread thin like chocolate pancakes! If you follow my Easy Chocolate Desserts recipe during a hot summer afternoon, don’t skip this: Chill the dough for about 30 minutes before scooping. It firms everything up just enough so they spread beautifully into thick, crinkly domes instead of flat wafers.
Selecting Chocolate for Rich Chocolate Baking
We talked about using good quality bittersweet chocolate, but let’s talk about the cocoa powder. For that truly deep, dark, intoxicating flavor that screams Decadent Chocolate Treats, you should look for Dutch-process cocoa powder. It’s been neutralized, so it has a smoother, less acidic taste than natural cocoa.
When I test these, I love the combination of Dutch-process cocoa powder mixed with the chopped bittersweet chocolate. It gives you layers of chocolate flavor that you just can’t get from using only one source. If you haven’t used it before, try it in my chocolate cupcakes too—you’ll see the difference it makes over at my cupcake post!
Variations for Your Chocolate Brownie Cookies
While I truly believe this recipe for chocolate brownie cookies stands perfectly on its own, sometimes you just need to raid the pantry and toss in a little something extra! These are fantastic bases for modifications, especially if you’re baking for a crowd with different preferences or just want to level up the decadence.
The key when adding mix-ins is to be gentle after the main flour is incorporated. We are protecting that fudgy texture at all costs, right? You want your additions to be suspended nicely throughout the dough, not completely absorbed by it.
For a fun twist that brings in salty and sweet notes, consider chopping up some of my favorite salted caramel candies and folding them in. That caramel swirl pairs magically with the deep cocoa flavor. You can find my guide on making incredible salted caramel for those kinds of additions over here if you want to try making the swirl from scratch!
Here are a few easy swaps and additions that I love:
- Nuts: Roughly chopped walnuts or pecans add a lovely crunch against the soft center. Add about 1/2 cup total.
- Different Chips: Try mixing in some white chocolate chips for contrast, or milk chocolate chips if you prefer a slightly sweeter overall bite than the bittersweet I recommend.
- A Little Heat: A tiny pinch of cayenne pepper mixed in with the cocoa powder bumps up the chocolate flavor without making them taste spicy—it just makes them taste *more* chocolatey!
Serving Suggestions for Irresistible Chocolate Bake
A cookie this rich deserves the perfect partner! Honestly, these chocolate brownie cookies are so decadent they barely need anything else, but serving them correctly elevates them instantly from a simple snack to a truly luxurious dessert experience. Since these are definitely falling into that category of ‘Chocolate Lover Desserts,’ we want beverages or accompaniments that cut through that intensity just a little bit.
The first thing I always reach for, especially when serving them warm, is a tall, ice-cold glass of milk. It’s the classic choice for a reason—the cool creaminess balances the deep, almost bitter notes of the dark chocolate perfectly. My kids swear by this pairing, and frankly, I agree!

If you need something a bit more grown-up for an evening treat, skipping the sugary sodas is key. A really strong black coffee or a rich espresso is absolutely divine alongside these. The slight bitterness of the coffee just intensifies how rich the brownie texture tastes.
But, if you’re looking to go all out, you simply must serve them à la mode. A scoop of high-quality vanilla bean ice cream is the ultimate pairing. The cool, melting ice cream mixing with that fudgy center creates a textural dream. For something a little different—though still cozy and warm—you could pair them with a mug of my Chai Latte Spiced Milk Tea, as those warm spices are wonderful with deep chocolate.
Whether you keep it simple with milk or go big with ice cream, remember the goal: balance that incredible chocolate intensity!
Storing and Freezing Homemade Brownie Style Cookies
One of the things I appreciate most about this recipe for Homemade Brownie Style Cookies is that, unlike some delicate cookies, they actually improve slightly after they’ve had a little time to rest! Because they are so fudgy, they hold their moisture wonderfully. This makes them perfect for making ahead for parties or just ensuring you have a decadent chocolate treat ready for an afternoon snack later in the week.
Keeping Your Browkies Fresh on the Counter
If you’re looking to enjoy these within a few days—which, let’s be honest, is ambitious because they’re so addictive—you just need a good airtight container. No need to refrigerate these! The high sugar content actually works as a natural preservative, keeping them perfectly soft and chewy.
I store mine at room temperature for up to four days. The minute they start to dry out, I know it’s time to move them to the freezer! I always keep a spare batch tucked away, just in case a craving hits or I need a quick bake sale offering. You can find some really great tips for other keepers, like my no-bake cookies, perfect for summer when you don’t want to turn on the oven.
Freezing for Future Chocolate Cravings
Freezing these treats is seriously simple, and they keep beautifully for future indulgences. The notes mentioned they freeze well for up to three months, and that’s exactly what I’ve found works best.
First, you absolutely must let them cool completely—and I mean completely—before you try to package them. A slightly warm cookie will just create condensation in the container, leading to a gummy texture when you thaw them. Once they are completely cool, lay them out on a baking sheet in a single layer, making sure they aren’t touching.

Pop that sheet into the freezer for about an hour until the cookies are completely solid. This prevents sticking! Then, transfer those frozen gems into a heavy-duty freezer bag or an airtight container. Make sure you press out as much air as you can before sealing it up tight.
Thawing Your Chocolate Brownie Cookies
When you need that fudgy fix, thawing is easy. You can leave them on the counter for a couple of hours, or if you’re in a real rush, microwave them for about 15 to 20 seconds. They warm up beautifully, and the centers get nice and melty again. It’s the best way to guarantee that rich, gooey bite whenever the mood strikes you!
Frequently Asked Questions About Chocolate Brownie Cookies
I always get the best questions in the comments section after people try these! It’s so rewarding to see everyone enjoying these chocolate brownie cookies. Here are a few things I frequently hear folks asking for clarification on, especially around achieving that perfect texture.
How do I make my chocolate brownie cookies extra fudgy?
To lock in that incredible fudgy density, you need two main things: fat ratio and timing. First, make sure you follow the sugar and melted butter ratios exactly—that high sugar content helps keep the center from drying out during baking. Second, and this is crucial for that gooey center, you must pull them out of the oven just when the edges look done but the middle is still soft. They finish cooking on the hot pans. If you want the fudgiest results possible, slightly underbake them every time! That’s the key to becoming a master of Simple Fudgy Cookie Recipe perfection.
Can I use brownie mix instead of making these chocolate brownie cookies from scratch?
Oh, I know the temptation of a box mix when you want a Quick & Easy Baking win, but for this recipe? I really advise against it if you want the *best* experience. Brownie mixes are calibrated to bake up like a standard square brownie. When you try to turn that into a cookie that spreads and sets up correctly, you often end up with something too cakey or grainy.
The entire magic here comes from how the melted butter interacts with the specific amount of flour and cocoa powder right when you mix them in. If you are in a major rush, sometimes you can use a mix as a base, but you’d have to add eggs, oil, and sometimes extra flour/cocoa to adjust the consistency, and honestly, by then, you’ve done all the work of making them from scratch anyway! Stick to the recipe for the ultimate satisfaction. For more dessert inspiration, feel free to browse all my recipes over at my main desserts page.
Why are my cookies spreading too much?
This is almost always down to temperature control, believe it or not! Since we use melted butter, the dough starts out much looser than a standard cookie dough. If your butter was still very hot when you mixed in the eggs, or if your kitchen is just blazing hot, the dough will be too thin before it even hits the oven.
If your dough looks looser than peanut butter right after mixing, that’s your warning sign. Don’t panic, though! Just scrape the dough onto the sheets, sprinkle the salt, and pop the whole tray into the refrigerator for about 20 minutes. Chilling helps solidify that fat just enough so they gain some necessary structure as they warm up in the oven, preventing them from turning into thin, crispy discs instead of thick, Chewy Chocolate Cookies.
Sharing Your Decadent Chocolate Treats
Now that you have successfully created these intensely rich, fudgy, and perfectly crackly chocolate brownie cookies, the best part is seeing how you serve them up! Honestly, these are a showstopper any time of year, whether it’s a cozy night in or part of a bigger spread.
I truly pour my heart into developing recipes that not only taste incredible but also give you confidence in the kitchen. That’s why I absolutely love hearing back from you all! Did you go wild with the flaky sea salt, or maybe try adding pecans like I suggested?
Please, if you make a batch, take a moment to share your experience. Drop a star rating right below this post—it helps other home cooks know this recipe is one of the reliable ones they can trust. Even better, snap a picture! Tag me on social media or send me a message through my contact page. Seeing your beautiful, Decadent Chocolate Treats pop up in my feed always makes my day.
Happy baking, everyone! I can’t wait to hear what you think of this cookie meets brownie masterpiece.
PrintThe Ultimate Fudgy Chocolate Brownie Cookies with Crackly Tops

Create the best chocolate brownie cookies that merge the fudgy texture of brownies with the satisfying chew of cookies. These gourmet browkies feature rich chocolate flavor and signature crackly tops, ready in under 30 minutes.
- Prep Time: 15 min
- Cook Time: 12 min
- Total Time: 27 min
- Yield: 18 cookies 1x
- Category: Dessert
- Method: Baking
- Cuisine: American
- Diet: Vegetarian
Ingredients
- 1/2 cup (1 stick) unsalted butter, melted
- 1 cup granulated sugar
- 1/2 cup packed light brown sugar
- 2 large eggs
- 1 teaspoon vanilla extract
- 3/4 cup all-purpose flour
- 1/2 cup unsweetened cocoa powder
- 1/2 teaspoon salt
- 1/4 teaspoon baking powder
- 4 ounces bittersweet chocolate, chopped (or chocolate chips)
- Flaky sea salt, for sprinkling (optional)
Instructions
- Preheat your oven to 350°F (175°C). Line two baking sheets with parchment paper.
- In a large bowl, whisk together the melted butter, granulated sugar, and brown sugar until fully combined.
- Whisk in the eggs one at a time until the mixture is smooth and glossy. Stir in the vanilla extract.
- In a separate medium bowl, whisk together the flour, cocoa powder, salt, and baking powder.
- Gradually add the dry ingredients to the wet ingredients, mixing on low speed or by hand until just combined. Do not overmix.
- Fold in the chopped bittersweet chocolate.
- Scoop rounded tablespoons of dough onto the prepared baking sheets, leaving about 2 inches between each mound.
- Sprinkle the tops lightly with flaky sea salt, if using.
- Bake for 10 to 12 minutes. The edges should look set, but the centers will still look slightly soft. This ensures a fudgy texture.
- Let the cookies cool on the baking sheets for 5 minutes before transferring them to a wire rack to cool completely. The tops will develop their signature crackle as they cool.
Notes
- For an even richer flavor, use high-quality Dutch-process cocoa powder.
- Chill the dough for 30 minutes before scooping if your kitchen is warm; this helps prevent spreading.
- These cookies freeze well; place cooled cookies in an airtight container for up to three months.
Nutrition
- Serving Size: 1 cookie
- Calories: 190
- Sugar: 18g
- Sodium: 110mg
- Fat: 11g
- Saturated Fat: 7g
- Unsaturated Fat: 4g
- Trans Fat: 0g
- Carbohydrates: 23g
- Fiber: 1g
- Protein: 2g
- Cholesterol: 35mg