
Oh, that deep, undeniable craving for a truly great cinnamon roll—you know the one. It needs to be impossibly soft, dripping with sweet filling, and coated in that lush, slightly tangy cream cheese frosting that makes you close your eyes in delight. If you are searching for the ultimate cinnamon rolls recipe that delivers on texture and ease, you have absolutely landed in the right spot. I’m Catherine Valdès, and here at Unfold Recipes, we take pride in turning simple desires into culinary realities that tell a beautiful story on your table. I spent years honing my craft, blending my love for soulful home cooking with formal culinary training, and I have tested this dough countless times to ensure it’s not just good, but reliably the BEST recipe for homemade cinnamon rolls—guaranteed easy, gooey, and fluffy without requiring you to spend your entire morning in the kitchen. Trust me; these are the sweet, decadent rolls you dream about.
- Why This is the BEST Easy, Gooey, and Fluffy Homemade Cinnamon Rolls Recipe
- Essential Ingredients for Your Cinnamon Rolls Recipe
- Step-by-Step Instructions for the Easiest Cinnamon Rolls Recipe
- Make Ahead Breakfast Dessert: Overnight Cinnamon Rolls Option
- Ingredient Notes and Substitutions for Your Cinnamon Rolls Recipe
- Serving Suggestions for These Bakery Style Sweet Rolls
- Storage and Reheating Instructions for Leftover Cinnamon Rolls Recipe
- Frequently Asked Questions About Making Soft and Fluffy Cinnamon Buns
- Share Your Experience with This Homemade Cinnamon Rolls Recipe
Why This is the BEST Easy, Gooey, and Fluffy Homemade Cinnamon Rolls Recipe
Why do so many recipes fall flat? Usually, it’s because they sacrifice texture for speed, or they demand endless kneading. Not here! When I developed this classic cinnamon rolls recipe, I made three things non-negotiable:
- It must be genuinely easy and ready in under two hours total time.
- The texture must scream Soft and Fluffy Cinnamon Buns, not dense bread.
- That filling has to be gloriously, unapologetically gooey.
After testing batches obsessively, I mastered the balance of ingredients. My culinary training ensures these aren’t just decent; they are truly bakery-style sweet rolls right in your own kitchen. This attention to detail is what separates a good roll from the absolute best.
Achieving Guaranteed Soft and Fluffy Cinnamon Buns
The secret to that cloud-like texture starts with the yeast! Honestly, if your yeast doesn’t foam up when you mix it with warm milk and just a touch of sugar, stop right there! It means the yeast is dead, and you won’t ever get those necessary air pockets that make these fluffy yeast rolls so wonderful.
We also knead until the dough is elastic—it should feel smooth and slightly bouncy when you poke it. This develops the gluten just enough to trap all that rising power. Remember, room temperature ingredients are your best friends here!
Tips for the Gooiest Cinnamon Rolls Filling
To get that incredible, melt-in-your-mouth pull, we skip just sprinkling dry brown sugar on the dough. That tends to leak out or dry up while baking! Instead, we create what I call a sweet, buttery paste first.
By making a proper filling out of softened butter, brown sugar, and cinnamon, you ensure that rich caramel layer stays exactly where it should be when you roll up the dough. That’s the real secret to the gooey cinnamon rolls people rave about in this amazing cinnamon rolls recipe.
Essential Ingredients for Your Cinnamon Rolls Recipe
When you are aiming for that perfect bakery style sweet roll that is unbelievably soft, the ingredients list isn’t something to casually glance at. Because I’ve tested these batches so many times, I can tell you exactly what you need and how you need it prepared. Making sure the milk is warm and the eggs are room temp isn’t just fussy—it’s vital for that beautiful, fluffy rise we are aiming for! Getting these details locked down sets you up for success before you even turn on the mixer.
For the Fluffy Yeast Rolls Dough
This is the structure of our rolls; treat it gently!
- 1 cup warm milk (It must be between 105-115 degrees F. Too hot and you kill the yeast; too cool and it takes forever to wake up.)
- 2 and 1/4 teaspoons active dry yeast
- 1/4 cup granulated sugar plus 1 teaspoon reserved for the yeast activation
- 1 large egg, room temperature
- 1/4 cup unsalted butter, melted
- 3 cups all-purpose flour, plus more for dusting
- 1/2 teaspoon salt
For the Gooey Cinnamon Filling
This is where the magic—and all that glorious gooeyness—comes from. Remember, we mix this first!
- 1/2 cup unsalted butter, softened (It needs to be soft enough to easily press down with a fork; this ensures an even spread!)
- 3/4 cup packed light brown sugar
- 2 tablespoons ground cinnamon
For the Best Cream Cheese Frosting Recipe
We want this rich, creamy, and spreadable—no lumps allowed! This thick application is what makes the tops of the warm rolls truly decadent.
- 4 ounces cream cheese, softened
- 1/2 cup unsalted butter, softened
- 2 cups powdered sugar, sifted (Sifting is a must to avoid little sugar pebbles in your lovely frosting!)
- 1 teaspoon vanilla extract
- 1-2 tablespoons milk (for thinning, if needed)
If you’re looking for other wonderful things to bake for brunch, check out my recipes for pumpkin bread pudding; it shares that same comforting, rich texture we love here!
Step-by-Step Instructions for the Easiest Cinnamon Rolls Recipe
Okay, let’s get our hands dusty! Following these steps means you are on the fast track to the most incredible, gooey cinnamon rolls recipe you’ve ever made. What I love about this process is that while the yeast does the heavy lifting, you are in charge of creating that perfect, soft foundation.
I remember one terrifying Saturday when I rushed the yeast activation because I was late getting brunch started. I thought I could cheat the system? Nope! The dough barely rose, and I ended up with dense hockey pucks! Since then, I insist on waiting for that beautiful, active foam. That visual cue is your promise of fluffy success!
Activating Yeast and Mixing the Dough
First things first: we wake up the yeast. In your large mixing bowl, gently combine the warm milk, that single teaspoon of sugar, and the active dry yeast. Leave it alone for about 5 to 10 minutes. You are looking for a cap of foam on top—that’s the magic happening! If it’s foamy, you’re good to proceed.
Once you see those bubbles, add the rest of your granulated sugar, the melted butter, the room-temperature egg, then the flour, and the salt. Mix everything together until you have a shaggy, slightly messy dough mass.
Kneading and First Rise for Soft and Fluffy Cinnamon Buns
Now, turn that shaggy mess out onto a lightly floured surface. Don’t be afraid to get in there and really knead this dough for a solid 5 to 7 minutes. You want it to feel smooth and elastic under your hands. It should resist just a little bit when you press on it—that means you’ve developed those gluten strands needed for a genuinely soft and fluffy cinnamon bun.
Pop the kneaded dough into a lightly oiled bowl, turning it once to coat. Cover the bowl with plastic wrap or a damp towel. Find a warm spot in your kitchen—near a sunny window or the turned-off oven usually works perfectly—and let it rest for about 60 to 75 minutes. It needs to almost double in size. Don’t rush this part!
Shaping, Filling, and Second Proofing
Gently punch the air out of the risen dough—it’s satisfying! On your floured surface, roll that dough out into a big, beautiful rectangle, roughly 12 inches by 18 inches. It should be relatively thin but hold together.
Take your softened butter, brown sugar, and cinnamon filling (which you should have mixed while the dough was rising) and spread it around evenly. Be sure to leave about a half-inch border clear along one of the long edges—this is the seam that seals everything in. Start rolling the dough TIGHTLY from the opposite long edge, creating a snug log. Pinch that empty seam edge closed so your beautiful filling doesn’t escape!
Cut your log into 12 even pieces. Place these cut rolls snugly into your prepared 9×13 inch baking dish. Cover them loosely again and let them have their second rising rest for about 30 minutes.
Here’s a crucial timing tip for this cinnamon rolls recipe: start preheating your oven to 375 degrees F during this 30-minute second rise. That way, everything is perfectly timed for baking!
Baking and Preparing the Cream Cheese Frosting
Bake those golden marvels for 20 to 25 minutes. You want them deeply golden brown on top and showing just a hint of firmness in the centers when you gently shake the pan.
While they bake, whip up your glorious frosting! Beat those softened cream cheese and butter together until they have zero lumps. Gradually add the sifted powdered sugar and vanilla. If it’s too stiff, add milk a teaspoon at a time until it’s thick enough to coat a spoon but still happily spreadable.
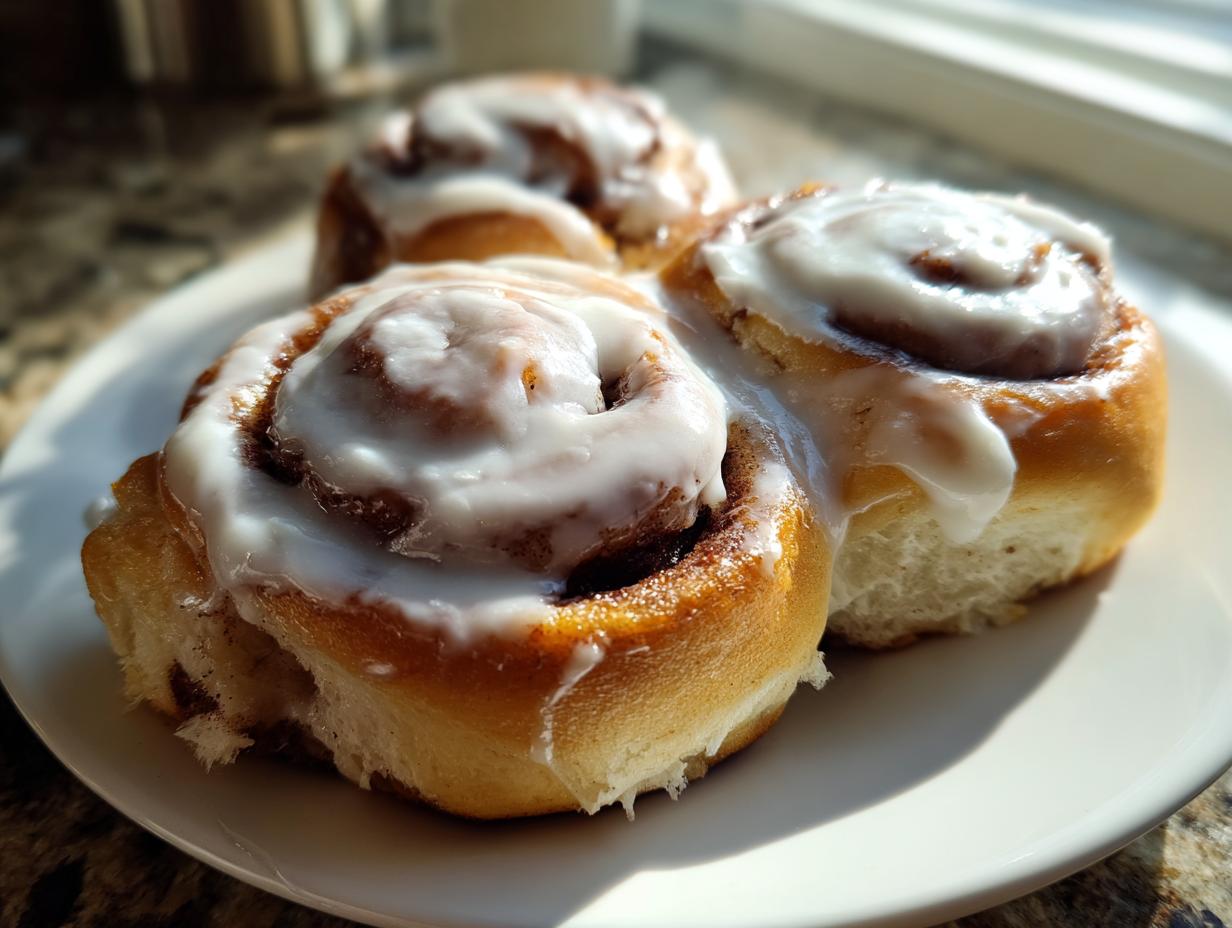
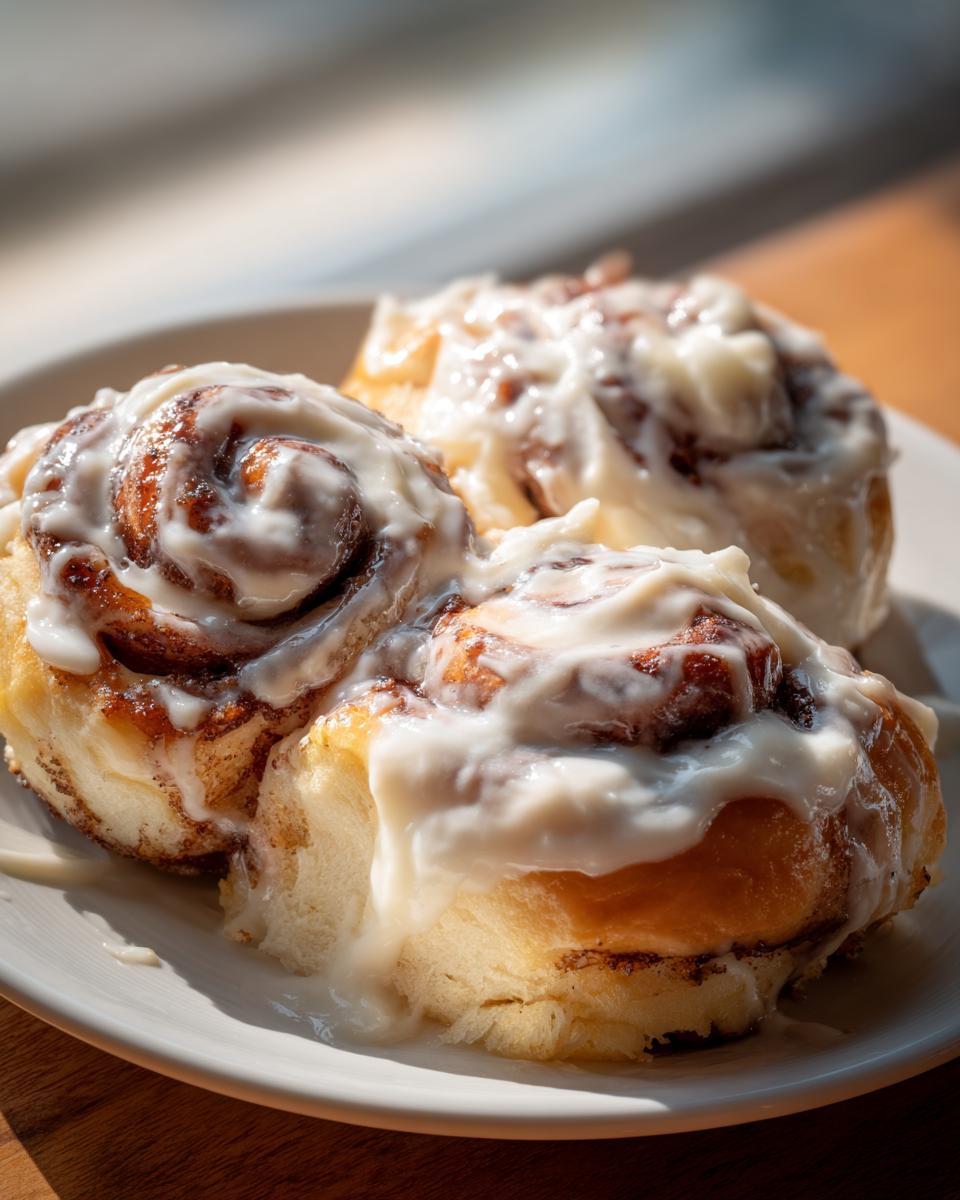
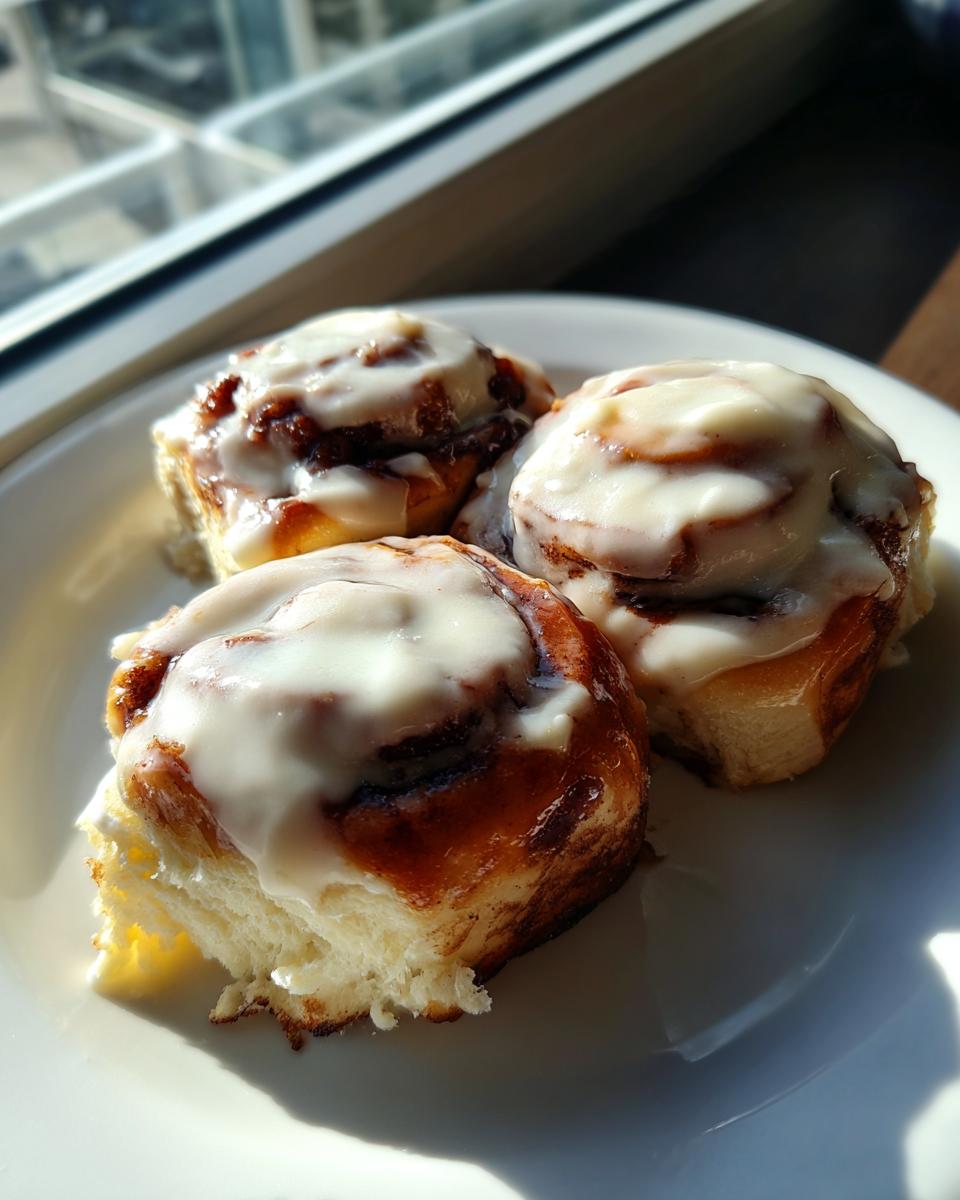
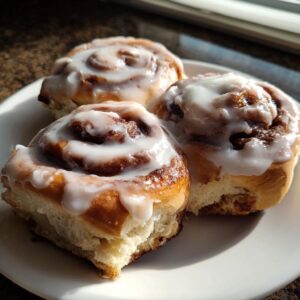
The absolute best part: as soon as the rolls come out of the oven, slather that incredible cream cheese frosting right over the top while they are still hot. That slight heat melts the frosting just enough to let it seep down into all those glorious swirls. That is how we guarantee that amazing, melt-in-your-mouth, slightly messy, gooey cinnamon rolls pull!
Make Ahead Breakfast Dessert: Overnight Cinnamon Rolls Option
I often get asked if this recipe is suitable for busy mornings, and the answer is a resounding yes! If you’re planning a big weekend brunch idea or just don’t want to wake up at 5 AM to get the yeast going, we can absolutely transform this into the perfect Overnight Cinnamon Rolls situation. This is one of those great make ahead breakfast dessert methods that my friends rely on for holiday mornings.
The core dough is robust enough to handle the cold sleep in the fridge, which is fantastic! The change is super minor, but timing is everything. We just need to pause that second rise right before baking.
Here’s what you do differently:
- Follow all steps right through to Step 6: kneading, rolling, filling, and cutting the rolls.
- Place the 12 cut rolls snugly into your greased 9×13 inch baking dish.
- Now, instead of letting them rest on the counter for that final 30 minutes, you cover that dish tightly with plastic wrap—make sure it’s sealed well so nothing dries out!
- Tuck the entire dish into the refrigerator. They can chill like this for up to 12 hours; I find 10 hours is perfect for maximum flavor development.
When you wake up, get your oven set to preheat to 375 degrees F right away. Take the pan out of the fridge, remove the plastic wrap, and let the rolls sit on the counter while the oven heats up. That 30-minute chill recovery time is usually just enough for them to proof softly again (as noted in my recipe document under the notes section). You’ll bake them exactly as written, 20 to 25 minutes. You still get that incredibly soft, fluffy yeast rolls texture, but with zero morning fuss! It’s such a lifesaver when hosting, and you should definitely check out more of my thoughts on make ahead breakfast dessert strategies!
Ingredient Notes and Substitutions for Your Cinnamon Rolls Recipe
I love talking ingredients! Making the cinnamon rolls recipe foolproof means understanding why we select certain items. A substitution here or there is usually fine, but when we are chasing that ethereal, soft and fluffy texture, we have to be smart about our swaps. I’ve learned through years of testing that these little details really do make the difference between “nice rolls” and “the best rolls I’ve ever eaten,” which is always my goal for you!
Yeast Temperature and Flour Selection
Let’s talk about the yeast situation again, because it’s the backbone of fluffy results. If your milk is too cold, your yeast just stays sleepy, and your dough won’t rise properly—leading to denser, flatter breakfast pastry recipes. If it’s boiling hot, well, you’ve basically made yourself warm, sweet milk soup, because the heat kills the yeast completely. That 105 to 115 degree range isn’t arbitrary; it’s the perfect temperature for waking up that active dry yeast and ensuring those magnificent air pockets form.
Now, for flour: I wrote this specifically using All-Purpose flour because it creates a softer crumb, which supports the “fluffy” texture. You can absolutely use good quality bread flour if you want a chewier roll, but you might need an extra splash of milk during the kneading process because bread flour is thirstier. Just watch your dough; if it feels stiff, add liquid slowly!
Adjusting the Glaze Consistency
I have to admit, I usually prefer the thick, glorious blanket of cream cheese frosting that completely hides the tops of my rolls. It adds richness and that slight tang! However, I know some of you want something lighter, perhaps a thin, shiny glaze for your cinnamon swirl rolls.
It’s so easy to adjust! If you want glaze consistency instead of thick frosting, just start with the base recipe (cream cheese, butter, vanilla, sugar) but only use about 1 cup of the powdered sugar to start. Then, add that milk spoonful by spoonful until it’s thin enough to drizzle beautifully off a spoon. It will still taste heavenly, just less decadent than the full frosting version!
If you want to read more about my general approach to using quality ingredients in my baking, you can always check out my main blog section!
Serving Suggestions for These Bakery Style Sweet Rolls
Honestly, these bakery style sweet rolls are so good they barely need an introduction, but presentation is part of telling a wonderful food story, isn’t it? I love setting the scene because these feel like a special treat, even if you whip them up on a Tuesday morning!
When I bring these out, they shine brightest as the centerpiece of a lovely weekend gathering. Serve them warm, of course—that maximizes the gooey factor! I find that the warmth brings out the incredible, deep aroma of the cinnamon, filling the entire house in the best way possible.

For brunch, try pairing them with something tangy and fresh to cut through that richness. Think sliced grapefruit, or perhaps a simple fruit salad piled high with berries. They are divine alongside some beautifully made eggs Benedict if you want to balance the sweet with savory.
And of course, coffee! A strong cup of black coffee or a creamy latte is the only acceptable partner for something this sweet. Everything tastes better when you slow down and enjoy the moment. You can find more of my favorite ideas for starting the day right over at my breakfast collection!
Storage and Reheating Instructions for Leftover Cinnamon Rolls Recipe
You know the drill—the pan of rolls is usually demolished in one morning, but if, by some miracle, you have any of this perfect cinnamon rolls recipe left over, we absolutely must treat them right! We put so much care into ensuring they are soft and gooey cinnamon rolls when fresh, so we can’t let them dry out on day two. Storage is actually quite straightforward, but the reheating step is where we bring them back to their bakery-quality glory.
For short-term storage (one or two days), keep them covered tightly at room temperature. I prefer using plastic wrap pressed right up against the icing to prevent the exposed tops from hardening overnight. If you have used the thick frosting, it will hold up beautifully this way. If you made the thinner glaze, watch it a little closer for drying.
If you need to keep them longer—perhaps you made a double batch for a party—you can absolutely freeze them! Once they are completely cool, wrap the rolls (unfrosted is best, but you can frost them if you don’t mind a slightly softer frosting texture after reheating) tightly in plastic wrap, then slip them into a heavy-duty freezer bag. They keep wonderfully for up to three months.
The Secret to Reheating for That Fresh-Baked Gooey Texture
This is the crucial part. Eating a cold cinnamon roll is just sad, trust me! We need heat, but we need moisture too. The microwave is your fastest friend for single servings, but you have to use water.
For one or two rolls: Place the roll on a microwave-safe plate and set a small, microwave-safe cup of water next to it in the microwave. Heat them together for about 15 to 25 seconds. The steam from the water jacket keeps the dough tender while the heat warms through to the center, restoring that wonderful, gooey cinnamon rolls experience.
For the whole pan or frozen rolls: I prefer the oven for uniformity. Reheat uncovered at 300 degrees F for about 10 to 15 minutes. If they were frozen, they’ll take closer to 18 minutes. If you are reheating frosted rolls, you don’t need to cover them, but keep an eye on the frosting; it will get very melty.
If you want even more tips on how to store and enjoy your baked treasures, you can browse my general desserts collection for inspiration on pairing or storing other sweet treats!
Frequently Asked Questions About Making Soft and Fluffy Cinnamon Buns
It’s normal to have questions when tackling a recipe for the first time, especially one promising truly soft and fluffy cinnamon buns! I want you to have the confidence of a seasoned baker, so let’s tackle the common roadblocks I’ve seen over the years. Knowing the ‘why’ behind the steps helps tremendously when troubleshooting your cinnamon rolls recipe.
Can I use Instant Yeast instead of Active Dry Yeast in this cinnamon rolls recipe?
Oh yes, you absolutely can! Instant yeast is formulated to be mixed right in with your dry ingredients without that bubbling activation step. If you’re using instant yeast, you can skip Step 1 completely. Just mix the instant yeast right in with your 3 cups of flour and the salt before adding the wet ingredients to form the dough.
Because you aren’t proofing the yeast first, you don’t need that initial teaspoon of sugar reserved for the yeast itself, so dump that reserved sugar right into the main 1/4 cup measurement. It’s a tiny shortcut that still leads to wonderful fluffy yeast rolls! Just be sure to knead it properly afterwards!
How do I ensure my rolls stay gooey and don’t dry out?
This is the essential question! The gooeyness comes from two major points in my method. First, we create that rich, buttery filling paste—that ensures the sugar and fat stay bound right in the swirl throughout the bake. If you just sprinkle dry sugar, it tends to vanish or caramelize too hard.
Second, and most importantly, is the application of that gorgeous best cream cheese frosting recipe. You MUST frost the rolls the second they leave the oven. The residual heat melts the butter and cream cheese just enough so that the frosting seeps down between the warm, tender layers. This locks in the moisture and keeps that center incredibly tender. For leftovers, remember my advice about reheating with a tiny bit of water to bring that gooey texture right back!
If you’re curious about other foolproof recipes that deliver bakery-quality results without the fuss, check out this amazing guide on bakery-quality rolls—it’s always good to have another trusted source in your back pocket!
I always keep a few excellent vegetarian appetizers recipes handy for when I need something savory to balance out a big batch of sweet rolls like this!
Share Your Experience with This Homemade Cinnamon Rolls Recipe
Now it’s your turn to tell the next chapter of this story! I truly hope this cinnamon rolls recipe brought some warmth and gooey deliciousness into your kitchen. I put so much care into testing every single rise and every swirl of filling so you wouldn’t have to worry about the outcome.
I would absolutely love to hear how they turned out! Did you manage to get them perfectly soft and fluffy? Were you impressed by how easy homemade cinnamon rolls can be when you have a reliable guide?
Please leave a rating for this recipe right down in the comments below. If you managed to nail the timing and served them up in under two hours, please let me know! And if you snapped a picture of those perfect swirls covered in frosting, tag me on social media—seeing your beautiful creations flowing from my recipe makes my day.
Did you try any variations yourself? Are you one of the thick frosting lovers, or did you opt for the thinner glaze? Don’t be shy; share your tips and triumphs! If you ever need to reach out with a quick question directly, you know you can always find the contact form over at my main contact page. Happy baking, friends!
PrintThe Best Easy, Gooey, and Fluffy Homemade Cinnamon Rolls Recipe
This recipe delivers bakery-style, unbelievably soft homemade cinnamon rolls with a perfect cream cheese glaze. You achieve a gooey and fluffy texture with straightforward steps, making it ideal for breakfast or brunch.
- Prep Time: 30 min
- Cook Time: 25 min
- Total Time: 1 hour 50 min
- Yield: 12 servings 1x
- Category: Breakfast
- Method: Baking
- Cuisine: American
- Diet: Vegetarian
Ingredients
- 1 cup warm milk (105–115 degrees F)
- 2 and 1/4 teaspoons active dry yeast
- 1/4 cup granulated sugar plus 1 teaspoon for yeast
- 1 large egg, room temperature
- 1/4 cup unsalted butter, melted
- 3 cups all-purpose flour, plus more for dusting
- 1/2 teaspoon salt
- For the Filling:
- 1/2 cup unsalted butter, softened
- 3/4 cup packed light brown sugar
- 2 tablespoons ground cinnamon
- For the Cream Cheese Frosting:
- 4 ounces cream cheese, softened
- 1/2 cup unsalted butter, softened
- 2 cups powdered sugar, sifted
- 1 teaspoon vanilla extract
- 1–2 tablespoons milk
Instructions
- Activate the yeast: In a large bowl, combine the warm milk, 1 teaspoon of sugar, and yeast. Let it sit for 5-10 minutes until foamy.
- Mix the dough: Add the remaining 1/4 cup sugar, melted butter, egg, flour, and salt to the yeast mixture. Mix until a shaggy dough forms.
- Knead the dough: Turn the dough onto a lightly floured surface and knead for 5-7 minutes until smooth and elastic. Place the dough in a lightly oiled bowl, cover, and let it rise in a warm place for 60-75 minutes, or until doubled in size.
- Prepare the filling: While the dough rises, mix the softened butter, brown sugar, and cinnamon together in a small bowl until well combined. This creates your gooey filling base.
- Shape the rolls: Punch down the risen dough gently. Roll the dough out into a large rectangle, about 12×18 inches. Spread the cinnamon-sugar filling evenly over the dough, leaving a small border on one long edge.
- Roll and cut: Starting from the long edge opposite the border, tightly roll the dough into a log. Pinch the seam closed. Cut the log into 12 equal rolls.
- Second rise: Arrange the rolls in a greased 9×13 inch baking dish. Cover loosely and let them rise again for 30 minutes. Preheat your oven to 375 degrees F during this time.
- Bake: Bake for 20-25 minutes, or until the tops are golden brown and the centers are set.
- Make the frosting: While the rolls bake, beat the softened cream cheese and butter until smooth. Gradually add the powdered sugar and vanilla extract. Add milk one tablespoon at a time until you reach a thick, spreadable consistency.
- Frost and serve: Remove the rolls from the oven. Immediately spread the cream cheese frosting generously over the warm rolls so it melts slightly. Serve warm for the best gooey texture.
Notes
- For an overnight option, assemble the rolls, place them in the dish, cover tightly, and refrigerate for up to 12 hours before the final 30-minute proof and baking.
- If you prefer a thinner glaze over thick frosting, reduce the powdered sugar in the frosting by half and increase the milk to achieve a pourable consistency.
- Ensure your milk temperature is correct; water that is too hot will kill the yeast, preventing the soft and fluffy rise you want.
Nutrition
- Serving Size: 1 roll
- Calories: 450
- Sugar: 35
- Sodium: 300
- Fat: 24
- Saturated Fat: 15
- Unsaturated Fat: 9
- Trans Fat: 0.5
- Carbohydrates: 55
- Fiber: 2
- Protein: 6
- Cholesterol: 65