

Sometimes you just need something unbelievably sweet, totally luxurious, and truly impressive, but you absolutely do not have time to stand by the oven. That’s where these coconut balls sneak right in and save the day! Created through my process of blending approachable elegance—something I learned balancing my mother’s sunny cooking with my father’s rich heritage—this recipe delivers pure, creamy decadence without turning on the heat.
We are talking about the ultimate no-bake treat here. Forget fussy steps; these rich, sweet little bites come together with just a handful of pantry staples and minimal effort. If you’re looking for that perfect hit of tropical flavor that satisfies every sweet craving instantly, you’ve truly found it. I’m Catherine Valdès, and I promise these coconut balls are as easy to share as they are to make right here in your own kitchen. You can read more about my cooking philosophy as I unfold my story and approach to accessible elegance.

- Why This Easy Coconut Balls Recipe is Your New Favorite Sweet Treat
- Gathering Ingredients for Your Sweetened Condensed Milk Coconut Balls
- Step-by-Step Instructions for Perfect No Bake Coconut Bliss Balls
- Expert Tips for Making Simple Coconut Treats
- Variations: From 2 Ingredient Coconut Balls to Healthy Coconut Energy Bites
- Storing Your Homemade Coconut Candy Treats
- Frequently Asked Questions About Coconut Balls
- Estimated Nutrition for These Coconut Balls
- Share Your Tropical Coconut Sweets Creations
Why This Easy Coconut Balls Recipe is Your New Favorite Sweet Treat
I developed this recipe because I believe that incredible desserts shouldn’t demand your entire afternoon. These coconut balls manage to hit every sweet spot—they’re simple, they taste absolutely decadent, and they let you skip the oven entirely. Honestly, you’ll be amazed at how quickly these come together. They are a total pantry hero for those unplanned moments when you need something elegant fast. You can find more of my approachable, stunning recipes over in my Desserts archive.
No Bake Convenience for Quick Coconut Dessert
The best part? Zero baking required. We mix everything together, chill it, and that’s it! This makes them the perfect Quick Coconut Dessert for unexpected guests or when you’re just craving something special late in the evening. Seriously, minimal cleanup is always a win for me.
Melt In Your Mouth Coconut Bites Texture
The secret weapon is the sweetened condensed milk, trust me here. It binds everything beautifully, resulting in a texture that is incredibly creamy on the inside. These are true Melt In Your Mouth Coconut Bites that satisfy that deep desire for sweet, rich flavor.

Perfect Party Ready Coconut Snacks
Because they look so polished after the chocolate dip, these are fantastic for any gathering. Whether you’re bringing them to a potluck or wrapping them up as little gifts, they always look impressive. They are truly the definition of fantastic Party Ready Coconut Snacks.
Gathering Ingredients for Your Sweetened Condensed Milk Coconut Balls
When making these simple coconut balls, the beauty is in starting with quality simple ingredients. Since we aren’t baking, the flavor of the coconut and the richness of the milk really shine through. I’ve listed everything you need right here—just make sure you keep your shredded coconut separated, as we use it twice in this recipe!
Base Ingredients for Creamy Coconut Truffles
This mix is what gives you that signature soft texture. Sweetened condensed milk is non-negotiable; it’s the glue that creates these incredible Creamy Coconut Truffles.
- 14 ounces sweetened condensed milk (the good stuff!)
- 3 cups shredded sweetened coconut, divided (keep 1 cup aside for coating!)
- 1 teaspoon vanilla extract
Chocolate Coating for Chocolate Coated Coconut Balls
For that perfect shell, you need a little help to keep the chocolate nice and fluid for dipping. This combination ensures your Chocolate Coated Coconut Balls set up beautifully.
- 1 cup semi-sweet chocolate chips
- 1 tablespoon coconut oil (this really helps with shine and dipping!)
Step-by-Step Instructions for Perfect No Bake Coconut Bliss Balls
Now for the best part—putting it all together! Since these are No Bake Coconut Bliss Balls, the assembly is straightforward, but timing the chilling is absolutely crucial for success. We want a firm base so they don’t turn into sticky messes when you try to roll them. Follow these steps exactly, and you’ll have gorgeous coconut balls dipped in chocolate faster than you think. For more easy, oven-free ideas, check out my thoughts on no-bake cookies!
Mixing and Chilling the Coconut Balls Base
First, grab a medium bowl. You’re going to combine the entire can of sweetened condensed milk with 2 cups of your shredded coconut and the vanilla extract. Mix this up really well until it looks like a thick, happy paste. Don’t skimp on mixing; you want that milk coating every single strand. Once combined, cover that bowl—this part is important—and pop it into the refrigerator for a solid 30 minutes. Give it time to firm up!
Forming and Rolling the Coconut Treats
While that base chills, get your remaining 1 cup of coconut ready on a shallow plate. Once your mixture seems a bit firmer, take it out. Using a small cookie scoop or just a regular spoon, scoop out uniform portions. Roll the mixture quickly between your palms to form little balls, about an inch wide. Try to make them all the same size so they look cohesive. Now, gently roll each ball through that reserved shredded coconut until it’s completely coated. Place these beauties on a baking sheet lined with parchment paper.
Melting Chocolate and Coating the Coconut Balls
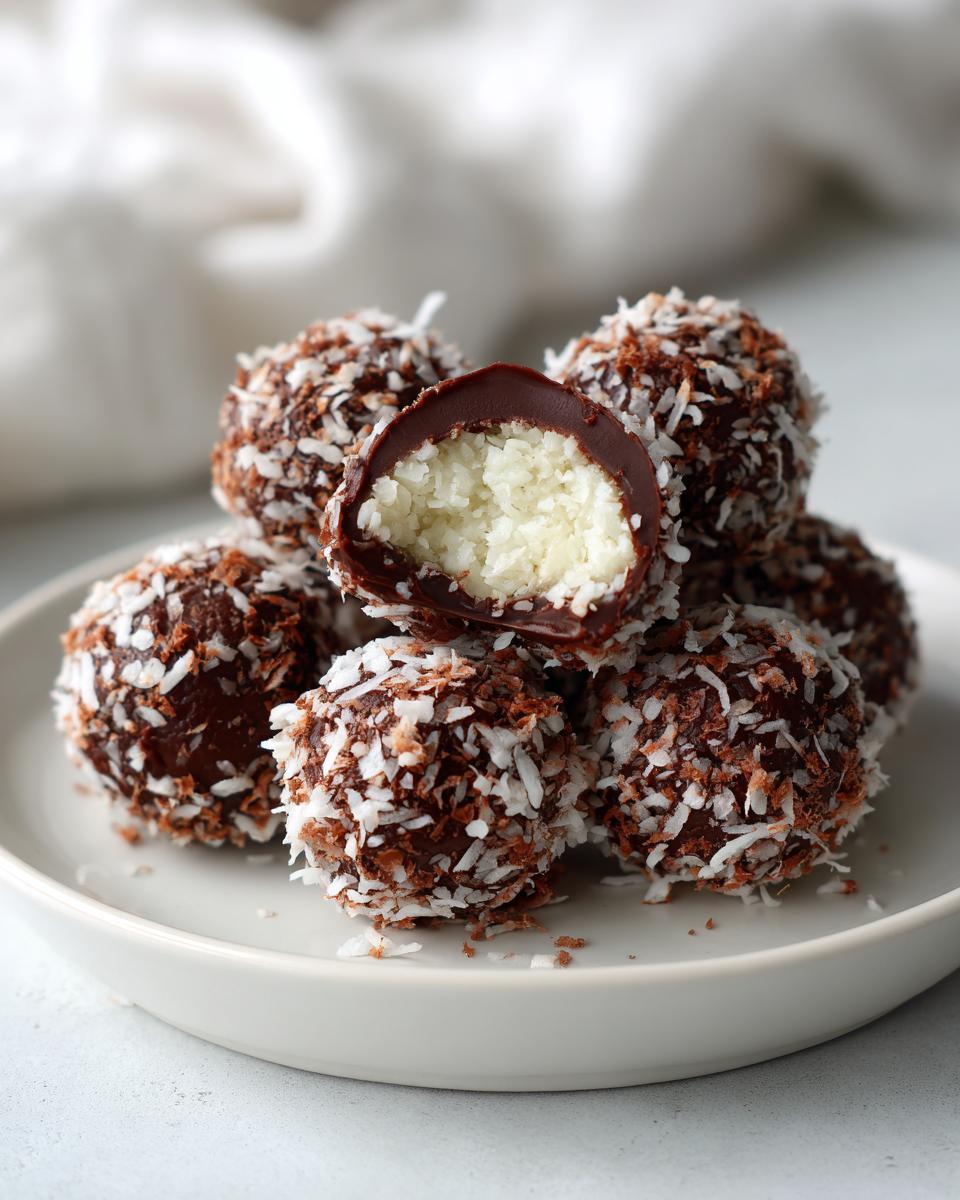
You must chill these rolled balls again for at least an hour until they are quite firm—this makes dipping so much cleaner! For the chocolate, combine your chips and coconut oil in a microwave-safe bowl. Zap it in the microwave for 30-second bursts, stirring well after every single one, until the chocolate looks smooth and glossy. Now, working quickly, pierce a chilled ball with a fork, plunge it into the melted chocolate, lift it out, let the extra drip off, and put it right back onto the parchment. Pop them back into the fridge for 15 minutes until that lovely chocolate coating sets.
Expert Tips for Making Simple Coconut Treats
Even though these are designed to be incredibly straightforward—my kind of recipe!—a few little tricks, passed down through kitchen mishaps and successes, really elevate these from good to absolutely stellar. I always want you to feel confident creating these Simple Coconut Treats, so take a peek at these tips before you roll your next batch. You can find more quick inspiration over on my blog updates.
Achieving the Ideal Firmness Before Rolling
Please, please, please do not rush that first chill time! If the mixture is too warm, it will be sticky and impossible to handle. You want the mixture firm enough that when you scoop it, it holds its shape immediately. If you find your hands are warming it up too fast while rolling, pause, and just pop the batch you are working on back into the fridge for five minutes. That chill is non-negotiable for smooth, perfect balls.
Smoothing the Chocolate Coating
That tablespoon of coconut oil I mentioned in the ingredient list? It’s not just for flavor, though it adds a nice touch of tropical depth. Its main job is thinning the chocolate just enough so that when you dip your cold coconut truffles, the coating flows beautifully around it. Warm chocolate coats cold centers poorly and tends to clump up fast. A little oil makes the dipping process so much slicker!
Variations: From 2 Ingredient Coconut Balls to Healthy Coconut Energy Bites
One of the things I absolutely adore about these coconut balls is how forgiving they are. They are amazing as written—rich, sweet, and totally reliant on that smooth condensed milk base—but they are also superstars when you need to pivot based on what you have. My goal here at Unfold Recipes is always to inspire you to cook confidently, even when you need to make swaps! If you’re looking for more inspiration on easy, crowd-pleasing recipes, check out my tips for appetizers that always impress.
You might see recipes online suggesting only two ingredients, which usually means skipping the chocolate dip or swapping out the milk for something else. While our primary recipe shines with the chocolate shell and condensed milk richness, you can absolutely turn these into cleaner snacks, too!
Healthy Coconut Energy Bites
If you’re craving something slightly less sweet or need a cleaner fuel source, these easily transform into fantastic Healthy Coconut Energy Bites. For this swap, you usually reduce the amount of sweetened condensed milk significantly or replace it entirely with mashed banana or a nut butter base, though you’ll need to adjust the liquid content carefully. You can also bulk them up by adding things like chia seeds or finely ground oats to the base mixture for texture and nutrition. These modifications let you sneak in that tropical flavor without the heavy sugar rush.
2 Ingredient Coconut Balls
When people talk about 2 Ingredient Coconut Balls, they are usually pairing sweetened condensed milk with coconut—that’s it! If you choose this route, remember that they will be much softer and slightly stickier, and they absolutely need that firm chill time. They also won’t hold up as well to dipping in chocolate, so they are best enjoyed rolled just in coconut or perhaps a light dusting of cocoa powder.

Making Gluten Free Coconut Balls
Fortunately, the base recipe we are using here is naturally gluten-free, provided your vanilla extract is pure and you are using standard shredded coconut, which usually is. However, if you choose to add flour or dry ingredients for texture—like when making those very dense Healthy Coconut Energy Bites—you must be diligent about sourcing certified gluten-free oats or flours. If you’re looking for more health-conscious sweets, I love checking out recipes that focus on cleaner ingredients.
Storing Your Homemade Coconut Candy Treats
Good news! Since these are no-bake, we don’t have to worry about them going stale quickly. If you manage to have any coconut balls left over—which is rare in my house!—storage is super simple. These Homemade Coconut Candy treats actually taste even better the next day once the flavors have really married. You want to keep them chilled. Place them snugly in a truly airtight container. They will last beautifully in the refrigerator for up to a full week. Just pull them out about 20 minutes before serving if you want the chocolate shells to be a little softer!
Frequently Asked Questions About Coconut Balls
I always get so many wonderful questions when I share simple recipes like this, and I totally get it—you want perfect results every time! I’ve gathered a few of the most common things readers ask about making these delicious little bites. I hope this helps you feel totally confident in the kitchen! If you have any more specific questions after trying them out, don’t hesitate to reach out on my contact page.
Can I use unsweetened coconut instead of sweetened?
That’s a great question if you are trying to manage the sugar intake! You absolutely can use unsweetened coconut, but you must compensate for the lost sweetness. Since our base relies heavily on the sugar in the sweetened condensed milk, if you swap the coconut to unsweetened, you’ll need to add a bit of extra powdered sugar or maybe even a tablespoon or two of maple syrup to the base mixture to maintain that creamy texture and balanced flavor profile.
What is the best way to get a smooth chocolate coating?
This is key to making them look elegant! For the smoothest chocolate coating, make sure to use good quality semi-sweet chips. The real secret, though, is that tiny bit of coconut oil we melt in with them. That little bit of fat thins the chocolate out just enough so that when you dip your cold coconut truffles, the coating flows beautifully and creates a thin, glossy shell that sets up perfectly hard.
Can these be made ahead for the holidays?
Oh, yes, they are absolutely ideal for making ahead! They are wonderful Holiday Coconut Confections because they chill so well. Once they are fully set, they keep wonderfully in an airtight container in the refrigerator for up to a week. They never seem to last that long in my house, but they definitely taste great after a day or two!
Estimated Nutrition for These Coconut Balls
When we make treats like these, we focus on flavor and joy first, right? But for those of you who track nutritional information, I’ve pulled together the estimates based on the full recipe yield. Keep in mind, since we are dealing with homemade goodness, these values are always an estimate per one single ball. They are rich, satisfying, and perfectly portioned little indulgences!
- Serving Size: 1 ball
- Calories: 150
- Sugar: 18g
- Sodium: 35mg
- Fat: 8g
- Saturated Fat: 7g
- Unsaturated Fat: 1g
- Trans Fat: 0g
- Carbohydrates: 19g
- Fiber: 1g
- Protein: 2g
- Cholesterol: 10mg
As you can see, they are definitely a sweet treat, often getting most of their calories from the fats and sugars that make them so wonderfully creamy and delicious. Enjoy them mindfully!
Share Your Tropical Coconut Sweets Creations
I truly hope making these coconut balls brings as much joy and sweetness to your kitchen as they do to mine. They are just such easy and rewarding Tropical Coconut Sweets to create! Now, I want to hear from you! Did you stick to the chocolate shell, or did you get creative with toppings? Please leave a comment below and let me know how these simple treats turned out for your family gatherings. You can also explore my favorite brunch recipes here!
PrintNo-Bake Chocolate Coconut Balls: Melt-in-Your-Mouth Treats

Create these simple, creamy coconut balls without baking. They use few ingredients and are perfect for quick desserts or party snacks.
- Prep Time: 20 min
- Cook Time: 5 min
- Total Time: 95 min
- Yield: 20 servings 1x
- Category: Dessert
- Method: No-Bake
- Cuisine: American
- Diet: Vegetarian
Ingredients
- 14 ounces sweetened condensed milk
- 3 cups shredded sweetened coconut, divided
- 1 teaspoon vanilla extract
- 1 cup semi-sweet chocolate chips
- 1 tablespoon coconut oil
Instructions
- In a medium bowl, combine the sweetened condensed milk, 2 cups of the shredded coconut, and vanilla extract. Mix until fully combined.
- Cover the bowl and chill the mixture in the refrigerator for 30 minutes to firm up slightly.
- Place the remaining 1 cup of shredded coconut on a shallow plate.
- Scoop the chilled coconut mixture using a small cookie scoop or spoon. Roll the mixture between your palms into uniform balls, about 1 inch in diameter.
- Roll each ball in the remaining shredded coconut until fully coated. Place the coated balls on a parchment-lined baking sheet.
- Chill the coconut balls in the refrigerator for at least 1 hour, or until very firm.
- Prepare the chocolate coating: Place the chocolate chips and coconut oil in a microwave-safe bowl. Microwave in 30-second intervals, stirring well after each, until the chocolate is smooth and melted.
- Dip each chilled coconut ball into the melted chocolate, allowing excess chocolate to drip off. Return the coated balls to the parchment-lined sheet.
- Refrigerate the chocolate coconut balls for about 15 minutes, or until the chocolate coating sets completely.
Notes
- For a healthier option, substitute almond flour for some of the shredded coconut in the center mixture.
- If you want a tropical flavor boost, add 1/2 teaspoon of coconut extract to the base mixture.
- These homemade coconut candy treats store well in an airtight container in the refrigerator for up to one week.
Nutrition
- Serving Size: 1 ball
- Calories: 150
- Sugar: 18g
- Sodium: 35mg
- Fat: 8g
- Saturated Fat: 7g
- Unsaturated Fat: 1g
- Trans Fat: 0g
- Carbohydrates: 19g
- Fiber: 1g
- Protein: 2g
- Cholesterol: 10mg