

If you’re looking to bring a real sense of pure, unadulterated magic to your next party, you’ve landed in the absolute right spot! Honestly, nothing stops a room quite like a cake that looks like it was spun from a fairytale cloud. We need impressive desserts that still feel achievable for the home cook, right? Well, I promise you, this cotton candy cake recipe is my go-to for creating the most whimsical, fluffy, and easy showstopper celebration cake. It features the dreamiest homemade frosting and swirls of pastel color that make everyone gasp. It’s baking that feels like play!
- Why This Cotton Candy Cake Recipe is Your New Favorite Showstopper Celebration Cake
- Gathering Ingredients for Your Cotton Candy Cake
- How to Prepare Your Fluffy Cotton Candy Cake Recipe
- Ingredient Notes and Substitutions for Your Cotton Candy Frosting Recipe
- Tips for Success: Making the Best Cotton Candy Cake Ever
- Variations: Fun Party Desserts and DIY Pink and Blue Cake Ideas
- Storage and Serving Suggestions for Your Cotton Candy Cake
- Frequently Asked Questions About This Cotton Candy Cake
- Estimated Nutritional Data for This Kid Friendly Birthday Cake
Why This Cotton Candy Cake Recipe is Your New Favorite Showstopper Celebration Cake
When I’m planning a fun party dessert, I want something that looks completely over-the-top amazing but doesn’t require me to spend all day wrestling with complicated techniques. That’s exactly what this cotton candy cake delivers! It’s high on visual impact but low on baking stress. Trust me, this is the recipe to save for those special birthdays.
- It produces genuinely fluffy cotton candy cake layers that melt in your mouth.
- The pastel swirls look magical, but the coloring process is surprisingly easy.
- It’s a homemade recipe that tastes way better than any boxed mix you could pick up.
- It’s the perfect centerpiece for any carnival themed dessert spread or celebration.
Achieving the Fluffiest Cotton Candy Cake Layers
Nobody wants a dense, heavy cake when they are expecting something dreamy, right? We focus purely on texture here. That fluffiness comes directly from using properly creamed butter and sugar alongside the precise leavening agents listed. These soft vanilla cake layers are light as air and provide the perfect tender base to hold all that sweet frosting.
Simple Pastel Swirl Cake Baking Technique
Don’t let the colors scare you! You don’t need a fancy offset spatula or a secret swirling tool to get that gorgeous look. The real trick is mixing the batter and just dividing it into three bowls—white, blue, and pink. You just dollop the colors into the pan randomly. The oven does all the magic swirl work for you, keeping this method wonderfully simple.
Gathering Ingredients for Your Cotton Candy Cake
Okay, let’s talk about what you need to pull off this *cotton candy cake*. I’ve broken the list down so you know exactly what goes into the layers versus what goes into that fluffy frosting. For the cake itself, we are keeping the base super simple—just standard pantry staples but handled with care! The real fun starts when we portion out the batter for coloring because that’s where the visual wow factor comes into play.
For the Softest Vanilla Cake Layers
To get those perfect, soft vanilla cake layers, you want to make sure your butter is actually room temperature soft—not melted, just yielding. We need 1 1/2 cups of all-purpose flour, baking powder, and salt whisked together. Then, you’ll need about a cup of sugar to cream with that butter, followed by two large eggs. The wet ingredients are rounded out with whole milk. The fun begins when we mix in the pink and blue gel food coloring—gel is a must, trust me, liquid coloring will water down the poor batter! And if you can find it, that cotton candy flavoring oil really pushes that nostalgic flavor home.
Homemade Cotton Candy Frosting Recipe Components
For this frosting, we are leaning into that classic American buttercream texture, but making it taste like a carnival! You absolutely must start with 1 cup of softened butter and 4 cups of powdered sugar that has been properly sifted. Sifting is non-negotiable here; we don’t want lumps in our fluffy dream coating! Add your vanilla, a tiny bit of heavy cream for spreadability, and—you guessed it—more of that gorgeous cotton candy flavoring oil to make sure the frosting tastes as magical as the layers look.
Whimsical Decoration Elements
This is the easiest part! You need store-bought cotton candy—a mix of pink and blue is perfect for maximum impact. You want this to be applied right at the end, though, because who wants melted cloud fluff? A quick toss of rainbow sprinkles over the edges adds a nice little crunch and finishes off that adorable, kid-friendly birthday cake look we are aiming for.
How to Prepare Your Fluffy Cotton Candy Cake Recipe
Alright, now that we have all our colorful components gathered, it’s time to start the actual baking! Don’t feel intimidated by the layers; I’ve broken this down into small, easy steps so your **cotton candy cake** comes out perfectly fluffy every single time. We need patience during the mixing, but the actual assembly is pure fun. Pay close attention to the creaming step—that’s truly the secret sauce for this light texture! If you love making stunning desserts, make sure you check out my guide on making rich chocolate cupcakes; similar rules about creaming apply!
Mixing the Cake Batter and Creating Pastel Hues
First things first, you need to preheat that oven to 350°F (175°C) and get your 8-inch pans prepped. I always grease, flour, and line the bottoms—no sticking allowed! Next, whisk up your dry stuff, and separately, we tackle the wet. Here is where you need to take your time: beat that softened butter and sugar until it’s genuinely light and fluffy, almost pale yellow. This takes a solid three minutes, but it’s creating those necessary air pockets. Don’t rush it!
Once those eggs are perfectly incorporated, alternate adding the flour mix and the milk, starting and ending with the dry ingredients. Mix *just* until it disappears. Now, quickly divide that heavenly white batter into three bowls. Leave one plain. Into the other two, gently mix in your food coloring and that cotton candy oil. Here’s the absolute biggest instruction: When you spoon the colored batters into your pans, just drop alternate piles randomly—white, pink, blue, white. Do not take a knife and swirl them around! If you swirl, you’ll muddy the colors. We want cute, soft divisions, not muddy mess.
Baking and Cooling the Cotton Candy Cake Layers
Pop those pans into the 350°F oven for about 28 to 32 minutes. You know they are done when a toothpick inserted right into the center comes out clean—maybe with a tiny, moist crumb sticking to it, but definitely not wet batter. Let the cakes rest in the pan for about 10 minutes. This lets them firm up just enough.
Then, flip them out onto a wire rack! This is crucial: the **cotton candy cake** layers must be stone-cold before you even think about touching them with frosting. If they are even slightly warm, that beautiful homemade frosting melts right off the sides and turns into a sticky disaster. Give them at least an hour to cool completely, or better yet, bake them the night before!
Assembling the Magical Layer Cake Tutorial
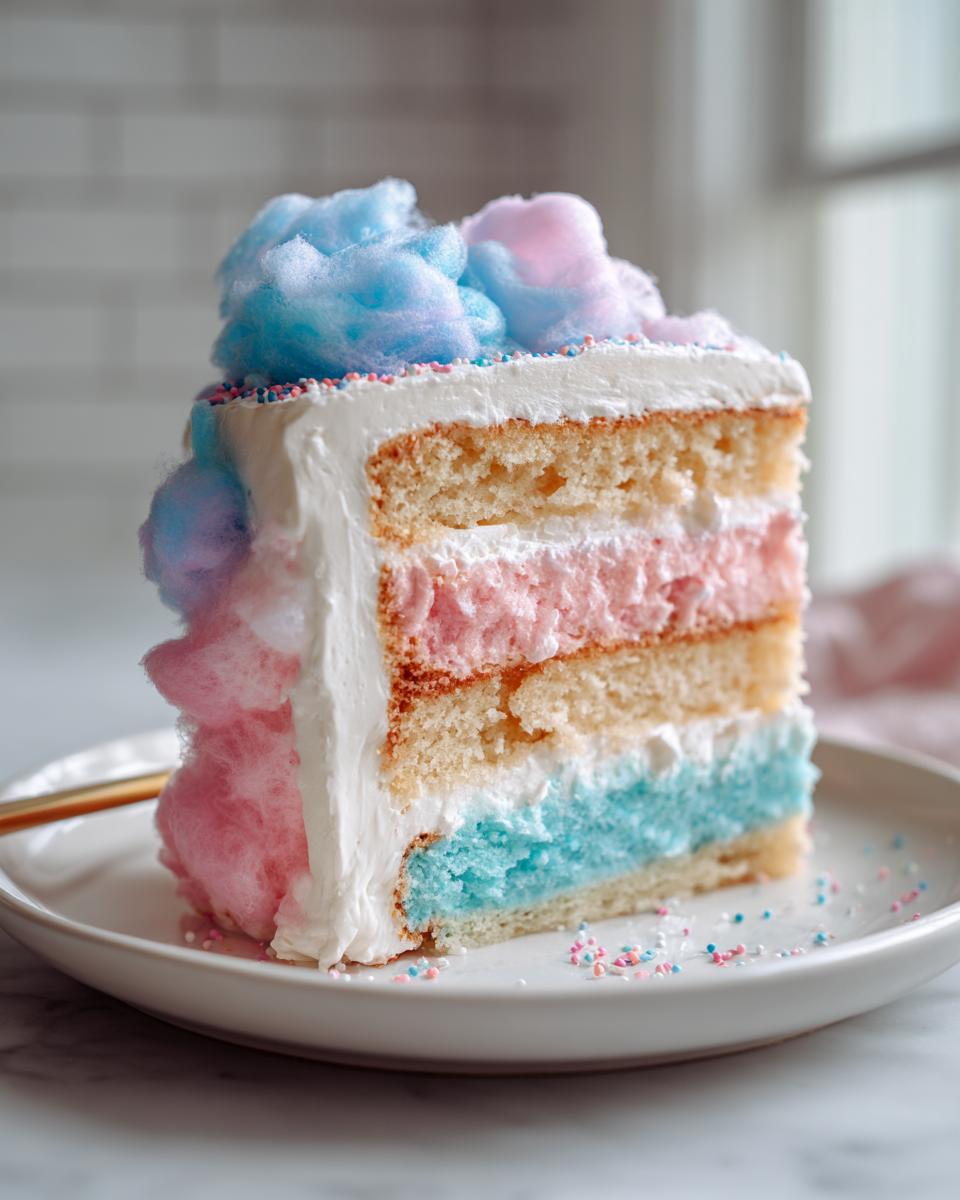
Time for the fun part! Start with a little dollop of frosting on your cake plate to anchor the first layer. Take one cooled layer and cover the top with a good, smooth layer of your plain white frosting. Place your second layer down, and cover that top with the blue frosting. Cap it off with the final layer, and now, cover the entire cake—top and sides—with the rest of the white frosting. This white “base coat” makes your pastel colors really pop later.

Grab your piping bags fitted with those cute star tips. Load the remaining pink and blue frostings into separate bags. Pipe pretty little borders or swirls around the top edge of the cake. This is where you get creative! Finally, just before you are ready to serve this spectacular creation, gently take handfuls of fresh, airy cotton candy and press it lightly onto the top and sides of the frosted cake. It’s that final touch that transforms it into a true showstopper celebration cake!
Ingredient Notes and Substitutions for Your Cotton Candy Frosting Recipe
I know that not everyone keeps specialty oils tucked away in the pantry, so let’s chat about the cotton candy flavoring in our **Cotton Candy Frosting Recipe**. If you can’t track down the oil, don’t panic! You can absolutely still make a successful cake; it will just taste like a sweet, gorgeous vanilla cake instead of the carnival treat. Just up that vanilla extract by an extra half teaspoon in the frosting.
Also, about the butter! I insist on using softened butter for the frosting because it creams up so much better than cold butter, ensuring you get that thick, luscious texture needed to pipe those pretty swirls. Stick to real butter here where you can—it beats margarine every time for the best flavor foundation. If you’re looking for other simple, sweet recipes that rely on quality fats, you should check out my guide on no-bake cookies; that texture is all about the right kind of melted fat!
Tips for Success: Making the Best Cotton Candy Cake Ever
Creating this **cotton candy cake** is all about nailing a few key moments in the process. I’ve made this too many times to count, and I’ve learned the hard way where you can afford to be careful and where you can afford to be fast! If you follow these little tricks, you’ll have the softest layers imaginable.
First big tip: Resist the urge to overmix the batter once you add the flour. Seriously, stop stirring the second you see the last streak of flour disappear into that colorful mix. Overmixing develops gluten, and we want fluffy, airy cake, not something tough! We are aiming for soft vanilla cake layers, not bread. If you feel like you’re fighting the urge to mix more dough, go read my latest posts on the blog while your batter rests—distraction works!

Next up is the frosting timing. Remember how I stressed that the cake must be completely cool? That’s step one. Step two is applying the topping. Because fresh cotton candy is basically spun sugar and air, it hates humidity and heat. Plan to frost your cake nicely, get it set up, and only put the actual cotton candy decoration on right before you bring it out to serve. If it sits for hours, you’ll end up with a puddle of sticky syrup instead of fluffy clouds. It needs to be a last-minute flourish for the best visual and texture!
Finally, embrace the casual nature of the pastel swirls. Don’t measure where you dollop the colors into the pan! The beauty of this layer cake lies in its slightly chaotic, random color distribution. Trying to make the pink and blue perfectly symmetrical takes time and often just results in muddier color separations. Trust the process and let the oven handle the blending!
Variations: Fun Party Desserts and DIY Pink and Blue Cake Ideas
While this **cotton candy cake** is pretty fantastic as a tall layer cake, I totally get that sometimes you need something that fits a different kind of party vibe. Baking is all about flexibility, and I love sharing little tweaks so you can customize this fun dessert for whatever celebration you’re hosting!
If you’re making a big batch for a crowd, skipping the layer assembly and making cupcakes is always a winner. Just fill those liners about two-thirds full with the colored batter—remember to still do the white, pink, and blue dollops to keep those fun pastel swirls inside, even in a mini format! They bake up so much faster, too; check them around the 18-minute mark.
Another thing that adds a little extra texture and surprise is incorporating sprinkles *inside* the batter. Before you divide it, you can gently fold about a quarter cup of those little colorful jimmies into the main white batch. When you divide and color, you’ll get fun little explosions of color within your pink and blue layers too! It really steps up the whimsical factor.
And if you can’t find that specific cotton candy flavoring, don’t fret. You can try swapping it out for a mix of almond extract and a tiny splash of raspberry or strawberry flavoring. It won’t be *exactly* the same nostalgic taste, but it still gives you a beautiful, fruity, sweet note that works perfectly with the vanilla base. If you’re looking for more clever uses for simple ingredients, my guide on making gorgeous candy apples has a few more fun flavor variations using extracts!
Storage and Serving Suggestions for Your Cotton Candy Cake
Okay, we’ve created this masterpiece, and now we need keep it looking perfect until showtime! The biggest thing to remember with this **cotton candy cake** is the topping. That beautiful, fluffy cloud of fresh cotton candy is basically sugar dust, and it is incredibly fragile, especially if your kitchen is even a tiny bit humid. If you put it on too soon, especially overnight, that glorious puff will weep into sticky syrup, and that is simply the saddest thing!
So, here is my absolute rule for serving: The cake layers and the frosting need to be ready well in advance, but the fresh cotton candy decoration is strictly last minute. Frost the entire cake beautifully and keep it covered loosely (don’t let plastic wrap touch the frosting!) in the refrigerator. This sets the frosting nicely and keeps everything stable. Then, about 15 to 20 minutes before you slice and serve, take your pink and blue fluff and gently nestle it right on top and on the sides.

This keeps your **Carnival Themed Dessert** looking spectacular. If you have leftovers (which is rare in my house, frankly!), you can store the cake, frosted but cake-only (no cloud topping!), in an airtight container in the fridge for up to three days. Just pull it out about an hour before you plan to eat any remaining slices to let the cake soften up a bit. If you still have some fresh cotton candy left, you can always add a little puff back on for the second day—but honestly, it’s nowhere near as good as that first time!
Frequently Asked Questions About This Cotton Candy Cake
I always get questions whenever I share this **cotton candy cake** recipe because people are worried they can’t master the look! Baking for celebrations should be fun, not scary, so here are the main things folks ask me about execution, flavor, and making substitutions.
Can I skip the cotton candy flavoring oil and still get a great flavor?
Yes, you absolutely can skip it! If you can’t find the oil or just prefer a milder taste, the cake will turn out tasting like a wonderfully soft vanilla cake. It will still be a beautiful, colorful **kid-friendly birthday cake**, even without that intense carnival pop. Just remember to add an extra little splash of vanilla extract to the frosting to keep that sweetness balanced. Don’t feel pressured to chase down exotic ingredients if you have beautiful vanilla on hand.
I only need a single layer cake; how do I adjust the recipe?
That’s a great question for a smaller gathering! If you only want a simple presentation, you can easily halve the entire recipe and bake it in one 8-inch or 9-inch round pan. Baking time will be slightly shorter, probably around 25 to 28 minutes, so really watch that toothpick test. You’ll have plenty of extra **cotton candy frosting recipe** components left over, but hey, that just means more delicious frosting for dipping spoons into later, right?
Can I use a store-bought cake mix to simplify this?
You certainly can take a shortcut if you’re short on time, and I won’t tell anyone! To make this a truly **no fuss cotton candy dessert**, start with a good quality white or vanilla cake mix. You’ll need to treat the mix according to the box directions, but here’s the key: when it says add water, substitute milk, and skip or reduce the oil the box calls for. Then, when you divide the batter for coloring, proceed just as instructed in the recipe above. You won’t get *quite* the same fluffy texture as the from-scratch version, but it will still look stunning!
Is this cake suitable for things like baby showers?
Definitely! This is one of my favorite **whimsical cake ideas** for baby showers or even spring parties. If you are aiming for a softer, almost ethereal look that isn’t strictly pink and blue, try using just one food coloring—maybe a soft lavender or mint green—instead of dividing it into three colors. It keeps the fluffy texture we love but gives you a more serene, elegant presentation. If you ever need tips on pairing this with the right wine for an adult celebration, feel free to reach out via my contact page!
Estimated Nutritional Data for This Kid Friendly Birthday Cake
Now, let’s be real for a second. When you are serving up a glorious, multi-layered, homemade *cotton candy cake* loaded with sweet buttercream, you aren’t strictly looking for a low-calorie option, are you? This is a **showstopper celebration cake**, after all! We bake these treats for joy.
However, for those of you who track macros or are just curious, I’ve put together some baseline estimates for one slice of this **kid-friendly birthday cake** based on the full recipe. Please remember, these numbers are purely estimations, and honestly, they will change depending on what brand of butter you use or how thick you spread that gorgeous frosting!
- Calories: Around 450 per slice. It is a rich dessert, so that sounds about right for a generous piece!
- Fat: Approximately 20g. That comes mostly from the wonderful, high-quality butter we use both in the cake and the frosting.
- Carbohydrates: Roughly 68g. Sugar is doing a lot of the heavy lifting here, as expected in a cake this sweet.
- Protein: Around 4g. Mostly coming from the milk and eggs we incorporated.
The main thing is that every bite is absolutely worth it. Whether you’re serving this as a weekend project treat or the centerpiece for a big birthday bash, enjoy it without guilt! That little bit of extra fat and sugar is what gives us that perfect, fluffy texture we worked so hard to achieve!
PrintThe Ultimate Fluffy & Easy Cotton Candy Layer Cake with Homemade Cotton Candy Frosting

Create a whimsical, fluffy cotton candy cake with pastel swirls and sweet frosting. This recipe is simple to follow and perfect for birthdays and celebrations.
- Prep Time: 35 min
- Cook Time: 30 min
- Total Time: 65 min
- Yield: 10 servings 1x
- Category: Dessert
- Method: Baking
- Cuisine: American
- Diet: Vegetarian
Ingredients
- 1 1/2 cups all-purpose flour
- 1 1/2 teaspoons baking powder
- 1/2 teaspoon salt
- 1 cup granulated sugar
- 1/2 cup unsalted butter, softened
- 2 large eggs
- 1 teaspoon vanilla extract
- 1/2 cup whole milk
- 1/4 teaspoon pink gel food coloring
- 1/4 teaspoon blue gel food coloring
- 1/2 teaspoon cotton candy flavoring oil (optional)
- For the Frosting:
- 1 cup (2 sticks) unsalted butter, softened
- 4 cups powdered sugar, sifted
- 1 teaspoon vanilla extract
- 1/4 teaspoon cotton candy flavoring oil
- 1–2 tablespoons heavy cream
- Pink and blue gel food coloring
- For Decoration:
- 1 cup store-bought cotton candy (pink and blue)
- Sprinkles (optional)
Instructions
- Preheat your oven to 350°F (175°C). Grease and flour two 8-inch round cake pans. Line the bottoms with parchment paper.
- In a medium bowl, whisk together the flour, baking powder, and salt. Set aside.
- In a large bowl, cream the softened butter and granulated sugar together until light and fluffy, about 3 minutes.
- Beat in the eggs one at a time, mixing well after each addition. Stir in the vanilla extract.
- Alternate adding the dry ingredients and the milk to the butter mixture, beginning and ending with the dry ingredients. Mix until just combined. Do not overmix.
- Divide the batter evenly into three separate bowls. Leave one bowl white. Add pink gel coloring and a few drops of cotton candy oil (if using) to the second bowl. Add blue gel coloring and a few drops of cotton candy oil to the third bowl. Mix each color gently until uniform.
- Spoon alternating dollops of the white, pink, and blue batters randomly into the prepared cake pans. Do not swirl with a knife; the colors will blend slightly during baking.
- Bake for 28 to 32 minutes, or until a toothpick inserted into the center comes out clean.
- Let the cakes cool in the pans for 10 minutes before inverting them onto a wire rack to cool completely.
- Prepare the frosting: Beat the softened butter until creamy. Gradually add the sifted powdered sugar, mixing on low speed until combined. Add vanilla extract, cotton candy flavoring oil, and heavy cream until the frosting is smooth and spreadable.
- Divide the frosting into three bowls. Color one bowl pink, one blue, and leave one white.
- To assemble, place one cooled cake layer on a serving plate. Spread a layer of white frosting over the top. Place the second layer on top and spread with blue frosting. Top with the final layer and cover the entire cake with the remaining white frosting for a base coat.
- Divide the remaining pink and blue frosting into separate piping bags fitted with a star tip. Pipe swirls or decorative borders around the top edge of the cake.
- Just before serving, gently press or place handfuls of fresh cotton candy over the top and sides of the cake for a whimsical finish. Add sprinkles if desired.
Notes
- For the best pastel effect, use gel food coloring instead of liquid drops.
- If you skip the cotton candy flavoring oil, the cake will taste like vanilla, but it will still look like a cotton candy cake.
- This cake is best served the day it is frosted, as the cotton candy topping will dissolve over time.
- If you are planning your weekly meals, this dessert is a great centerpiece for a fun party menu, though it does not fit well with strict meal planning regimens like those associated with weight loss programs.
Nutrition
- Serving Size: 1 slice
- Calories: 450
- Sugar: 65
- Sodium: 250
- Fat: 20
- Saturated Fat: 12
- Unsaturated Fat: 8
- Trans Fat: 0.5
- Carbohydrates: 68
- Fiber: 1
- Protein: 4
- Cholesterol: 65