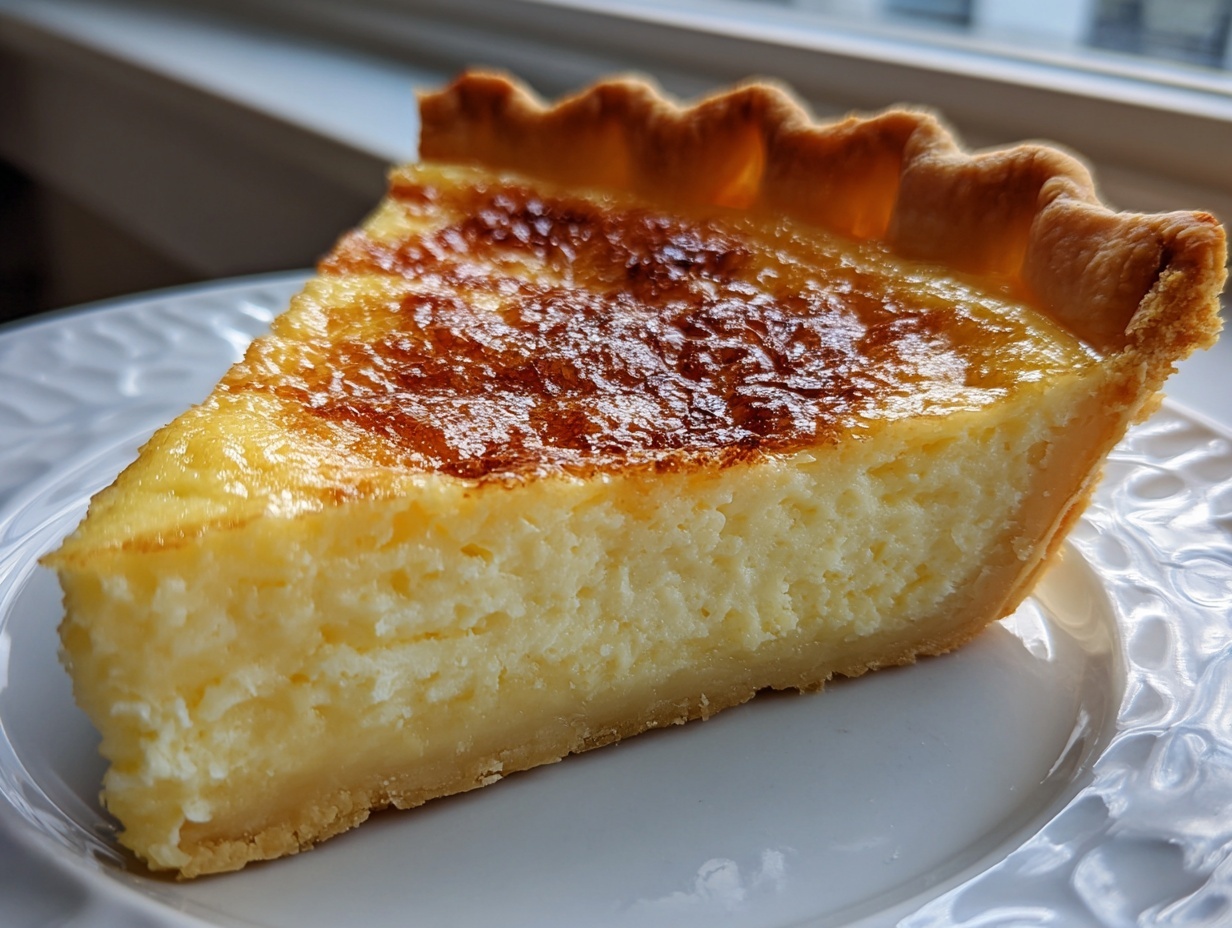

There is just something about a truly classic, homemade dessert that centers everything, isn’t there? When the holidays roll around or I simply need a taste of pure comfort, nothing rivals a beautiful slice of baked custard. That’s why I’m so thrilled to share my very best Old Fashioned Creamy Vanilla Custard Pie. If you, like me, have been scarred by dry textures or those awful cracks radiating across the top, you can breathe a sigh of relief. This recipe, developed through my culinary training and a deep commitment to reliable home cooking, guarantees that silky, velvety smooth final result you dream about when you think of a perfect custard pie. You can learn more about my philosophy on accessible, elegant recipes over at my About Page—but right now, let’s get this perfect pie in the oven!
- Why This Old Fashioned Custard Pie Recipe Works (The Secrets to Silky Texture)
- Ingredients for Your Classic Custard Pie Recipe
- How to Prepare the Best Custard Pie Filling
- Baking Silky Custard: Step-by-Step Instructions for Your Custard Pie
- Cooling and Chilling for the Ultimate Creamy Egg Custard Pie
- Tips for Making Traditional Pie Recipes a Holiday Pie Success
- Serving Suggestions for Your Nostalgic Baked Goods
- Frequently Asked Questions About This Easy Homemade Custard Pie
- Nutritional Estimates for This Simple Vanilla Pie
Why This Old Fashioned Custard Pie Recipe Works (The Secrets to Silky Texture)
I know the main reason people skip making a classic custard pie at home: the fear factor! Nobody wants to pull out a beauty, only to see it’s cracked like dry earth. Over the years, I’ve figured out the gentle chemistry needed to keep that filling impossibly smooth and creamy. This isn’t just guesswork; it’s about controlling the temperature and the mixing motions. When you follow these keys, you get a slice that truly melts in your mouth.
Trust me, once you master these simple adjustments, you’ll be whipping up this gorgeous dessert for every gathering. For more tips on foundational techniques that make cooking approachable, don’t forget to check out my general Blog!
Gentle Mixing for a No Crack Custard Pie
This is rule number one for achieving that beautiful, unblemished surface. When you whisk your eggs, you are actually trying to incorporate as little air as possible. Too many air bubbles trapped in the mixture rise to the top during baking and then pop, leaving those dreaded fissures everywhere. I use just a standard whisk and mix only until the yolks and whites are smoothly combined. If bubbles sneak in, take a spoon and gently skim them off the surface before you even think about pouring it into the crust!
The Perfect Baking Temperature for Creamy Egg Custard Pie
Heat is the enemy of silkiness here. If you blast your filling with high heat, the proteins in the eggs cook too fast and shrink, which causes that rubbery texture and the inevitable cracking. That’s why we set the oven to a gentle 350°F. This moderate temperature allows the heat to gently penetrate the crust and slowly cook the dairy and egg mixture all the way through. This slow, even bake ensures that your creamy egg custard pie sets beautifully without scrambling or breaking apart.
Ingredients for Your Classic Custard Pie Recipe
The beauty of this old fashioned dessert pie is how simple the ingredient list truly is—it’s all about using fresh pantry staples correctly. You don’t need a ton of fuss here, just good quality items. We are keeping this recipe straightforward to ensure it qualifies as an easy homemade custard pie for any weeknight or holiday rush.
Here is exactly what you’ll need for the filling:
- 1 (9-inch) unbaked pie crust (I prefer aiming for a good from scratch pie crust, but don’t panic if you need to use a quality store-bought one!)
- 1 1/2 cups whole milk (full fat is essential for richness)
- 3 large eggs, no need to separate them
- 3/4 cup granulated sugar
- 1 teaspoon pure vanilla extract
- A tiny pinch of salt to wake up the sweetness
- 1/4 teaspoon ground cinnamon, reserved for dusting later
If you’re looking for that foundational flaky crust, you can explore my favorite techniques for making one over in my Desserts section—but honestly, this filling is the star of the show.
Crust Considerations for This Simple Vanilla Pie
Since we are not pre-baking this crust, it needs to be structurally sound. If you are making your own from scratch pie crust, make sure it’s chilled well before you fill it. If you opt for a store-bought version, just pull it straight from the freezer or fridge and gently ease it into the plate. Remember, we want a sturdy vessel for our liquid filling but nothing that will fight us when it comes time to slice! We are aiming for that contrast: crunchy crust and that smooth, unset center.
How to Prepare the Best Custard Pie Filling
Okay, now that we have our ingredients ready to go, getting this silky filling mixed up is surprisingly quick—seriously, this is where the ‘quick custard pie‘ nickname comes from! Remember what I said about gentle mixing? We are applying that principle right now. Start by taking your three eggs in a medium bowl and just whisk them until they are uniform and smooth. And I mean *gently*! We are not making scrambled eggs here; we are aiming for integration, not aeration.
Once they look nicely blended, whisk in your sugar and that tiny pinch of salt. Then, slowly stream in the milk and the vanilla extract. Stirring slowly here helps marry everything together without whipping air in. After you think you’re done stirring, give the surface a good look. If you see even a few little bubbles lurking, just grab a spoon and skim them right off the top. This one small act is crucial for producing that flawless topside on your final custard pie. Trust me, taking this extra minute will save you so much heartache later! If you’re looking for some other comforting baked treats, you can check out my recipe for Pumpkin Bread Pudding next.
Baking Silky Custard: Step-by-Step Instructions for Your Custard Pie
Alright, the filling is in the unbaked shell. It looks beautiful and liquid—and now, we enter the most critical stage where we turn liquid into that dreamy, silky custard! My process relies on patience, which is the secret sauce for any baked dessert, especially a delicate one like this custard pie.
First things first: get your oven at 350°F. We are baking low and slow. Place your pie dish right in the center rack. This placement is exactly where the heat distribution is most reliable, which is necessary if you want a perfectly set filling without overheating the base.
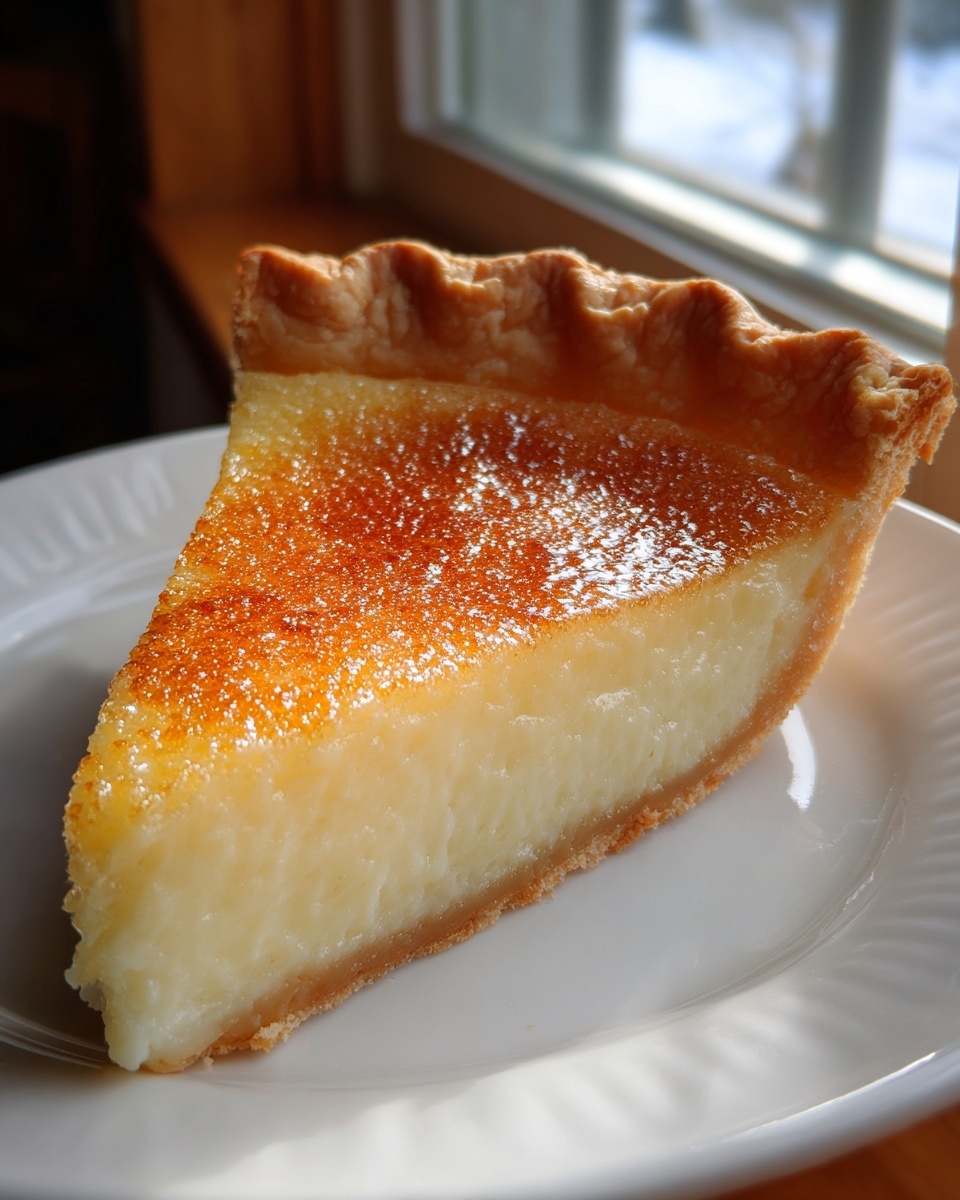
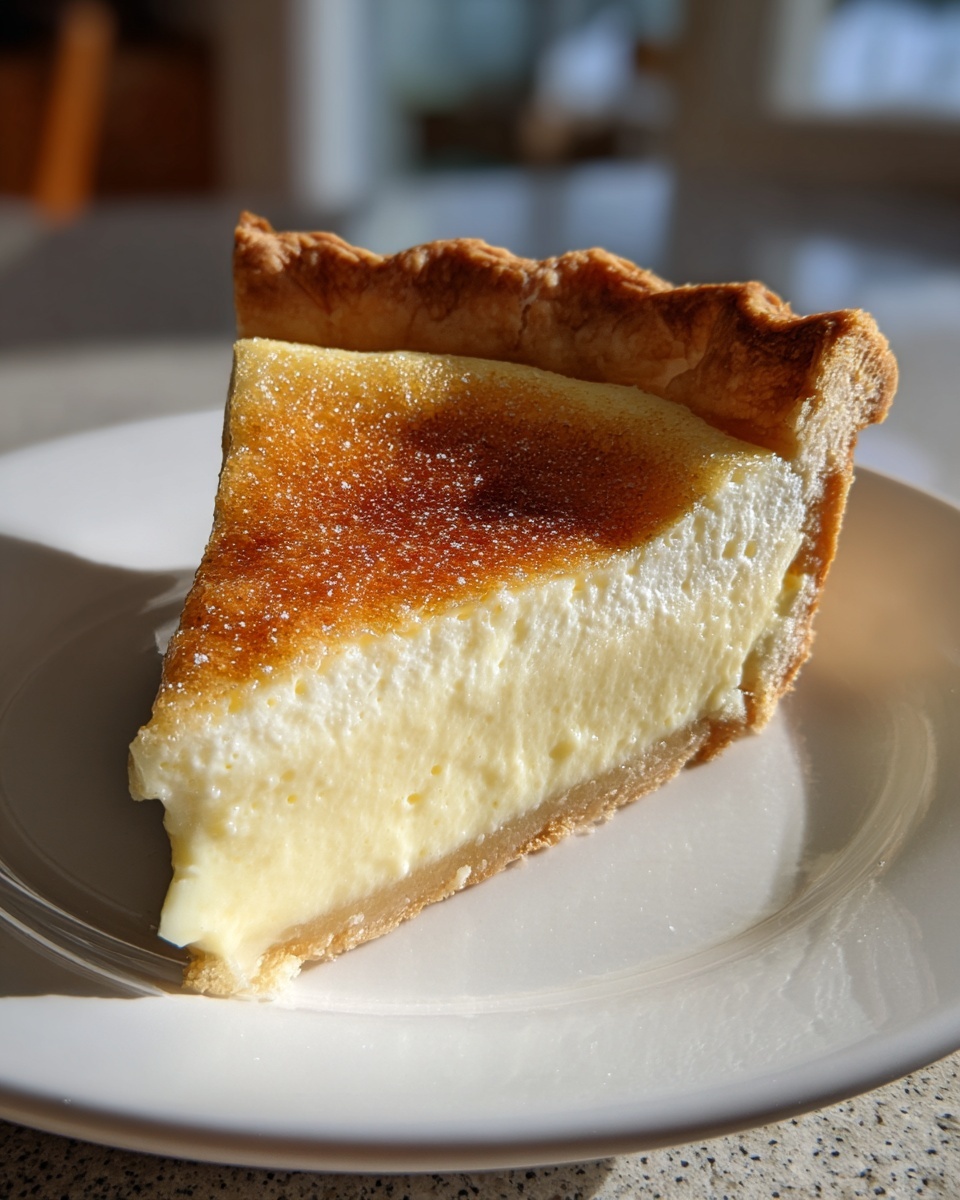
Now for the timing. We need to bake this for about 40 to 50 minutes total. How do you know when it’s done? This is the visual cue that separates the pros from the panicky bakers. You want the edges of the custard to look completely set—no wobbling there. But the absolute center? It should still have a tiny, delicate jiggle, almost like very firm gelatin. If the whole thing looks solid, it’s overdone!
Here is the most important part for protecting your crust integrity: Around the 25-minute mark, you must check the rim of the pie. If it’s starting to look golden brown, take a small piece of aluminum foil and loosely drape it over the edges. This shields the crust from browning too fast while the center finishes cooking. It guarantees you won’t end up with a burnt edge on your perfect custard pie. Trust me on this step; it’s a game-changer for getting a flawless presentation. If you are trying to find companion recipes for your dinner spread, my thoughts on baking Apple Dump Cake might inspire you!
Cooling and Chilling for the Ultimate Creamy Egg Custard Pie
The oven is off, and you’re tempted to cut into that gorgeous pie immediately—I know the feeling! Resist that urge with everything you have! This step is just as important for getting that incredible structure in your creamy egg custard pie. If you try to slice it warm, it will absolutely fall apart on the knife because the custard hasn’t had time to fully set up its structure.
When you remove the pie, set it carefully on a wire rack and just let it be for about two full hours at room temperature. This initial slow cool down is vital. Once it’s lost that initial oven heat, transfer the entire custard pie into the refrigerator. You absolutely must chill it for a minimum of four hours, but honestly, overnight is even better!
This extended chill time firms up the proteins, ensuring every slice is picture perfect and truly lives up to the promise of baking silky custard. If you’re looking for some fantastic no-bake options for when you just can’t wait, check out my easy No-Bake Cookies!
Tips for Making Traditional Pie Recipes a Holiday Pie Success
Now that you’ve mastered this classic custard pie recipe, let’s talk about making sure every slice of your holiday pie recipes collection is a showstopper. The biggest success factor, honestly, is temperature management, both in baking and serving. Remember, achieving that silky mouthfeel means you need to serve this pie chilled. It just sets up beautifully when it’s cold, making those slices easy to lift!
The simple vanilla flavor in this pie is versatile, but sometimes I like a little spice. Just before serving, that light dusting of cinnamon I mentioned earlier really elevates it, making it feel more like an old fashioned dessert pie. If you want to see how other great cooks approach similar desserts, checking out some adaptations, like the Pioneer Woman’s take, can be inspiring! You can see one popular version right here.
Stick to these careful cooling steps, and you’ll find that these traditional pie recipes are less intimidating than you thought. Don’t forget to pair it with something warm, maybe even a slice of my Pumpkin Coffee Cake for breakfast the next day!
Serving Suggestions for Your Nostalgic Baked Goods
When you finally pull that perfectly smooth, chilled custard pie out of the fridge, it deserves the right stage performance! Since this is such a pure, classic flavor—that lovely blend of sweet milk, vanilla, and maybe a hint of cinnamon—we want accompaniments that enhance, not overpower it. Keep it simple; that’s the mark of truly elegant home baking.
I mentioned it before, but that final dusting of cinnamon right before you bring it to the table is non-negotiable for me. It adds that lovely warmth that makes people instantly think of cozy, nostalgic baked goods. If you want something a bit richer on the side, a tiny dollop of unsweetened, freshly whipped cream is divine. It cuts through the richness perfectly.
For that slightly more festive touch, a light drizzle of homemade caramel sauce works wonders, but use it sparingly! You don’t want the sauce to overwhelm the delicate vanilla notes. If you’re inspired to make a batch of amazing caramel to go alongside your next dessert, you must try my recipe for Caramel Popcorn—it uses a similar buttery base!

Frequently Asked Questions About This Easy Homemade Custard Pie
I always get so many questions about making sure this delicate beauty turns out perfectly—it’s totally normal when working with baked fillings! My goal with this easy homemade custard pie is simplicity paired with foolproof results, so let’s tackle the few things folks worry about most when preparing their pie.
If you’d like to explore some non-pie comfort food next, my soup recipes, like the one for Chicken Gnocchi Soup, are always reliable hits!
Can I use evaporated milk instead of whole milk in the custard pie?
You absolutely can, and many older, traditional pie recipes call for it! If you swap whole milk for evaporated milk, you’ll need to dilute the evaporated milk with an equal amount of water to return it to the correct liquid volume. This substitution generally yields a satisfyingly creamy egg custard pie, but whole milk just gives a cleaner, richer vanilla base, which I prefer for this version.
How do I know when the custard pie is fully baked?
This is the critical moment that dictates success! Forget the toothpick test for this recipe; we are looking for movement. When you gently nudge the side of the pie dish (carefully, grab the edges!), the outer two inches of the filling should look set and firm. However, right in the center, you need to see a slight, gentle wobble—that signature jiggle. If you see that movement, take it out immediately! The residual heat will finish cooking it as it cools, locking in that perfect, plush texture for your creamy egg custard pie.
Nutritional Estimates for This Simple Vanilla Pie
I always want to give you a full picture when you’re making something special at home, even for classic comfort recipes like this custard pie. Now, the precise nutritional breakdown can shift a little depending on the size of your eggs or if you use a store-bought crust versus a homemade one. So, please take these numbers as a fantastic guideline based on standard ingredients.
These estimates are calculated per generous slice (based on 8 servings) for this simple vanilla pie:
- Calories: Approximately 320
- Total Fat: Around 16g (with about 7g saturated fat)
- Carbohydrates: Roughly 35g
- Protein: About 9g
- Sugar: I see about 28g here, mostly from the milk and sugar we added
- Cholesterol: Around 110mg
The good news is that this dish offers a decent little protein boost thanks to the three eggs we use. If you’re looking for something savory to pair with this dessert, you might want to check out my comforting Zuppa Toscana Soup Recipe for dinner first! Remember, these are estimates, but they show you what a wonderfully satisfying slice of home baking this really is!
PrintOld Fashioned Silky Creamy Custard Pie

Create a classic, old-fashioned egg custard pie with a velvety smooth vanilla filling. This simple recipe focuses on techniques to guarantee a no-crack, creamy dessert perfect for holidays or comfort.
- Prep Time: 15 min
- Cook Time: 50 min
- Total Time: 65 min
- Yield: 8 servings 1x
- Category: Dessert
- Method: Baking
- Cuisine: American
- Diet: Vegetarian
Ingredients
- 1 (9-inch) unbaked pie crust, from scratch or store-bought
- 1 1/2 cups whole milk
- 3 large eggs
- 3/4 cup granulated sugar
- 1 teaspoon pure vanilla extract
- 1/4 teaspoon ground cinnamon (optional, for dusting)
- Pinch of salt
Instructions
- Preheat your oven to 350°F (175°C). Place the unbaked pie crust into a 9-inch pie plate. Do not pre-bake the crust.
- In a medium bowl, whisk together the eggs until they are completely blended. Do not over-whisk, as this incorporates too much air, which can cause cracks.
- Add the sugar and salt to the eggs and whisk gently until just combined.
- Slowly pour in the milk and vanilla extract, stirring until the mixture is uniform. Skim off any visible bubbles from the surface using a spoon.
- Pour the custard filling carefully into the unbaked pie shell.
- For a creamy, no-crack result, place the pie on the middle rack of the oven. Bake for 40 to 50 minutes. The edges should be set, but the center should still have a slight jiggle when gently shaken.
- To prevent the crust edges from burning, cover them loosely with aluminum foil halfway through baking, around the 25-minute mark.
- Remove the pie from the oven. Let it cool completely on a wire rack at room temperature for at least 2 hours. The center will firm up as it cools.
- Once fully cooled, chill the pie in the refrigerator for at least 4 hours before slicing. Dust the top lightly with ground cinnamon just before serving, if desired.
Notes
- To achieve a silky texture, avoid beating the eggs vigorously. Gentle mixing keeps air incorporation low, which is key to preventing cracks.
- Bake the pie in a moderate oven (350°F). High heat cooks the edges too fast, leading to separation and cracking.
- If you notice the top browning too quickly, place a sheet of parchment paper loosely over the pie for the remainder of the baking time.
- This pie tastes best when served chilled, allowing the custard structure to fully set.
Nutrition
- Serving Size: 1 slice
- Calories: 320
- Sugar: 28
- Sodium: 210
- Fat: 16
- Saturated Fat: 7
- Unsaturated Fat: 9
- Trans Fat: 0
- Carbohydrates: 35
- Fiber: 1
- Protein: 9
- Cholesterol: 110