
You know those moments when you can’t decide between a rich, decadent brownie and a satisfyingly chewy cookie? Well, I used to struggle with that choice constantly! That’s why I spent ages perfecting what I now call the ultimate indulgence: brownie cookies. These aren’t just ordinary cookies; they capture that incredibly dense, fudgy interior of a classic baked brownie but offer the perfect chew around the edges. If you’re like me and appreciate beautiful baked goods that don’t require a ton of fussy steps, you are going to adore this recipe. We are making these from scratch, and I promise you will achieve that beautiful, signature crinkly, shiny top that looks like it came straight from a high-end bakery.
- Why You Will Love These Fudgy Brownie Cookies
- Essential Ingredients for Perfect Brownie Cookies From Scratch
- Steps to Make Easy Brownie Cookies
- Tips for Success Making Gourmet Brownie Cookies
- Variations for Your Brownie Cookies
- Storage and Making Ahead Brownie Cookies
- Frequently Asked Questions About Brownie Cookies
- Estimated Nutrition Data for These Brownie Cookies
- Share Your Homemade Chocolate Dessert Creations
Why You Will Love These Fudgy Brownie Cookies
Honestly, these treats hit every single mark a chocolate lover could want. I developed this recipe so you get premium results with very little fuss—perfect for when you need a truly special sweet treat fast.
- Speedy Perfection: We get these ready for the oven in about 15 minutes, making them a fantastic quick chocolate dessert for any sudden craving.
- The Perfect “Brookie” Balance: They manage to be incredibly rich without being heavy, achieving that sought-after hybrid texture.
- Impressive Finish: The tops look absolutely stunning, making them worthy of your next gathering.
Texture and Flavor Profile of Our Brownie Cookies
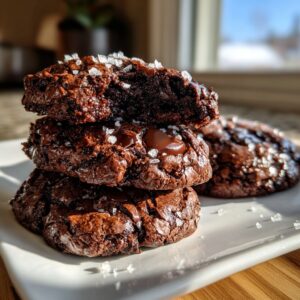
The absolute goal here is supreme fudginess in the center, paired with just the right bite of chewiness around the edges. When you bite into one of these **brownie cookies**, you get intense, deep chocolate flavor that feels gourmet, but without having to bake a full pan of standard brownies.
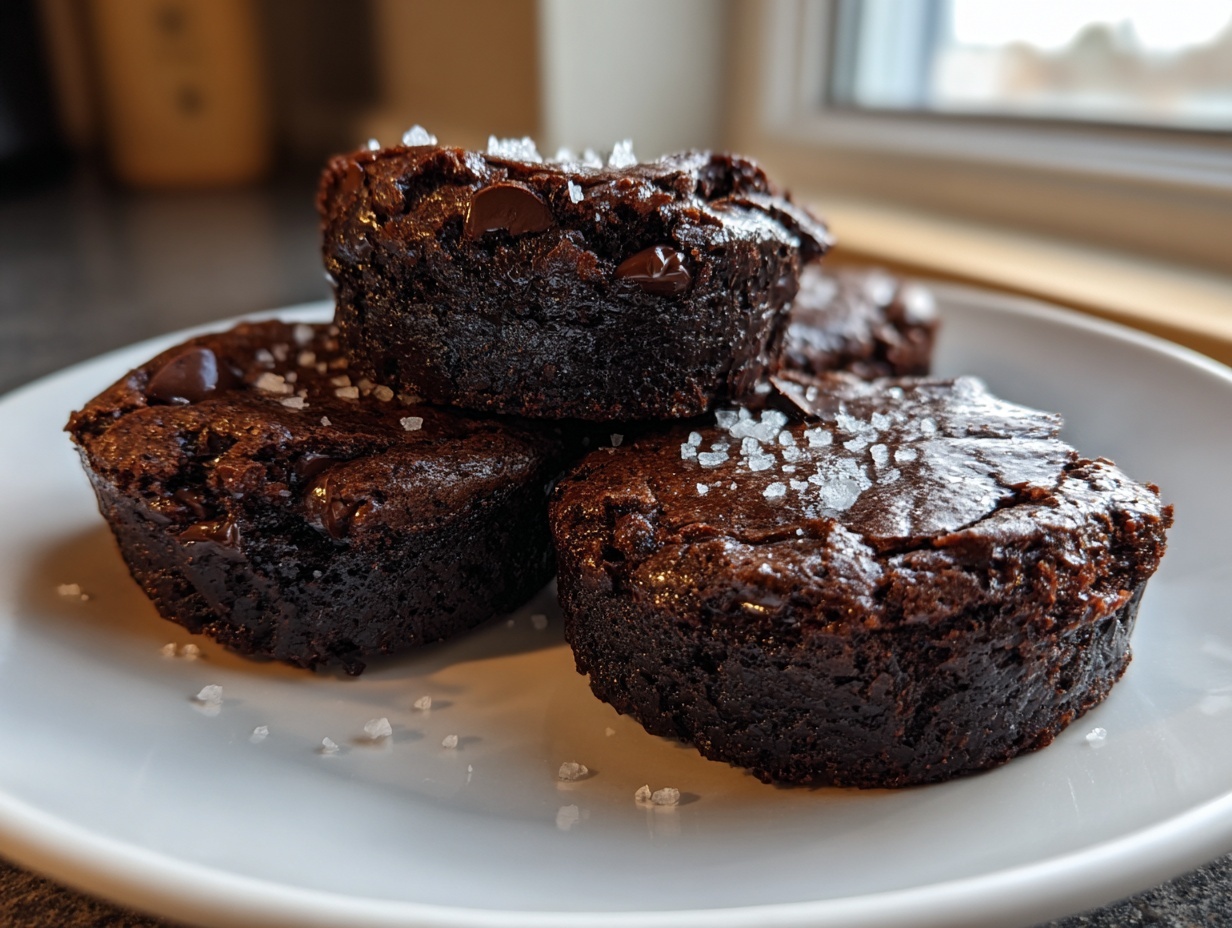
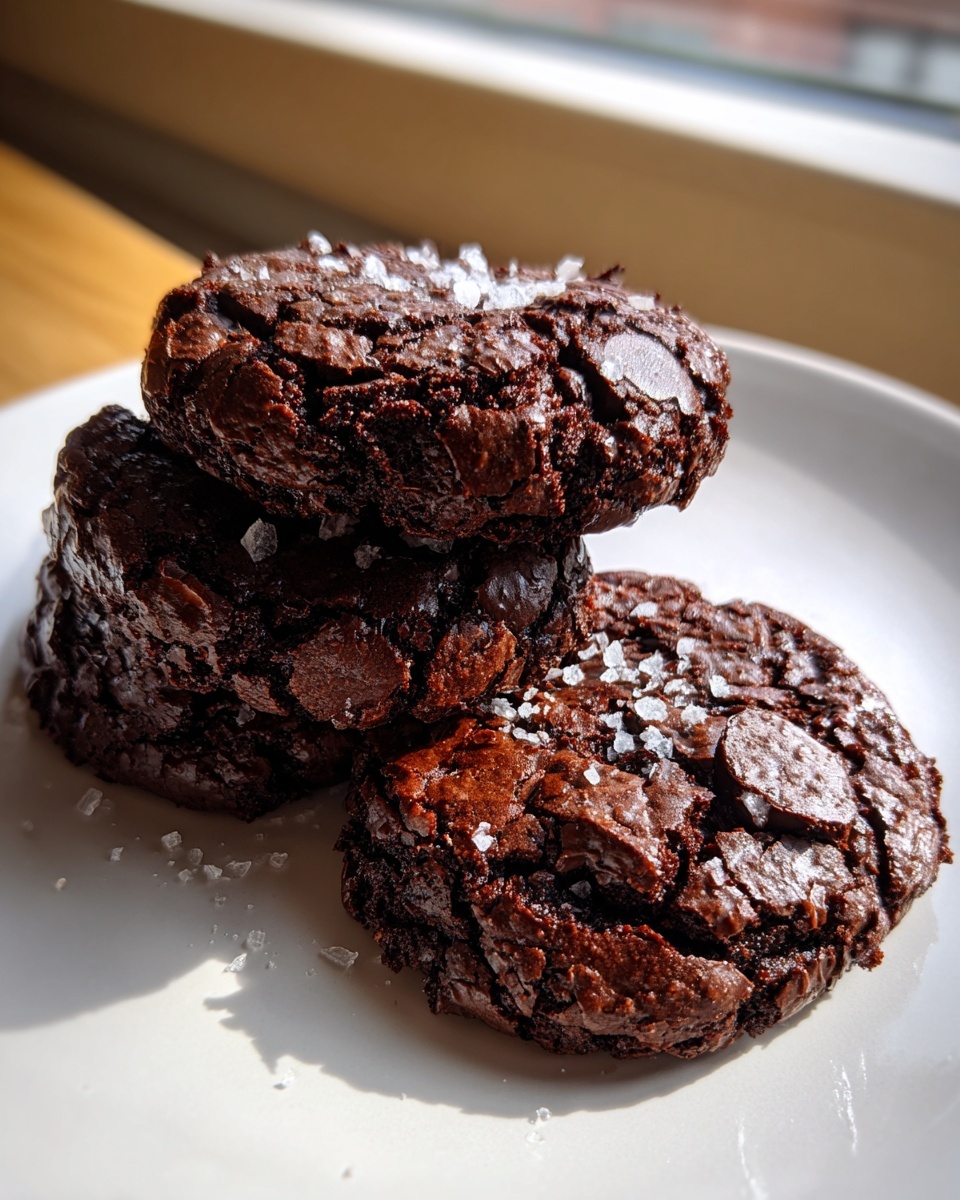
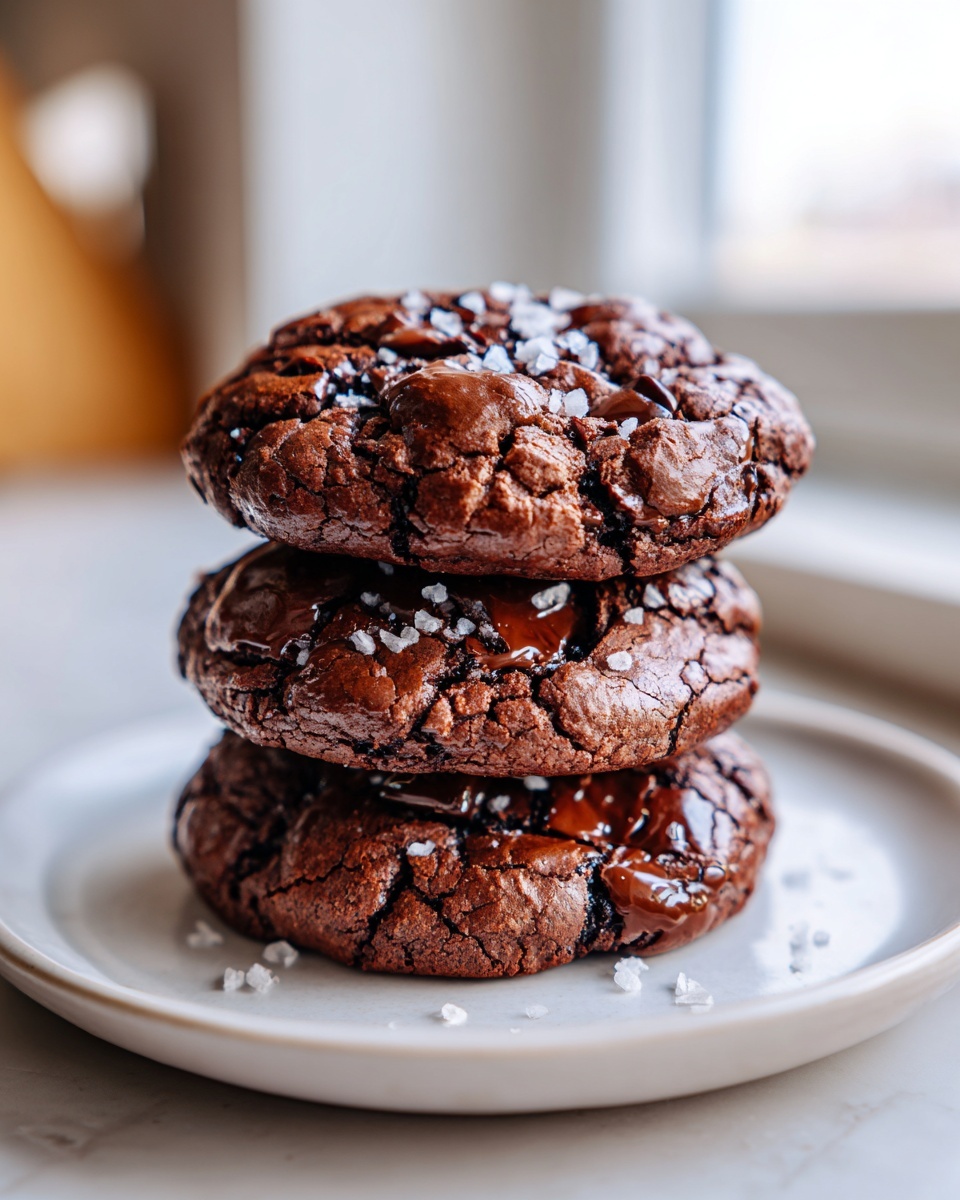
Achieving the Signature Crinkly Top Cookies
This is my favorite part! That shiny, crackly shell on top of the best **brownie cookies** happens because of the high ratio of both melted butter and sugar that we beat together early on. When done correctly, that glistening sheen seals in all that gooey goodness underneath. These **Crinkly Top Cookies** are the sign of a baker who knows her chocolate!
Essential Ingredients for Perfect Brownie Cookies From Scratch
Creating something this magnificent—a true **gourmet brownie cookie**—relies entirely on starting with the best ingredients. I learned early on that substituting quality fats and cocoa just isn’t worth the risk when you’re aiming for that bakery style. Everything here works together to achieve that deep, dark chocolate color and that luscious feel.
For instance, notice we use both granulated and brown sugar; the brown sugar is essential for that signature chewiness and moisture we crave. Please make sure your eggs are at room temperature; it helps them emulsify better with the melted butter, which is key for the texture!
Here is what you’ll need for about 18 delicious homemade chocolate cookies:
- 1 cup (2 sticks) unsalted butter, melted
- 1 1/2 cups granulated sugar
- 1 cup packed light brown sugar
- 2 large eggs, room temperature
- 1 tablespoon vanilla extract
- 3/4 cup unsweetened cocoa powder, natural or Dutch-process
- 1 teaspoon baking powder
- 1/2 teaspoon salt
- 1 1/4 cups all-purpose flour
- 1 cup semi-sweet chocolate chips (plus a few extra for topping!)
- Flaky sea salt, for finishing
My little expert tip: When it comes to cocoa powder, I highly recommend Dutch-process here. It gives a deeper, smoother chocolate flavor compared to natural cocoa, which keeps your **brownie cookies** tasting rich and intense rather than slightly acidic.
Steps to Make Easy Brownie Cookies
The beauty of these **Easy Brownie Cookies From Scratch** is that the mixing is very straightforward—no stand mixer fuss required! Get your oven warmed up to 350°F (175°C) and line those baking sheets with parchment paper first. Trust me, cleanup is half the fun when everything slides right off. If you need a reminder on chocolate bases, check out my thoughts on chocolate cupcakes recipe for general technique!
The steps are simple, but consistency is what gets you that stunning result. Follow this order, especially when adding the dry stuff, and you’re golden.
- First, we focus on the base: Whisk that melted butter together enthusiastically with both the granulated sugar and the packed brown sugar. You want them happy and combined before moving on.
- Next, beat in your room-temperature eggs one by one until they disappear, followed by that splash of vanilla extract.
- Now for the dry mix: In a separate bowl, just whisk your cocoa powder, baking powder, and salt together really well. This stops us from having any weird salty or bitter pockets later!
- Gradually stream the dry ingredients into the wet mixture. Mix this slowly, maybe just by hand or on the lowest mixer speed, just until you see everything come together. Seriously, stop mixing once the flour streaks vanish!
- Fold in your cup of semi-sweet chocolate chips—don’t stir them too much!
- Scoop your dough onto the lined sheets, leaving a nice 2-inch space between each mound. Then, press a few extra chips right on top of each dough ball.
- Bake for that magic window of 10 to 13 minutes.
- Pull them out, immediately sprinkle them with flaky sea salt—don’t skip this!—and let them hang out on the hot pan for 5 minutes before moving them to a cooling rack.
Mixing the Wet and Dry Components for Brownie Cookies
When we are dealing with cocoa powder, we have to be careful not to invite too much air that would make us Cakey Cookies instead of our desired fudgy delights. The key here? Once the flour and cocoa hit the butter mixture, you switch to gentle folding. You are trying to bring the ingredients together, not develop the gluten structure. If you mix too hard or too long at this stage, you lose the density that makes these **brownie cookies** taste like a dense brownie.
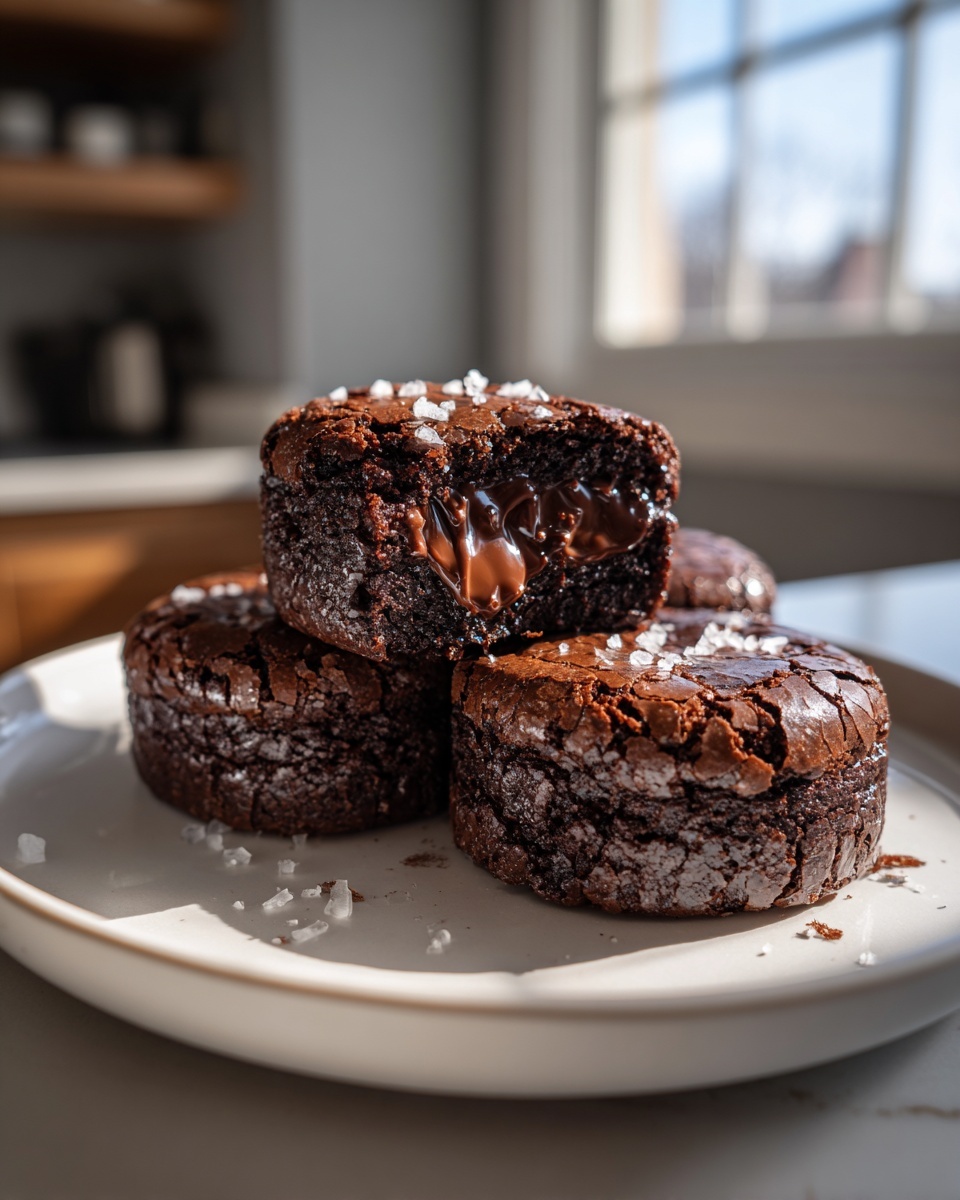
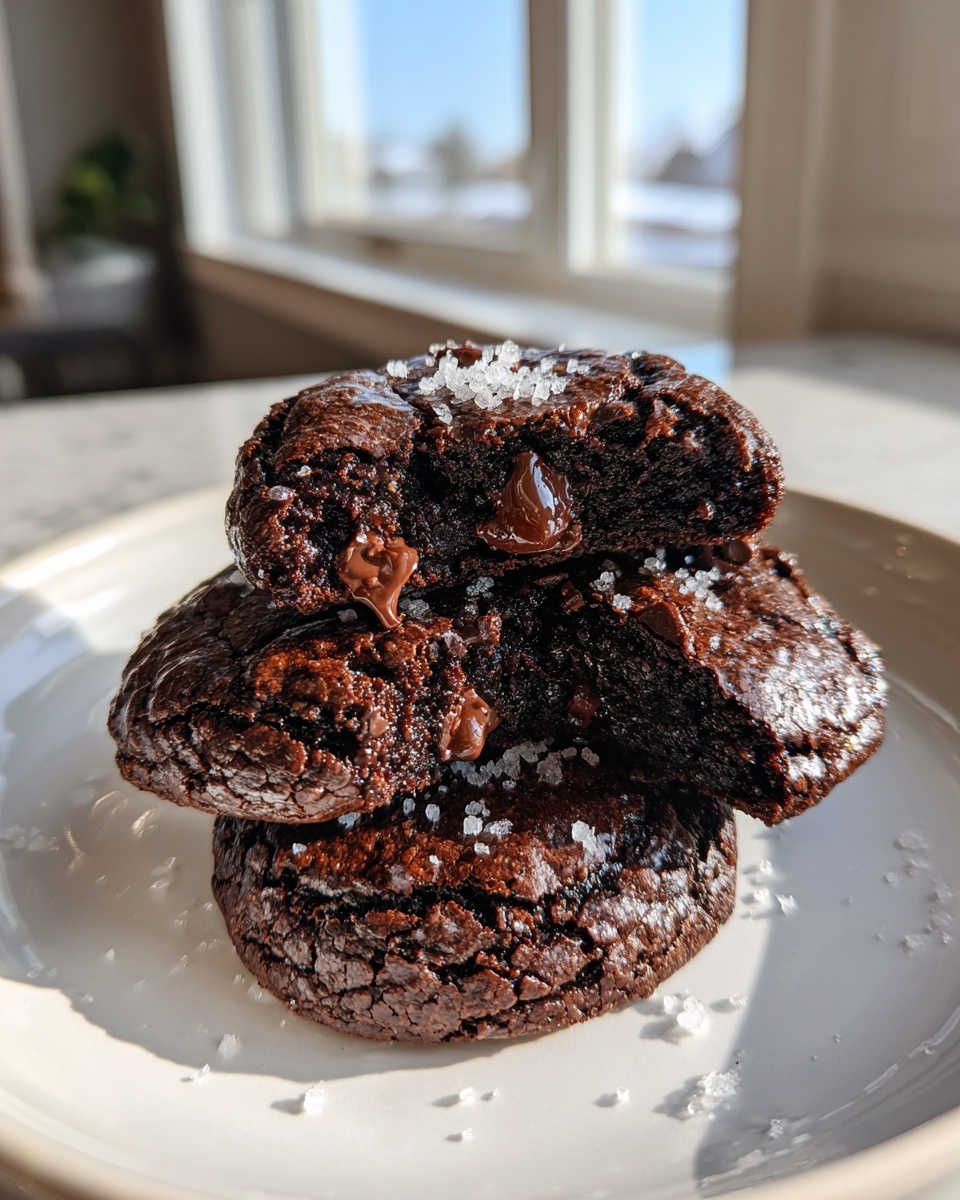
Baking and Cooling for Chewy Chocolate Cookies Texture
When you check them around the 10-minute mark, they should look like they are *just* done. That means the edges look firm, but the center is still glossy and slightly soft—almost wet looking. This is crucial for authentic, soft and gooey **brownie cookies**! If you wait until the middle looks baked, you’ve gone too far. Those 5 minutes resting right on the hot sheet pan are what finishes setting that interior to that perfect fudgy state. This cooling process is non-negotiable if you want amazing **Chewy Chocolate Cookies**!
Tips for Success Making Gourmet Brownie Cookies
When you are aiming for that bakery-style perfection in your **brownie cookies**, a few details really separate a good batch from an absolutely unforgettable one. I always refer back to my tried-and-true notes to ensure I nail that signature texture every single time. It’s about honoring the process, even when we are aiming for speed!
First, let’s talk about being under the slightest bit heavy-handed with the heat. Remember what I said about checking them at 10 minutes? You must resist baking them until they look completely solid. If you overbake these, you lose that gooey, fudgy interior entirely, and you end up with a simple chocolate cookie, not a glorious **brownie cookie**. They firm up significantly as they cool on the pan—that 5-minute resting period is non-negotiable science!
If you find your dough feels a bit too soft when you go to scoop it, or perhaps you want even thicker cookies, try chilling it for half an hour. This solidifies the fat just enough so the cookies hold their shape better while baking. You might need an extra minute or two in the oven, but the resulting thickness is worth it. For a truly deep, sophisticated flavor that feels incredibly gourmet, try swapping half your semi-sweet chips for high-quality dark chocolate chips. It adds such a lovely dimension to the overall taste of these chocolate chip cookie brownie bars!
Variations for Your Brownie Cookies
While I absolutely stand by the pure, unadulterated chocolate perfection that is the original recipe, sometimes we just need to mix things up, right? That’s the joy of baking at home! Since this base batter is so rich and forgiving, it takes mix-ins beautifully, turning our basic **brownie cookies** into something truly custom.
If you want to elevate these even further, forget just milk chocolate chips. Try mixing in 1/4 cup of chopped toasted pecans or walnuts for a lovely little crunch that plays perfectly against the gooey texture. Or, if you’re feeling extra decadent—and I highly recommend this—swirl in a teaspoon of creamy peanut butter right before you bake each mound. It creates this gorgeous, marbled effect!
Remember what I said about swapping half the chips for dark chocolate? That’s my top recommendation because the intensity really cuts through the richness. When you’re ready for even more creative chocolate fun, check out my recipe for those dramatic spider web brownies for a truly show-stopping centerpiece!
Storage and Making Ahead Brownie Cookies
One of the best things about these **brownie cookies** is that they actually get better as they rest, provided you store them correctly! To maintain that beautiful fudgy center versus drying out, you must keep them in an airtight container at room temperature. Forget the fridge; it can sometimes speed up the hardening process.
They easily keep well for three to four days, which is great for portion control—or *not* having to bake a new batch every single day! If you need to make them ahead of time for a party, they freeze beautifully. Just make sure they are completely cooled first, layer them between sheets of parchment paper in a freezer-safe bag, and they’ll last about a month. When you want to enjoy them, just pull them out and let them thaw on the counter for an hour or so. They’ll be just as soft and gooey as when they first came out of the oven. For more make-ahead favorites, you might enjoy my tips on no-bake cookies!
Frequently Asked Questions About Brownie Cookies
It’s totally normal to have questions when you’re trying a new recipe, especially one as rich as this! I want every single batch of your **brownie cookies** to be a total success, so let’s clarify a few things I hear often from people trying out this hybrid favorite for the first time.
How do I ensure my brownie cookies are fudgy and not cakey?
This is the million-dollar question! To keep your **brownie cookies** perfectly fudgy, the secret lies in the fat and the bake time. First, you must use melted butter—no exceptions! This instantly gives you that dense brownie element. Second, resist the urge to bake them until a toothpick comes out totally clean. If your edges look set and the center is still glossy, they are done. They firm up as they cool down, ensuring that gooey interior remains intact.
Can I use a boxed brownie mix to make these brownie cookies?
I know the ease of a good mix is tempting! You absolutely *can* make cookies using a boxed mix, and many people do swear by that route. However, this recipe is designed to be made completely from scratch because that’s where we get the deep, vibrant chocolate flavor that makes them feel like a truly gourmet dessert. When you control the cocoa and the sugars yourself, the final texture of your **brownie cookies** is just richer and more satisfying. Trust me; this scratch version is worth the extra 10 minutes!
What makes the tops of these cookies crinkly?
Oh, that shiny, crinkly top is pure magic! It’s all about ensuring that the sugar dissolves properly into the wet ingredients—which is why vigorously whisking the melted butter with both sugars at the start is so important. As the **brownie cookies** bake, the sugar rises to the surface before the rest of the dough fully sets. When it cools down, that thin sugar layer cracks slightly, giving you those beautiful **Crinkly Top Cookies**. A little sprinkle of flaky salt right afterwards just makes that glaze pop even more!
If you’re looking for more beautiful chocolate inspiration, you can always browse my general collection of desserts recipes!
Estimated Nutrition Data for These Brownie Cookies
When you are indulging in something this heavenly, sometimes it is better not to look too closely, but for those who like to plan, here is the estimated breakdown for one of these magnificent treats. Remember, this is just an estimate, as the exact amounts depend on your specific ingredients like chocolate chips!
For one of these incredibly fudgy **brownie cookies**, here is what we are looking at:
- Calories: Approximately 250
- Sugar: Around 25g
- Total Fat: Around 14g (Keep an eye on that saturated fat!)
- Protein: About 3g
These rich **dessert recipes for chocolate lovers** are certainly decadent, but wow, are they worth every single bite!
Share Your Homemade Chocolate Dessert Creations
Now that you’ve baked these incredible **brownie cookies**, I truly hope you are savoring every fudgy, chewy bite! Part of the joy of making something this special is sharing the experience, and I absolutely love hearing from you all when you bring these beauties into your own kitchens.
Did you achieve that perfect, shiny crinkle top? Which mix-in did you decide on? Please, don’t be shy! Leave a rating right at the top of the page—your feedback helps other home cooks feel confident trying this recipe. Drop a comment below and tell me all about your batch. If you shared them at a party, tell me who the biggest fan was!
And if you snapped a picture of your beautiful **chewy chocolate cookies**—especially if you used that flaky sea salt garnish—I would be thrilled to see them! Tag me over on social media so I can celebrate your success. It brings me so much joy to know that these recipes are unfolding into wonderful family memories in your homes. Happy baking, and I can’t wait to see what you create next!
For more inspiration for your next baking adventure, feel free to browse through my latest blog posts!
PrintThe Ultimate Fudgy & Chewy Brownie Cookies (From Scratch)
Create rich, fudgy brownie cookies with shiny, crinkly tops. This recipe blends the intense chocolate flavor of a brownie with the satisfying chew of a cookie, ready for your next gathering or quick dessert craving.
- Prep Time: 15 min
- Cook Time: 13 min
- Total Time: 28 min
- Yield: 18 cookies 1x
- Category: Dessert
- Method: Baking
- Cuisine: American
- Diet: Vegetarian
Ingredients
- 1 cup (2 sticks) unsalted butter, melted
- 1 1/2 cups granulated sugar
- 1 cup packed light brown sugar
- 2 large eggs, room temperature
- 1 tablespoon vanilla extract
- 3/4 cup unsweetened cocoa powder, natural or Dutch-process
- 1 teaspoon baking powder
- 1/2 teaspoon salt
- 1 1/4 cups all-purpose flour
- 1 cup semi-sweet chocolate chips (plus extra for topping)
- Flaky sea salt, for finishing
Instructions
- Preheat your oven to 350°F (175°C). Line two large baking sheets with parchment paper.
- In a large bowl, whisk together the melted butter, granulated sugar, and brown sugar until fully combined.
- Whisk in the eggs one at a time until incorporated, then stir in the vanilla extract.
- In a separate medium bowl, whisk together the cocoa powder, baking powder, and salt.
- Gradually add the dry ingredients to the wet ingredients, mixing on low speed or by hand until just combined. Do not overmix.
- Fold in the 1 cup of chocolate chips.
- Scoop rounded tablespoons of dough onto the prepared baking sheets, leaving about 2 inches between each mound. You should get about 18 to 20 cookies.
- Press a few extra chocolate chips onto the top of each dough mound.
- Bake for 10 to 13 minutes. The edges should look set, but the centers will still look slightly soft and glossy. This ensures a fudgy texture.
- Remove the sheets from the oven. Immediately sprinkle the tops of the hot cookies with flaky sea salt.
- Let the cookies cool on the baking sheet for 5 minutes before transferring them to a wire rack to cool completely. The tops will develop their signature crinkly shine as they cool.
Notes
- For the best fudgy texture, do not overbake. The cookies firm up significantly as they cool.
- If you prefer a thicker cookie, chill the dough for 30 minutes before scooping and baking.
- You can substitute half of the semi-sweet chips with dark chocolate chips for a deeper chocolate flavor.
Nutrition
- Serving Size: 1 cookie
- Calories: 250
- Sugar: 25
- Sodium: 110
- Fat: 14
- Saturated Fat: 8
- Unsaturated Fat: 6
- Trans Fat: 0
- Carbohydrates: 30
- Fiber: 2
- Protein: 3
- Cholesterol: 55