

There is truly nothing that screams comfort food louder than a plate piled high with creamy mashed potatoes or a slice of savory meatloaf, just waiting for that perfect cascade of sauce. I know for so many of us, gravy is non-negotiable. That’s why I’m sharing my secret weapon: the ultimate homemade brown gravy that delivers deep, restaurant-quality flavor without needing a single meat scrap or pan dripping! Yes, you read that right. It’s incredibly versatile, ready in about 20 minutes, and honestly, it’s what I relied on when my schedule was completely slammed back in my PR days. This rich, savory sauce proves you don’t need roast beef drippings to achieve something spectacular. It’s become a staple in my own kitchen, just like my recipe for biscuits and gravy, and I can’t wait for you to try it. You can find all my helpful tips for making perfect gravy over on my biscuits and gravy recipes post, too!
- Why This Homemade Brown Gravy Recipe Works So Well (No Drippings Needed)
- Gathering Ingredients for Your Homemade Brown Gravy
- The Simple Roux Gravy Method: Making Homemade Brown Gravy
- Tips for the Thick And Rich Gravy Finish
- Serving Suggestions for Your Quick Beef Gravy
- Storage and Reheating Instructions for Homemade Brown Gravy
- Frequently Asked Questions About Making Homemade Brown gravy
- Nutritional Estimates for This Dinner Side Sauce
- Share Your Homemade Brown Gravy Creations
Why This Homemade Brown Gravy Recipe Works So Well (No Drippings Needed)
When you don’t have beautiful, flavorful pan drippings from a roast sitting there waiting for you, your roux has to do all the heavy lifting. And that’s exactly what it does here! Seriously, ditch the idea that you need rendered fat from meat to make a spectacular sauce. We are developing incredible depth using just butter and flour—that simple roux is the star.
This method gives you a wonderfully flavorful base for a Simple Roux Gravy every single time. It’s reliable, fast, and so much better than anything from a packet. It’s truly the secret to my favorite homemade brown gravy.
- It relies on quality beef broth seasoned with herbs for that savory baseline.
- Browning the initial fat and flour mixture creates a nutty base flavor instantly.
- It comes together quicker than waiting for a chicken to even start roasting!
Achieving Velvety Brown Gravy Texture
This is where so many folks go wrong with gravy, whether they use drippings or not. The texture must be smooth—I can’t stand lumps creeping into my food! To guarantee a Velvety Brown Gravy, you must add your cold or room-temperature beef broth to that hot roux slowly.
Seriously, whisk in just a splash at a time until it’s totally incorporated and smooth before you add the next bit. Patience here pays off massively, resulting in that luxurious mouthfeel we all crave over our potatoes.

Gathering Ingredients for Your Homemade Brown Gravy
When we look at the ingredients for this Savory Sauce Recipe, you’ll notice we keep things incredibly simple, which is how you get that fantastic flavor so fast. No weird additives, just kitchen staples that deliver big impact. I’ve underlined what I consider essential for the best result—especially the broth choice!
- Four tablespoons of unsalted butter.
- Four tablespoons of all-purpose flour—our thickening agent.
- Two cups of beef broth, and please use low sodium! We control the salt later.
- One teaspoon each of onion powder and garlic powder.
- Half a teaspoon of dried thyme for complexity.
- A small dash of Worcestershire sauce for that necessary umami depth.
- Freshly ground black pepper and salt to finish.
The Simple Roux Gravy Method: Making Homemade Brown Gravy
This process is where the magic happens, and it moves surprisingly fast once you get started—always keep your whisk ready! We are building a beautiful Stovetop Gravy Sauce right here. You’ll start by melting that butter in your saucepan over medium heat. Once it’s foamy, you shower in the flour and immediately start whisking. This mixture is what we call the roux, and we need to dedicate a few minutes here to developing that foundational flavor.
We don’t rush this first part, but we don’t dawdle either. Once the flavors are built, we introduce the liquid gradually. Remember what I said about lumps? This step requires your full attention, but trust me, the rich, savory result of this homemade brown gravy is worth the focus. Keep whisking until everything is combined, and the sauce looks glossy and ready to serve! Don’t forget you can always pop over to my latest blog posts if you need another quick cooking inspiration.
Browning the Roux for Deep Flavor in Your Homemade Brown Gravy
This is the most crucial part of making this From Scratch Gravy taste like Sunday dinner, even on a Tuesday night. You need to cook that flour and butter mixture for about two to three full minutes, whisking constantly. You are looking for the color to shift from pale yellow to a lovely, deep, nutty peanut-butter brown.
I watch mine carefully—it should smell slightly toasted. If you see any dark brown spots start to form on the bottom of the pan, pull it off the heat immediately! Burnt roux tastes bitter, and we definitely don’t want that bitterness in our sauce.

Whisking in Broth for a Smooth No Drippings Gravy
Now for the part where we transform the roux into glorious gravy. Take your beef broth—and this must be cold or room temperature if your roux is hot—and add just a quarter cup at a time. Whisk vigorously until that first addition is fully smoothed out and those little bubbles disappear.
It will seize up a bit, don’t panic! Keep whisking until there are absolutely no specks of unincorporated flour left. Slowly repeating this ensures you have a perfectly lump-free, marvelous No Drippings Gravy that pours like silk every time you make it.

Tips for the Thick And Rich Gravy Finish
Once you’ve added your seasonings and let the gravy simmer for those five glorious minutes, it should have reached that perfect level of richness, but sometimes we need micro-adjustments, right? That’s why I always teach my readers how to tune the final product. If you find your gravy is just a touch too thin for that perfect cascade over your steak or your amazing Mashed Potato Topping, don’t worry!
For a little extra thickness, you can create a quick slurry—just mix one teaspoon of cornstarch with two teaspoons of cold water until it’s perfectly smooth, then whisk that slowly into the simmering gravy. It thickens up almost instantly! Also, if you aimed for that deep, dark mahogany color but it’s still a bit light for your liking, continue cooking it on very low heat for another minute or two. Just watch it like a hawk to make sure that roux doesn’t burn! For further inspiration on rich sauces, you can check out my recipe for that creamy soup over at chicken gnocchi soup, although this gravy is designed to be much thinner than that creamy base. And for another take on quick gravy, this article offers some neat advice as well, which I found interesting: Easy Brown Gravy (no drippings).
Serving Suggestions for Your Quick Beef Gravy
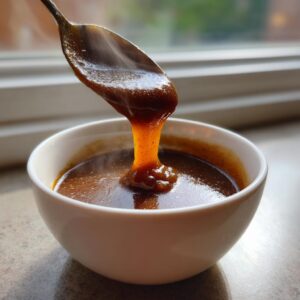
This Quick Beef Gravy is just waiting to make your next meal feel special, even if it was a weeknight dash to get dinner on the table! Obviously, it’s absolutely divine smothering a pile of fluffy mashed potatoes, but please don’t stop there.
It is the perfect accompaniment for savory meatloaf—it creates its own little crust, truly!—or poured generously over a beautiful slice of pot roast. I have a wonderful slow-cooker pot roast recipe if you need a main course to go with it!

Because we used those lovely, subtle savory hints like Worcestershire and thyme, this gravy pairs beautifully with a medium-bodied red wine, like a youthful Merlot or a slightly earthy Pinot Noir. They echo those deep notes perfectly!
Storage and Reheating Instructions for Homemade Brown Gravy
Even though this is such a quick recipe, I always encourage people to double the batch because leftovers are lovely! Once cooled completely, seal your beautiful homemade brown gravy tightly in an airtight container. It keeps wonderfully in the refrigerator for about four days—perfect for quick additions to lunches later in the week.
When you’re ready to reheat, remember that gravy will tighten up as it chills, so you’ll likely need to help it along. Place it in a small saucepan over low heat. Add a tablespoon or two of extra beef broth or even just water while stirring constantly until it melts back into that smooth, pourable consistency we love.
Frequently Asked Questions About Making Homemade Brown gravy
I know when you’re just trying to get a beautiful side sauce on the table quickly, little questions pop up! That’s totally normal. Dealing with gravy from scratch can feel intimidating, but since this recipe skips the drippings, it’s incredibly forgiving. Here are a few things I hear often from readers who are mastering their first batch of homemade brown gravy.
Can I make this Homemade Brown Gravy vegetarian or vegan?
Absolutely! This is one of the best things about using a roux base—it’s incredibly adaptable. If you swap out the butter for a good quality vegan butter alternative—or even a neutral oil like refined avocado oil—and use vegetable broth instead of beef broth, you’ve instantly got a delicious vegetarian base. It will be a lighter color, of course, but all those lovely herbs and the nicely browned roux still give you a fantastic, flavorful sauce. It turns into a truly wonderful Easy Brown Gravy Recipe that everyone can enjoy!
My gravy is too thin. How do I thicken this Comfort Food Gravy?
Don’t sweat it! This happens sometimes depending on the liquid absorption of your flour or the temperature of your broth when you whisked it in. The best fix, which gives the best result, is a slurry. Mix one teaspoon of cornstarch with two teaspoons of very cold water until it looks milky and smooth—make sure there are zero lumps!
Then, while your gravy is at a low simmer, slowly whisk that slurry into the pot. Let it bubble for just a minute or so, and you’ll see it firm right up. Remember, simmering itself will help it thicken naturally, so always let it cook for a few minutes before introducing the slurry!
How can I make my Homemade Seasoned Gravy taste richer?
That deep, savory flavor is what we are aiming for! If you feel like your Homemade Seasoned Gravy needs just a nudge toward that dark, meaty flavor profile without adding actual meat, I have a couple of favorite tricks. First, give your roux an extra minute to cook until it’s the deepest brown color you dare to risk without burning—that toasting is pure flavor!
For an umami punch, try whisking in about half a teaspoon of soy sauce or a tiny splash of mushroom powder along with your herbs. These ingredients boost the savory, earthy notes beautifully and make people wonder how you got so much flavor from such simple ingredients. If you want more ideas on savory sauces, you can see what I’m cooking up for chicken and other mains over at my BBQ pulled chicken post.
If you want to see how another great cook approaches this same challenge, this recipe offers some really helpful insights on making a savory sauce: Homemade Brown Gravy from Scratch.
Nutritional Estimates for This Dinner Side Sauce
I always like to share the nutritional snapshot of what we are creating here, just so you have a full picture of your lovely $\text{Dinner Side Sauce}$. Remember that these figures are based on the exact measurements I used, and your own homemade brown gravy might vary slightly depending on the type of broth or the amount of salt you ultimately add to taste.
Think of these numbers as a helpful guideline for your meal planning. For instance, this recipe yields about two cups, so these estimates are based on a standard quarter-cup serving size.
- Calories: Approximately 85 per serving
- Total Fat: 6g (with 3.5g being saturated fat from the butter)
- Carbohydrates: 6g
- Protein: 2g
- Sodium: Around 350mg (This is why using low-sodium broth is so important—you control the final salt level!)
- Cholesterol: 12mg
We are keeping the sugar very low here, which is fantastic. It’s just good, honest, savory flavor built on a simple roux base. If you are counting macros or tracking different dietary considerations, these estimates should help you fit this wonderful comfort food right into your weeknight rotation!
Share Your Homemade Brown Gravy Creations
And there you have it! A truly rich, savory, and incredibly homemade brown gravy made completely from scratch, and all without those messy pan drippings. Doesn’t that feel empowering? I really hope this simple roux technique brings a bit of that elegant comfort food charm to your dinner table, whether it’s for a fun weeknight supper or part of a bigger holiday spread.
I truly want to see how you’re using this sauce! Please, take a moment once you’ve tried it to leave a rating for the recipe—five stars if it earns it! Your feedback helps other home cooks feel confident in jumping in and making this too. I’m always looking for new ways my readers adapt my basics, so let me know in the comments below: What did you serve this rich gravy over? Were they mashed potatoes, perhaps a piece of roasted chicken, or maybe you finally tackled that meatloaf?
If you have any lingering questions or want to get in touch directly about substitutions or troubleshooting, feel free to reach out via my contact page! And if you’re looking for other reliable, no-fuss pantry recipes, this lovely one from cravecookcreate is another great example of simple technique leading to big flavor: Homemade Brown Gravy – No Drippings Needed! Recipe. Happy cooking, friends!
PrintHomemade Brown Gravy Without Drippings: Rich and Velvety Sauce
Create a rich, savory brown gravy from scratch using a simple roux and beef broth. This recipe delivers restaurant-quality flavor perfect for mashed potatoes, meatloaf, or holiday roasts, even when you skip the meat drippings.
- Prep Time: 5 min
- Cook Time: 15 min
- Total Time: 20 min
- Yield: About 2 cups 1x
- Category: Side Dish
- Method: Stovetop
- Cuisine: American
- Diet: Vegetarian
Ingredients
- 4 tablespoons unsalted butter
- 4 tablespoons all-purpose flour
- 2 cups beef broth, low sodium
- 1 teaspoon onion powder
- 1/2 teaspoon garlic powder
- 1/2 teaspoon dried thyme
- 1/2 teaspoon Worcestershire sauce
- 1/4 teaspoon black pepper, freshly ground
- 1/2 teaspoon salt, or to taste
Instructions
- Melt the butter in a medium saucepan over medium heat.
- Add the flour to the melted butter. Whisk constantly for 2 to 3 minutes until the mixture turns a deep, nutty brown color. This is your roux and browning it develops deep flavor.
- Slowly whisk in the beef broth, a little at a time, ensuring no lumps form before adding more liquid. Continue whisking until the mixture is smooth.
- Bring the gravy to a simmer, stirring frequently. It will begin to thicken as it heats.
- Stir in the onion powder, garlic powder, thyme, Worcestershire sauce, salt, and pepper.
- Reduce the heat to low and let the gravy simmer gently for 5 minutes, stirring occasionally, until it reaches your desired thickness. This creates a velvety brown gravy.
- Taste the gravy and adjust salt and pepper as needed before serving hot over your favorite comfort food.
Notes
- For a darker color, continue to cook the roux for an extra minute or two, watching carefully to prevent burning.
- If you prefer a thinner consistency, add a splash more beef broth while simmering.
- This recipe makes a wonderful mashed potato topping.
Nutrition
- Serving Size: 1/4 cup
- Calories: 85
- Sugar: 0.5
- Sodium: 350
- Fat: 6
- Saturated Fat: 3.5
- Unsaturated Fat: 2.5
- Trans Fat: 0
- Carbohydrates: 6
- Fiber: 0.2
- Protein: 2
- Cholesterol: 12