

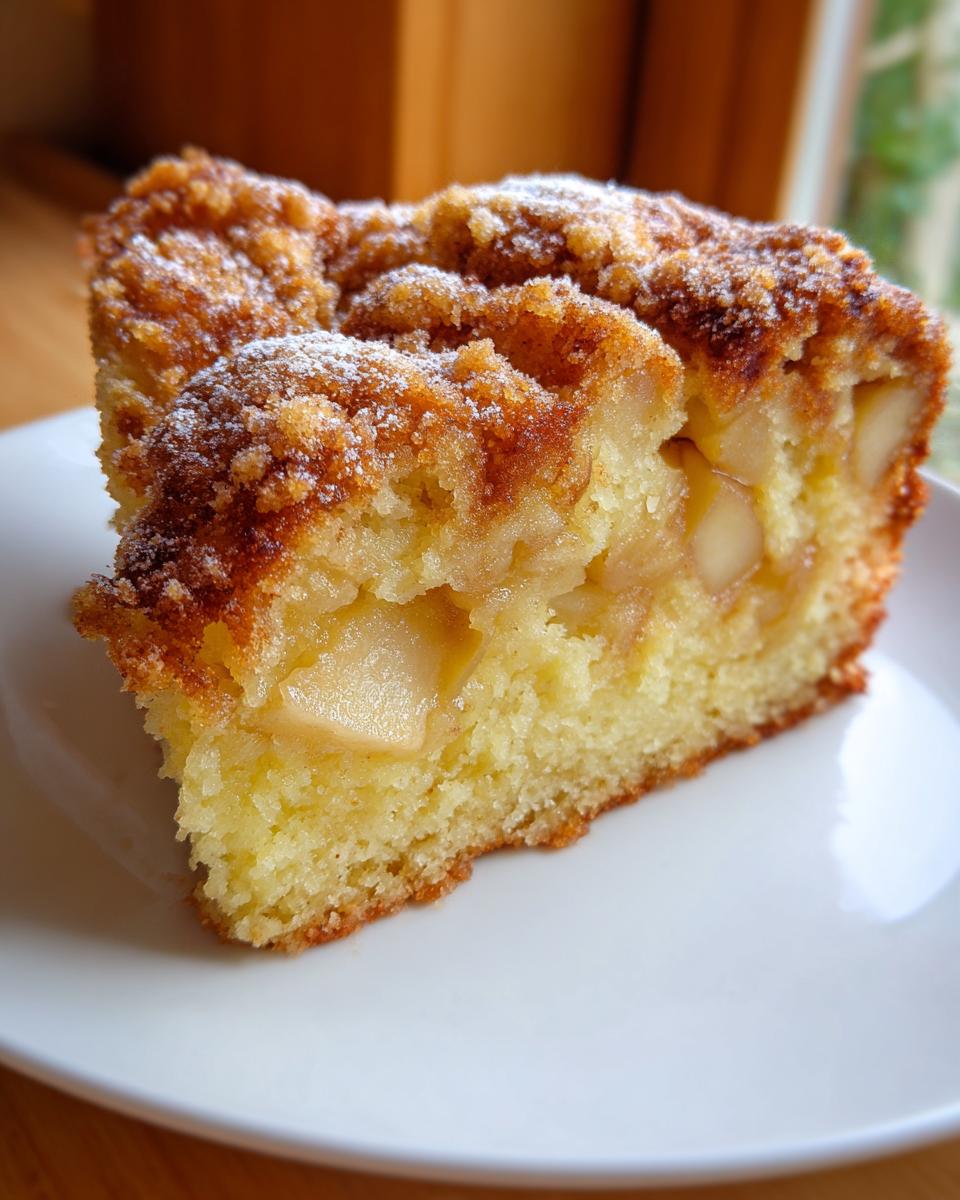
When the air turns crisp and the High Holidays arrive, there’s no scent more comforting than warm apples and cinnamon filling the kitchen. For me, the true spirit of celebration settles in when I pull a gorgeous, deeply spiced cake from the oven. This isn’t just any cake; this is the ultimate moist jewish apple cake recipe, and I promise it will become your household tradition, too. It’s special because it delivers that heavenly, dense tender apple dessert consistency—think of your favorite pound cake—but it’s layered throughout with gooey ribbons of brown sugar and spice.
Baking for my family, especially around Rosh Hashanah, is how I connect with my roots and share my love. It brings me so much joy to finally share this meticulously developed recipe that guarantees a stunning presentation and incredible flavor every single time. If you’ve been searching for a reliable, unbelievably delicious classic apple cake recipe that sings of autumn, you’ve found it right here.
- Why This is the Best jewish Apple Cake Recipe You Will Make
- Gathering Ingredients for Your jewish Apple Cake
- Step-by-Step Instructions for the Ultimate jewish Apple Cake
- Tips for a Perfect jewish Apple Cake Every Time
- Making Your jewish Apple Cake Dairy-Free
- Serving Suggestions for Your jewish Apple Cake
- Storing and Reheating Your jewish Apple Cake
- Frequently Asked Questions About jewish Apple Cake
- Serving Suggestions for Your jewish Apple Cake
- Storing and Reheating Your jewish Apple Cake
- Frequently Asked Questions About jewish Apple Cake
- Sharing Your jewish Apple Cake Creation
- Sharing Your jewish Apple Cake Creation
Why This is the Best jewish Apple Cake Recipe You Will Make
You see, I’ve tried every apple cake under the sun, but none hold up quite like this one. This isn’t some delicate sponge cake trying to pretend it’s full of fruit! This best jewish apple cake delivers on its promise: it’s sturdy, rich, and stays perfectly moist long after the holidays end. The flavor complexity comes from those gorgeous ribbons of brown sugar and cinnamon—they caramelize slightly as they bake, creating pockets of gooey goodness throughout the crumb. That unique, deep golden brown crust is just gorgeous when flipped out of the pan, making it feel truly special.
If you’ve been disappointed before by dry results, trust me, this moist apple cake recipe is the answer. It’s the ideal pound cake with apples texture you’re looking for. For more insights on what makes baked goods shine, feel free to browse my latest baking explorations.
Achieving That Signature Moist Texture in Your jewish Apple Cake
The secret to that lovely moist apple cake texture is simple chemistry! Unlike butter-based cakes, we use oil here. That oil stays liquid at room temperature, which keeps the crumb tender for days. We pair that with four eggs, providing structure without drying out the mix. The golden rule, though? Do not overmix once the flour goes in! Mixing too much activates the gluten, and suddenly your beautiful, tender apple dessert becomes tough. Mix just until you see no streaks of flour remaining, and that’s it. Let the apples do the heavy lifting for moisture!
Gathering Ingredients for Your jewish Apple Cake
When you’re making a cake meant to be so deeply satisfying, you have to start with ingredients you trust. This recipe for our jewish apple cake is so forgiving because we rely on oil, which keeps everything beautifully moist, which is perfect for our fall apple dessert!
You’ll see that nearly everything here is simple pantry stock, but the quantities matter. Take a look; I’ve written down exactly how I prepare everything below. You can also find some great tips on making homemade preserves, like my slow-cooker apple butter, if you want extra apple flavor!
Here is what you need to pull together this amazing apple spice cake:
- 2 cups all-purpose flour
- 2 teaspoons baking powder (Make sure it’s fresh!)
- 1/2 teaspoon salt
- 1 1/2 cups granulated sugar, divided (We use this in two spots, so pay attention to where it goes!)
- 1 cup vegetable oil (This is our secret to that amazing dairy free apple cake structure!)
- 4 large eggs (Room temperature is always best, if you remember to pull them out.)
- 1 tablespoon vanilla extract
- 1/4 cup orange juice (This brightens up the whole classic apple cake recipe—or use water if you prefer.)
- 3 medium Granny Smith apples, peeled, cored, and diced small
- 1/2 cup packed light brown sugar (Don’t just eyeball this; pack it in!)
- 1 tablespoon ground cinnamon (Use fresh ground if you have it; the aroma is unmatched!)
- 1/2 cup chopped walnuts or pecans (Optional, but I love the little crunch it adds to the apple coffee cake texture.)
Step-by-Step Instructions for the Ultimate jewish Apple Cake
Now for the fun part! It feels like a celebration just putting this homemade apple cake together. We aren’t doing anything difficult here, but the order in which we layer things is what gives you that stunning, ribboned interior, keeping this a truly moist creation. Before you grab your bowls, get your oven ready to go—we want everything warm when it enters. If you’re interested in learning more about making lovely fried treats, I have a fantastic recipe for homestyle apple fritters too!
- First things first: we have to preheat your oven to 350°F (175°C). Then, take a 10-inch tube pan or a nice Bundt pan, and generously grease and flour it. This step is non-negotiable to ensure that gorgeous cake releases easily later!
- Grab a medium bowl and just whisk together your dry ingredients: the flour, baking powder, and salt. Set that aside for just a moment.
- In a big bowl, mix your wet ingredients. Whisk the 1 cup of the granulated sugar (remember, we divided the sugar!), the oil, the four eggs, orange juice, and vanilla extract together until everything looks happy and combined.
- Slowly—and I mean slowly—add those dry ingredients into the wet mixture. You can use a low speed on a mixer or a wooden spoon, but stop mixing as soon as you see the last bit of flour disappear. Seriously, don’t overdo it!
- Now we create the magic layers! In a clean, separate little bowl, toss your diced Granny Smith apple pieces. You really want to coat them well with the remaining 1/2 cup of granulated sugar, the light brown sugar, and all that cinnamon. This mixture is what gives you the gooey spots.
- Gently fold those coated apples—and any nuts if you’re using them—right into your cake batter. Don’t stir vigorously; we want clumps of apple, not apple purée!
- Pour exactly half of your batter into your prepared pan. Then, scatter gently over top of that half of the cinnamon-sugar apple mixture. Top that with the rest of the batter, and finish by sprinkling the remaining apples right on top. It sounds like a lot of apples, but trust me, they bake down beautifully.
- Time for the oven! Bake this beauty for about 60 minutes, but be prepared to let it go up to 75 minutes. You’ll know it’s done when a wooden skewer comes out clean and the top has that signature, beautiful golden brown crust.
- Once it’s done, resist the urge to flip it out immediately! Let it cool down in that pan on a wire rack for a solid 15 minutes. This is crucial for that pound cake with apples structure to set up so it doesn’t collapse.
- After those 15 minutes, carefully invert the cake onto your cooling rack. Let it cool completely before you slice into it. Trust me, patience here rewards you with the perfect slice!

Preparing the Cinnamon Apple Mixture for Your jewish Apple Cake
This is where we build those fantastic ribbons of flavor that make this an incredible cinnamon apple cake. It’s all about the toss! Take those diced apples and make sure every single piece gets a proper coating from the brown sugar and cinnamon. You’re essentially making a very thick, sugary coating for the fruit. When you fold this mixture into the batter, those little pockets of sugar and spice will slowly melt down while baking. This process ensures you don’t just have apples *in* the cake; you have those sweet spots all over.
Baking and Cooling Your jewish Apple Cake
We are looking for a baking window between 60 and 75 minutes for this jewish holiday baking classic. Start checking around the hour mark. The visual cue is a lovely, deep golden brown crust that looks richly caramelized—that’s a good sign! The skewer test is your final authority, though. When it comes out clean, it’s done. The mandatory 15-minute cooling period in the pan is essential to help the interior structure solidify. Since we want that dense, gorgeous apple coffee cake texture, chilling out for those first 15 minutes before you risk inverting it prevents the tender cake from tearing away from the sides.

Tips for a Perfect jewish Apple Cake Every Time
Even with a foolproof recipe like this one, a few seasoned chef tricks can take your homemade apple cake from delicious to legendary. I’ve learned these things through trial and error—mostly error when I was first starting out! My goal is to save you the cleanup from a sticky pan or the heartbreak of a slightly deflated middle. These are the things I focus on when I need that perfect apple coffee cake texture.
We are aiming for elegance without the fuss, remember? Here are the three pillars I stick to every time I bake this amazing fruit filled cake:
- Choose Tart Apples: Please, please, please use Granny Smith apples for this recipe. They are essential! They hold their shape beautifully during that long bake time, preventing them from turning into mush. More importantly, their tartness cuts right through the sweetness of the sugar and oil, creating that perfect balance in your apple spice cake. If you use a sweeter apple, the entire flavor profile gets too one-note.
- Prep Your Pan Like a Pro: I mentioned greasing and flouring, but for Bundt or tube pans—especially with higher sugar content cakes like this—I use what I call my ‘secret baking paste.’ It’s just equal parts shortening, oil, and flour blended into a paste. Brush this mixture right into every nook and cranny. If you’re looking for other interesting baked treats, take a peek at my apple dump cake recipe for more warm fruit inspiration! It gives you an almost guaranteed non-stick surface.
- Respect the Mixing Bowl Rules: This is the single biggest mistake people make. Once the flour mixture hits the oil and egg base (Step 4), you are on the clock. Mix only until the flour streaks disappear. If you keep going because you want to make sure everything is incorporated, you are developing gluten, and gluten equals chewiness, which is the absolute opposite of the tender crumb we want. Stop early; the apples and folding will finish the job for you.
Making Your jewish Apple Cake Dairy-Free
One of the truly wonderful things about this jewish apple cake recipe is how easily it slides right into a dairy-free lifestyle. In fact, I’d say it’s one of the simplest holiday treats to adapt! Unlike so many classic cakes that rely heavily on butter for flavor and structure, we use oil here. Vegetable oil is naturally dairy-free, and it’s the secret weapon that keeps this cake so incredibly moist, preventing that heavy, dense texture you sometimes get with other substitutes.
Because the core ingredients—flour, sugar, eggs, apples, and oil—are already safe, you can confidently serve this as a dairy free apple cake for everyone at your table, which is just lovely when hosting for Rosh Hashanah dessert or any gathering. You won’t miss the butter one bit, trust me; the flavor of the apples and spices shines through brilliantly.
For those asking about toppings or additions, just stick to the core recipe. If you use water or orange juice instead of milk in any glaze you might decide to make later (though this cake is perfect plain!), you are set. If you’re looking for other wonderful, comforting bakes that fit dietary needs, you should absolutely check out my recipe for moist pumpkin bread, which is also incredibly easy to make dairy-free!
Serving Suggestions for Your jewish Apple Cake
This tender apple dessert is such a showstopper on its own, you barely need to do anything to it! That golden brown crust and the lovely scent of spice are wonderful enough for a simple presentation. Since the cake is naturally so rich and moist, it really stands up perfectly on its own, which is why many families, mine included, just favor a light dusting of powdered sugar right before serving. It lets the texture and the apple-cinnamon flavor really take center stage.
However, since we love making things feel a bit more special, especially when celebrating something like Rosh Hashanah dessert, I have a few favorite presentation tricks. If you are not worried about keeping it strictly dairy-free, a small dollop of lightly sweetened whipped cream alongside each slice is just heaven. It adds a beautiful textural contrast to the denser crumb of our cake.

Another idea that just screams cozy fall baking is a drizzle of thinned caramel sauce. You can skip the heavy cream and just use a few spoonfuls of the brown sugar coating mixture we made earlier—add a tablespoon of hot water to the extra cinnamon-sugar mixture leftover from the apple prep, stir it until it almost melts, and drizzle that lightly over the top. It looks professional but takes zero extra effort!
If you are looking for something savory or light to serve alongside this rich cake for an afternoon gathering, I always pair my sweet bakes with something fresh. You might enjoy my recipe for a beautiful fall harvest salad if you’re planning a full holiday spread; the brightness of fresh greens balances out the richness of this jewish apple cake beautifully.
Storing and Reheating Your jewish Apple Cake
One of the absolute best parts about this jewish apple cake is that it’s even better the next day! Because we used oil instead of butter, this cake fights off staleness like a champion. It maintains that incredibly moist texture we worked so hard to achieve, making it the perfect dish to prepare a day or two before you need it.
When it comes to leftovers, keeping it simple ensures you get that perfect slice again and again. If you plan on eating the cake over two or three days, your best bet is to keep it right on the counter. A loosely tented piece of foil or plastic wrap covering the cake, placed on a cake stand, works perfectly. Since this is such a wonderfully dense apple coffee cake texture, it doesn’t dry out quickly at all at room temperature.
If you find yourself with more cake than you can eat in three days—which is a delicious problem to have, by the way!—you can absolutely freeze the leftovers. Wrap individual slices snugly in plastic wrap first, perhaps adding a layer of aluminum foil around that. This double-wrap keeps freezer burn far away, and they thaw beautifully overnight when you need a quick baked apple sweet.
If you ever need a quick refresh, reheating is simple. I don’t normally bother with reheating since it’s so good cold, but if you want that just-baked warmth, pop a slice in the microwave for about 10 to 15 seconds. It softens everything up instantly, especially those pockets of cinnamon sugar! If you’re looking for other delightful, make-ahead treats, you might want to check out my recipe for no-bake cookies; they are great for keeping on hand!
Frequently Asked Questions About jewish Apple Cake
I know when you find a treasured recipe like this jewish apple cake, you probably have a few lingering questions before you commit to the mixing bowl. It’s smart to check! I want you to feel completely confident that you are going to achieve that wonderfully moist texture and beautiful presentation, perfect for any jewish holiday baking celebration.
Below are some of the things I get asked most often regarding texture, technique, and tradition. If you’re looking for more inspiration for your sweet tooth, feel free to explore my full dessert collection!
Can I substitute the oil in this jewish Apple Cake recipe?
This is a great question, and it gets right to the heart of what makes this cake so unique! While you absolutely *can* swap the oil, I highly recommend against it if you are seeking that signature, long-lasting moisture. The vegetable oil is what keeps the crumb so tender and mimics that soft pound cake with apples consistency, especially over several days. Butter adds flavor, of course, but it also firms up considerably when cooled, which risks turning your cake denser than intended. If you absolutely must avoid vegetable oil, a neutral-flavored canola oil is the closest substitute, but for the absolute best jewish apple cake experience, stick to the oil!
What is the traditional pan for a jewish Apple Cake?
Traditionally, you will see many recipes calling for a tube pan—that’s the one with the straight sides and the hollow chimney in the middle. That chimney is crucial because it helps the heat penetrate the center of a denser batter more evenly. This is essential for getting that uniform bake without burning the edges while the middle is still raw.
However, a Bundt pan works beautifully too! The shape is very similar, and if you properly prepare the pan (remember my baking paste tip?), you’ll get the cake out just fine. The important thing for this cinnamon apple cake is the vertical shape. Avoid shallow cake pans, as the ratio of batter height to pan width will likely result in a cake that bakes too quickly on the outside and remains underdone or sunken in the middle. A tube or Bundt pan ensures you get that perfect, evenly baked exterior everyone admires!
If you are curious about what other lovely things other bakers are doing, I came across this great version by The Sarcastic Baker while researching; they have wonderful tips too about achieving a similar cake.
Serving Suggestions for Your jewish Apple Cake
This tender apple dessert is such a showstopper on its own, you barely need to do anything to it! That golden brown crust and the lovely scent of spice are wonderful enough for a simple presentation. Since the cake is naturally so rich and moist, it really stands up perfectly on its own, which is why many families, mine included, just favor a light dusting of powdered sugar right before serving. It lets the texture and the apple-cinnamon flavor really take center stage.
However, since we love making things feel a bit more special, especially when celebrating something like Rosh Hashanah dessert, I have a few favorite presentation tricks. If you are not worried about keeping it strictly dairy-free, a small dollop of lightly sweetened whipped cream alongside each slice is just heaven. It adds a beautiful textural contrast to the denser crumb of our cake.
Another idea that just screams cozy fall baking is a drizzle of thinned caramel sauce. You can skip the heavy cream and just use a few spoonfuls of the brown sugar coating mixture we made earlier—add a tablespoon of hot water to the extra cinnamon-sugar mixture leftover from the apple prep, stir it until it almost melts, and drizzle that lightly over the top. It looks professional but takes zero extra effort!
If you are looking for something savory or light to serve alongside this rich cake for an afternoon gathering, I always pair my sweet bakes with something fresh. You might enjoy my recipe for a beautiful fall harvest salad if you’re planning a full holiday spread; the brightness of fresh greens balances out the richness of this jewish apple cake beautifully.
Storing and Reheating Your jewish Apple Cake
One of the absolute best parts about this jewish apple cake is that it’s even better the next day! Because we used oil instead of butter, this cake fights off staleness like a champion. It maintains that incredibly moist texture we worked so hard to achieve, making it the perfect dish to prepare a day or two before you need it.
When it comes to leftovers, keeping it simple ensures you get that perfect slice again and again. If you plan on eating the cake over two or three days, your best bet is to keep it right on the counter. A loosely tented piece of foil or plastic wrap covering the cake, placed on a cake stand, works perfectly. Since this is such a wonderfully dense apple coffee cake texture, it doesn’t dry out quickly at all at room temperature.
If you find yourself with more cake than you can eat in three days—which is a delicious problem to have, by the way!—you can absolutely freeze the leftovers. Wrap individual slices snugly in plastic wrap first, perhaps adding a layer of aluminum foil around that. This double-wrap keeps freezer burn far away, and they thaw beautifully overnight when you need a quick baked apple sweet.
If you ever need a quick refresh, reheating is simple. I don’t normally bother with reheating since it’s so good cold, but if you want that just-baked warmth, pop a slice in the microwave for about 10 to 15 seconds. It softens everything up instantly, especially those pockets of cinnamon sugar! If you’re looking for other delightful, make-ahead treats, you might want to check out my recipe for no-bake cookies; they are great for keeping on hand!
Frequently Asked Questions About jewish Apple Cake
Can I substitute the oil in this jewish Apple Cake recipe?
This is a great question, and it gets right to the heart of what makes this cake so unique! While you absolutely *can* swap the oil, I highly recommend against it if you are seeking that signature, long-lasting moisture. The vegetable oil is what keeps the crumb so tender and mimics that soft pound cake with apples consistency, especially over several days. Butter adds flavor, of course, but it also firms up considerably when cooled, which risks turning your cake denser than intended. If you absolutely must avoid vegetable oil, a neutral-flavored canola oil is the closest substitute, but for the absolute best jewish apple cake experience, stick to the oil!
What is the traditional pan for a jewish Apple Cake?
Traditionally, you will see many recipes calling for a tube pan—that’s the one with the straight sides and the hollow chimney in the middle. That chimney is crucial because it helps the heat penetrate the center of a denser batter more evenly. This is essential for getting that uniform bake without burning the edges while the middle is still raw.
However, a Bundt pan works beautifully too! The shape is very similar, and if you properly prepare the pan (remember my baking paste tip?), you’ll get the cake out just fine. The important thing for this cinnamon apple cake is the vertical shape. Avoid shallow cake pans, as the ratio of batter height to pan width will likely result in a cake that bakes too quickly on the outside and remains underdone or sunken in the middle. A tube or Bundt pan ensures you get that perfect, evenly baked exterior everyone admires!
If you are curious about what other lovely things other bakers are doing, I came across this great version by The Sarcastic Baker while researching; they have wonderful tips too about achieving a similar cake.
Sharing Your jewish Apple Cake Creation
Now that you have the secrets to making the most incredibly moist, flavorful jewish apple cake, I truly want to know how it turned out for you! Sharing food is sharing a story, and I love hearing the tales our recipes inspire.
When you pull that gorgeous cake out of the oven, take a moment to look at that rich, unique golden brown crust and those perfectly tender apples peeking through. Did it remind you of your favorite fall apple dessert? Did the cinnamon ribbons melt perfectly in the middle?
Please, take a star rating for me below, and if you have a moment, leave a comment sharing any little tweaks or successes you had while following this recipe. Better yet, snap a picture and connect with me! I love seeing your beautiful bakes. Don’t hesitate to reach out if you have any specific questions about your bake; you can always send me a quick note!
PrintThe Ultimate Moist Jewish Apple Cake with Cinnamon-Sugar Crumb Topping (Dairy-Free Option Available)

This recipe creates a deeply moist Jewish Apple Cake with a texture similar to pound cake, featuring ribbons of gooey cinnamon sugar and a beautiful golden brown crust. It is a classic, tender apple dessert perfect for Rosh Hashanah or fall baking.
- Prep Time: 20 min
- Cook Time: 70 min
- Total Time: 90 min
- Yield: 10 servings 1x
- Category: Dessert
- Method: Baking
- Cuisine: Jewish
- Diet: Low Fat
Ingredients
- 2 cups all-purpose flour
- 2 teaspoons baking powder
- 1/2 teaspoon salt
- 1 1/2 cups granulated sugar, divided
- 1 cup vegetable oil (or substitute with neutral oil for dairy-free)
- 4 large eggs
- 1 tablespoon vanilla extract
- 1/4 cup orange juice (or water for dairy-free)
- 3 medium Granny Smith apples, peeled, cored, and diced
- 1/2 cup packed light brown sugar
- 1 tablespoon ground cinnamon
- 1/2 cup chopped walnuts or pecans (optional)
Instructions
- Preheat your oven to 350°F (175°C). Grease and flour a 10-inch tube pan or Bundt pan.
- In a medium bowl, whisk together the flour, baking powder, and salt. Set this dry mixture aside.
- In a large bowl, whisk together 1 cup of the granulated sugar, the oil, eggs, orange juice, and vanilla extract until well combined.
- Gradually add the dry ingredients to the wet ingredients, mixing on low speed or by hand until just combined. Do not overmix.
- In a separate small bowl, toss the diced apples with the remaining 1/2 cup of granulated sugar, brown sugar, and cinnamon until the apples are evenly coated.
- Gently fold the coated apples and the optional nuts into the cake batter.
- Pour half of the batter into the prepared pan. Sprinkle half of the remaining cinnamon-sugar apple mixture over the batter. Top with the remaining batter, then sprinkle the rest of the apple mixture on top.
- Bake for 60 to 75 minutes, or until a wooden skewer inserted into the center comes out clean. The top should have a unique golden brown crust.
- Let the cake cool in the pan on a wire rack for 15 minutes.
- Invert the cake onto the rack and allow it to cool completely before slicing.
Notes
- For a dairy-free version, use vegetable oil and substitute water or orange juice for any dairy liquids, though this recipe is naturally dairy-free if you omit butter.
- To achieve the pound cake texture, avoid overmixing the batter once the flour is added.
- This cake stays incredibly moist for several days when stored covered at room temperature.
Nutrition
- Serving Size: 1 slice
- Calories: 380
- Sugar: 35
- Sodium: 210
- Fat: 19
- Saturated Fat: 3
- Unsaturated Fat: 16
- Trans Fat: 0
- Carbohydrates: 50
- Fiber: 2
- Protein: 4
- Cholesterol: 65