

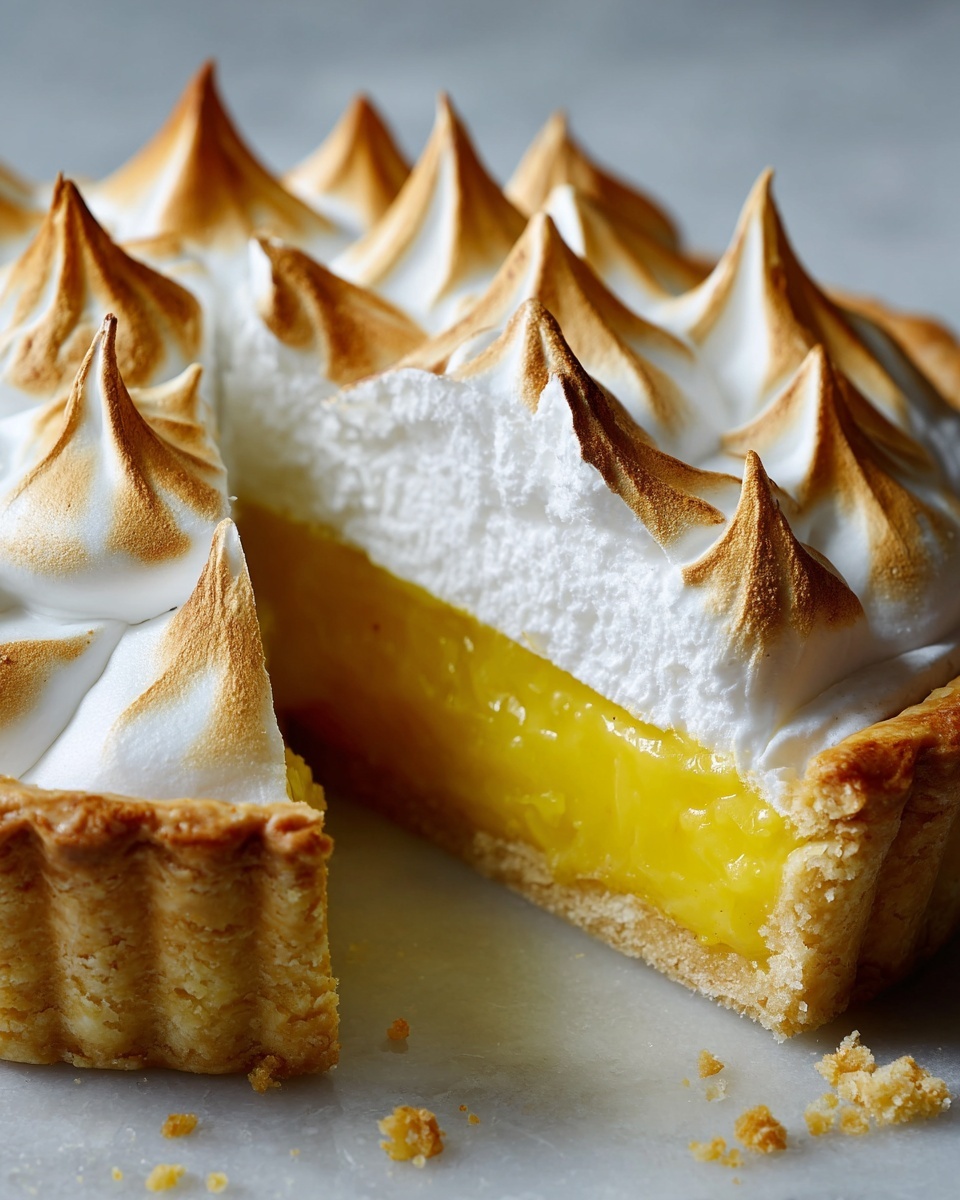
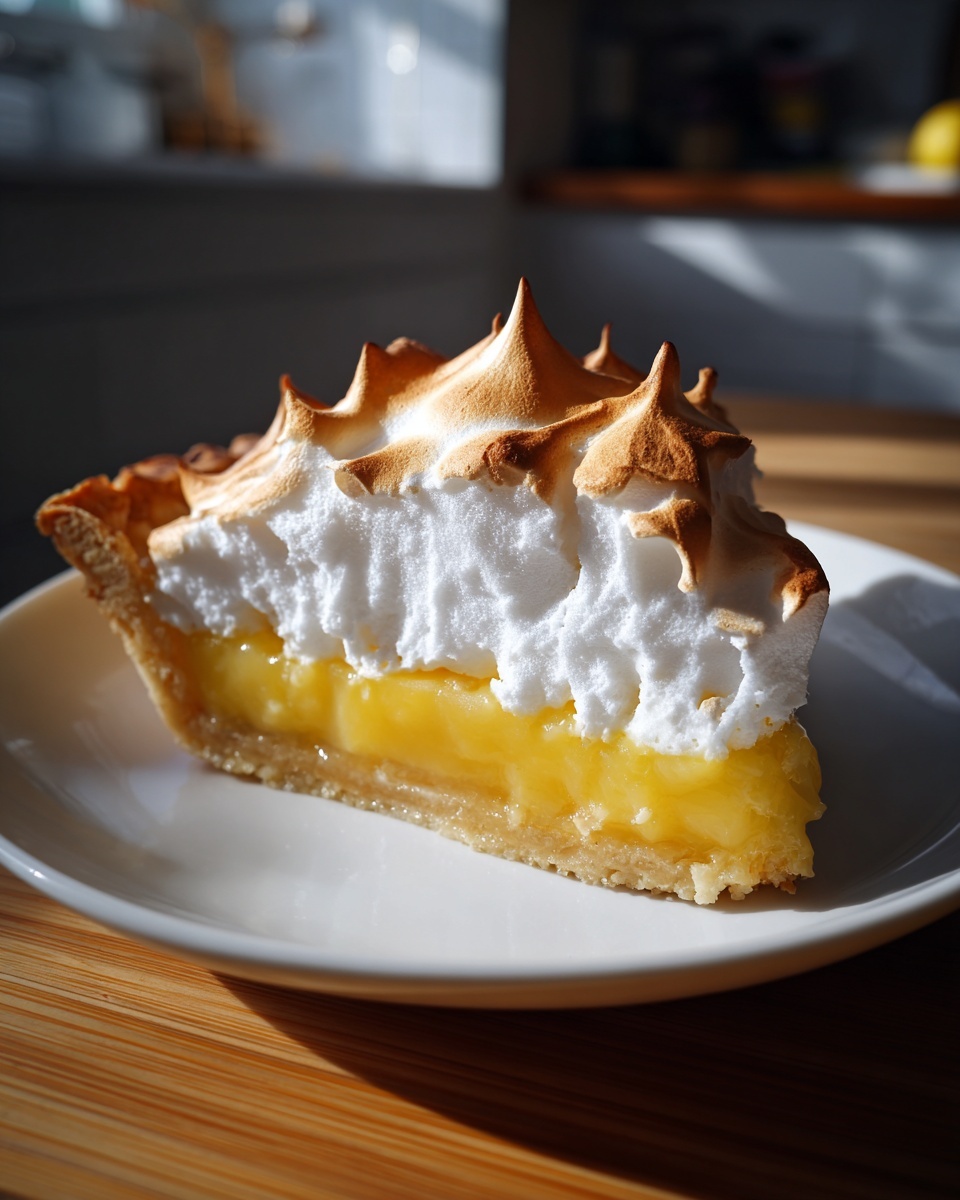
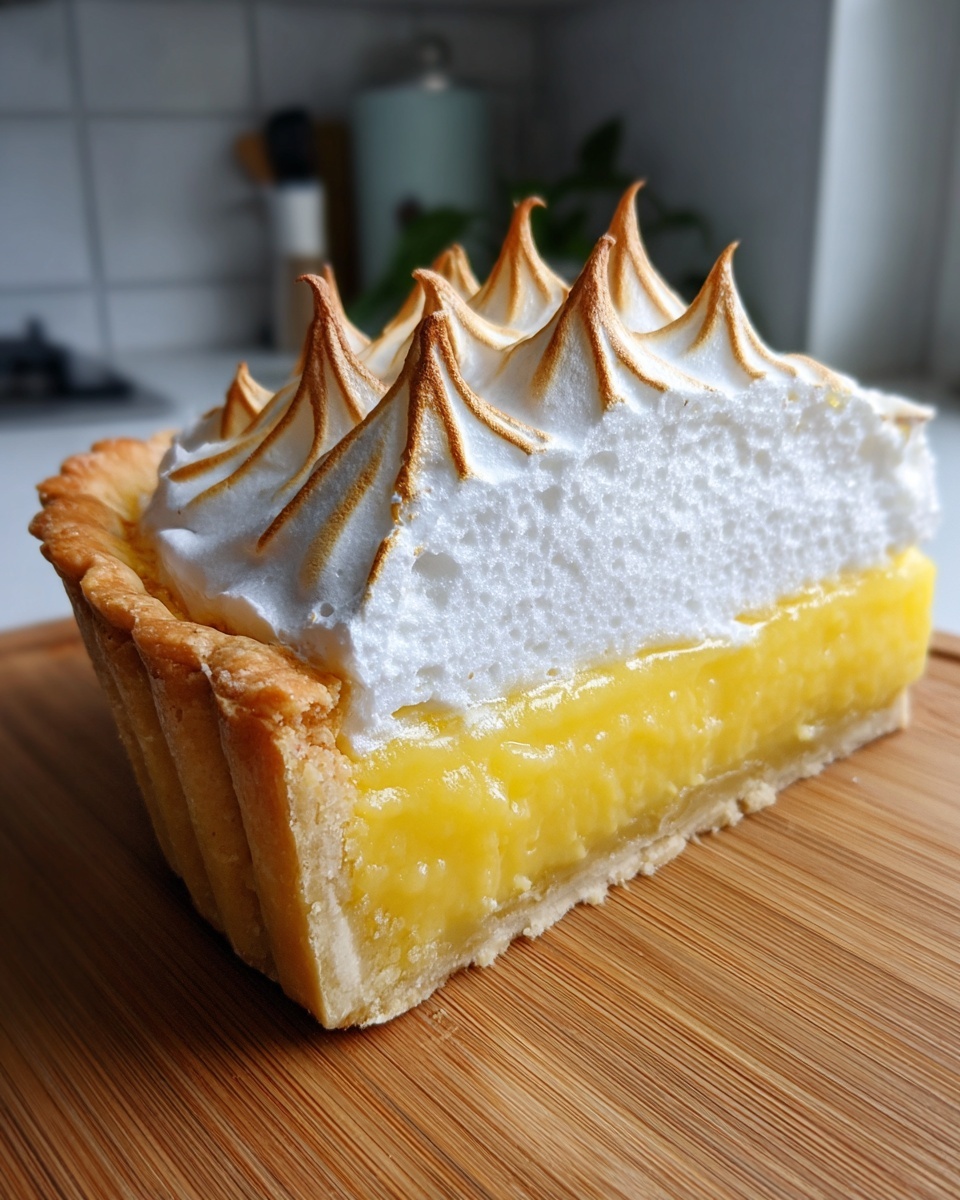
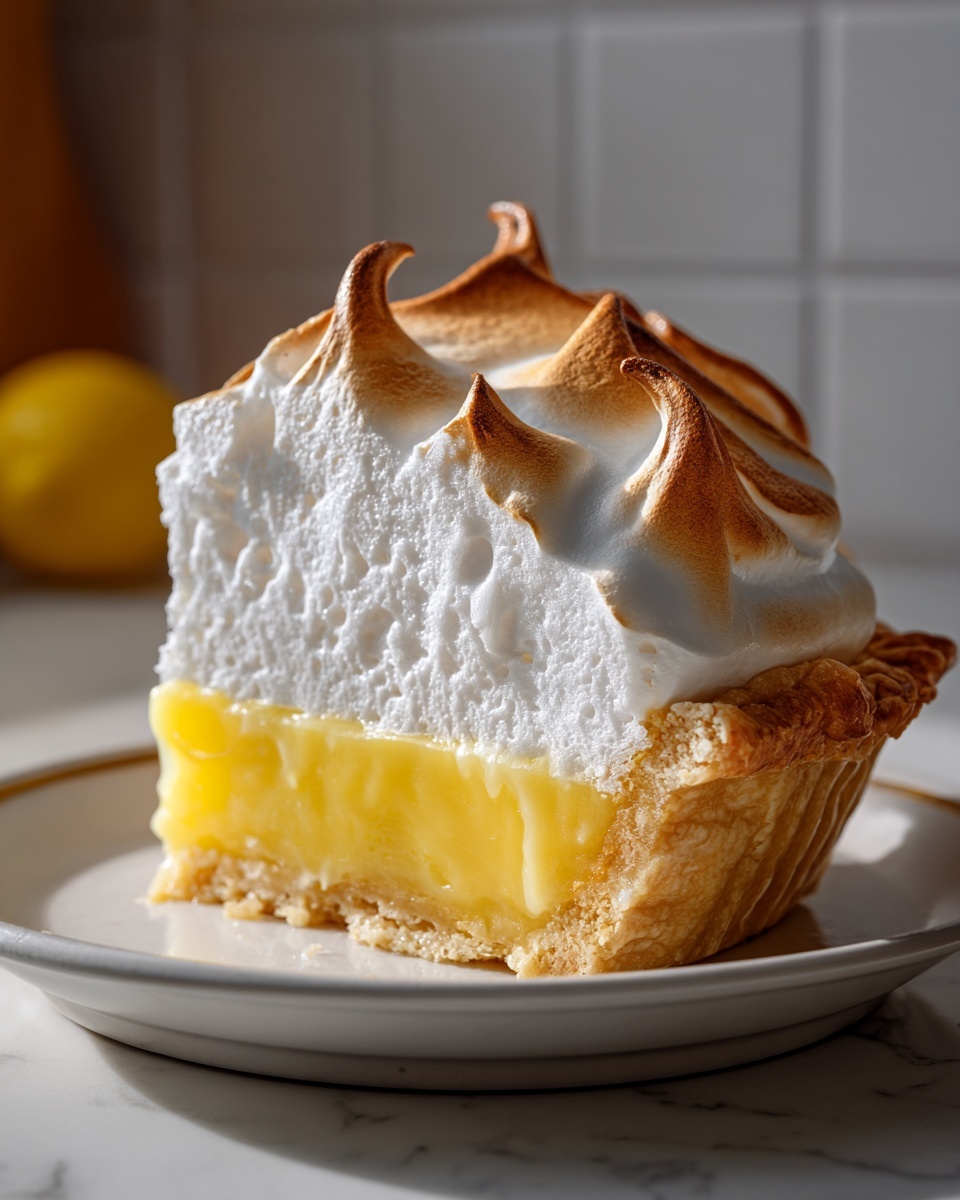
Oh, the dazzling, dramatic lemon meringue pie! It’s the quintessential classic dessert that stops you in your tracks at any bakery or gathering. I know why you’re here: you want that towering, perfectly toasted meringue that doesn’t collapse, weep, or shrink away from that fiercely zesty lemon filling. Trust me, I’ve wrestled with temperamental egg whites plenty of times! But after years spent balancing my Californian love for brightness with my father’s Spanish precision, I finally cracked the code. This recipe for the ultimate lemon meringue pie isn’t just a formula; it’s my promise to you that you can achieve a truly showstopping dessert completely from scratch, every single time. Let’s get baking!
- The Story Behind Our Ultimate Lemon Meringue Pie Recipe
- Ingredients for the Best Lemon Meringue Pie
- How to Prepare a Classic Lemon Meringue Pie From Scratch
- Tips for the Perfect Showstopping Lemon Meringue Pie
- Ingredient Notes and Substitutions for Your Lemon Meringue Pie
- Serving Suggestions for Your Classic Dessert
- Storage and Reheating Instructions for Lemon Meringue Pie
- Frequently Asked Questions About Perfect Lemon Meringue Pie
- Understanding the Nutrition in This Classic Dessert
The Story Behind Our Ultimate Lemon Meringue Pie Recipe
For years, the lemon meringue pie taunted me. It’s gorgeous when it’s perfect, but oh, the drama it can bring to the kitchen! I used to dread that moment when the meringue would start sweating right after coming out of the oven—that dreaded weeping that ruins the presentation. When I decided to pivot from my PR career and really dig into my culinary foundation, mastering technical bakes like this became my obsession. My formal training taught me exactly *why* certain steps happen, allowing me to troubleshoot that shrinking or watery filling.
This recipe is the result of that deep dive. It delivers the approachable elegance I strive for here at Unfold Recipes. It lets you create a truly showstopping dessert without needing a chemistry degree. If you want to learn more about my kitchen journey between corporate life and rolling out dough, I share more on my About Page!
Ingredients for the Best Lemon Meringue Pie
Getting the best out of your lemon meringue pie starts right here, staring at the list. When everything is measured out and placed in little bowls—we call that ‘mise en place’—the actual assembly flows like a dream. For this recipe, we absolutely need three distinct sets of ingredients to nail that beautiful balance between crust, tart filling, and sweet topping.
For the Homemade Flaky Crust
You need one fully prepared, 9-inch pie shell baked until golden brown. If you are making my buttery pie crust recipe from scratch, just make sure it’s cooled completely before we move on to the next part. We can’t move forward until that shell is ready!
- 1 recipe for Homemade Flaky Crust (9-inch pie shell, baked)
For the Zesty Lemon Filling
This is where the punch comes from! We rely on fresh-squeezed juice and zest to make sure this tangy lemon custard really sings against the sweet meringue. Don’t skimp on the butter at the end; it adds that beautiful, silky mouthfeel.
- 1 1/2 cups granulated sugar
- 1/3 cup cornstarch
- 1/4 teaspoon salt
- 1 1/2 cups cold water
- 4 large egg yolks, lightly beaten
- 1/2 cup fresh lemon juice (about 3 lemons)
- 1 tablespoon lemon zest
- 2 tablespoons unsalted butter
For the Tall Meringue Topping
This selection is crucial for achieving that mile high meringue we are aiming for. Make sure your egg whites are truly at room temperature; they just whip up higher and faster that way!
- 6 large egg whites, room temperature
- 1/2 teaspoon cream of tartar
- 1/2 cup granulated sugar (for meringue)
How to Prepare a Classic Lemon Meringue Pie From Scratch
Now we move into the creation phase—the best part of baking from scratch! When following these steps, trust your instincts alongside the instructions. It’s about building structure, especially in the filling, so it sets up beautifully and doesn’t weep later. We’re going to handle the custard first, then whip up the meringue while the filling is still hot. It’s a precise dance, but a simple one!
Preparing the Baked Crust and Zesty Lemon Filling
First things first, make sure that gorgeous crust you baked is completely cool. You don’t want any residual heat spoiling the custard! In a medium saucepan, you’ll whisk together the 1 1/2 cups of sugar, cornstarch, and salt, then slowly introduce the cold water until it’s totally smooth. Put this over medium heat and stir constantly until it thickens up like pudding and actually comes to a rolling boil. You need that one full minute of boiling; that’s what activates the cornstarch and sets your filling structure for the perfect lemon meringue pie.
While that’s boiling, gently whisk your egg yolks in a separate bowl. Remember to temper them! Slowly drizzle about a cup of the hot sugary water into your yolks while whisking nonstop. This stops them from scrambling. Then—slowly—pour that tempered yolk mixture back into the saucepan. Stir it gently until it thickens again and bubbles softly. Off the heat goes the magic! Stir in your lemon juice, zest, and that good butter until it melts right in. Pour this hot, gorgeous filling directly into your cooled crust.
Achieving the No Weep Meringue Topping
This is where we conquer meringue melodrama! Before you even think about touching the egg whites, your mixing bowl and whisk must be surgically clean—I mean zero grease allowed. That’s my biggest expertise tip for how to make stable meringue.
Start beating your room-temperature whites until they get foamy, then add the cream of tartar. That little powder is your secret weapon against weeping! Once you get soft peaks, take your time adding the final 1/2 cup of sugar, just a tablespoon at a time. Beat it until those peaks are stiff, glossy, and stand straight up when you lift the beater. That towering structure is your no weep meringue!
Assembly and Baking the Lemon Meringue Pie
As soon as your meringue is ready, you need to stop messing around and spread it over the *hot* filling. Seriously, piping hot filling! This seals the lemon layer underneath, which is an absolute non-negotiable step for a successful lemon meringue pie. Make sure that meringue seals all the way to the edge of the crust so it can’t sneak around the sides and shrink!
Finally, bake it at 350°F until those beautiful peaks are just kissed with golden brown color—usually 12 to 15 minutes. Here’s the last, super-important step: Let it cool slowly on a wire rack at room temperature for at least four hours. Resist the urge to put it in the fridge right away; rapid temperature drops are what cause all that gooey weeping.
Tips for the Perfect Showstopping Lemon Meringue Pie
Achieving that perfect, dramatic presentation for your lemon meringue pie takes just a little bit of insider knowledge. Baking is science, and when you follow the science, you avoid all those common kitchen tragedies like a shrinking meringue or a runny filling. We want that sky-high, beautiful topping that makes everyone gasp a little, right?
Secrets to a Tall Meringue Topping
The secret to that mile high meringue really boils down to two things: cleanliness and whisking power. Do not, I repeat, *do not* let a single microscopic trace of grease or egg yolk touch your bowl or whisk attachments. I cannot stress this enough—grease is the enemy of volume!
Make absolutely sure those egg whites are fully at room temperature before you start. They incorporate air so much better when they aren’t cold. Beat them until they form stiff, glossy peaks—meaning when you lift the whisk, the peak stands perfectly straight up without flopping over. We want architecture, not droop!
Flavor Boost for Your Zesty Lemon Filling
For the most vibrant, intensely flavored tangy lemon custard, you have to use fresh lemons. Bottled juice just doesn’t have that aromatic lift. I always use the zest of about three medium lemons, but make sure you’re only scraping off the bright yellow part—the white pith underneath is bitter and we don’t want that!
It’s worth spending that extra minute zesting right before you make the pie; the oils from fresh zest are magic. If you want a little extra depth, some bakers online swear by a small addition of something like almond extract, but honestly, I find the simple butter and fresh citrus combination is unbeatable. If you are looking for more advanced tips on foolproof meringue, I came across a specific whipping sequence that I always keep tucked away; you can see what I mean over here!
Ingredient Notes and Substitutions for Your Lemon Meringue Pie
When you’re aiming for a spectacular lemon meringue pie, the ingredients matter, and I know questions pop up instantly—especially when you realize you’re out of something crucial! That’s totally normal when you’re baking from scratch. Remember, I aim for approachable elegance, but that doesn’t mean we skip the foundational science behind why certain components are non-negotiable.
Let’s talk about substitutions. For a classic dessert like this, I always recommend sticking close to the recipe, particularly for the filling structure—that combination of cornstarch and yolks needs to be precise for that perfect set. However, I understand life happens! If you’re looking for a reliable crust, please check out my dedicated recipe for a flaky crust. A store-bought shell is certainly faster, but I promise you, the buttery flavor of a homemade flaky crust takes this pie over the top!
What about that magic ingredient to make your meringue stable? If you don’t have cream of tartar on hand for your no weep meringue, you can substitute it with about half a teaspoon of white vinegar or lemon juice for the 1/2 teaspoon called for in the recipe. It still provides that necessary acid to help the egg whites build structure. It works well, but honestly, cream of tartar is the gold standard for preventing any moisture leakage.
And finally, the lemons. Can you use bottled lemon juice? Technically, yes, if you are in an absolute pinch, but please consider it a last resort for your tangy lemon custard. The flavor profile just won’t be as vibrant or as true to that bright, fresh spring feeling we’re chasing. Trust me, squeezing three lemons is a small investment for the massive payoff in flavor intensity!
Serving Suggestions for Your Classic Dessert
When you have finally created this magnificent, towering lemon meringue pie, the last thing you want to do is serve it with something that competes with that beautiful explosion of sweet and tart flavor. This pie truly stands on its own as the star of the show!
When I bring this out after a big meal, I like to keep the accompaniments incredibly simple. Overly heavy sauces or desserts just drown out that perfect, bright citrus snap. This is where the elegance comes in—pairing something subtle that enhances the tang without stealing the spotlight.
First, let’s talk drinks. Because the pie is so richly flavored, a simple palate cleanser works wonders. Forget heavy sodas! I love serving this with a piping hot cup of good quality coffee, or even better, a delicately spiced tea. If you’re looking for something warm and aromatic that cuts through the richness of the crust beautifully, you simply must try my Chai Latte recipe—the subtle cinnamon and cardamom notes pair surprisingly well with the lemon!
If you must serve a side, keep it light. A tiny dusting of extra powdered sugar on the plate is often all you need for visual appeal. Or, if it’s a summer evening, you could serve a small bowl of fresh, unsweetened berries on the side—think raspberries or blueberries. Their slight tartness mirrors the filling, but their coolness offers a lovely texture contrast to the creamy custard and fluffy meringue.
Honestly though? Once you’ve gone through the trouble of making a showstopping dessert like this completely from scratch, the best pairing is just silence, admiration, and a big slice!
Storage and Reheating Instructions for Lemon Meringue Pie
Okay, this is probably the most important part of taking care of your beautiful creation. We spent all that time perfecting this traditional pie recipe, and the last thing we want is to ruin the meringue by storing it wrong. You absolutely cannot stick your beautiful, towering lemon meringue pie straight into the refrigerator!
Why? Rapid cooling sucks the moisture right out of the atmosphere inside the fridge and pulls it straight into the meringue, causing that awful puddle of sugar water—weeping, remember? So, for the happiest pie, let it cool down fully on the counter first. I let mine sit out at room temperature for at least four to six hours after baking before I even consider putting it away. This lets the filling firm up nicely while keeping the meringue stable.
Once it’s cooled down, then yes, you need to chill it. Cover the pie very loosely with plastic wrap; don’t press it directly onto those gorgeous peaks. If I’m only chilling it for a day or two, I actually prefer to use a cake carrier or a large bowl that I drape over it, leaving air flow around the edges. This prevents the plastic from sticking.
If you are only planning to eat a slice or two right away, this is my hack for saving the rest: Slice the pie carefully. Then, take the remaining section and cover the exposed filling and crust edges with plastic wrap, leaving the meringue slightly exposed but protected from direct airflow. Store slices in individual airtight containers if you can because once meringue gets exposed to air for too long, it starts to look less fluffy.
Reheating? Don’t even try it. This classic dessert is designed to be served cool or at room temperature. Trying to warm up a meringue pie just invites disaster and sogginess. Enjoy that wonderful sweet and tart contrast slightly chilled!
Frequently Asked Questions About Perfect Lemon Meringue Pie
I get so many messages asking about specific steps, so let’s tackle some of the most common concerns about making this incredible lemon meringue pie masterpiece. Even when you bake this wonderful from scratch pie, little questions always pop up!
Can I make the lemon filling for my lemon meringue pie ahead of time?
Yes, you absolutely can! This is a fantastic trick, especially if you’re hosting a big holiday bake event. You can cook the tangy lemon custard completely, cool it slightly, pour it into your baked shell, and then cover it tightly with plastic wrap. Then, you store it in the fridge. The key is that you *must* wait until you’re ready to serve (or within a few hours of serving) to make and top it with the meringue. The filling needs to be room temperature or slightly warm when the meringue goes on, but never cold, or they won’t bond properly!
What is the best way to slice a lemon meringue pie without messing up the meringue?
This is where you need a bit of kitchen warfare! Forget your everyday butter knife; it drags and smears that lovely toasted topping. For clean slices, you need a sharp, thin knife, and you must dip it in very hot water right before each cut. Wipe the knife dry quickly, slice cleanly through the pie, and then repeat the hot water dip for the next slice. It keeps the meringue looking sharp and prevents dragging!
Is it possible to use a store-bought crust for this lemon meringue pie recipe?
Look, I won’t lie to you—if you are short on time and need an easy lemon pie this minute, a good quality store-bought shell works in a pinch. But hear me out: the entire experience of this dessert is that glorious interplay between the three layers. The buttery, flaky layers of my dedicated buttery pie crust recipe give the sharp lemon filling something sturdy and rich to rest on. If you skip that step, you miss out on about 30% of the wow factor! It’s certainly doable, but trust me, try the homemade crust once.
If you want to see more of my baking tips and thoughts on entertaining, feel free to poke around my latest blog posts!
Understanding the Nutrition in This Classic Dessert
When we talk about creating a showstopping dessert like this deeply satisfying lemon meringue pie, I always want to be transparent about what goes into that perfect slice. While this recipe is all about rich flavor—from the buttery pie crust recipe to that sweet, sticky meringue—it’s good to have a general idea of the nutritional breakdown.
Please remember, since this is a complete from scratch pie recipe, these numbers are just estimates! They can change wildly depending on the brands of butter, sugar, and even the type of flour you use in your crust. This breakdown is based on my standard recipe yields:
- Serving Size: 1 slice
- Calories: 380
- Sugar: 45g (That’s where the sweet and tart balance comes from!)
- Fat: 18g
- Saturated Fat: 9g
- Carbohydrates: 52g
- Protein: 6g
This beautiful classic dessert tends to be higher in sugar and fat, which is exactly what gives us that incredibly rich mouthfeel and the structure necessary for that mile high meringue. Don’t worry about hitting these numbers every time you decide to treat yourself—that’s not what cooking is all about! It’s about joy. But it’s helpful to know what you’re serving!
PrintThe Ultimate No-Fail Lemon Meringue Pie: Tall, Zesty Custard, and Weep-Proof Meringue

This recipe guides you through creating a classic lemon meringue pie from scratch, featuring a buttery crust, intensely zesty lemon custard, and a mile-high, stable meringue topping that resists weeping. It is a showstopping dessert designed for reliable success.
- Prep Time: 30 min
- Cook Time: 35 min
- Total Time: 65 min
- Yield: 8 servings 1x
- Category: Dessert
- Method: Baking
- Cuisine: American
- Diet: Vegetarian
Ingredients
- 1 recipe for Homemade Flaky Crust (9-inch pie shell, baked)
- 1 1/2 cups granulated sugar
- 1/3 cup cornstarch
- 1/4 teaspoon salt
- 1 1/2 cups cold water
- 4 large egg yolks, lightly beaten
- 1/2 cup fresh lemon juice (about 3 lemons)
- 1 tablespoon lemon zest
- 2 tablespoons unsalted butter
- 6 large egg whites, room temperature
- 1/2 teaspoon cream of tartar
- 1/2 cup granulated sugar (for meringue)
Instructions
- Prepare your 9-inch pie crust and bake it according to your preferred recipe until golden brown. Let the baked crust cool completely on a wire rack.
- For the zesty lemon filling, whisk together 1 1/2 cups sugar, cornstarch, and salt in a medium saucepan. Gradually whisk in the cold water until smooth.
- Cook the mixture over medium heat, stirring constantly, until it thickens significantly and comes to a boil. Boil for one minute, stirring constantly. Remove from heat.
- In a separate bowl, whisk the egg yolks lightly. Slowly drizzle about 1 cup of the hot sugar mixture into the yolks while whisking constantly to temper the eggs.
- Pour the tempered yolk mixture back into the saucepan with the remaining hot mixture. Cook over medium heat, stirring constantly, until the filling thickens again and bubbles gently. Do not boil.
- Remove the pan from the heat. Stir in the lemon juice, lemon zest, and butter until the butter melts completely.
- Pour the hot lemon filling immediately into the cooled, baked pie crust.
- For the tall meringue topping, place the room temperature egg whites in a clean, grease-free mixing bowl. Beat on medium speed until foamy. Add the cream of tartar and continue beating until soft peaks form.
- Gradually add the remaining 1/2 cup of sugar, one tablespoon at a time, beating well after each addition. Increase the speed to high and beat until stiff, glossy peaks form. This creates the no-weep meringue.
- Spread the meringue over the hot lemon filling, making sure the meringue touches the inner edge of the crust all the way around to prevent shrinking. Create decorative peaks with the back of a spoon.
- Bake the pie in a preheated 350°F (175°C) oven for 12 to 15 minutes, or until the meringue peaks are lightly golden brown.
- Cool the pie completely on a wire rack at room temperature for at least 4 hours before slicing. Do not refrigerate immediately, as rapid cooling can cause weeping.
Notes
- To achieve a truly stable, no-weep meringue, make sure your mixing bowl and whisk attachments are completely free of any grease or egg yolk residue.
- Pour the hot filling into the crust before topping with meringue; this helps seal the filling and prevents the meringue from sliding off.
- For a showstopping presentation, use a kitchen torch to toast the meringue peaks instead of baking.
Nutrition
- Serving Size: 1 slice
- Calories: 380
- Sugar: 45
- Sodium: 180
- Fat: 18
- Saturated Fat: 9
- Unsaturated Fat: 9
- Trans Fat: 0.5
- Carbohydrates: 52
- Fiber: 1
- Protein: 6
- Cholesterol: 110