
When the holidays roll around, my kitchen turns into a whirlwind of activity, and frankly, sometimes I just cannot face turning on the oven again! The last thing I need during Thanksgiving prep is to fight for precious oven space. That is exactly why I developed this recipe for the easiest, creamiest no bake pumpkin pie you will ever lay eyes on. It’s the perfect answer for relaxed entertaining—a dessert that looks stunning, tastes like pure autumn bliss, and can be totally finished days before guests even arrive. Seriously, this recipe is my secret weapon for keeping things elegant without adding last-minute stress to the menu. It’s all about letting the refrigerator do the heavy lifting here. If you are looking for more inspiration for your kitchen adventures, take a peek at my main recipe index.
- Why This is the Best No Bake Pumpkin Pie for Your Holiday Table
- Ingredients Needed for Your No Bake Pumpkin Pie Recipe
- Step-by-Step Instructions for This Easy No Bake Pumpkin Pie
- Tips for the Best No Bake Pumpkin Pie Success
- Storage and Serving Suggestions for Your Chilled Pumpkin Delight
- Variations: From No Bake Pumpkin Pie to Cheesecake
- Frequently Asked Questions About Making a No Bake Pumpkin Pie
- Nutrition Estimates for This Simple Fall Treat
- Share Your Experience with This No Bake Pumpkin Pie
Why This is the Best No Bake Pumpkin Pie for Your Holiday Table
When I develop a recipe for entertaining, I always look for amazing flavor married to minimal fuss. This no bake pumpkin pie is the reigning champion of simplicity. It’s the ultimate quick pumpkin dessert because you are only dealing with mixing and chilling—no actual cooking involved! The result? A truly decadent, yet impossibly light, creamy chilled pie that tastes like spiced heaven.
It’s honestly my go-to when I know I’ll be juggling sides and a main course. You can whip this up in the morning and completely forget about it until dessert time. If you love planning ahead for gatherings, check out my tips on creating the perfect make ahead holiday dessert menu.
Speedy Preparation: A 20-Minute No Bake Pumpkin Pie
I know, I know, twenty minutes of prep sounds unbelievable when you are expecting flawless results. But trust me, because there is no baking, the hands-on time stays low, easily dipping into the realm of a 10 minute dessert recipe when you are quick. You press the crust, mix the filling, whip the cream, and you are done! The oven stays cold, and you get to focus on the main meal.
Achieving the Perfect Creamy Chilled Pie Texture
The magic here is twofold: we are using cream cheese for a sturdy, rich body, and folding in freshly whipped cream to keep it airy. This combination prevents that dense, heavy feeling you sometimes get with baked pies. It sets up beautifully in the fridge, giving you slices that are clean but melt beautifully on your tongue. That beautiful creaminess is why everyone asks for this recipe year after year.
Ingredients Needed for Your No Bake Pumpkin Pie Recipe
Sourcing the right ingredients really sets up this no bake pumpkin pie recipe for success. Since there’s no heat to cook them, the quality and preparation—like making sure the cream cheese is actually softened—matter a great deal! I always lay everything out before I begin, much like I do when tackling a pumpkin dump cake. Here is exactly what you need:
For the Graham Cracker Crust Pie
- 1 1/2 cups graham cracker crumbs
- 1/4 cup granulated sugar (for crust)
- 6 tablespoons unsalted butter, melted
For the Creamy Filling Base
- 1 (15 ounce) can pure pumpkin puree
- 1 (14 ounce) can sweetened condensed milk
- 1 teaspoon pumpkin pie spice
- 1/2 teaspoon ground cinnamon
- 1/4 teaspoon ground nutmeg
- 1 (8 ounce) package cream cheese, softened
- 1 teaspoon vanilla extract
For the Whipped Topping
- 1 1/2 cups heavy whipping cream, cold
- 1/4 cup powdered sugar (for topping)
Step-by-Step Instructions for This Easy No Bake Pumpkin Pie
Putting this easy no bake pumpkin pie together feels more like assembling a layered dessert than actual baking, which is why I adore it! We are layering textures here—the crunchy crust, the dense creamy filling, and the light whipped topping. Just follow these steps carefully, and you absolutely cannot go wrong. If you’ve ever made a quick treat like a pumpkin dump cake, you already have the right instinct for mixing things together!
Preparing and Chilling the Graham Cracker Crust Pie
First things first, we need the base to be solid! In a medium bowl, combine your graham cracker crumbs, that small amount of granulated sugar meant for the crust, and the melted butter. Use a fork to mix everything until it looks evenly moistened—you want the texture of wet sand. Press this mixture firmly into the bottom and all the way up the sides of your 9-inch pie plate. Don’t be shy; press hard against the bottom so it holds together when slicing later. Pop this into the refrigerator for at least 15 minutes while you work on the filling. This short chill time is vital!
Mixing the Pumpkin Filling Base
Now for the star! Grab a large bowl—preferably one chilled from the fridge, if you can manage it. Beat that softened cream cheese until it’s perfectly smooth and no lumps remain. This is important; if the cream cheese is cold, your filling will be lumpy! Once it’s smooth, add in the pumpkin puree, the sweetened condensed milk, and all those beautiful spices: the pumpkin pie spice, cinnamon, and nutmeg. Beat until everything is completely homogenous. Finish this step by stirring in the vanilla extract thoroughly.
Folding in the Whipped Topping for a Light Pumpkin Dessert
This is where we get that incredible whipped pumpkin dessert lift! In a separate, CLEAN, chilled bowl, whip your cold heavy cream and powdered sugar together until you reach stiff peaks. You know it’s ready when you can lift the beaters out and the cream stands straight up—that gorgeous texture is what turns this into something special, almost like a No Bake Pumpkin Cheesecake filling!
Here’s my technique for keeping all that air in: Take about one-third of the whipped cream and gently fold it into your thick pumpkin mixture. This lightens the base so the rest incorporates easier. Then, very gently, fold in the remaining two-thirds until you see just a few streaks left. Stop folding right there! You want a unified, beautiful filling, but overmixing knocks out all that precious air we just created.
Setting the No Bake Pumpkin Pie
Carefully spoon all that creamy filling into your waiting, chilled graham cracker crust. Smooth the top with an offset spatula so it looks neat and professional. Cover the pie loosely with plastic wrap—make sure the wrap isn’t touching the surface, or it might leave marks. Now, the hardest part: you have to let it set in the refrigerator for a minimum of 4 hours. Honestly, for the absolute best results where you can get perfect slices, I strongly recommend letting this no bake pumpkin pie chill overnight. Patience rewards you with a perfectly set dessert!
Tips for the Best No Bake Pumpkin Pie Success
Look, the beauty of a no bake pumpkin pie is that it’s forgiving, but there are always a few little expert nudges that take it from good to truly spectacular. Since we aren’t using an oven to help structure things, we rely on chilling and ingredient balance. When I test my recipes, I always try to account for real-life kitchen mishaps, so these tips should keep your pie picture-perfect! If you’ve mastered cookies before, you’ll find this just as fun; check out my tips for making no bake cookies for another easy win.
Ingredient Swaps for Your No Bake Pumpkin Pie
Sometimes you just need to pivot based on what you have in the pantry. If you are in a major rush, you can use pre-made graham cracker crumbs instead of crushing your own; just start with 1 3/4 cups of crumbs and skip mixing in the extra granulated sugar that the crust recipe calls for. That saves you a few minutes right there!
Another common pivot point is the topping. If whipping heavy cream feels like one step too many, you can absolutely substitute about one cup of that heavy cream measurement with 8 ounces of thawed, cool whipped topping—think Cool Whip. It still delivers a lovely, light texture. It might not be quite as rich as pure homemade whipped cream, but it’s a wonderful option for your no bake pumpkin pie when time is tight. Just remember to gently fold it in, just like we did with the real cream!
Making This a Make Ahead Holiday Dessert
This is where this recipe truly shines as a make ahead holiday dessert. Because it sets so beautifully while chilling, you don’t have to worry about it the day of the big meal. You can easily prepare the entire pie—crust, filling, and all—a full twenty-four hours early. In fact, I think the chilled spice flavors are even better if they have rested overnight! If you make it a day ahead, just cover it loosely, make sure it’s not near anything smelly in the fridge, and you are golden. When it comes time for serving, it’s ready to go straight to the table.
Storage and Serving Suggestions for Your Chilled Pumpkin Delight
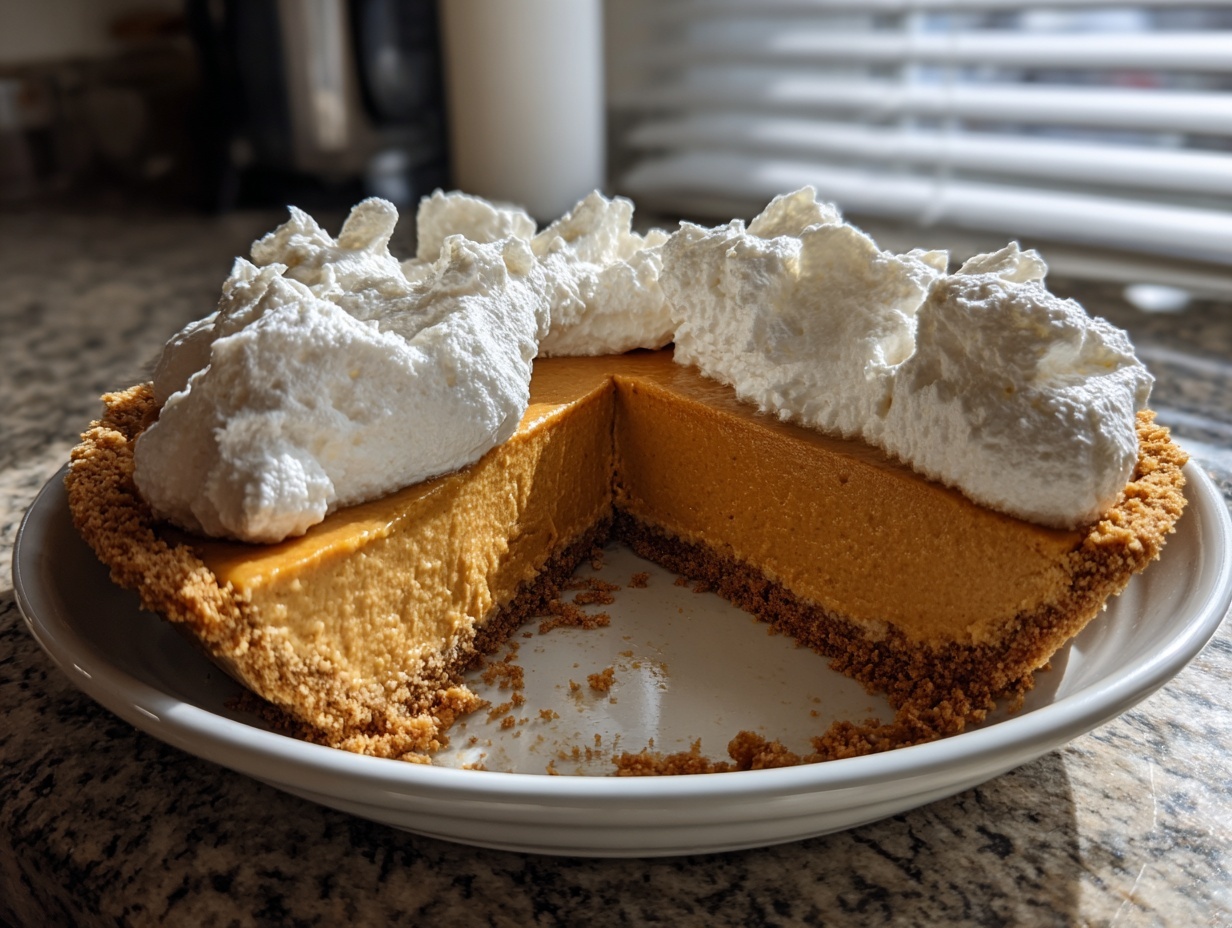
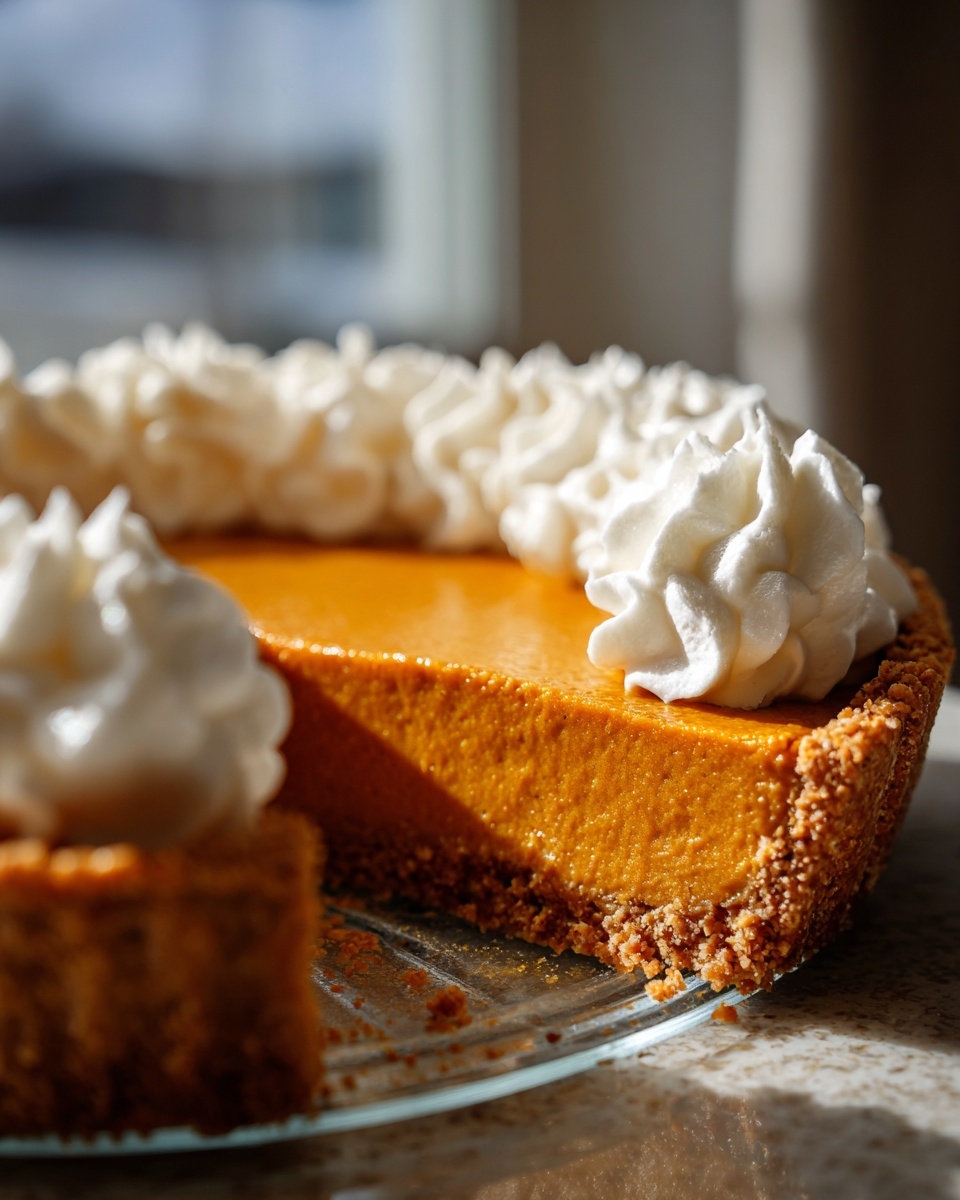
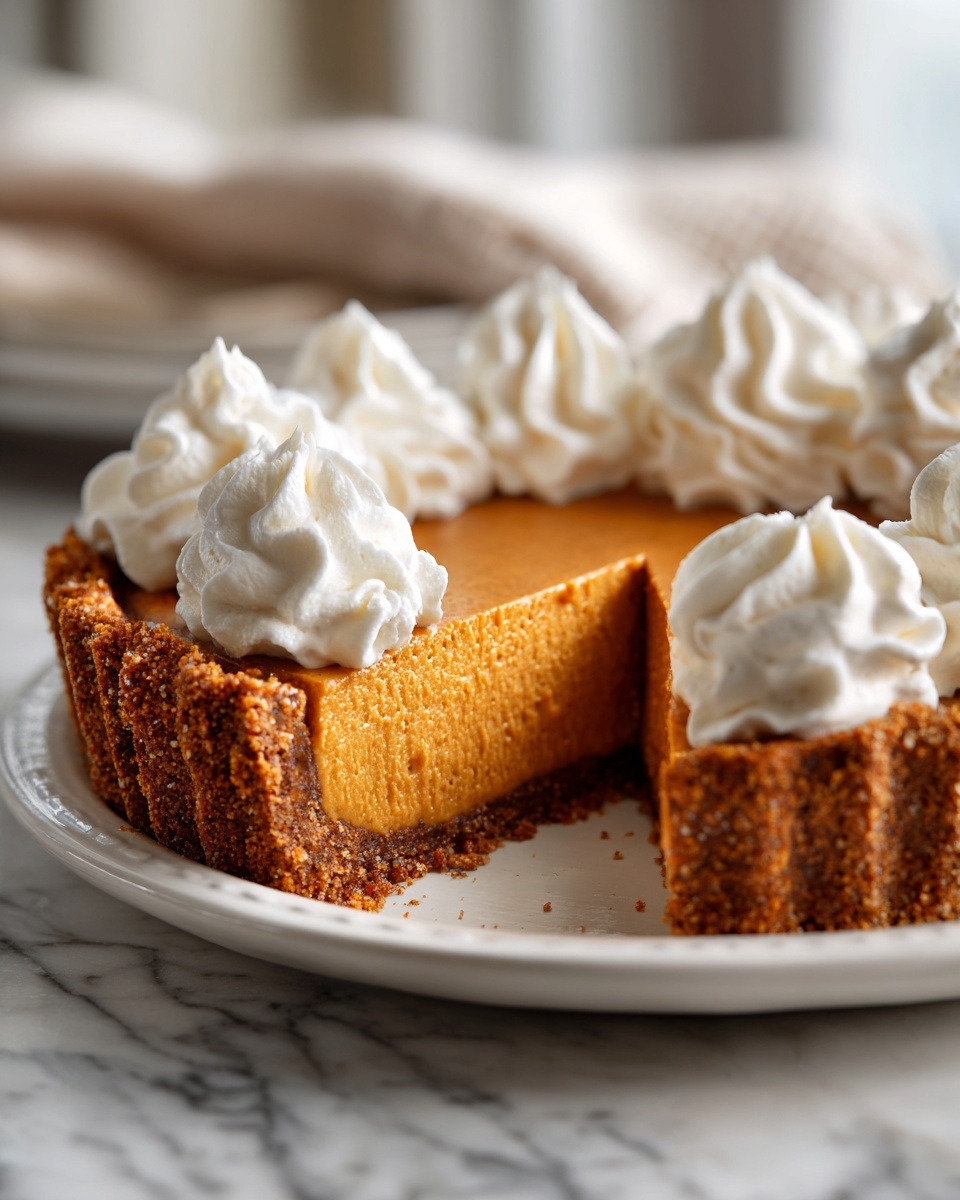
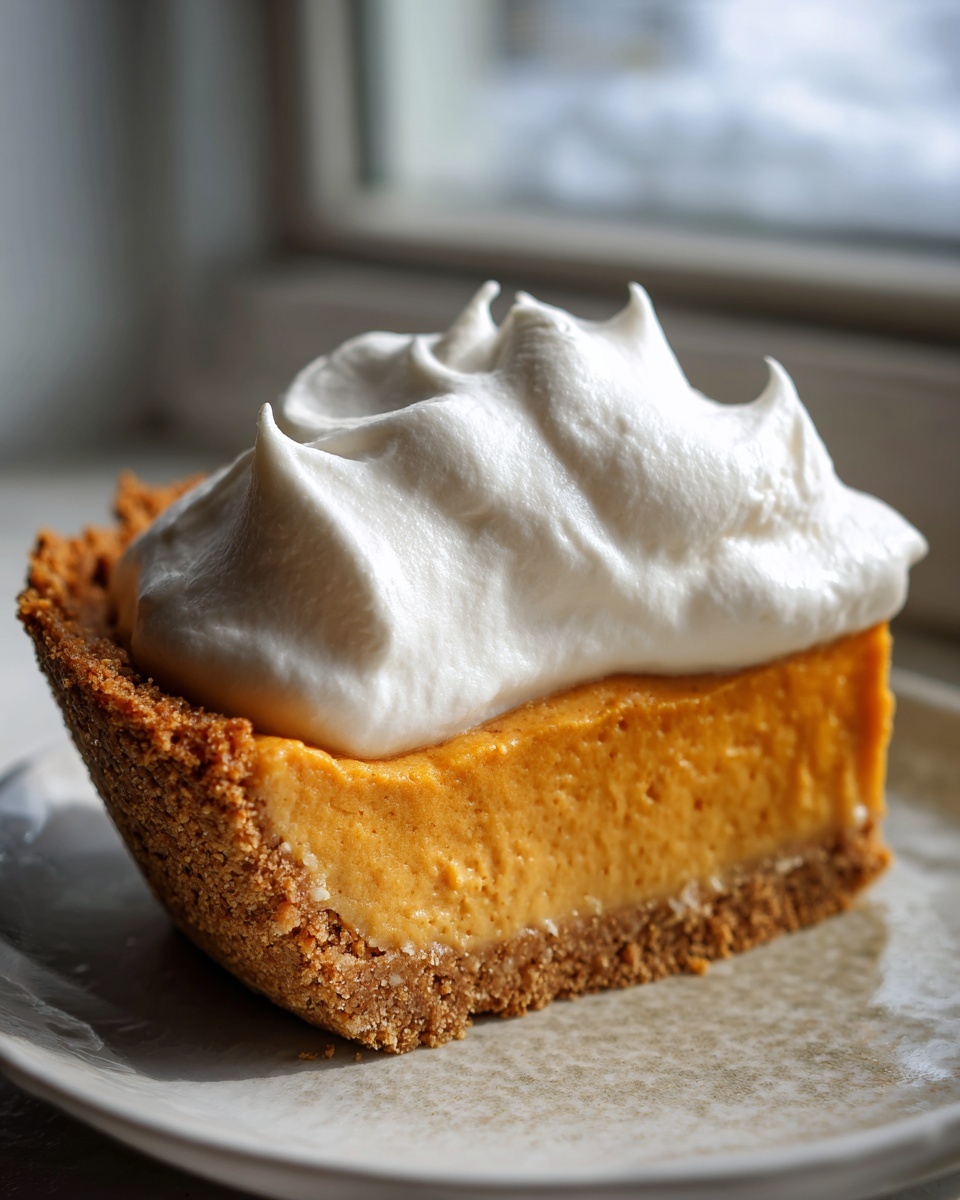
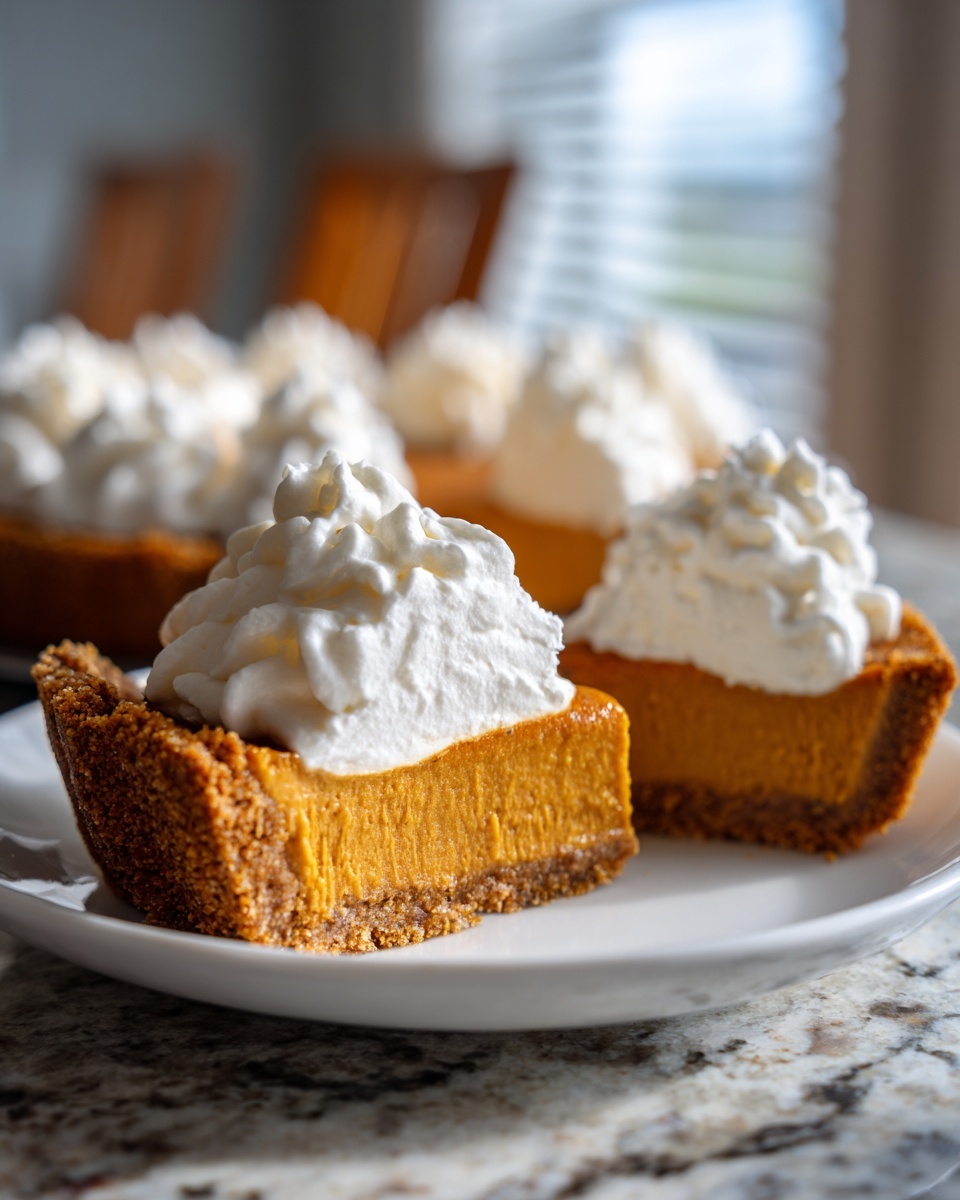
Once your no bake pumpkin pie has set up perfectly—and trust me, you’ll know it because it will feel firm and slice cleanly—the final act is presentation! This dessert is truly a chilled pumpkin delight, and how you serve it can elevate it just as much as a baked classic.
Storage is simple, which is the beauty of no-bake recipes! Keep the pie tightly covered with plastic wrap in the refrigerator. Because of the stabilized dairy and pumpkin base, it holds up wonderfully. I find it tastes best within the first two to three days, but honestly, it rarely lasts that long at my house!
When it comes time to serve, you have a few lovely options for garnishing. My favorite way is the most classic: a generous swirl of freshly whipped cream right before it hits the table. You can easily whip up a small batch—just heavy cream, a tablespoon of powdered sugar, and a splash of vanilla—to top each wedge individually, or you can spread a thin layer over the entire pie surface. That light texture contrasts beautifully with the density of the filling.
For a little visual flair during those busy fall gatherings, consider dusting the top lightly with extra cinnamon or pumpkin pie spice. If you want to bring in another seasonal aroma, skip the spice and grate a tiny bit of fresh orange zest over the top—it’s unexpected and complements the spices so well. It’s an effortless touch that makes this simple dessert look like you spent hours fussing over it. If you enjoyed this cool treat, you might also love bringing that autumn flavor into your morning routine with my pumpkin spice latte recipe!
Variations: From No Bake Pumpkin Pie to Cheesecake
One of the things I love most about this foundation recipe is how versatile it is! It’s so easy to morph this no bake pumpkin pie into other amazing chilled desserts just by tweaking one key ingredient. When people ask me how to make a richer, denser dessert, I always point them toward the cream cheese element. It’s the backbone of that luxurious structure we built!
If you’ve been craving something more substantial than a light pie, you can easily convert this into a spectacular No Bake Pumpkin Cheesecake. The secret is simply increasing the dairy structure. Instead of using one 8-ounce package of cream cheese, you can easily double that to 16 ounces, keeping the pumpkin, the condensed milk, and the spices exactly the same. That added cream cheese gives you a firmer set and that signature tangy profile cheesecake lovers adore. You’ll likely need to chill it for an hour or two longer, which is no issue since we love making these ahead of time anyway!
For those who want something almost impossibly light, almost cloud-like—think of the ever-popular Pumpkin Fluff—the adjustment is just as simple. Here, we lean heavily on the whipped topping. You would reduce the cream cheese slightly, perhaps keeping just 4 ounces, and almost double the amount of cold heavy whipping cream you fold in. This creates that airy, spoonable dessert texture that is amazing served in individual bowls. It’s wonderfully light!
If you are experimenting with these variations, I highly encourage you to check out my full guide on making a fantastic pumpkin cheesecake, which dives deep into structure and setting times. And if you want to see a fantastic example of how this concept is used elsewhere, this No Bake Pumpkin Pie Cheesecake recipe over on recipes by Elena is a wonderful inspiration for shifting the dairy ratios slightly!
Frequently Asked Questions About Making a No Bake Pumpkin Pie
I always feel that the very best recipes answer all the little questions before they even pop into your head! Even though this is such a simple no bake pumpkin pie, I want you to feel totally confident executing it perfectly. People often ask me about texture and timing, since we aren’t using the oven as a safety net! Here are a few things that come up most often:
Can I skip chilling the crust?
Oh, please don’t skip this step! I know that extra chilling time feels like torture when you are ready to eat dessert, but chilling the crust (even for those minimum 15 minutes we asked for) is absolutely necessary. Remember, the crust is held together by melted butter. If that butter hasn’t firmed up again in the cold, the moment you try to press the filling in or slice the finished pie, the crust will just crumble underneath. We want a sturdy graham cracker base, not gravel, so keep it chilled!
What if I don’t have pumpkin pie spice?
This is such a useful question, especially if you are running out to the store last minute and they are sold out of the pre-mixed blends! You absolutely do not need to panic or run out and buy a whole new jar. It’s really easy to make your own blend, and honestly, sometimes blending them yourself smells even better. For this recipe, just mix together 3 parts cinnamon, 2 parts ginger, and 1 part nutmeg. Since we already added those spices separately in the recipe, just use about 1 1/2 teaspoons of your homemade blend to replace the 1 teaspoon of pre-mixed spice. It’s a great rule of thumb for any pumpkin spice pie recipe.
How long does this quick pumpkin dessert last in the fridge?
Because this is a chilled, dairy-based dessert, we want to enjoy it while the whipped cream is still lovely and fresh. Officially, this quick pumpkin dessert is best eaten within three to four days. You must keep it well-covered in the refrigerator the entire time. If you notice the crust starting to soften up near the end of that window, don’t worry; it’s still perfectly safe to eat, but the texture won’t be quite as crisp as it was on day one. It truly is the perfect make-ahead feast centerpiece.
Nutrition Estimates for This Simple Fall Treat
When we focus on creating food that feels indulgent but is actually quite simple, like this no bake pumpkin pie, it helps to have a rough idea of what we are serving. I want you to enjoy every bite without worry! Please keep in mind that these numbers are my best estimates based on standard ingredient calculations for one slice. Since we are dealing with dairy, condensed milk, and a buttery crust, this is certainly a richer treat, although certainly lighter than a fully baked version!
It’s important to remember that this delicious snapshot of autumn flavors is best enjoyed as an occasional treat alongside a balanced meal, like a lovely fall harvest salad, perhaps paired with a nice glass of wine!
Here are the estimated nutrition details for a single serving of this simple fall treat:
- Serving Size: 1 slice
- Calories: 380
- Sugar: 35g
- Sodium: 210mg
- Fat: 20g
- Saturated Fat: 11g
- Trans Fat: 0g
- Carbohydrates: 45g
- Fiber: 1g
- Protein: 6g
- Cholesterol: 45mg
This breakdown helps you understand the profile of this decadent, easy dessert. Honestly, they disappear so fast at holiday parties, these numbers rarely matter for long!
Share Your Experience with This No Bake Pumpkin Pie
As a home cook, there is truly nothing better than knowing a recipe I poured my heart into becomes part of someone else’s special memories. This glorious no bake pumpkin pie is meant to be shared, discussed, and enjoyed, often with a very generous dollop of whipped cream!
Now that you’ve created this effortless, impressive dessert, I would be so grateful if you’d take a moment to tell me all about it. Did it make your holiday entertaining smoother? Did your family notice how incredibly creamy the texture was? Head down to the comments section and let me know! If you had a chance to try it, please consider leaving this recipe a full five stars. Those ratings truly help other home cooks find reliable, delicious dishes like this one.
And please, if you share photos on social media, tag me! I absolutely love seeing your gorgeous creations on my feed. Seeing that smooth, chilled, spiced filling setting up bright on your holiday table is the best reward. If you’re looking for another crowd-pleaser that delivers maximum flavor with zero actual baking time, you must look at my decadent chocolate cupcakes recipe next!
Thank you for letting this no bake pumpkin pie become part of your story. Happy entertaining!
PrintEasy No Bake Pumpkin Pie: A Creamy Chilled Delight

Create a stunning, creamy pumpkin pie without turning on your oven. This recipe uses a simple graham cracker crust and rich, spiced filling, making it the perfect make-ahead dessert for Thanksgiving or any fall gathering.
- Prep Time: 20 min
- Cook Time: 0 min
- Total Time: 4 hr 20 min
- Yield: 8 servings 1x
- Category: Dessert
- Method: Chilling
- Cuisine: American
- Diet: Vegetarian
Ingredients
- 1 1/2 cups graham cracker crumbs
- 1/4 cup granulated sugar (for crust)
- 6 tablespoons unsalted butter, melted
- 1 (15 ounce) can pure pumpkin puree
- 1 (14 ounce) can sweetened condensed milk
- 1 teaspoon pumpkin pie spice
- 1/2 teaspoon ground cinnamon
- 1/4 teaspoon ground nutmeg
- 1 (8 ounce) package cream cheese, softened
- 1 teaspoon vanilla extract
- 1 1/2 cups heavy whipping cream, cold
- 1/4 cup powdered sugar (for topping)
Instructions
- Prepare the crust: Mix graham cracker crumbs, 1/4 cup granulated sugar, and melted butter in a bowl until evenly moistened. Press the mixture firmly into the bottom and up the sides of a 9-inch pie plate. Chill the crust in the refrigerator for at least 15 minutes.
- Make the pumpkin filling base: In a large bowl, beat the softened cream cheese until smooth. Add the pumpkin puree, sweetened condensed milk, pumpkin pie spice, cinnamon, and nutmeg. Beat until the mixture is fully combined and smooth. Stir in the vanilla extract.
- Prepare the whipped topping: In a separate, chilled bowl, use an electric mixer to beat the cold heavy whipping cream and powdered sugar until stiff peaks form. This creates your light topping.
- Fold the topping into the filling: Gently fold about one-third of the whipped cream into the pumpkin mixture to lighten it. Then, fold in the remaining whipped cream until just combined. Do not overmix.
- Assemble the pie: Spoon the creamy pumpkin filling into the chilled graham cracker crust, smoothing the top with a spatula.
- Chill: Cover the pie loosely with plastic wrap and refrigerate for at least 4 hours, or preferably overnight, to allow the pie to set completely.
- Serve: Before serving, top the pie with extra whipped cream or a dusting of cinnamon, if desired. Slice and enjoy this chilled pumpkin delight.
Notes
- For an even quicker crust, you can use 1 3/4 cups of pre-made graham cracker crumbs.
- If you prefer a lighter texture, substitute 1 cup of the heavy whipping cream with 8 ounces of thawed, cool whipped topping (like Cool Whip).
- This make-ahead holiday dessert is best served cold directly from the refrigerator.
Nutrition
- Serving Size: 1 slice
- Calories: 380
- Sugar: 35
- Sodium: 210
- Fat: 20
- Saturated Fat: 11
- Unsaturated Fat: 9
- Trans Fat: 0
- Carbohydrates: 45
- Fiber: 1
- Protein: 6
- Cholesterol: 45