

When thinking about true comfort desserts, we often go straight for chocolate or apple, but let me tell you, nothing beats the deep, sophisticated sweetness of a classic butterscotch pie. This isn’t one of those overly fussy, complicated puddings; this is an old-fashioned pie recipe that tastes like pure, buttery nostalgia. As someone who traded a career telling stories for brands to focus on what truly matters—the stories we share over food—I took deep care developing this recipe. My formal culinary training combined with my drive to create approachable elegance means this creamy butterscotch pie is reliable, delicious, and something you’ll be proud to serve at any gathering. Trust me when I say that once you master this from scratch pie filling, it’s going straight into your go-to rotation. You can read more about my philosophy on approachable cooking and storytelling over at the About page!
- Why This Old-Fashioned butterscotch pie Recipe Works
- Ingredients for Your Homemade butterscotch dessert
- How to Make the Best butterscotch pie Recipe Step-by-Step
- Variations: Try a No Bake butterscotch pie
- Tips for Success with Your Rich dessert Recipes
- Storage & Reheating Instructions for Classic custard pie
- Frequently Asked Questions About butterscotch pie
- Estimated Nutritional Data for butterscotch pie
- Share Your Homemade butterscotch dessert Experience
Why This Old-Fashioned butterscotch pie Recipe Works
I’m not going to give you a recipe that tastes thin or grainy, especially when we’re aiming for true homemade butterscotch dessert perfection. This recipe is all about achieving that indulgent, velvety result that feels sophisticated but is totally achievable right on your stovetop. It embodies the ‘approachable elegance’ I aim for here at the blog. It stands apart from those simple, quick mixes because we respect the process.
Achieving Silky Smooth butterscotch filling Texture
The real secret to that luxurious, creamy butterscotch pie filling is careful handling of the egg yolks. You absolutely must temper them! That means slowly introducing a bit of the hot sugar liquid to the beaten yolks before you add the yolks back to the main saucepan. If you just dump them in, you end up with scrambled bits instead of smooth custard. It’s a simple trick that separates a good pie from the absolute best.

Perfect Pairing for Thanksgiving pie ideas
Listen, everyone expects pumpkin or pecan at the holidays, and while I love those classics, this warm, rich flavor is a fantastic change-up! If you’re looking for Thanksgiving pie ideas that impress guests but are simple enough for you to manage alongside the turkey, this is it. It sits perfectly alongside a traditional classic custard pie plate, offering that beautiful caramel flavor without the fuss of a double crust.
Ingredients for Your Homemade butterscotch dessert
Here’s what you’ll need to assemble this divine pie. I always lay everything out before I start cooking—it’s my little secret to keeping things calm when the filling starts heating up! We are aiming for that true, from scratch pie experience, but I won’t dictate how you handle the shell. Remember, we focus on approachable elegance here!
- For the base, you’ll need one 9-inch pie crust. Either your favorite homemade flaky crust or a good quality pre-made one works here.
- For the filling, grab 1 1/2 cups of light brown sugar (and make sure it’s packed!), 1/2 cup all-purpose flour, 1/4 teaspoon salt, 1 1/2 cups cold water, 3 large egg yolks (lightly whisked), 1/2 cup unsalted butter cut into small pieces, and 1 teaspoon vanilla extract.
- The topping is simple: just 1 cup of heavy whipping cream, 2 tablespoons of powdered sugar, and another 1/4 teaspoon of vanilla extract.
Ingredient Notes and Substitutions for butterscotch pie
If you are going for truly intense flavor, try swapping out a quarter cup of that light brown sugar for dark brown sugar. That extra molasses gives you a beautiful, deep caramel flavor that makes this dessert sing. If you are worried about serving this alongside all those other Thanksgiving pie ideas, know that the crust is forgiving. If you don’t have time for a full flaky crust, a good graham cracker crust is a perfectly acceptable shortcut for this amazing filling!
How to Make the Best butterscotch pie Recipe Step-by-Step
Making this creamy butterscotch pie filling feels like magic, but it all comes down to a couple of key cooking moments. My goal is always to give you the most easy pie recipes that deliver show-stopping flavor, and this one definitely qualifies! Just follow these steps closely, and you’ll have that beautiful, rich dessert ready for the fridge in no time. You can check out my tips for other simple bakes over at my Easy Pie Recipes section for more ideas!
Preparing the Flaky Crust and how to make butterscotch filling
First things first: your crust needs to be completely cooled. Whether you baked it blind or bought it ready, don’t rush this part! Into a medium saucepan, whisk together your brown sugar, flour, and salt until they look perfectly combined. Then, slowly whisk in the cold water until there are absolutely no lumps remaining. Put this mixture over medium heat. You need to stir constantly until it thickens up enough to coat the back of a spoon—this takes about 8 to 10 minutes. Don’t let it boil wildly, just bubble happily as it thickens up.
Tempering Eggs for a Creamy butterscotch pie Filling
Now for the crucial part: the egg yolks. In a separate tiny bowl, gently whisk your three egg yolks. Take about half a cup of the hot sugar mixture from the saucepan and slowly, *slowly* whisk it into those yolks. This is the tempering that keeps them smooth! Once they are warmed up, pour that tempered yolk mixture right back into the saucepan with the rest of the sugar base. Cook this gently over medium-low heat for just 1 to 2 minutes more, stirring the entire time. Stop cooking the second it gets thick again, and seriously, do not let it boil once the yolks are in!

Chilling and Preparing the Whipped Cream Topping pies
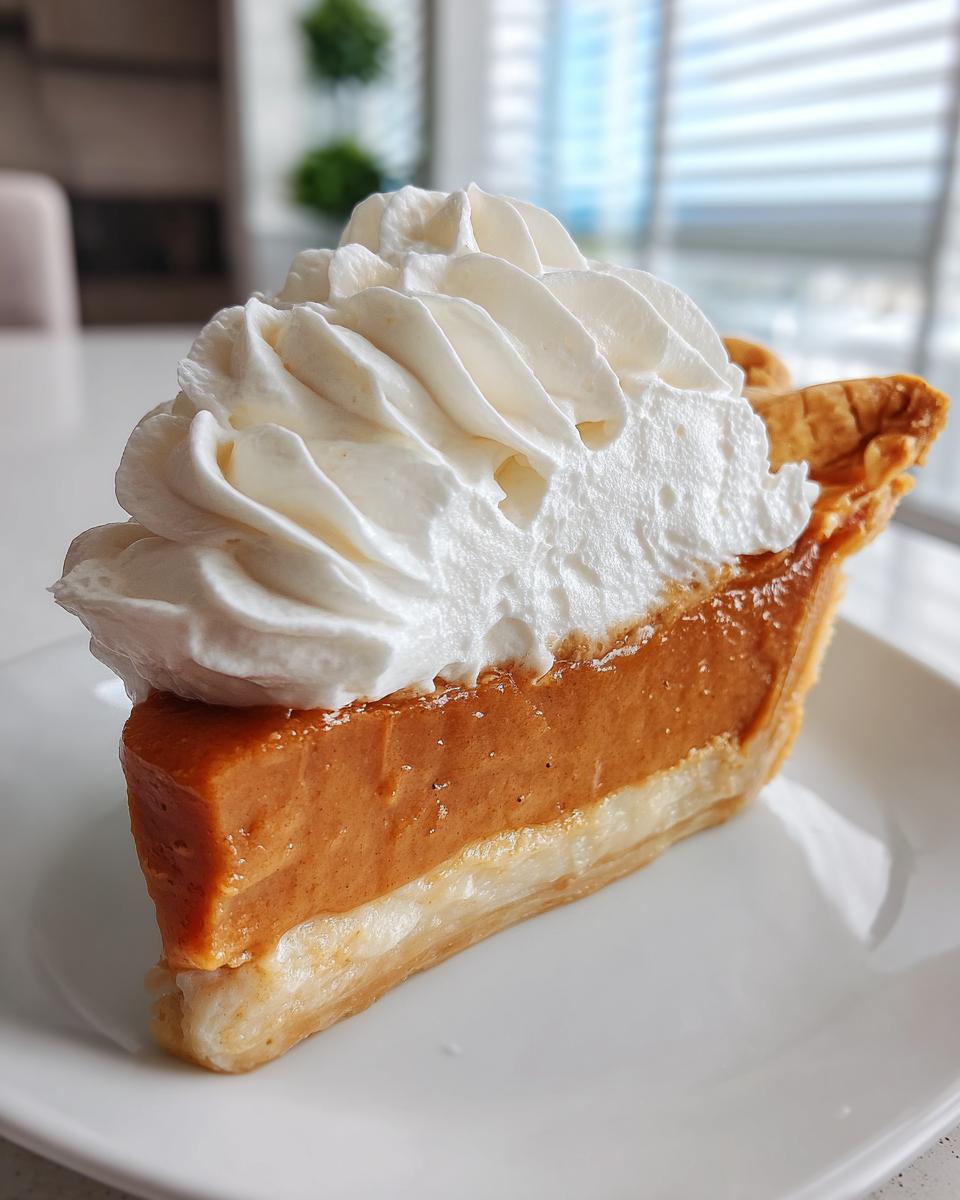
Get that pan off the heat fast! Stir in your butter pieces until they melt completely, then finish it off with your vanilla. Pour that glorious hot filling right into your cooled crust quickly. This next part is a non-negotiable tip for any custard pie: press a piece of plastic wrap directly onto the surface of the filling. This stops that silly skin from forming while it chills. You need at least 3 full hours in the fridge until it’s firm. When it’s time to serve, whisk your heavy cream, powdered sugar, and vanilla until you have stiff peaks, and pile it high on top!
Variations: Try a No Bake butterscotch pie
I know that sometimes you’re just craving that rich, gorgeous flavor of butterscotch, but you might not have time to fuss with baking a crust, especially during busy times like coordinating appetizers and sides, which is why I always keep a few easy hacks up my sleeve. If you are looking for a truly speedy dessert, this recipe is wonderfully adaptable into a fantastic no bake butterscotch pie!
The main difference is the shell. Instead of using a traditional pastry crust that needs to be blind-baked (you can skip that whole waiting game!), you should go straight for a pre-made graham cracker crust. They are sturdy and perfect for this application. Or, if you’re feeling extra speedy, you can even use a crushed Biscoff cookie crust for an added layer of spiced flavor. Because the filling is cooked on the stovetop anyway, you aren’t baking it again—it just needs that long chill time to set up properly. It’s a great way to get that amazing flavor without turning the oven on! If you love easy, chilly desserts, check out some of my favorite no bake cookies too!
Tips for Success with Your Rich dessert Recipes
Listen, once you’ve made this gorgeous, creamy butterscotch pie, we need to talk about how to serve it so it’s truly memorable. Since my background included learning about hosting and wine pairings, I never just serve a pie—I present it! Even though this is an easy pie recipe, small touches go a long way toward making it look incredible, especially if you’re managing complicated meal planning for a big night. For more thoughts on making entertaining seamless, feel free to browse my general tips in the blog section!
Serving Suggestions for this butterscotch pie
Because this is such a deeply sweet and rich dessert recipe, you don’t want to weigh down the palate with something too heavy afterward. My advice, channeling my early days, is to skip thick coffee or heavy liqueurs. A slightly crisp, light white wine works wonders here—think a good Riesling or maybe a lightly chilled Pinot Gris. The brightness cuts through the butterscotch beautifully!

If you aren’t into wine, a garnish makes all the difference visually. You’ve already got that beautiful cloud of fresh whipped cream, but consider just one final texture element for contrast. A tiny sprinkle of flaky sea salt right on the cream right before serving? Divine. Or, if you want to lean into that caramel flavor, a very light dusting of finely chopped toasted pecans offers a lovely crunch against the silky smooth filling. You deserve a beautiful presentation for all that hard work!
Storage & Reheating Instructions for Classic custard pie
Now that you’ve made this stunning, creamy butterscotch pie, you need to know how to keep it perfect! This is definitely a chilled dessert, folks. Since the filling is essentially a cooked custard, it needs the cold to stay properly set and safely delicious.
You must keep this pie covered well in the refrigerator. If you used the whipped cream topping, make sure it’s in an airtight container or well-covered with plastic wrap so it doesn’t absorb any funky fridge smells. Honestly, it lasts beautifully for about three to four days when kept cold, though in my house, it rarely makes it past day two!
Here is my big tip for the best experience: If you are saving the whipped cream for later, don’t put it on until you are ready to serve it. Storing the pie uncovered in the fridge makes the cream weep after a day or so, and we definitely don’t want that when we painstakingly achieved those stiff peaks! If you’ve already topped it, just serve it quickly—it’s not really designed to be reheated anyway, which is why it’s such a great make-ahead option for your rich dessert recipes.
Don’t try to freeze this pie, particularly with the fresh cream on top, because the texture of the custard filling just won’t be the same once thawed. Keep it simple, keep it chilled, and enjoy that perfect texture!
Frequently Asked Questions About butterscotch pie
I always find I have questions swimming in my head after I nail a new recipe, so I figured I’d tackle a few common worries about making this spectacular butterscotch pie. If you’ve ever wondered about the difference between this and a standard caramel dessert, or worried your filling might get grainy, you’re in the right spot!
Why is my homemade butterscotch filling grainy or lumpy?
Nine times out of ten, a grainy filling means one of two things: either you cooked the mixture too violently after adding the eggs, or you didn’t whisk well enough when mixing the dry ingredients in the beginning. Remember, once those yolks go in, we keep the heat low and barely let it simmer. A gently cooked, properly tempered filling is the key to that silky mouthfeel you want in your classic custard pie. If you see lumps forming, pull it off the heat immediately and whisk like mad!
Can I use pre-made butterscotch pudding instead of making it from scratch?
Oh, you certainly *can* take that shortcut if you need a super easy pie recipe! But if you do, you’re probably leaning toward a no bake butterscotch pie variation. The real joy of this old fashioned pie recipes method is building that flavor from the sugar and yolks. Using boxed pudding skips all that fun, especially the delicious tempering step. If you use packaged pudding, make sure your crust is frozen or fully chilled, as you won’t be cooking the filling much, if at all!
How is butterscotch flavor different from pure caramel flavor dessert?
That’s a fantastic question! Caramel flavor comes from heating pure sugar until it melts and browns, which develops those complex toasted notes. Butterscotch pie is different because it *requires* brown sugar—that molasses content adds a deep, slightly more complex, almost smoky background note that caramel doesn’t naturally have. That’s why using that packed brown sugar is non-negotiable for authentic flavor; it’s the heart of that Southern style desserts taste! If you love that deep flavor profile, you absolutely must check out my recipe for amazing caramel popcorn too!
Can I make this ahead of time, maybe for holiday entertaining?
Absolutely, and I highly encourage it! This is one of my favorite rich dessert recipes to make the day before, which really helps with complex meal planning. You must chill the filling completely before adding the homemade whipped cream topping. The filling sets up beautifully in the fridge, but stick to adding the topping right before you plan to serve to keep those peaks light and fluffy!
Estimated Nutritional Data for butterscotch pie
Alright, before you dive into that glorious slice of creamy butterscotch pie—and trust me, you deserve every single bite—we should quickly touch on the numbers. I always list the estimates because, honestly, when you’re making something this decadent, you’re looking for comfort, not a science experiment! This homemade version, especially with that rich filling, is certainly a splurge, but totally worth it for a memorable dessert.
Here’s a general breakdown based on the recipe proportions for an 8-serving slice. My goal for all my classic custard pie work is deliciousness first, but it’s good to have a ballpark idea!
- Serving Size: 1 slice
- Calories: 450
- Sugar: 55g
- Sodium: 250mg
- Fat: 24g
- Saturated Fat: 14g
- Carbohydrates: 58g
- Protein: 5g
Now, a little reminder that Catherine always gives: these values are estimates based on standard ingredient measurements. If you use lighter cream or a super thin homemade crust versus a buttery store-bought one, those numbers can certainly shift! Use this as a helpful guide, but don’t let it stop you from enjoying one of the best rich dessert recipes you’ll ever master.
Share Your Homemade butterscotch dessert Experience
Now that you’ve baked this beauty, I simply have to know how it turned out! Honestly, seeing your successes is the best part of my job. Did you achieve that silky smooth texture we talked about? Was the butterscotch flavor deep enough? Please, take a moment to leave a rating right here on the recipe card!
Don’t be shy about leaving comments, either. If you ran into a snag, or if you tried a little swap that made it even better—like maybe adding a touch of bourbon to the whipped cream—I want to hear all about it! Your feedback helps others master this homemade butterscotch dessert too.
And if you shared a photo on Instagram or Facebook, please tag me! I love swooning over those perfect swirls of whipped cream perched atop a flawless, rich dessert. Happy baking, truly!
PrintOld-Fashioned Creamy Butterscotch Pie

Make a truly creamy, rich butterscotch pie from scratch with this old-fashioned recipe. The filling is silky smooth and perfect for any gathering.
- Prep Time: 20 min
- Cook Time: 15 min
- Total Time: 3 hours 35 min
- Yield: 8 servings 1x
- Category: Dessert
- Method: Stovetop Filling/Baking
- Cuisine: American
- Diet: Vegetarian
Ingredients
- 1 pre-made 9-inch pie crust (or homemade flaky crust)
- 1 1/2 cups packed light brown sugar
- 1/2 cup all-purpose flour
- 1/4 teaspoon salt
- 1 1/2 cups cold water
- 3 large egg yolks, lightly beaten
- 1/2 cup (1 stick) unsalted butter, cut into pieces
- 1 teaspoon vanilla extract
- 1 cup heavy whipping cream
- 2 tablespoons powdered sugar
- 1/4 teaspoon vanilla extract (for topping)
Instructions
- Prepare your pie crust according to your preferred method and let it cool completely.
- In a medium saucepan, whisk together the brown sugar, flour, and salt.
- Gradually whisk in the cold water until the mixture is smooth.
- Cook the sugar mixture over medium heat, stirring constantly, until it thickens enough to coat the back of a spoon, about 8 to 10 minutes. Do not let it boil rapidly.
- In a separate small bowl, whisk the egg yolks. Temper the yolks by slowly whisking about 1/2 cup of the hot sugar mixture into the yolks.
- Pour the tempered yolk mixture back into the saucepan with the remaining sugar mixture. Cook over medium-low heat, stirring constantly, for 1 to 2 minutes until the filling thickens further. Do not let it boil after adding the yolks.
- Remove the pan from the heat. Stir in the butter pieces until fully melted and incorporated. Stir in the vanilla extract.
- Pour the hot butterscotch filling immediately into the cooled pie crust. Press plastic wrap directly onto the surface of the filling to prevent a skin from forming. Chill for at least 3 hours, or until firm.
- When ready to serve, prepare the topping: In a chilled bowl, beat the heavy whipping cream, powdered sugar, and 1/4 teaspoon vanilla extract until stiff peaks form.
- Spread or pipe the whipped cream topping over the chilled pie filling. Serve immediately or keep refrigerated until serving.
Notes
- For a richer flavor, substitute 1/4 cup of the brown sugar with packed dark brown sugar.
- If you prefer a no-bake option, use a graham cracker crust and skip the blind-baking step.
- This pie pairs well with a light, crisp white wine, similar to what you might pair with other rich dessert recipes.
- If you are planning ahead for holiday meals, this pie is a great alternative to traditional Thanksgiving pie ideas.
Nutrition
- Serving Size: 1 slice
- Calories: 450
- Sugar: 55g
- Sodium: 250mg
- Fat: 24g
- Saturated Fat: 14g
- Unsaturated Fat: 10g
- Trans Fat: 0.5g
- Carbohydrates: 58g
- Fiber: 1g
- Protein: 5g
- Cholesterol: 110mg