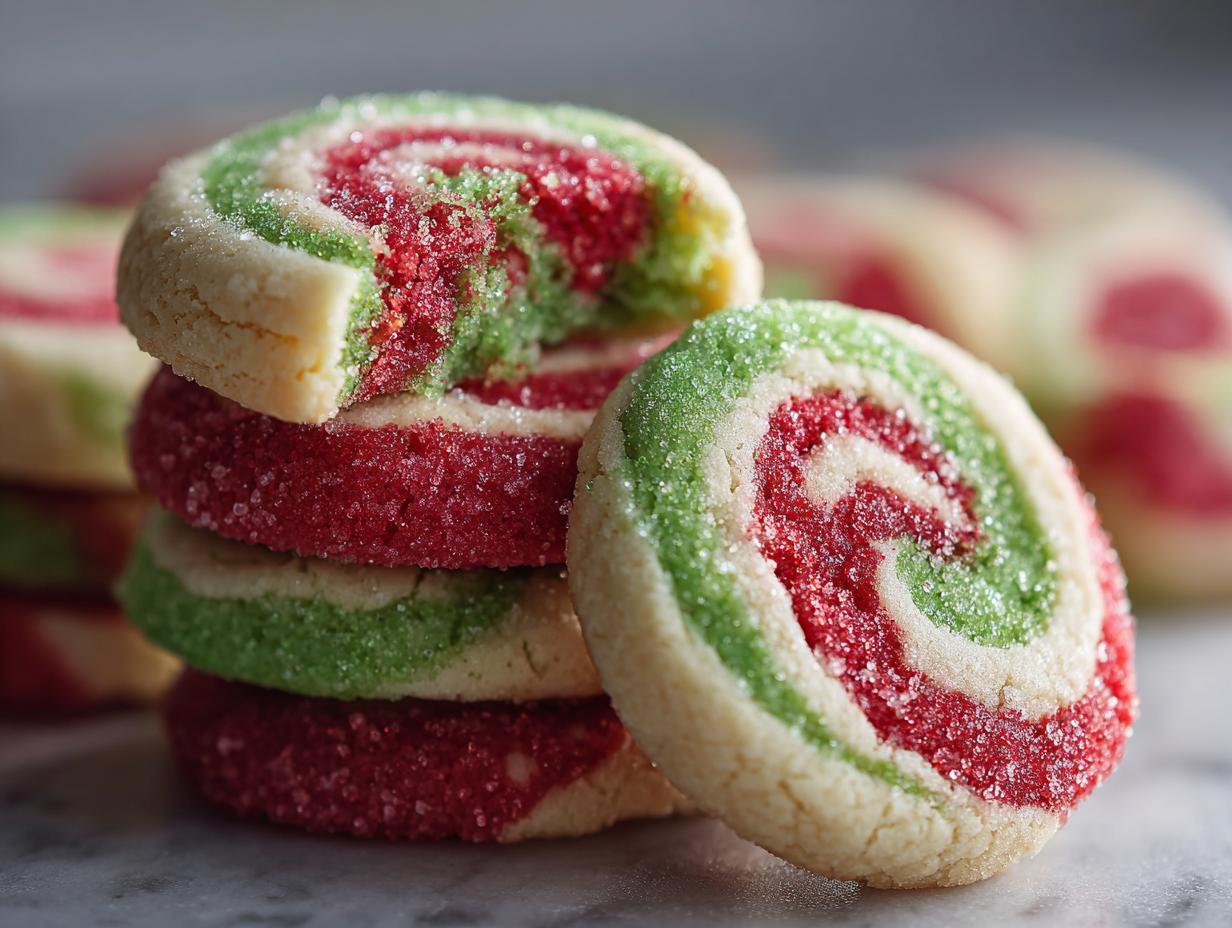

The holidays are when baking truly shines, and I always look for those beautiful, impressive treats that don’t demand I spend the entire week stressing in the kitchen. If you are looking for showstopping cookies for your holiday tray, these pinwheel cookies are the answer. I’m thrilled to share my recipe for the Classic Red and Green Christmas Pinwheel Cookies. These slice-and-bake wonders deliver those gorgeous, precise festive swirls with hardly any fuss.

My background in hosting taught me that effortless entertaining is everything, and these cookies fit that bill perfectly. After meticulously testing the dough thickness and chilling times in my kitchen, I can promise you the swirls will stay wonderfully defined. They are just the right balance of buttery sweetness and festive color, making them an absolute essential for any cookie exchange or platter this season. They truly are beautiful cookie recipes that deliver big results! You can read more about my baking philosophy over on my About page.
- Why These Classic Red and Green pinwheel cookies Are Essential for Your Holiday Tray
- Gathering Ingredients for Your Buttery pinwheel cookies
- Step-by-Step Instructions for Stunning pinwheel cookies
- Expert Tips for Perfect pinwheel cookies Every Time
- Make Ahead & Storage for Your Christmas cookie exchange ideas pinwheel cookies
- Frequently Asked Questions About pinwheel cookies
- Estimated Nutritional Data for these Festive dessert spirals
- Share Your Beautiful pinwheel cookies Creations
Why These Classic Red and Green pinwheel cookies Are Essential for Your Holiday Tray
Honestly, I pull these out every December because they achieve that perfect blend of stunning presentation and zero stress. They are undeniably showstopping cookies, but the technique keeps things incredibly easy. If you are stressed about time during the holiday rush, you need these in your life!
Why are they so necessary for your baking lineup?
- They offer maximum visual reward for minimal active effort.
- They embody the festive spirit with classic red and green colors.
- They are genuinely slice and bake cookies, which is a lifesaver when you are juggling so many items!
If you want to see more beautiful holiday baking inspiration, check out all my dessert recipes right here.
Achieving Perfect, Defined pinwheel cookies Swirls
The magic, my friends, is entirely in the chill time! This is the absolute number one secret to getting those clean, crisp spirals and ensuring the colors don’t just bleed into a muddy purple mess. You must follow the chilling instructions exactly.
When the three layers of dough are cold—really cold—they act as one solid block when you roll them tight. When that solid log goes into the oven, the layers hold their shape beautifully. That firm dough means your pinwheel cookies come out looking like an artisan confection, not sad, slightly squished rounds.

The Simplicity of Rolled cookie dough recipes
Because this is a rolled cookie dough recipe, it falls right into the category of the best easy cookie recipes. You mix it, divide it, roll it, chill it, and slice it. That’s it! We aren’t dealing with complicated piping bags or fussy cutout shapes here.
This simplicity makes them the ultimate make ahead holiday baking project. You can wrap those logs up tightly and keep them in the fridge for days, or even freeze them! Imagine: just pull one log out the day before your cookie exchange, slice, and bake fresh spirals. It feels like cheating, but trust me, it’s just being smart!
Gathering Ingredients for Your Buttery pinwheel cookies
Alright, let’s talk supplies. These buttery pinwheel cookies rely on very straightforward pantry staples, which makes them so accessible for every baker. The dough base is essentially a classic sugar cookie, which is why they taste so wonderful and hold their shape so well.
When you look at the list, you’ll see I’ve mentioned food coloring specifically. If you are going for that vibrant red and green you see in the pictures, please, please, please use gel food coloring if you have it. Liquid coloring works, but you need a lot of it to get that deep holiday hue, and that extra liquid can throw off the dough balance ever so slightly. Gel drops give you intense color without altering the texture. Trust me on this one; it makes a real difference when achieving those beautiful, crisp swirls.
Ingredient List for the pinwheel cookies Dough
Here is exactly what you need for this recipe to turn out perfectly laminated:
- 1 cup (227g) unsalted butter, softened
- 1 cup (200g) granulated sugar
- 1 large egg
- 1 teaspoon vanilla extract
- 3 cups (360g) all-purpose flour
- 1 teaspoon baking powder
- 1/2 teaspoon salt
- 1/4 teaspoon almond extract (optional)
- Red food coloring (gel preferred)
- Green food coloring (gel preferred)
- 1/4 cup (50g) granulated sugar, for rolling
- 1/4 cup nonpareils or sprinkles (optional, for coating)
Step-by-Step Instructions for Stunning pinwheel cookies
Now for the fun part! This is where your simple butter cookie dough transforms into those gorgeous, showstopping spirals. I know the layering sounds intimidating, but honestly, if you can stack papers, you can do this! We are going to take this step-by-step so your pinwheel cookies look professional but taste like home baking.
Creating and Coloring the Dough Portions
First things first, we need to mix the base dough. In your big bowl, cream together that softened butter and the cup of granulated sugar until it’s pale and fluffy—you want air in there! Then, beat in your egg and vanilla until it’s all happy together. In a separate bowl, whisk your flour, baking powder, and salt.
Now, gradually add the dry stuff to the wet stuff, mixing just until it comes together. Don’t overmix; we aren’t making bread here! Once you have one plain dough, immediately divide it evenly into three separate bowls. Leave one as is (that’s your white). To the other two bowls, add your gel coloring—lots of drops for the red and green—and mix each one until it is completely uniform in color. Pop all three color portions into the fridge for at least an hour. They really need to firm up so they handle nicely later on, as detailed in my baking tips overview.
Assembling the Layered Dough for perfect swirl cookies recipe
Once your chilled dough balls are firm, it’s time to build our structure! You’ll want two baking sheets ready with parchment paper. Take out one color at a time. Roll the white dough into a rectangle about 10 inches long by 8 inches wide on a lightly floured surface. Do the same exact dimensions for the red dough, and then again for the green dough.
Carefully place the red rectangle directly on top of the white, gently pressing them where they meet so they stick. Then, place the green rectangle right on top of the red layer. You now have three colorful layers stacked! Starting on one of the long sides, begin rolling the whole stack up tightly, like you’re rolling up a rug. Keep that roll compact! Wrap that beautiful striped log super tight in plastic wrap. This next chill is vital for clean cuts, so pop it back in the fridge for a minimum of two hours, or until it is totally stiff.
Slicing, Coating, and Baking Your pinwheel cookies
Preheat your oven to a nice, warm 375°F (190°C). Once your log is rock hard, you can take it out. I like to roll the log gently in extra sugar or some fun nonpareil sprinkles for a little extra sparkle—they really make these festive dessert spirals pop! Use a sharp knife and slice the log into even rounds, about 1/4 inch thick. Thicker slices mean the swirls get lost, so be precise!

Lay those lovely slice and bake cookies onto your lined baking sheets, leaving about two inches between them, because they will spread just a tiny bit. Bake them for 8 to 10 minutes. You are looking for the edges to just be set and maybe whisper-thin gold. The centers should still look soft! That’s how you guarantee chewy, buttery texture. Don’t forget to let them rest on the hot sheets for about five minutes before carefully moving them to a wire rack to finish cooling completely.
Expert Tips for Perfect pinwheel cookies Every Time
Even though these are incredibly straightforward, I always have a few tricks up my sleeve to ensure your homemade sugar cookie swirls look absolutely magazine-worthy. Remember, baking is all about controlling a few key variables, and we’ve got those dialed in now for these pinwheel cookies!
The main thing I stress over and over is that chilling time—it’s worth the wait! If your dough feels sticky or soft when you take it out after the first hour, just give it another 30 minutes. Patience is the key to clean edges.
Ingredient Notes and Flavor Variations for pinwheel cookies
Beyond the color aspect, let’s talk flavor. When I cream the butter and sugar, it has to be room temperature, not warm or oily. That creaming step is what creates the structure for these buttery pinwheel cookies. If your butter is too warm, the layers won’t adhere properly during rolling.
If you want to shake things up, try the peppermint variation I mentioned. It’s so festive! Just remember to only add the peppermint extract—about 1/2 teaspoon—to the white dough portion. That way, you get a beautiful flavor contrast in your slice without making all three colors smell like peppermint.
Make Ahead & Storage for Your Christmas cookie exchange ideas pinwheel cookies
This is where these pinwheel cookies truly become my favorite for the busy holiday season. If you can manage the chill time, you can manage your entire Christmas baking calendar! The best part about these is that they are designed to be made well in advance, meaning less stress on the actual day you need them.
For the make-ahead magician in you, wrap those fully assembled dough logs—the ones that have already had their long two-hour chill—super-duper tightly in plastic wrap. I always go around twice, just to be safe from any freezer burn whispers. You can pop these logs right into the freezer and leave them there for up to three months. Seriously, three months!
When you realize you need fresh cookies for a surprise party or that last-minute Christmas cookie exchange idea, just pull the log out of the freezer. Don’t let it thaw completely! I find that slicing them directly from frozen works best for maintaining those gorgeous swirls. Just slice them to your 1/4-inch thickness and add about one or two extra minutes to the baking time listed in the recipe. They bake up just as beautifully!

Once they are completely cooled, of course, you need to store them properly. These cookies are relatively sturdy, but we want to protect those beautiful patterns. Store the baked pinwheel cookies in an airtight container at room temperature. To keep them from smashing into each other, I always layer them between sheets of parchment or wax paper. That way, when you open the tin later, the red and green patterns haven’t smudged together! They stay fresh and delicious for nearly a week this way.
Frequently Asked Questions About pinwheel cookies
It is totally normal to have questions when tackling a recipe that looks this artistic! These pinwheel cookies are showstoppers, and I want to make sure your results are exactly what you envisioned. I’ve gathered some of the things folks always ask after seeing this recipe.
Can I use different colors or flavors in my pinwheel cookies?
Absolutely! That’s one of the best things about these swirl cookies recipe types—they are so versatile. You can easily switch up the red and green for pink and white for Valentine’s Day, or even use purple and yellow for Easter. Just use quality gel colors to get that pop!
If you decide to add extracts, like that lovely peppermint I mentioned earlier, make sure you only add the flavoring to one of the dough portions. If you try to flavor all three, it definitely muddies the flavor profile and you lose that clean, buttery taste we are aiming for in these homemade sugar cookie swirls.
How do I keep my homemade sugar cookie swirls from spreading too much?
Oh, spreading! That’s the enemy of a good swirl. If your cookies go totally flat in the oven, it usually means two things: your butter was too soft when you creamed it, or the log wasn’t cold enough before slicing. Remember, we want these to be icebox cookies how to style, which relies on that deep chill!
My number one tip here is persistence with the freezer/fridge. If you are about to slice the log and it feels even slightly soft to the touch, pop it back in for another 30 minutes. Firm dough equals firm cookies that hold their perfectly stacked layers beautifully! Trust me, the extra chilling time is the difference between a crisp swirl and a puddle.
Estimated Nutritional Data for these Festive dessert spirals
I always like to include this information for my readers, especially since these are wonderful for Christmas cookie exchange ideas and people often wonder about what they are serving. Please keep in mind that these values are based on my specific ingredient measurements and brand choices, so they are just an estimate!
For these festive dessert spirals, here is the approximate breakdown per cookie, assuming a yield of about 3 dozen:
- Serving Size: 1 cookie
- Calories: 135
- Sugar: 11g
- Sodium: 65mg
- Fat: 7g
- Saturated Fat: 4g
- Unsaturated Fat: 3g
- Trans Fat: 0g
- Carbohydrates: 17g
- Fiber: 0g
- Protein: 2g
- Cholesterol: 25mg
Just a little note here from my professional kitchen training: these numbers can shift depending on the brand of butter you use or if you decide to roll them in sprinkles versus just sugar, so treat this as a very helpful guide rather than an exact science. They are best enjoyed with a glass of milk or maybe a nice dry Riesling!
Share Your Beautiful pinwheel cookies Creations
Baking for me is all about connection, and while I hope these pinwheel cookies bring a festive sparkle to your kitchen, I truly love seeing how they look on your holiday trays!
When you make a batch, I would be so happy if you came back and shared your experience with me. Did the blue and white work better than the traditional red and green for your party? Did you try the peppermint addition? Please leave a rating below—five stars if they’ve earned it! Knowing what worked for you helps everyone else who is looking for the best Christmas cookie exchange ideas.
Also, if you take a picture of your gorgeous, perfectly swirled slice and bake cookies, please tag me on social media! I love gathering inspiration from all of you. You can reach out or send me a note if you have any final questions using my contact form. I’m so glad you let me share this recipe with you, and I can’t wait to see your beautiful results!
PrintClassic Red and Green Christmas Pinwheel Cookies

Create stunning, festive swirls with these easy slice-and-bake Christmas Pinwheel Cookies. This recipe delivers buttery sugar cookie spirals perfect for holiday cookie exchanges.
- Prep Time: 45 min
- Cook Time: 10 min
- Total Time: 3 hours 55 min
- Yield: About 3 dozen 1x
- Category: Dessert
- Method: Baking
- Cuisine: American
- Diet: Vegetarian
Ingredients
- 1 cup (227g) unsalted butter, softened
- 1 cup (200g) granulated sugar
- 1 large egg
- 1 teaspoon vanilla extract
- 3 cups (360g) all-purpose flour
- 1 teaspoon baking powder
- 1/2 teaspoon salt
- 1/4 teaspoon almond extract (optional)
- Red food coloring (gel preferred)
- Green food coloring (gel preferred)
- 1/4 cup (50g) granulated sugar, for rolling
- 1/4 cup nonpareils or sprinkles (optional, for coating)
Instructions
- In a large bowl, cream together the softened butter and 1 cup of sugar until light and fluffy. Beat in the egg and vanilla extract until combined.
- In a separate bowl, whisk together the flour, baking powder, and salt. Gradually add the dry ingredients to the wet ingredients, mixing until just combined. Add almond extract if using.
- Divide the dough evenly into three separate bowls. Leave one bowl plain (this will be white).
- Add several drops of red food coloring to the second bowl and mix until the color is uniform. Add several drops of green food coloring to the third bowl and mix until the color is uniform.
- Wrap each color of dough separately in plastic wrap and chill in the refrigerator for at least 1 hour, or until firm enough to handle.
- Prepare two baking sheets by lining them with parchment paper. Place the 1/4 cup of rolling sugar and sprinkles (if using) on separate shallow plates.
- Remove one color of dough at a time from the refrigerator. On a lightly floured surface, roll the white dough into a rectangle approximately 10 inches by 8 inches.
- Roll the red dough into a rectangle of the same size. Carefully place the red dough directly on top of the white dough, pressing gently to adhere.
- Roll the green dough into a rectangle of the same size. Place the green dough on top of the red dough, pressing gently.
- Starting from one long edge, tightly roll the layered dough into a compact log. Wrap the log tightly in plastic wrap and chill in the refrigerator for at least 2 hours, or until very firm. This step is crucial for clean slices.
- Preheat your oven to 375°F (190°C).
- Once the dough is firm, unwrap it. Roll the log lightly in the reserved 1/4 cup of sugar or coat it in sprinkles for extra visual appeal.
- Using a sharp knife, slice the log into 1/4-inch thick rounds.
- Place the slices about 2 inches apart on the prepared baking sheets.
- Bake for 8 to 10 minutes, or until the edges are just set and lightly golden. The centers should remain soft.
- Let the cookies cool on the baking sheet for 5 minutes before transferring them to a wire rack to cool completely. These are showstopping cookies for any holiday baking tray.
Notes
- For the best, most defined swirls, chill the dough logs until they are very firm before slicing. If the dough is too soft, the colors will bleed together.
- You can make these ahead by freezing the wrapped dough logs for up to three months. Slice directly from frozen, adding 1-2 minutes to the baking time.
- If you prefer a peppermint flavor, substitute the almond extract with 1/2 teaspoon of peppermint extract in the white dough portion only.
Nutrition
- Serving Size: 1 cookie
- Calories: 135
- Sugar: 11g
- Sodium: 65mg
- Fat: 7g
- Saturated Fat: 4g
- Unsaturated Fat: 3g
- Trans Fat: 0g
- Carbohydrates: 17g
- Fiber: 0g
- Protein: 2g
- Cholesterol: 25mg