

Oh, the joy of a perfect sugar cookie—and the absolute dread of rolling out the dough, cutting intricate shapes, and re-rolling all those scraps! I know the feeling well. While I adore the elegance of a carefully decorated sugar cookie, sometimes you just need that classic, buttery flavor delivered without the fuss. That is why I developed these incredible sugar cookie bars. They are my answer for when I want that delightful bakery taste, but I don’t have the time (or patience!) for all the cutters and chilling. This recipe, refined right here in my kitchen for Unfold Recipes, focuses entirely on achieving the single best soft and chewy texture imaginable. You can learn more about my passion for approachable elegance on my About Page. Trust me, once you try this simple traybake, you’ll never look back!
- Why This is the Best Sugar Cookie Bars Recipe You Will Make
- Gathering Ingredients for Your Sugar Cookie Bars
- Stap-by-Step Instructions for Easy Sugar Cookie Bars
- Expert Tips for Perfect Sugar Cookie Bars Every Time
- Variations on Classic Sugar Cookie Bars Flavor
- Serving Suggestions for Your Simple Dessert Squares
- Storage and Make Ahead Cookie Bars Instructions
- Frequently Asked Questions About Sugar Cookie Bars
- Nutritional Snapshot of These Sugar Cookie Bars
Why This is the Best Sugar Cookie Bars Recipe You Will Make
There is a reason this recipe has become my go-to when I need a guaranteed crowd-pleaser. We skip all the tricky parts of traditional cutout cookies but keep every bit of that wonderful vanilla flavor. These sugar cookie bars deliver pure comfort in a simple square. I developed this specifically to be the best in my collection of all my dessert recipes. Trust me, once you try this simple traybake, you’ll never look back!
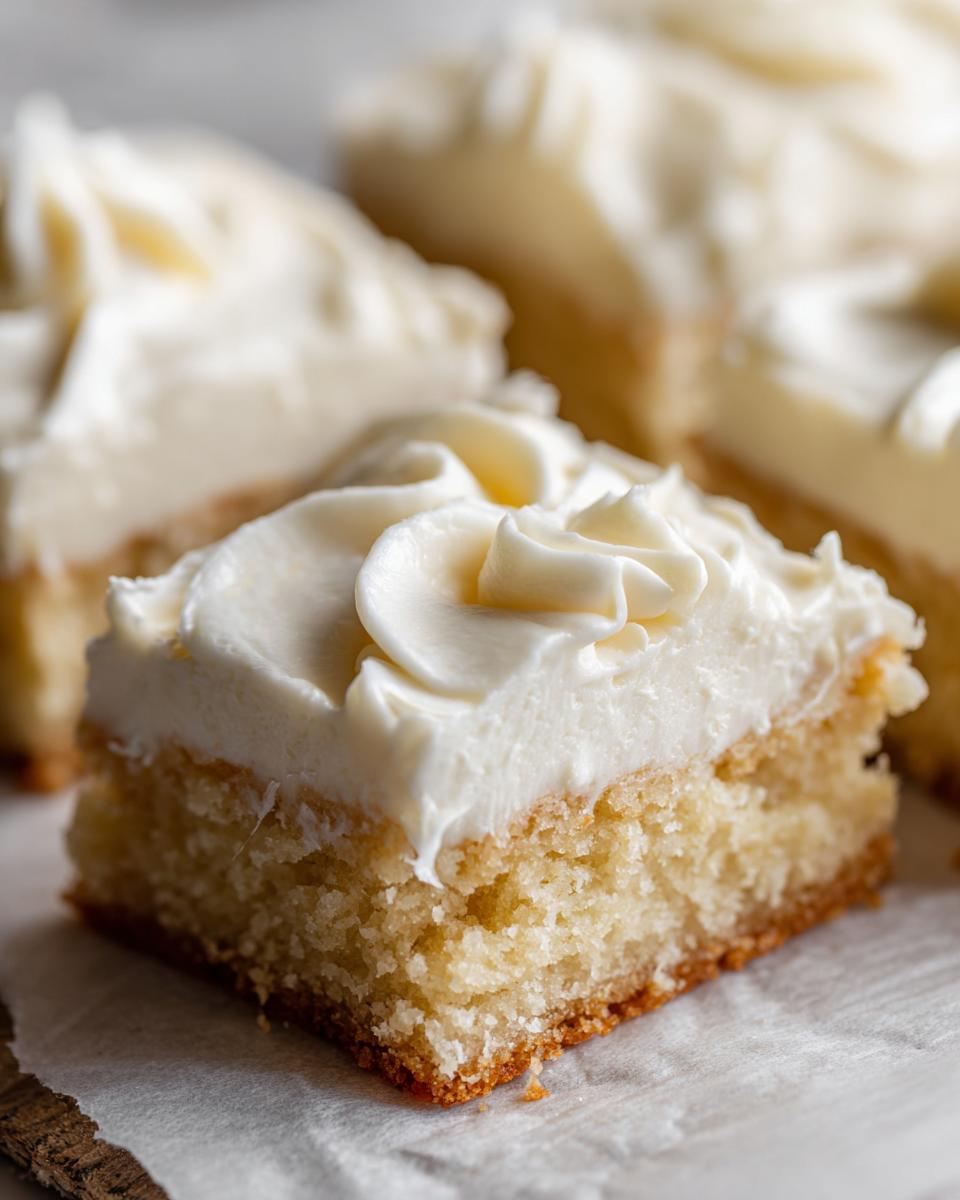
- They are wonderfully thick, not thin and crispy.
- No messy chilling or rolling required—just press and bake!
- They hold that perfect balance of sweet flavor and soft structure.
- The creamy frosting is absolutely essential for the complete experience.
Achieving the Perfect Soft and Chewy Cookie Bars Texture
This is where the magic truly happens, and it all comes down to two quick steps. First, you must properly cream your softened butter and sugar until it looks genuinely light and fluffy, almost pale. This step is what guarantees the texture you’re looking for in soft and chewy cookie bars. Second, and this is vital: mix the flour in until it *just* comes together. The second you see everything incorporated, stop the mixer! Overmixing develops gluten and turns your beautifully soft batter into something dense and tough—we absolutely want to avoid that.
Gathering Ingredients for Your Sugar Cookie Bars
To achieve that signature soft texture and perfect sweetness in our sugar cookie bars, ingredient quality really matters. I’ve laid out everything you need below, divided into the base dough and the cloud-like frosting. When you measure your flour, make sure you spoon it lightly into your measuring cup rather than scooping directly from the bag; too much flour is the quickest way to dry out these gorgeous bars!
For the Base: The Ultimate Sugar Cookie Bars
- 1 cup (2 sticks) unsalted butter, softened
- 1 1/2 cups granulated sugar
- 2 large eggs
- 1 tablespoon vanilla extract
- 3 1/2 cups all-purpose flour
- 1 teaspoon baking powder
- 1/2 teaspoon salt
- 1/2 cup milk
For the Creamy Vanilla Buttercream Cookie Bars Frosting
The frosting is non-negotiable, I think! You need that creamy topping to balance the buttery base. Just like with the base, the butter for the frosting must be perfectly softened—not melted, just yielding to the touch.
- 4 cups powdered sugar
- 1/2 cup (1 stick) unsalted butter, softened
- 1 teaspoon vanilla extract
- 2-3 tablespoons milk
- Pinch of salt
- Optional: Festive sprinkles
Stap-by-Step Instructions for Easy Sugar Cookie Bars
Now comes the fun part! Don’t let the ingredient list intimidate you; these steps for making your easy sugar cookie bar recipe are incredibly straightforward. Remember, this whole process is designed to save you time while delivering superior texture. I promise that taking a moment for proper creaming and avoiding overmixing in the early stages is what separates a mediocre bar from the absolute best sugar cookie bars you’ve ever had. If you are looking for other quick options, check out my recipe for Chocolate Chip Cookie Bars!
Preparing the Pan and Mixing the Dough for Sugar Cookie Bars
First, let’s get organized. Preheat your oven right away to 350°F (175°C). I suggest thoroughly lining your 9×13 inch pan with parchment paper, making sure you leave a good overhang on the sides—that’s your built-in handle for lifting them out later. Lightly grease that paper so nothing sticks!
- Creaming: In your large bowl, beat the softened butter and sugar until it looks genuinely pale and fluffy.
- Wet Ingredients: Beat in the two eggs, one at a time, followed by the vanilla extract.
- Dry Mix: Whisk your flour, baking powder, and salt together in a separate bowl.
- Alternating: Now, add the dry mixture to the wet mixture, alternating slowly with the milk. Start and end with the dry ingredients.
- Stop Mixing! This is my most important tip: mix only until you see the last streak of flour disappear. If you keep going, you activate the gluten, and we want soft bars, not tough ones!
Baking and Cooling Your Thick Cookie Bars Recipe
Once the dough is mixed, press it out gently and evenly into your prepared pan. You want a nice, even layer for consistent baking.

- Bake: Bake for 20 to 25 minutes. The edges should just start looking lightly golden, and if you poke a toothpick near the center, you want to see moist crumbs clinging to it—not wet batter! Don’t overbake, or they will lose that chewy quality.
- Cool Completely: This part is tough but essential! Let these amazing thick cookie bars recipe bars cool completely in the pan on a wire rack before you even think about frosting them.
Making and Applying the Frosted Sugar Cookie Bars Topping
While the base is cooling, whip up that classic frosting. Make sure your butter for the frosting is softened to that same perfect consistency we talked about earlier.
- Butter First: Beat the butter until it’s super smooth. Then, slowly add the powdered sugar, vanilla, and salt.
- Consistency Check: Add the milk one tablespoon at a time. You are looking for a frosting that is thick enough to hold its shape but smooth enough to spread easily without tearing the cooled cookie base. If it’s too stiff, add a tiny bit more milk!
- Apply: Spread that beautiful vanilla buttercream evenly across the completely cooled bars.
- Decorate & Cut: If you’re using sprinkles, get them on right away so they stick! Then, use those parchment overhangs to lift the whole slab out, and slice them into beautiful squares.
Expert Tips for Perfect Sugar Cookie Bars Every Time
Even with a straightforward recipe like this, a few small secrets ensure your baking blog posts make the best impression. Since we are aiming for that signature soft texture in these sugar cookie bars, paying attention to temperature is key. If your batter seems too stiff during mixing, it usually means your butter was too cold to begin with. Don’t panic!
For the frosting, if it turns out too thin—maybe you added too much milk—simply sift in half a cup more powdered sugar and beat it again. This saves the whole batch! Also, if you are using a 9×9 inch pan for thicker bars, remember that the edges will bake faster than the middle. Try pulling the pan out when the edges look set but the center still has a tiny wobble. That residual heat will finish the job perfectly as they cool, guaranteeing you don’t end up with dry edges.
Variations on Classic Sugar Cookie Bars Flavor
While this base recipe for sugar cookie bars stands perfectly on its own—it gives you that quintessential, buttery, vanilla flavor that everyone craves—it is also just begging for a little bit of creativity! This is where we can have some real fun, especially if you are assembling a beautiful dessert tray. Changing up the additions or the topping is such an easy way to put your signature spin on things.
To keep those classic sugar cookie flavor bars exciting, you just need to swap out one or two things. For example, if you want something richer, try swirling in some melted dark chocolate right before the bars go into the oven. I do this when I need a slightly more grown-up alternative. Or, if you are preparing these for a celebration, the easiest way to transform them is with the frosting decoration.

For instance, you can fold chopped toasted pecans directly into the base dough before pressing it into the pan—instant texture and nuttiness! Or, for a super bright flavor, try adding the zest of one whole lemon into the batter. We also take advantage of the frosting layer: use almond extract instead of vanilla in the buttercream when you want that classic bakery taste we all remember from childhood treats. The possibilities for easy customization are endless!
Serving Suggestions for Your Simple Dessert Squares
Presenting food beautifully is just as important as the taste, isn’t it? Even something as homey and delicious as these simple dessert squares deserves a lovely moment on the table. Since these bars are rich with butter and sweet vanilla, they pair wonderfully with things that offer a little brightness or contrast.
If you are prepping a large buffet or hosting a gathering, I always suggest serving these alongside something fresh. Think thinly sliced, crisp green apples or even a small bowl of mixed berries—raspberries work exceptionally well. This provides a lovely palate cleanser between those rich, sweet bites.
Now, for my favorite kind of pairing, especially if these are served after dinner! Because the flavor profile is so clean and vanilla-forward, I find these bars pair beautifully with a glass of crisp, slightly chilled Moscato d’Asti. It’s light, bubbly, and its subtle sweetness complements the buttercream without overpowering it. For a non-alcoholic option, a very strong iced black tea with a sliver of lemon creates a wonderful balance. You can find some lovely ideas for easy entertaining over on my Appetizers section, too—presentation makes all the difference!
Storage and Make Ahead Cookie Bars Instructions
One thing I absolutely adore about these make ahead cookie bars is how wonderfully they hold up! When I’m prepping for a big holiday or just want to make sure I have a simple dessert ready for unexpected company, I love knowing I can bake these ahead of time. This is a huge advantage over traditional cutout cookies, which tend to dry out if you try to store them for too long.
As noted in the recipe details, these bars are fantastic for making ahead, usually lasting beautifully for about three days when stored correctly at room temperature. The key here is airtight sealing, especially since we have that lovely layer of buttercream on top. If you wait too long, the frosting starts to dry out or absorb any outside smells, which we certainly don’t want!
- Room Temperature Storage: Store the uncut or cut bars tightly covered in the pan (or transferred to an airtight container) at room temperature for up to three days. Keep them away from direct sunlight or heat, as that will ruin the buttercream immediately.
- Refrigeration Check: While you *can* refrigerate them, I generally advise against it unless your kitchen is very warm. Cold temperatures tend to make the cookie base a bit firm and less chewy. If you do refrigerate them, let them sit on the counter for at least 30 minutes before serving to let them come back to that perfect, soft texture.
If you are someone who loves preparing desserts when you have a free afternoon, these are your sweet ticket! You can certainly bake the base completely one day, let it cool, and then frost and cut them the next morning. It truly makes entertaining so much more relaxed. If you’re curious about other dishes that can sit well overnight, you might want to check out some of my no-bake cookie ideas for even more preparation flexibility!
Frequently Asked Questions About Sugar Cookie Bars
Even when a recipe seems straightforward, there are always little questions that pop up when you’re standing in the kitchen, spatula in hand! That’s totally normal. I’ve collected the questions I get most often about making sure these sugar cookie bars turn out perfectly soft and chewy every time. If you have another burning question, feel free to reach out—I love hearing from you on my contact page!
Why are my sugar cookie bars dry or crumbly?
This is almost always due to two things: overmixing the flour, or measuring the flour incorrectly. If you mix after the dry ingredients are just combined, you develop gluten, which turns your lovely dough tough. Also, if you scoop flour directly from the bag, you end up with about 25% too much flour. Always spoon the flour into your measuring cup and level it off. This mistake is the quickest way to ruin the texture of your easy sugar cookie bar recipe.
Can I use margarine or shortening instead of all that butter?
Oh, I know butter can be expensive! Unfortunately, for the base of these bars, I truly insist on real butter. Butter not only brings unmatched flavor but also carries moisture and structure we need for that perfect chew. Margarine often contains more water and less fat, which changes the final texture dramatically; you will likely end up with flatter, oilier bars.
Can I skip the milk entirely? I’m out!
The milk might seem like an odd ingredient in a cookie recipe, but it plays a role in getting the consistency just right when alternating with the dry ingredients. If you are truly out, you can substitute an equal amount of plain, unsweetened yogurt or sour cream to maintain some moisture, though this might slightly alter the final flavor profile. If all else fails, use just one tablespoon of water to bring the dough together, but be aware that you might need to adjust your baking time slightly for these thick cookie bars recipe squares.
How can I make these bars festive (like for a Christmas cookie exchange)?
This is perhaps the most fun part! Since the base is a lovely, neutral canvas for classic sugar cookie flavor bars, decorating is where you shine. Wait until the bars are completely cool before frosting. Once frosted, you can use any festive sprinkles you love—nonpareils, sanding sugar, or even festive shapes. If you want an extra special look, you can even use food coloring in the buttercream to dye sections pink or green, then lightly swirl them together with a knife before they set!

What is the best pan size for making these into thick cookie bars?
The recipe is written perfectly for a standard 9×13 inch pan, which yields beautifully thick bars that are still easy to cut. If you prefer an extra-thick dessert, you can reduce the pan size to 9×9 inches. Just remember that the smaller, deeper pan will require an extra 5 to 10 minutes of baking time, so start testing with that toothpick around the 28-minute mark.
Nutritional Snapshot of These Sugar Cookie Bars
I always tell my friends that we bake for joy, not necessarily for perfect nutrition labels, but it’s still helpful to have a general idea of what’s in our delicious creations! Because we use generous amounts of real butter and a lovely swirl of buttercream frosting, these squares are definitely a treat, not an everyday health food.
Keep in mind that these figures are just an estimate based on the components listed in the recipe and assume you get 24 servings. Your final numbers might vary slightly depending on the exact brands of sugar or butter you happen to use. Every recipe tells a story—and this one tells a story of pure, buttery indulgence!
- Serving Size: 1 bar
- Calories: 310
- Fat: 15g
- Carbohydrates: 42g
- Sugar: 35g
- Protein: 3g
Just a little note from my kitchen: Since these are rich, don’t hesitate to serve them alongside a lovely cup of herbal tea or that crisp Moscato I mentioned earlier—it really helps balance out the richness!
PrintSoft and Chewy Frosted Sugar Cookie Bars

Create the softest, chewiest sugar cookie bars topped with creamy vanilla buttercream. This simple traybake delivers classic flavor without the fuss of rolling and cutting cookies.
- Prep Time: 20 min
- Cook Time: 25 min
- Total Time: 45 min
- Yield: 24 servings 1x
- Category: Dessert
- Method: Baking
- Cuisine: American
- Diet: Vegetarian
Ingredients
- 1 cup (2 sticks) unsalted butter, softened
- 1 1/2 cups granulated sugar
- 2 large eggs
- 1 tablespoon vanilla extract
- 3 1/2 cups all-purpose flour
- 1 teaspoon baking powder
- 1/2 teaspoon salt
- 1/2 cup milk
- For the Frosting: 4 cups powdered sugar
- 1/2 cup (1 stick) unsalted butter, softened
- 1 teaspoon vanilla extract
- 2–3 tablespoons milk
- Pinch of salt
- Optional: Festive sprinkles
Instructions
- Preheat your oven to 350°F (175°C). Line a 9×13 inch baking pan with parchment paper, leaving an overhang on the sides for easy removal. Lightly grease the paper.
- In a large bowl, cream together the softened butter and granulated sugar until light and fluffy. This step helps achieve the soft texture.
- Beat in the eggs one at a time, mixing well after each addition. Stir in the vanilla extract.
- In a separate bowl, whisk together the flour, baking powder, and salt.
- Gradually add the dry ingredients to the wet ingredients, alternating with the milk, beginning and ending with the flour mixture. Mix until just combined; do not overmix.
- Press the dough evenly into the prepared baking pan.
- Bake for 20 to 25 minutes, or until the edges are lightly golden and a toothpick inserted near the center comes out with moist crumbs attached. Do not overbake for a chewy result.
- Let the bars cool completely in the pan on a wire rack. This cooling time is important before frosting.
- Prepare the frosting: Beat the softened butter until smooth. Gradually add the powdered sugar, vanilla extract, and salt. Add milk one tablespoon at a time until you reach a smooth, spreadable consistency.
- Spread the vanilla buttercream evenly over the cooled cookie bars.
- If desired, immediately decorate with festive sprinkles.
- Once the frosting is set, use the parchment paper overhang to lift the bars from the pan. Cut into squares or rectangles.
Notes
- For a thicker bar, use a 9×9 inch pan instead, but reduce the baking time slightly.
- You can substitute almond extract for some of the vanilla extract for a classic bakery flavor.
- These bars are excellent for make ahead preparation; store them tightly covered at room temperature for up to three days.
Nutrition
- Serving Size: 1 bar
- Calories: 310
- Sugar: 35
- Sodium: 150
- Fat: 15
- Saturated Fat: 9
- Unsaturated Fat: 6
- Trans Fat: 0.3
- Carbohydrates: 42
- Fiber: 0.5
- Protein: 3
- Cholesterol: 45