
When I moved away from corporate life, it wasn’t just about swapping suits for aprons; it was about rediscovering the joy of making beautiful things without the fuss. And nothing embodies that principle quite like **tuna tataki**. Truly, this is the dish you make when you want something that screams ‘elegant’ but secretly takes less active time than boiling an egg. It’s raw, it’s seared, it’s stunning. We’re making a restaurant-quality dish—my signature Sesame Crusted **Tuna Tataki** finished with the brightest, quickest citrus-soy ponzu sauce you’ve ever tasted. Trust me, this elegant starter will instantly become your go-to whenever you need that impressive wow factor fast. You can find more of my favorites like this in my appetizers collection!
- Why This Sesame Crusted Tuna Tataki Recipe Works
- Essential Ingredients for Flavorful Tuna Tataki
- Mastering the Ahi Tuna Sear Technique for Tuna Tataki
- Step-by-Step Instructions to Assemble Your Tuna Tataki
- Tips for Success with Your Rare Seared Tuna Presentation
- Variations on the Classic Tuna Tataki
- Serving Suggestions for This Delicate Seafood Preparation
- Storage and Reheating Instructions for Tuna Tataki
- Frequently Asked Questions About Tuna Tataki
- Nutritional Snapshot of This Healthy Tuna Recipe
- Share Your Elegant Tuna Starter Experience
- Nutritional Snapshot of This Healthy Tuna Recipe
- Share Your Elegant Tuna Starter Experience
Why This Sesame Crusted Tuna Tataki Recipe Works
When I test recipes, I’m always asking: Is it worth the effort? For this **tuna tataki**, absolutely! It’s proof that you don’t need hours to create something that tastes like you ordered it straight from a high-end dining room. It’s raw, it’s seared, it’s stunning. We’re making a restaurant-quality dish—my signature Sesame Crusted **Tuna Tataki** finished with the brightest, quickest citrus-soy ponzu sauce you’ve ever tasted. Trust me, this elegant starter will instantly become your go-to whenever you need that impressive wow factor fast. Be sure to check out my general thoughts on developing flavors over on the blog!
- It delivers on speed, making it the perfect Quick Tuna Appetizer.
- The sesame crust elevates it to true Restaurant Style Tuna status immediately.
- My extensive testing guarantees that crisp sear every time you try this amazing Tuna Tataki Recipe.
Speed and Simplicity of the Tuna Tataki Recipe
Honestly, once you watch the video, you’ll see there’s very little active time here. We’re talking about maybe two minutes of actual searing. It’s shocking how fast this dish comes together. You’re mostly just whisking sauce and waiting for the pan to get screaming hot for that beautiful **tuna tataki** crust.
Achieving the Perfect Rare Seared Tuna Texture
This is the heart of the dish! We are aiming for intense heat, very fast. We want that thin, crisp, flavorful shell from the sesame seeds meeting the fire, but the instant it hits the beefy, cool, velvety interior—it needs to come off the heat. That contrast is what makes this **rare seared tuna** so addictive!
Essential Ingredients for Flavorful Tuna Tataki
The secret to making this **tuna tataki** taste like it came from a beautiful coastal restaurant is realizing that, while the technique is fast, the ingredients can’t be skimped on. When you’re dealing with raw fish, quality isn’t just about flavor; it’s about safety and texture, too. We need top-notch products here, but luckily, the list itself stays wonderfully simple. Head over to my dedicated page on handling tuna steaks if you have any lingering questions after reading this!
Selecting the Right Sushi Grade Tuna Recipes
If you take only one piece of advice from me today regarding this Japanese Tuna Dish, please let it be this: the tuna must be sushi-grade or sashimi-grade. There is zero room for error, or even negotiation, here. Because we are barely searing the outside, the bulk of the meat stays completely raw. You need to buy it from a source you trust implicitly—a reputable fishmonger who understands how this fish is handled from the ocean to them. For **tuna tataki**, I almost always use Ahi tuna loin. It’s large, symmetrical, and gives you those gorgeous, thick rectangles perfect for rolling in seeds.
For the Quick Citrus-Soy Ponzu Sauce for Tuna
Forget the bottled stuff for this! Our quick citrus-soy ponzu sauce brings the necessary bright, salty, acidic punch to cut through the richness of the sesame-crusted fish. It comes together in about three minutes while the pan heats up. You’ll need:
- A quarter cup of low-sodium soy sauce—we want flavor, not just buckets of salt!
- Two tablespoons of fresh lemon juice. And I mean fresh. None of that bottled stuff in the little plastic lemon shape, please!
- One tablespoon of good quality rice vinegar.
- One teaspoon of grated fresh ginger. Grating it finely makes sure you get all that spicy, aromatic juice.
- One teaspoon of fragrant sesame oil.
- One teaspoon of sugar to balance the acidity.
- Just a tiny pinch of red pepper flakes, only if you want a little kick on the finish.
Mastering the Ahi Tuna Sear Technique for Tuna Tataki
Okay, now that our lovely ponzu is resting and we have our gorgeous, cold block of **sushi grade tuna**, we move into the technique that separates the home cook from the chef: the sear. This is where the magic of **tuna tataki** really happens, but you have to be confident and move fast. If you’re nervous about high heat, check out my general guide on seared ahi tuna recipe techniques, but honestly, once you see how quick this is, you’ll feel like a pro.
Preparing the Sesame Crusted Tuna
First order of business is drying. Seriously, dry the tuna loin until it feels slightly tacky—use paper towels, pat it really well. Any moisture will steam the fish instead of searing it, and we absolutely cannot have that! Now for the stars of the show: mix your white and black sesame seeds together on a low, clean plate. Roll that dry tuna loin all over in the mixture, making sure you press those seeds in firmly so they fully coat the entire exterior. We want full coverage for maximum flavor and crunch!
The High-Heat Sear for Perfect Tuna Tataki
You need a heavy pan—cast iron is my absolute favorite here—on the highest heat setting your stove offers. Add just a slick of olive oil. Wait until it shimmers and looks almost smoky. That means it’s ready for our **Ahi Tuna Sear Technique**. Gently lay the crusted tuna down. And here’s the commitment: 30 to 45 seconds per side, rotating carefully to get all four long edges. Seriously, that’s it! We are looking for an intense, thin crust. The center should be virtually untouched by the heat—cool, vibrant red, perfect.
Step-by-Step Instructions to Assemble Your Tuna Tataki
Alright, this is where we bring all our beautiful components together to create the final plate. We’ve got the sauce, we’ve got the crusted tuna, and now we just need to follow a few simple steps to get this **Homemade Tuna Tataki** ready for the table. It moves quickly from this point, so have everything else you need—your prettiest serving platter, your sharpest knife—ready to go!
- Make the Ponzu First: Do this while the pan comes to temperature. Whisk together all those Ponzu sauce elements—soy sauce, lemon, vinegar, ginger, sesame oil, and sugar—in a little bowl. Give it a good stir until that sugar disappears, then just let it sit by the stove. It needs a few minutes to let those flavors really start hinting at each other.
- Pat and Roll: Remember, the tuna has to be bone-dry. I can’t stress that enough! Pat that loin down firmly with paper towels. Then, immediately roll it right into that beautiful mix of white and black sesame seeds. Press gently but firmly to make sure you get full coverage sticking all over.
- Heat the Skillet: Get your heaviest skillet—yes, the cast iron one—on the highest heat. Add just enough olive oil to cover the base thinly. Remember, we are searing, not frying. You know it’s ready when the oil is shimmering and just about to smoke.
- The Speedy Sear: Gently place the crusted tuna into that hot pan. Now, your timer starts! Sear for only 30 to 45 seconds on each of the four long sides. Use tongs to gently rotate it smoothly. We don’t touch the top or bottom—we just kiss the sides with extreme heat.
- Rest and Chill (The Crucial Step!): As soon as you pull it off the heat, place it on a cutting board to rest for just two minutes. This lets the outermost layer relax a bit. Then, I swear by this trick: wrap it tightly in plastic wrap and pop it into the freezer for exactly five minutes. This firms the fish up perfectly, which is the secret to those paper-thin, non-mushy slices later!
- Slice Thinly: Take it out, unwrap it, and get your sharpest knife. Slice the **tuna tataki** against the grain into pieces about 1/4-inch thick. Don’t try to saw through it; let the sharp blade do the work.
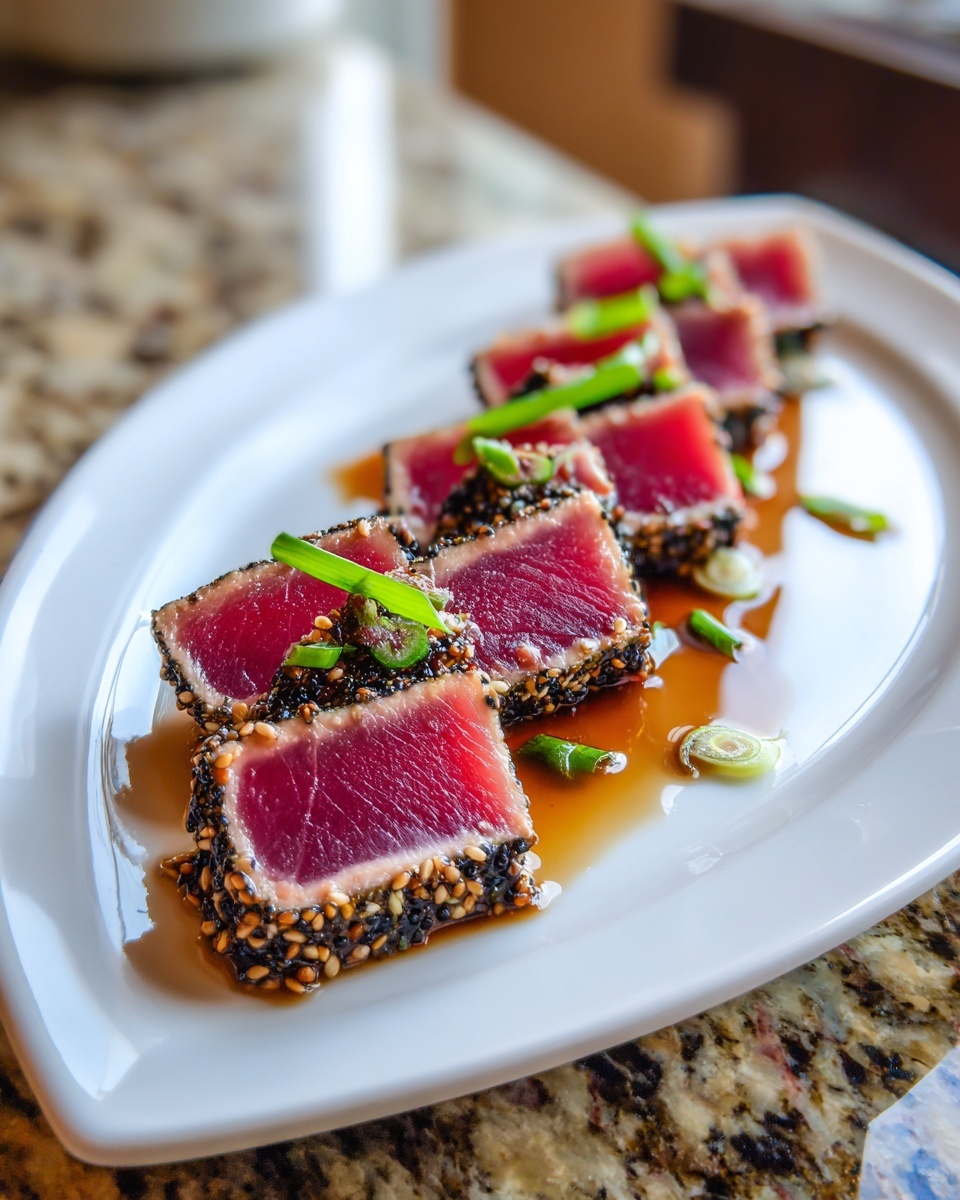
- Plate and Serve: Arrange those stunning slices on your platter. Drizzle that lovely citrus-soy ponzu right over the top, or put the sauce in a small dipping dish nearby. Finish it off with a scattering of those thinly sliced scallions. That’s it! You’re done. If you need more inspiration for prepping your fish, take a look at my marinade guide for tuna steak.
Tips for Success with Your Rare Seared Tuna Presentation
The final act in making this show-stopping **tuna tataki** is presentation. Since we’ve cooked it so minimally, the visuals are just as important as the taste! Making sure your slices are uniform and beautiful really enhances the enjoyment of this Delicate Seafood Preparation. Remember that brief trip to the freezer we gave the tuna? That wasn’t just for fun; it’s the secret weapon for clean slicing, especially important when dealing with such **rare seared tuna**.
Here are my absolute must-do tips for getting those picture-perfect slices that scream restaurant quality:
- Use Your Sharpest Knife: This is non-negotiable. A dull knife will crush the sesame crust and mash the delicate interior of the tuna. You want a long, thin, razor-sharp knife, ideally a good slicing or chef’s knife.
- The Grain is Everything: You must slice against the grain. When you look at the tuna loin, you’ll see lines running through it—those are the muscle fibers. Your slices need to cut right across those fibers. Slicing *with* the grain leads to chewy, stringy bites. Slicing *against* the grain ensures every piece is melt-in-your-mouth tender. It’s a quick visual check before you start cutting!
- Don’t Crowd the Plate: Arrange the slices slightly overlapping, but give each piece room to breathe. It makes the plate look abundant without looking messy. I usually fan them out in a slight curve, ensuring every guest can easily see that gorgeous contrast between the dark sesame crust and the pink center.
- Chill it Down Before Slicing: If you skipped the 5-minute freezer rest after searing, go back and give it a quick 10 minutes now. Cold, firm tuna slices cleanly. Warm tuna looks sloppy when cut thinly.
- Garnish Last: Only drizzle that bright ponzu sauce and scatter your fresh scallions right before the plate hits the table. Fresh herbs wilt fast, and you want that vibrant green pop to contrast with the darker fish and seeds.
When done right, your beautiful **tuna tataki** platter will look better than anything you paid for last time you went out! If you’re looking for other ways to use peak-season tuna, you might love my recipe for Tuna Poke Bowls.
Variations on the Classic Tuna Tataki
While I absolutely adore the classic sesame crust and bright ponzu that make up this specific **Tuna Tataki Recipe**, I know my readers love to improvise a little charm into their creations. Food should always evolve to suit your pantry and your palate, right? I encourage you to play with the crust and definitely play around with the sauce. That’s how my father ended up adding a splash of sherry vinegar to his marinades years ago—it was a happy accident!
Don’t feel boxed in by the sesame seeds, either. If that citrus tang feels a little too bright for a cold evening, you have tons of options for making this dish your own. If you are looking for heavier seasoning, you might enjoy my guide to blackened tuna steak recipe, though remember we aim for a light sear here!
Alternative Umami Tuna Dressing Ideas
The Citrus-Soy Ponzu is fantastic, truly, but if you’re craving a deeper, richer flavor profile—maybe something with a little more heft for a colder night—you can easily pivot your dressing. Since we are keeping this **tuna tataki** light overall, the dressing needs to complement, not overpower, that delicate seafood preparation.
Here are a few swaps you can try for your next batch:
- Spicy Sesame-Peanut Drizzle: Whisk the soy sauce, sesame oil, and a tablespoon of creamy peanut butter until smooth. Whisk in a generous amount of Sriracha—maybe a teaspoon to start—and skip the fresh citrus entirely. This gives you a lovely, thick coating sauce.
- Ginger-Shallot Reduction: For an intense savory punch, melt a tablespoon of butter in a pan, gently sweat one minced shallot and a teaspoon of grated ginger until fragrant. Deglaze the pan with a splash of soy sauce and let it reduce slightly until it coats the back of a spoon. This is fantastic if you skip the sesame seeds entirely on the tuna.
- Yuzu Forward: If you happen to find real yuzu juice, swap out the lemon in our original ponzu 1:1. Yuzu is instantly more floral and complex than standard lemon, making any **tuna tataki** feel instantly more gourmet and complex.
Experimenting with these homemade sauces is a wonderful way to turn this simple **tuna tataki** into something totally new every time you make it!
Serving Suggestions for This Delicate Seafood Preparation
When you pull off that perfect sear, you naturally want to show off this gorgeous **Asian Seared Fish**! Because **tuna tataki** is so light, it’s fantastically versatile. It works beautifully as an elegant starter to a multi-course dinner, but honestly, I love having it as the centerpiece of a light, flavorful weeknight meal. Presentation is key here; think clean lines and vibrant colors to contrast that sesame crust.
If you’re serving it as a starter, keep the sides minimal. If you’re making it a meal, you’ll want a bed for those beautiful slices and that leftover ponzu sauce to soak into something lovely. For more inspiration on light meals, check out my collection of soups and salads!
Serving the Tuna Tataki as a Meal
I find that adding texture and a clean base really completes this **Delicate Seafood Preparation**.
- Over Crispy Greens: Toss some peppery arugula or thinly sliced Napa cabbage with a tiny drizzle of sesame oil and maybe a squeeze of lime. Lay the sliced tuna over the top and finish with the ponzu. It feels like a sophisticated warm-weather salad.
- With Sushi Rice: If you have day-old sushi rice (seasoned with vinegar, sugar, and salt), this is the perfect canvas. Place a small mound of rice in the bowl, arrange the tuna artfully around it, and pour the sauce over everything. The rice soaks up that citrus-soy beautifully!
- In Vibrant Bowls: Think about adding thinly sliced avocado, some cucumber ribbons, and perhaps some pickled ginger alongside the tuna. It turns into a gorgeous, balanced bowl that is both healthy and deeply flavorful.
Catherine’s Wine Pairing Recommendation
Because this dish walks the beautiful line between rich sesame oil and bright citrus acidity, you need a wine that has enough body not to be overwhelmed, but enough crispness to match the lemon and vinegar in the ponzu. I always steer people toward a crisp, aromatic white. My top choice is almost always a dry **Alsatian Pinot Gris**. It has mineral notes, beautiful texture, and just enough aromatic pop from stone fruit to stand right up to the sesame and tuna without fighting it. If you prefer red, keep it super chilled and very light—think Beaujolais, but Pinot Gris is the winner here, truly.
Storage and Reheating Instructions for Tuna Tataki
I wish I could tell you that this incredible **tuna tataki** keeps well for days, but here’s the reality check that comes with serving such a fresh, nearly raw preparation. Like any beautiful piece of raw fish, this dish is intensely best eaten the second you slice it. Seriously, the texture contrast—that warm, toasted sesame crust against the cool, rare interior—starts to degrade quickly once it sits at room temperature. This isn’t something you want hanging around waiting for lunch the next day.
If, by some miracle, you have leftovers (which rarely happens in my house!), you need to treat them carefully. Remember, this whole dish hinges on that quick, high-heat sear and the chilled center.
Storing Leftover Tuna Tataki
If you must save some slices, you need to keep them refrigerated immediately. Don’t sauce them ahead of time! Keep the slices tightly wrapped in plastic wrap—air is the enemy here—and place them in the coldest part of your fridge. You should aim to consume any leftovers within 24 hours maximum. The texture will change, you can expect the raw interior to warm up slightly, and the sear won’t be as crisp, but it will still be safe to eat if handled correctly.
The Big Rule: Absolutely No Reheating
I need you to hear me on this part: do not, under any circumstances, attempt to reheat your **tuna tataki**. If you put this back in a pan or the microwave, you lose the entire point of the dish! You’ll end up with lukewarm, slightly rubbery fish that is cooked through—which defeats the entire “tataki” style we worked so hard to achieve. Think of this preparation as an immediate reward for your cooking efforts. If the remaining slices have warmed up too much in the fridge overnight, serve them cold straight from the wrap, perhaps with a fresh drizzle of lemon juice instead of the full ponzu, to revive the flavor.
Frequently Asked Questions About Tuna Tataki
It’s completely natural to have questions when handling a beautiful piece of raw fish for a Tuna Tataki Recipe! I know when I first started experimenting, I had a mountain of concerns, mostly centered around safety since it’s such a fast-cook dish. My goal here is to make sure you feel as confident walking up to that hot pan as I do. We want this to feel like a truly Easy Seafood Dinner experience, not a stressful one. If I didn’t cover something crucial, please feel free to reach out via my contact page!
Can I use regular canned tuna for tuna tataki?
Oh, bless your heart for asking, but heavens no! Please do not try this with canned tuna. Canned tuna is fully cooked and processed; it has none of the fresh texture, high-fat content, or vibrant color needed for this dish. The entire point of **tuna tataki** is the contrast between the *seared* exterior and the *raw, cool* interior. Canned tuna simply won’t give you that experience. You need a solid, fresh loin for this!
How do I know if my tuna is safe for this quick tuna appetizer?
Safety first, always! The key here is knowing your source. When you are looking for the fish, you must specifically ask your fishmonger for “sushi-grade” or “sashimi-grade” Ahi tuna. This designation means the fish has been handled according to specific FDA guidelines, usually involving freezing at ultra-low temperatures to eliminate any potential parasites. If your market can’t guarantee that traceability and grade, then it’s best to skip this **quick tuna appetizer** for now. Trust your gut, and only buy high-quality fish that looks bright red and smells clean, like the ocean, not ‘fishy.’
What is the difference between tuna tataki and seared ahi tuna?
This is a great question because the techniques overlap so much! When we talk about *seared ahi tuna*, we are generally describing the action: quickly cooking the exterior. However, *Tuna Tataki* (which literally means ‘pounded’ or ‘seared’ in Japanese) usually implies a few more specific elements: a very defined *crust*—like our sesame seeds—and, critically, that it is served sliced and accompanied by a punchy, often citrus-based dipping sauce like Ponzu. So, while all **tuna tataki** is seared ahi, not all seared ahi tuna deserves the name Tataki!
Nutritional Snapshot of This Healthy Tuna Recipe
One of the reasons I love this dish so much is that it delivers incredible flavor without weighing you down. It relies on lean protein from the fish and healthy fats from the sesame seeds and olive oil used in the sear. It’s proof that an elegant meal can also be a fantastic part of an overall healthy tuna recipe rotation. Remember, these numbers are estimates based on the core ingredients listed, not including any extra oils or soy sauce you might add at the table!
- Serving Size: 4 oz tuna slice
- Calories: About 250
- Protein: A whopping 30 grams!
- Fat: Roughly 12 grams (mostly the heart-healthy unsaturated kind!)
- Carbohydrates: Low here, around 5 grams.
- Sodium: This varies depending on your soy sauce, but aiming for around 450mg with low-sodium soy.
See? It’s a wonderfully light fish meal that packs a massive protein punch!
Share Your Elegant Tuna Starter Experience
I poured my heart into making this recipe reliable and beautiful for you, and now I truly can’t wait to hear how it turned out in your kitchen! There is nothing that makes me happier than seeing my readers successfully create something elegant at home. Did your sesame crust adhere perfectly? Did your ponzu sauce cut through the richness just right? I want all the details!
Please take a moment to pop down to the comments section below and give this **tuna tataki** recipe a rating; five stars if it knocked your socks off! If you snapped a gorgeous photo—and trust me, this dish photographs beautifully—tag me on social media! I love celebrating your culinary wins. If you’re looking for something equally delightful for your next gathering, explore my best brunch ideas!
PrintRestaurant Style Sesame Crusted Tuna Tataki with Quick Citrus-Soy Ponzu
Create elegant, restaurant-quality Tuna Tataki at home. This recipe features sushi-grade ahi tuna lightly seared with a sesame crust, served with a bright, homemade citrus-soy dipping sauce. It is a quick appetizer or light meal.
- Prep Time: 10 min
- Cook Time: 2 min
- Total Time: 17 min
- Yield: 4 servings 1x
- Category: Appetizer
- Method: Pan Searing
- Cuisine: Japanese
- Diet: Low Fat
Ingredients
- 1 pound sushi-grade Ahi Tuna loin, very cold
- 1/4 cup white sesame seeds
- 1/4 cup black sesame seeds
- 1 tablespoon olive oil, for searing
- For the Citrus-Soy Ponzu Sauce:
- 1/4 cup low-sodium soy sauce
- 2 tablespoons fresh lemon juice
- 1 tablespoon rice vinegar
- 1 teaspoon grated fresh ginger
- 1 teaspoon sesame oil
- 1 teaspoon sugar
- Pinch of red pepper flakes (optional)
- For Serving:
- Thinly sliced scallions
- Thinly sliced radish (optional)
Instructions
- Prepare the sauce: In a small bowl, whisk together the soy sauce, lemon juice, rice vinegar, grated ginger, sesame oil, sugar, and red pepper flakes until the sugar dissolves. Set the ponzu sauce aside.
- Prepare the tuna: Pat the tuna loin completely dry with paper towels. Mix the white and black sesame seeds together on a shallow plate. Roll the entire surface of the tuna loin in the sesame seed mixture, pressing gently so the seeds adhere evenly.
- Heat the oil: Place a heavy-bottomed skillet (cast iron works well) over high heat. Add the olive oil. The oil should be shimmering hot before adding the tuna.
- Sear the tuna: Carefully place the sesame-crusted tuna in the hot skillet. Sear for 30 to 45 seconds per side, rotating to coat all four long sides. You want a thin, crisp crust while leaving the center completely raw and cool.
- Chill the tuna: Immediately remove the seared tuna from the pan and place it on a cutting board. Let it rest for 2 minutes, then wrap it tightly in plastic wrap and place it in the freezer for 5 minutes to stop the cooking process and firm it up for clean slicing.
- Slice and serve: Remove the plastic wrap. Using a very sharp knife, slice the tuna against the grain into thin, 1/4-inch thick pieces. Arrange the slices attractively on a serving platter.
- Finish the dish: Drizzle the Citrus-Soy Ponzu sauce over the tuna slices or serve it alongside for dipping. Garnish with sliced scallions and radish, if using.
Notes
- Use only the highest quality, sushi-grade tuna available to you for this recipe.
- For an extra layer of flavor, you can substitute the lemon juice in the sauce with fresh yuzu juice if you can find it.
- If you prefer a slightly warmer presentation, you can briefly warm the ponzu sauce, but do not boil it.
Nutrition
- Serving Size: 4 oz tuna
- Calories: 250
- Sugar: 3
- Sodium: 450
- Fat: 12
- Saturated Fat: 2
- Unsaturated Fat: 10
- Trans Fat: 0
- Carbohydrates: 5
- Fiber: 1
- Protein: 30
- Cholesterol: 65