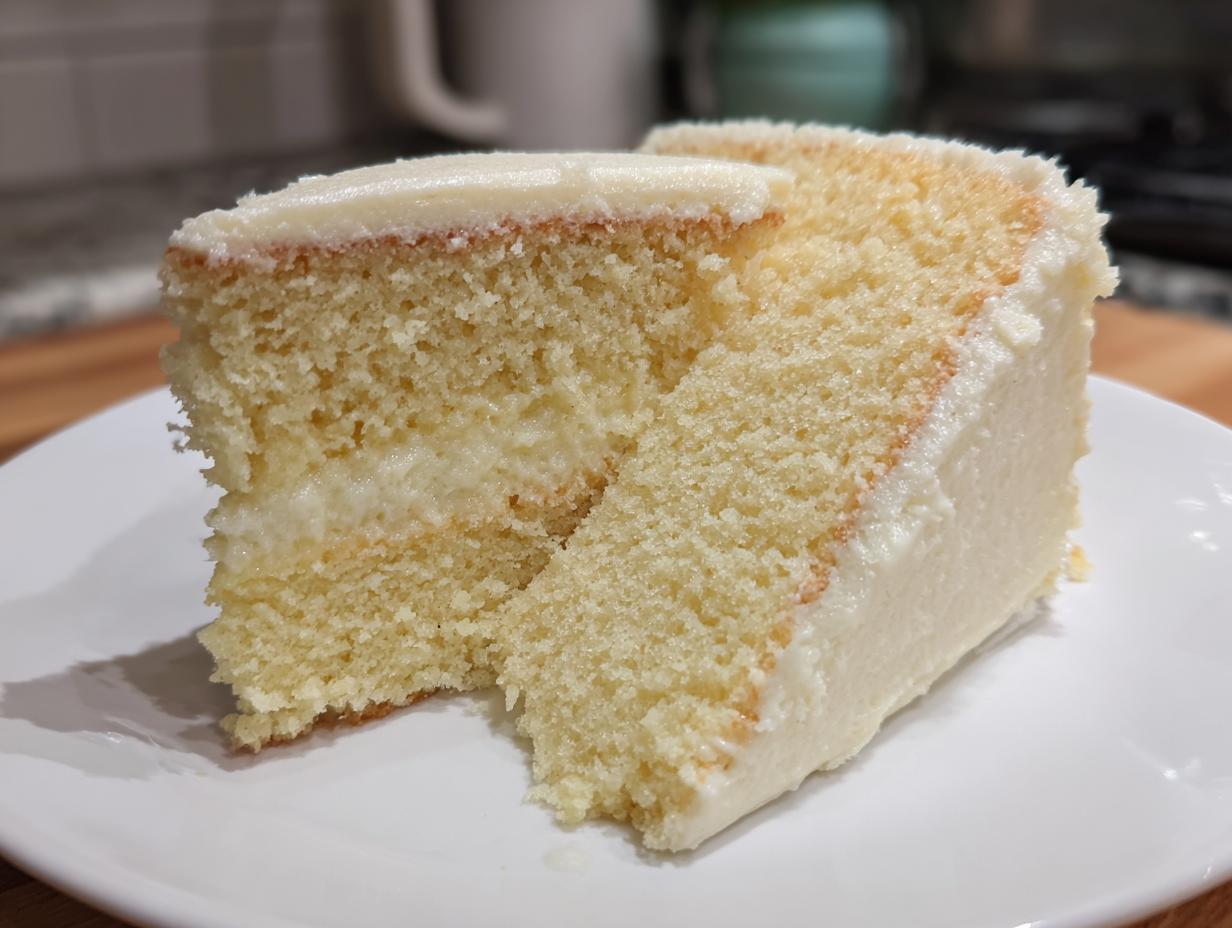

Oh my goodness, let’s talk about the vanilla cake. I mean, seriously, every home baker needs a go-to vanilla cake recipe tucked away for those last-minute birthdays or just when you need something truly comforting. This isn’t just any recipe; this is, hands down, the Best Vanilla Cake Recipe you will ever pull out of your oven. It creates layers that are impossibly moist and fluffy—the kind that make you close your eyes after the first bite. I’ve spent ages perfecting this blend of simple ingredients so you can trust it completely. We test and re-test everything here so you get that incredible bakery-style result right in your own kitchen without any fuss or drama!
- Why This is the Perfect Vanilla Cake Recipe (Moist & Fluffy)
- Gathering Ingredients for Your Classic Vanilla Cake Recipe
- Step-by-Step Instructions for the Easy Vanilla Cake Recipe
- Assembling Your Vanilla Cake for Special Occasions
- Tips for the Perfect Vanilla Cake Recipe Every Time
- Make Ahead Vanilla Cake and Storage Instructions
- Serving Suggestions for Your Classic Birthday Cake Recipe
- Frequently Asked Questions About This Vanilla Cake Recipe
- Estimated Nutritional Data for This Simple Vanilla Dessert
- Share Your Experience with This Vanilla Cake Recipe
Why This is the Perfect Vanilla Cake Recipe (Moist & Fluffy)
I know what you’re thinking: another vanilla cake? But trust me, what makes this specific **vanilla cake recipe** a keeper is what keeps it from being dry or dense! We are shooting for the stars here—the dream of a **Moist Vanilla Layer Cake** that stays tender for days. The secret sauce, honestly, is using room temperature ingredients for everything wet, especially the milk and eggs. When they hit that creamed butter just right, they create a stable emulsion that traps air beautifully. Plus, we sneak in a bit of sour cream! That tiny bit creates the magic that gives you that truly classic, rich flavor and super soft structure you expect from a wonderful **Fluffy Vanilla Cake From Scratch**.
I’ve tested variations, I really have, cutting corners and then putting them back in because the texture just wasn’t right. This version? It’s the one that passes my reliability test every single time, making it one of the easiest recipes to get perfect.
Key Secrets to a Soft Vanilla Sponge Cake
If you want that cloud-like texture, you need to respect the mixing bowl. First, cream that butter and sugar until it’s visibly pale and airy—don’t rush that step! Second, remember to add the dry ingredients and milk alternately. This keeps the batter from getting tough. Most importantly, once the flour goes in, only mix until you see streaks disappear. Overmixing develops gluten, and gluten turns a light sponge cake into a chewy disappointment. We don’t want that!
Gathering Ingredients for Your Classic Vanilla Cake Recipe
Okay, time to pull out your mixing bowls! Before we even think about turning on the oven, we need to make sure all our players are ready. For this **Classic Vanilla Cake Recipe**, organization is key. Seriously, the biggest difference between a good vanilla cake and an absolutely stunning one comes down to ingredient temperature. Cold milk and eggs will literally shock your creamed butter, making your batter curdle and knocking out all that lovely air we worked so hard to whip in!
So, please, plan ahead! Get your butter, milk, and eggs out at least an hour before you start mixing. This small act of patience is what guarantees that smooth, reliable texture we’re aiming for. I separate my list, so I never accidentally use frosting butter in the cake!
Ingredients for the Moist Vanilla Layer Cake
- 1 3/4 cups all-purpose flour
- 1 3/4 cups granulated sugar
- 1 tablespoon baking powder
- 1/2 teaspoon salt
- 1 cup unsalted butter, softened
- 4 large eggs, room temperature
- 1 cup whole milk, room temperature
- 2 teaspoons pure vanilla extract
- 1/4 cup sour cream (for cake)
Ingredients for Homemade Vanilla Buttercream Frosting
You absolutely need this rich, **Homemade Vanilla Buttercream Frosting** to top those beautiful layers. Don’t even think about skipping the sifted sugar; nobody wants little gritty clumps in their perfect frosting!
- 1 cup unsalted butter, softened
- 4 cups powdered sugar, sifted
- 1 teaspoon pure vanilla extract
- 2-3 tablespoons heavy cream
- Pinch of salt
Step-by-Step Instructions for the Easy Vanilla Cake Recipe
This is where the magic happens, and I promise you, pulling off this beautiful **Easy Vanilla Cake Recipe** is less complicated than you think! We’re going to treat our batter gently to ensure maximum fluffiness. Get everything ready, put on some good music, and let’s break this down into manageable chunks. Don’t forget to preheat that oven to 350°F (175°C) right away!
Preparing the Cake Layers
First things first: pans! I always take an extra minute here because nothing throws off my day like a crumbled cake edge. I grease my 8-inch rounds really well, dust them lightly with flour, and then cut out parchment paper circles just for the bottom. It’s my little insurance policy against sticking. While that’s happening, whisk your dry ingredients—flour, baking powder, and salt—in one bowl. Set that aside.
Now for the big mixing bowl: cream the softened butter and sugar until they look light and almost ribbon-like. Beat in those room-temperature eggs one by one—don’t rush it! Once that’s done, we alternate! Slowly add the dry mix and the milk, starting and ending with dry ingredients. This is critical for keeping things blended smoothly. Finally, very gently fold in those two teaspoons of vanilla and the sour cream until it just disappears. I mean, barely stir! You can hop over to my tips on chocolate cupcakes recipe for exactly what I mean by ‘gently fold.’
Baking and Cooling the Soft Vanilla Sponge Cake
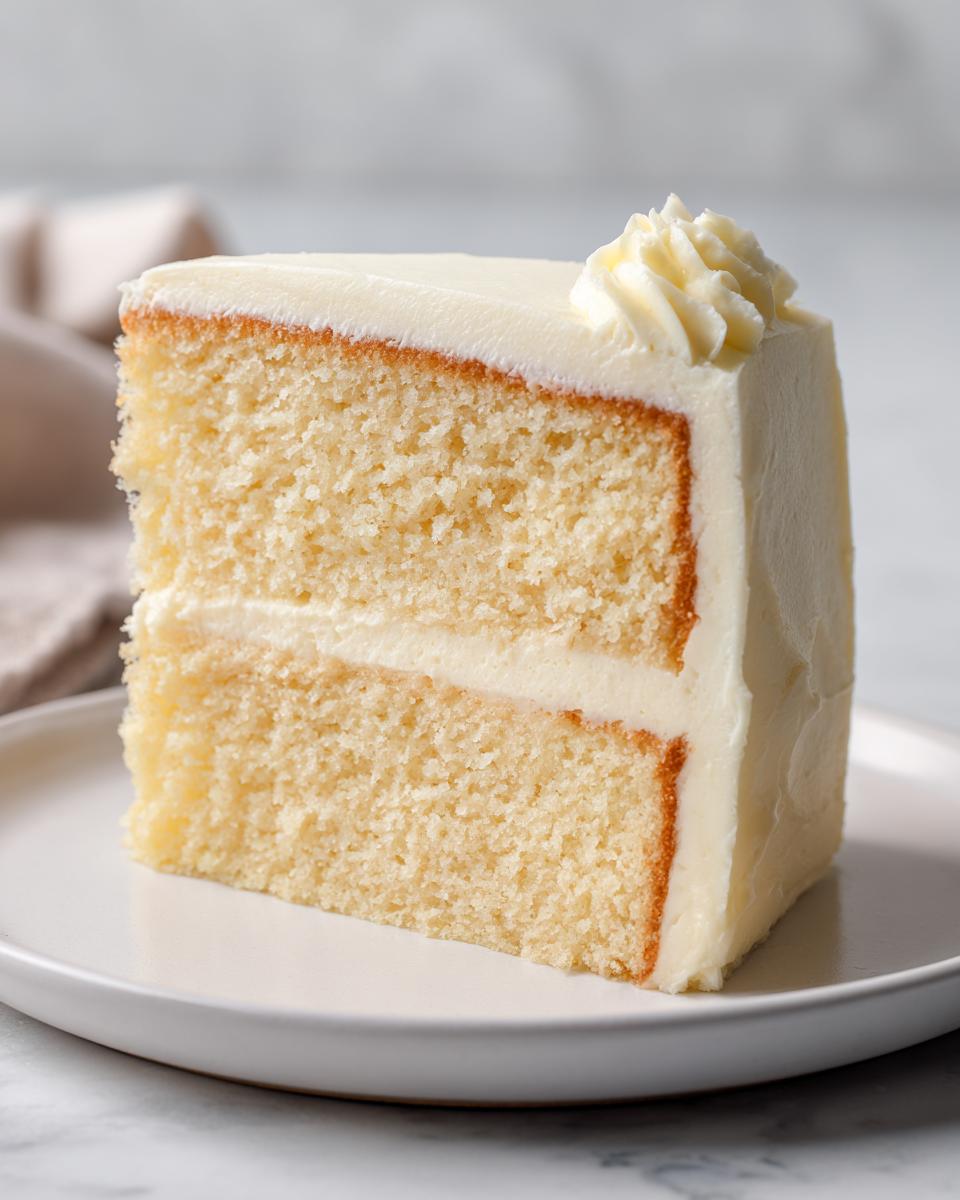
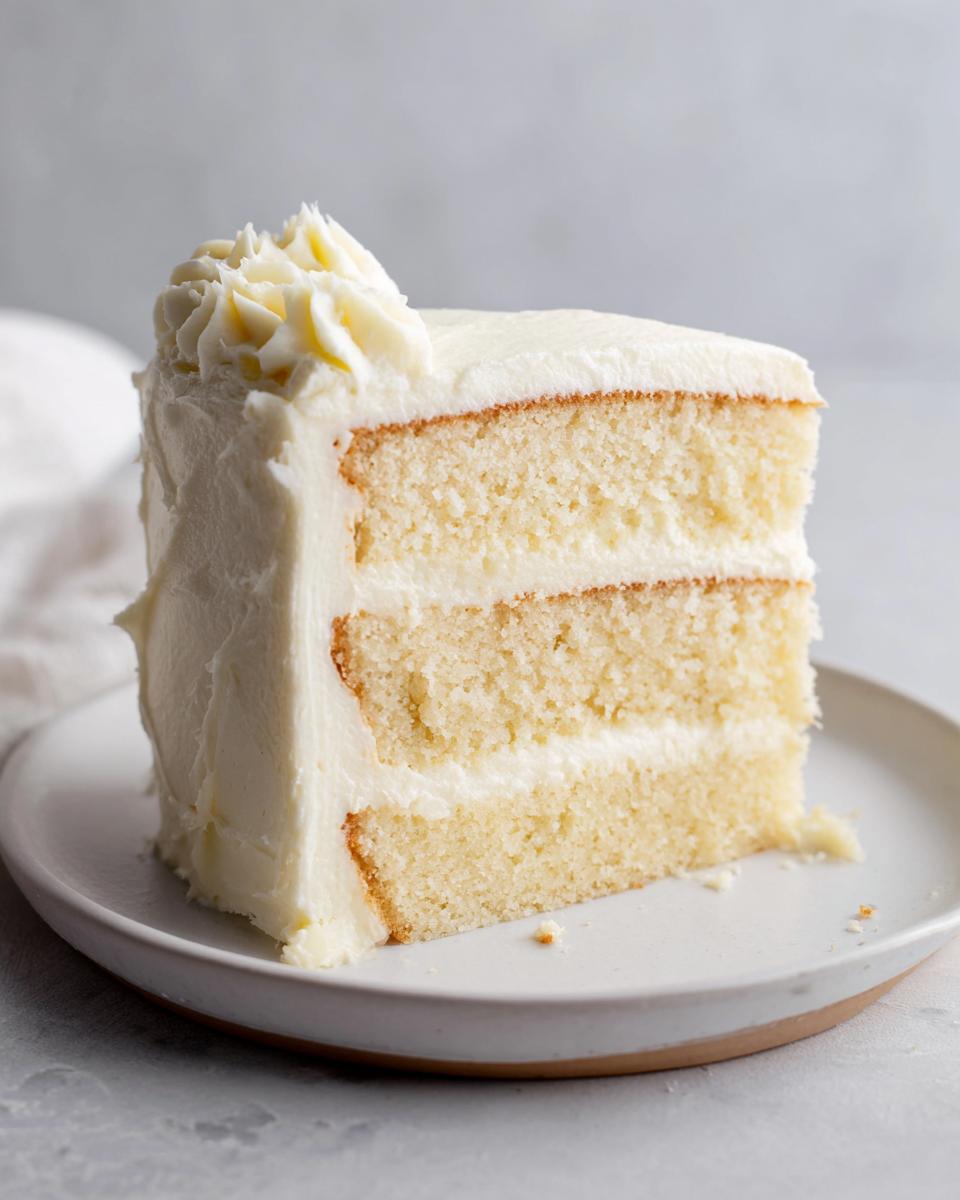
Divide that beautiful, soft batter evenly between your two prepared pans. They should go into that preheated oven for about 30 to 35 minutes. You’ll know they’re ready when a wooden pick inserted right into the center comes out clean—no wet goo, just moist crumbs clinging to the wood. That’s the sign of a **Soft Vanilla Sponge Cake** done just right!
The next step is patience, which I know is hard! Let them sit sweetly in the pans for exactly 10 minutes. If you try to flip them out immediately, they might collapse. Once those 10 minutes are up, carefully invert them onto a wire rack. They need to cool *completely* before we even think about frosting them, or all that gorgeous buttercream will melt into a sad, oily puddle!
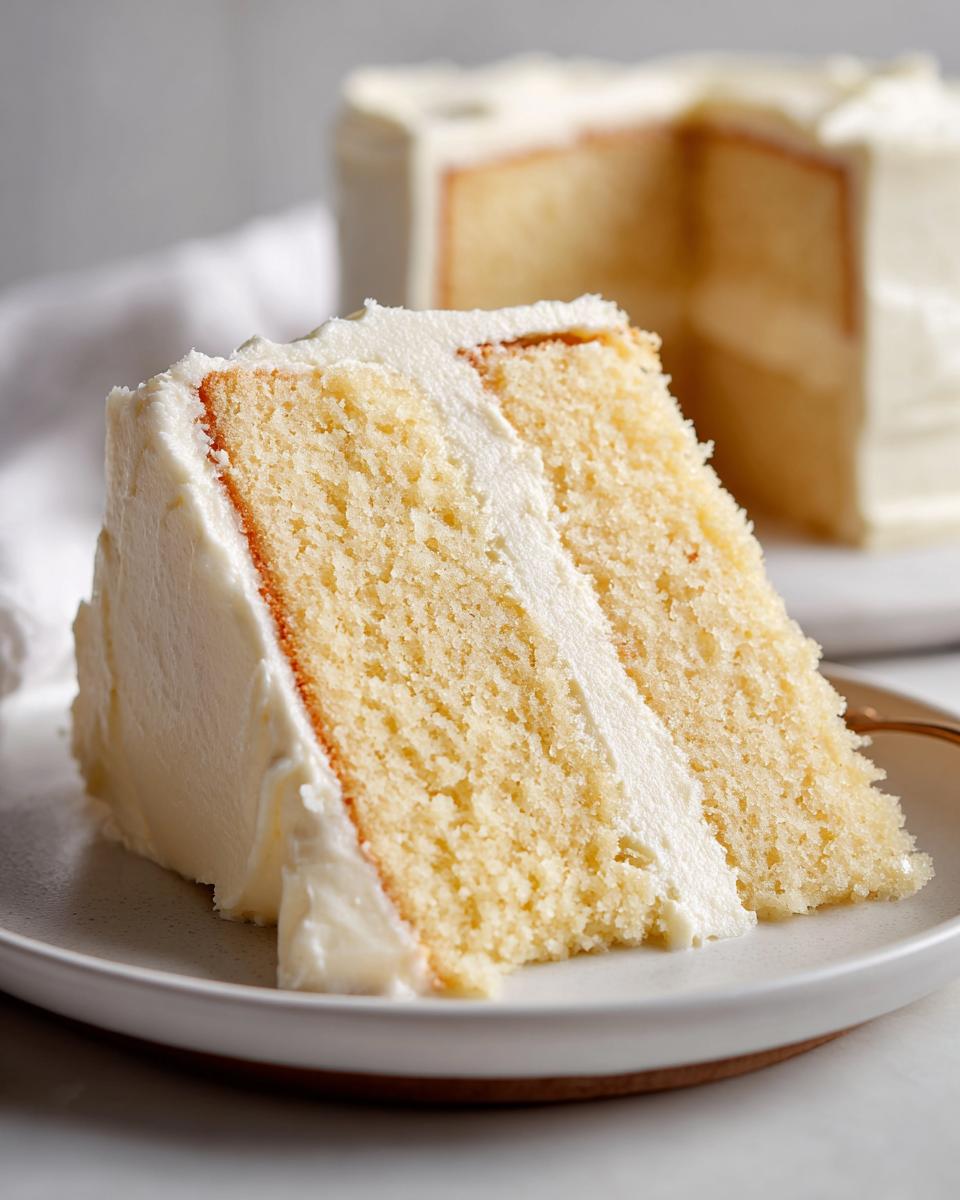
Assembling Your Vanilla Cake for Special Occasions
Alright, the layers are cool—and I mean *completely* cool—so now we get to the fun part: turning these simple sponges into a showstopper fit for any party! If your layers baked with a little dome on top, I usually just take a long serrated knife and gently shave off that top bump so they stack perfectly flat. It makes such a difference for that professional, clean look we want for a **Vanilla Cake for Special Occasions**.

Once they are level, stack away! A little dollop of frosting right in the center of the serving plate helps anchor the first layer so it doesn’t slide around while you’re frosting the sides. Then it’s just a matter of piling on that glorious, silky buttercream between the layers and smoothing it all over the top and sides until it looks like perfection!
Making the Creamy Vanilla Buttercream Frosting
The frosting needs just as much love as the cake itself! Start by beating that cup of softened butter until it’s really smooth and creamy—no lumps allowed! Then, you slowly introduce the sifted powdered sugar, low and slow at first, because that sugar flies everywhere otherwise, trust me! Once it’s mostly combined, I crank the mixer up. That pinch of salt I added is non-negotiable; it cuts through the sweetness so the frosting tastes rich, not just sugary.
The final touch for smoothness is the heavy cream. I add it just one tablespoon at a time until the whole mixture is dreamy, light, and holds a gentle peak. If you want to see how I use simple techniques to create elegant desserts like this, you should check out my recipe for pumpkin coffee cake recipe sometime!
Tips for the Perfect Vanilla Cake Recipe Every Time
Baking should always feel dependable, right? Even though this is my tried-and-true favorite **vanilla cake recipe**, I know sometimes things happen in the oven that we didn’t plan for! Whether it’s a humid day or you just ran out of one thing, I have a few tricks up my sleeve that I’ve gathered over years of testing recipes, making sure you get that soft, fluffy result even when you deviate slightly.
When you read my notes about needing room-temperature ingredients, that’s serious business! While I mentioned that some people prefer using a sous-vide precision cooker to perfectly temper eggs for things like complicated custards, for this cake, simply leaving them on the counter an hour before baking gets you that amazing consistency in the batter. It’s all about building those stable layers for the final bake!
Ingredient Notes and Substitutions for This Vanilla Cake Recipe
First up: the sour cream! Don’t skip it or think you can substitute it with regular yogurt. The fat and acidity of the sour cream are crucial; they keep the crumb incredibly tender and react perfectly with our baking powder. If you absolutely must substitute, use full-fat Greek yogurt, but know that the cake might be slightly less rich.
As for the milk, if you are out of whole milk, whole buttermilk is actually a fantastic swap! It adds a little extra tanginess that really brightens up the flavor, kind of like a lighter butter flavor. Just make sure if you use buttermilk, you might slightly reduce the baking powder, maybe down to just shy of the full tablespoon, depending on how active your buttermilk is. But honestly, for the very first time making this cake, stick to the full list—it’s guaranteed perfection that way!
Make Ahead Vanilla Cake and Storage Instructions
I know life gets crazy busy, so planning ahead is huge, especially when you need a show-stopping **Vanilla Cake for Special Occasions**! The great news is that this cake layers beautifully. If you bake the layers one day and frost them the next, I promise they won’t dry out. Just wrap the *unfrosted* layers tightly in plastic wrap—I use two layers of wrap—and leave them on the counter for up to 24 hours. If you need to stash them longer, the fridge works, but bring them back to room temperature before frosting.
If you frost it, keep it loosely covered on the counter. It’s that sour cream that keeps this **Make Ahead Vanilla Cake** so incredibly fresh; it honestly tastes just as good the next day. If you are freezing leftovers, the frosted cake does well for about a week wrapped tightly!
Serving Suggestions for Your Classic Birthday Cake Recipe
Once you have that gorgeous, towering cake assembled, the presentation matters almost as much as the taste! Since this is such a versatile and approachable cake, it really shines with simple, elegant garnishes. For a truly classic birthday cake feel, you can’t beat fresh berries—strawberries or raspberries scattered around the base or piled lightly on top look stunning against the white buttercream.
If you’re serving this as a weekend treat, it pairs absolutely perfectly with a strong cup of coffee, cutting through the sweetness just right. I also happen to love serving a slice alongside something warm, like a fresh mug of my homemade chai latte spiced milk tea during chilly afternoons. It just makes the whole experience feel cozy and intentional. For something really simple, a few light candy sprinkles mixed into the leftover frosting and drizzled over the top before serving gives it that festive pop without too much effort!
Frequently Asked Questions About This Vanilla Cake Recipe
I always get so many questions once people start baking this cake, and that’s wonderful! It just shows how many people need a reliable, tried-and-true recipe in their collection. I’ve gathered the most common queries here so you can feel completely confident, even if you are looking for a **Beginner Friendly Vanilla Cake** option.
Can I turn this into a Vanilla Sheet Cake Recipe?
Oh yes, you totally can! If you don’t want to deal with stacking layers, making it as a **Vanilla Sheet Cake Recipe** is brilliant because it’s so easy to frost and slice. When you switch to a 9×13 inch pan, you need to spread the batter out evenly—it will be a shallower layer than our two rounds.
Because the cake is spread thinner, it bakes much faster. Instead of 30–35 minutes, start checking around the 25-minute mark. You’re aiming for that same clean toothpick test. Just be extra careful not to overbake it when it’s in a sheet pan, because that’s the fastest way to lose the moisture we worked so hard to keep in there!
How do I get a Bakery Style Vanilla Cake crumb?
Achieving that gorgeous, even, fine crumb that you see in professional bakeries all comes down to temperature and mixing discipline. It’s not really about a fancy ingredient; it’s about respecting the process! First, make sure all those cold ingredients—eggs, milk, sour cream—are truly at room temperature. If they are cold, the batter clumps and you get tunnels.
Second, and this is huge: don’t substitute the butter for oil when trying to make it easier, even though that seems like a shortcut! The act of creaming the butter with the sugar creates those initial air pockets crucial for that soft cake structure. Lastly, stop mixing as soon as those flour streaks disappear when you’re combining the dry into the wet. A few tiny lumps are way better than an overmixed, tough crumb! If you want more tips on reliable baking, you can always check out my main blog page for more baking theory!
Estimated Nutritional Data for This Simple Vanilla Dessert
I always feel a *little* nervous sharing the nutrition facts because once you go heavy on the butter and sugar for a spectacular cake, the numbers go up! But since you deserve to know exactly what you’re dealing with when you make this incredible **Simple Vanilla Dessert**, here are the estimated numbers based on the recipe yields. Remember, these are just ballpark figures, not exact science, because whipping air into ingredients changes things!
These estimates assume you are serving one slice of the fully frosted cake. If you make fewer servings or use homemade frosting, your numbers will shift, so take this as a helpful guide rather than gospel. What I can guarantee is that every calorie is worth it!
- Serving Size: 1 slice
- Calories: 450
- Sugar: 55g
- Sodium: 250mg
- Fat: 24g
- Saturated Fat: 15g
- Carbohydrates: 58g
- Protein: 5g
Honestly, I try not to look at the sugar count too closely when I’m serving this for a real celebration! The most important thing is the quality of that vanilla flavor and the unbelievably soft texture we achieved with the sour cream.
Share Your Experience with This Vanilla Cake Recipe
Now that you’ve hopefully pulled this glorious, fluffy cake out of your oven, I would absolutely *adore* to hear about it! Honestly, seeing your creations is what makes all the testing and tweaking worth it for me. I want to know if this became your new favorite **vanilla cake recipe** for birthdays or just any time you need that perfect sweet fix.
Did the sour cream truly make a difference in the moisture for you? Did the frosting turn out perfectly creamy? Please, leave a rating below—those star ratings really help other home cooks who are looking for a dependable recipe they can trust. Your feedback is how I know to keep testing and perfecting these classic desserts for everyone!
And please, snap a picture! Tag me while you’re enjoying your slice—maybe with a cup of coffee or tea—so I can celebrate right along with you. I can’t wait to see what beautiful layers you’ve created!
PrintClassic Moist Vanilla Layer Cake with Creamy Buttercream

This is a reliable recipe for a moist, soft vanilla layer cake paired with a rich, creamy vanilla buttercream frosting, perfect for birthdays and special occasions.
- Prep Time: 25 min
- Cook Time: 35 min
- Total Time: 60 min
- Yield: 12 servings 1x
- Category: Dessert
- Method: Baking
- Cuisine: American
- Diet: Vegetarian
Ingredients
- 1 3/4 cups all-purpose flour
- 1 3/4 cups granulated sugar
- 1 tablespoon baking powder
- 1/2 teaspoon salt
- 1 cup unsalted butter, softened
- 4 large eggs, room temperature
- 1 cup whole milk, room temperature
- 2 teaspoons pure vanilla extract
- 1/4 cup sour cream (for cake)
- 1 cup unsalted butter, softened (for frosting)
- 4 cups powdered sugar, sifted (for frosting)
- 1 teaspoon pure vanilla extract (for frosting)
- 2–3 tablespoons heavy cream (for frosting)
- Pinch of salt (for frosting)
Instructions
- Preheat your oven to 350°F (175°C). Grease and flour two 8-inch round cake pans, or line the bottoms with parchment paper.
- In a large bowl, whisk together the flour, baking powder, and salt. Set aside.
- In a separate large bowl, cream the softened butter and sugar together with an electric mixer until light and fluffy, about 3 minutes.
- Beat in the eggs one at a time, mixing well after each addition. Mix in the 2 teaspoons of vanilla extract.
- Gradually add the dry ingredients to the wet ingredients, alternating with the milk, beginning and ending with the dry ingredients. Mix on low speed until just combined. Do not overmix.
- Gently fold in the sour cream until the batter is smooth.
- Divide the batter evenly between the prepared cake pans.
- Bake for 30 to 35 minutes, or until a wooden pick inserted into the center comes out clean.
- Let the cakes cool in the pans for 10 minutes before inverting them onto a wire rack to cool completely.
- Prepare the frosting: In a large bowl, beat the 1 cup of softened butter until smooth. Gradually add the sifted powdered sugar, mixing on low speed until incorporated.
- Add the 1 teaspoon of vanilla extract and a pinch of salt. Beat on medium speed until fluffy. Add heavy cream one tablespoon at a time until you reach a smooth, spreadable consistency.
- Once the cakes are completely cool, level the tops if necessary. Place one layer on a serving plate, spread with a generous layer of frosting, top with the second layer, and frost the top and sides of the cake.
Notes
- For the moistest cake, ensure your milk and eggs are at room temperature before mixing.
- If you are planning ahead, this cake freezes well unfrosted for up to one month.
- This recipe is a great base; consider using a sous-vide precision cooker to perfectly temper your eggs for the frosting if you want extra stability, though it is not required for this simple recipe.
Nutrition
- Serving Size: 1 slice
- Calories: 450
- Sugar: 55g
- Sodium: 250mg
- Fat: 24g
- Saturated Fat: 15g
- Unsaturated Fat: 9g
- Trans Fat: 0.5g
- Carbohydrates: 58g
- Fiber: 1g
- Protein: 5g
- Cholesterol: 90mg