
There’s something truly magical about natural leavening, isn’t there? It feels like coaxing life from just flour and water—a tiny, wild yeast culture that becomes the heart of every perfect loaf. I know this process sounds daunting, especially if you’re looking for a sourdough starter recipe that feels straightforward. As someone who loves approachable elegance in the kitchen, please believe me when I say cultivating your first starter is easier than you think. We are trading fussy chemistry for patient observation, and I’m here to guide you through creating your very own, active, bubbly culture right from scratch right here on Unfold Recipes. It’s an essential step for real artisan bread making.
- Why Cultivate Your Own Sourdough Starter From Scratch
- Essential Ingredients for Your First Sourdough Starter
- The 7-Day Day by Day Sourdough Starter Schedule
- How to Feed Sourdough Starter Once Established
- Sourdough Starter Care: Storage and Revitalization
- Troubleshooting Common Sourdough Starter Issues
- Variations: Exploring the Amish Sourdough Starter Method
- Frequently Asked Questions About Your Sourdough Starter
- Next Steps in Your Artisan Bread Making Journey
Why Cultivate Your Own Sourdough Starter From Scratch
I truly believe the best bread comes from the slowest methods, and making your own sourdough starter from scratch is the ultimate lesson in slowing down. Why bother, when you can just buy dry yeast? The answer is flavor, my friends, pure, deep, complex flavor that commercial yeast just cannot replicate. When you cultivate your own wild yeast culture, you are harnessing the microbial ecosystem of your own kitchen. It’s satisfying in a way that few other baking tasks are!
It’s about connection, really. Once you see those first tiny bubbles form, you realize you’re doing something ancient and real. It builds unbelievable confidence and is the key foundation for everything that follows in artisan baking.
The Joy of Natural Leavening
Natural leavening is simply using native yeasts and bacteria, rather than the quick-acting instant yeast you grab at the store. Commercial yeast works fast and does one job: rise. But your wild starter does so much more! It breaks down the flour, creating wonderful acids that give sourdough that signature tangy complexity and make the final bread easier to digest. Don’t worry about the science behind it; just know that this slow process equals incredible taste. It’s completely approachable, I promise!
Essential Ingredients for Your First Sourdough Starter
When you look at the ingredients list for this process, you might think I’m playing a little trick on you, because there are so few things required! We are keeping things beautifully simple here. To start your amazing new flour and water starter, you only need two items: flour and water. That’s it! The less you complicate the start, the better chance those little wild organisms have to take hold and thrive. Trust me, no fancy supplements required for this journey into natural leavening.
The most important thing regarding the water is that it must be unchlorinated. Chlorine is designed to kill microbes, which is the exact opposite of what we are trying to achieve. If you use tap water, it’s wise to let it sit out on the counter for 24 hours uncovered; this allows the chlorine gas to dissipate into the air naturally. Easy peasy!
Ingredient Notes and Flour Selection
For the flour, the goal in the very beginning is to feed the strongest, most diverse population of microbes we can find. That is why I insist on starting with a whole grain flour—either rye or whole wheat. These flours contain more of the natural yeasts and nutrients on the bran that the bacteria love to feast on. This initial robust feeding helps jumpstart your culture much faster than starting with just all-purpose flour.
Once you see good, solid activity by Day 3 or 4, you can smoothly transition to using unbleached all-purpose flour for all subsequent feedings. This switch is important because it helps you build the structure needed for baking later on. I’ve seen people try to start with only white flour, and it works, but honestly, it takes longer. Giving your starter a good whole grain push at the start is my little secret for building expertise and speed right out of the gate.
The 7-Day Day by Day Sourdough Starter Schedule
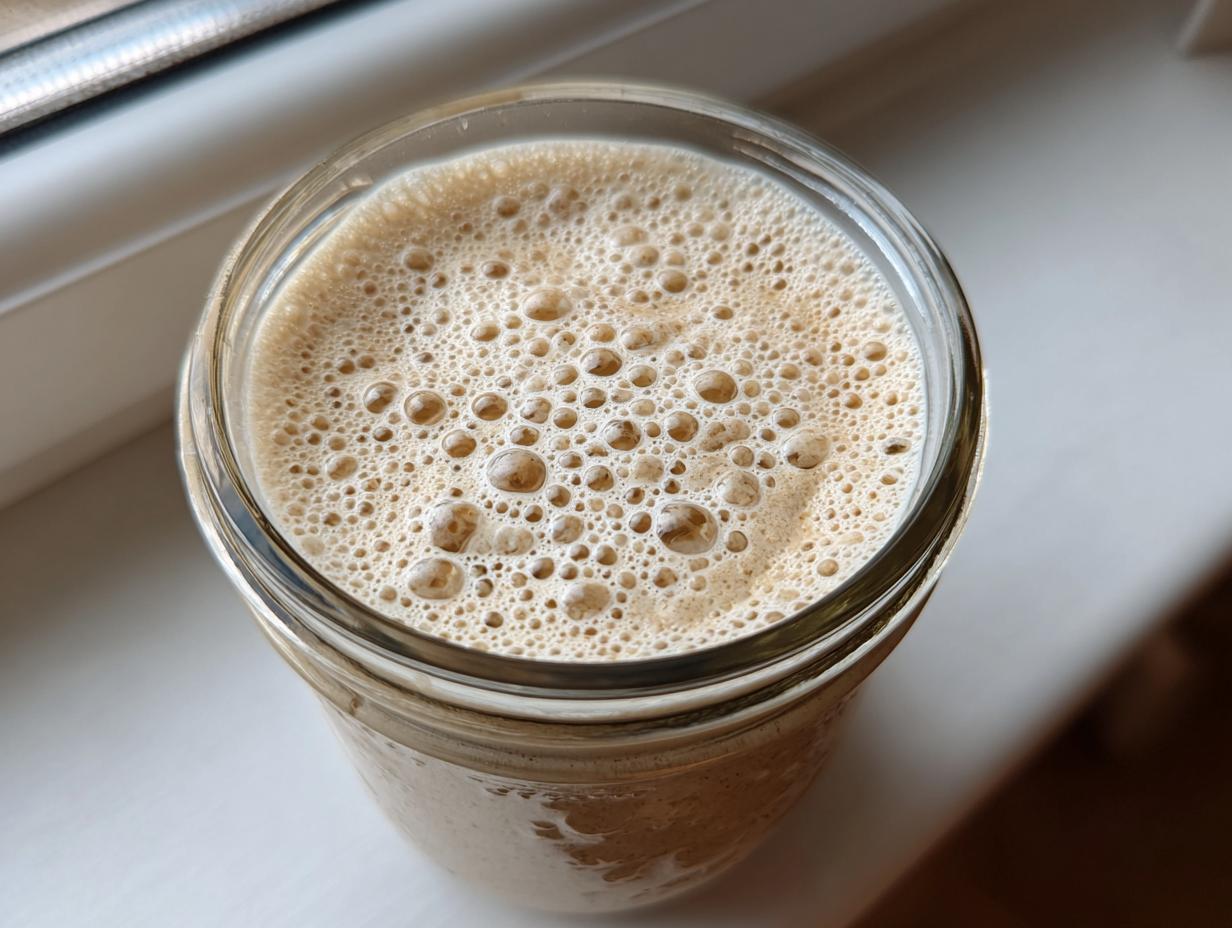
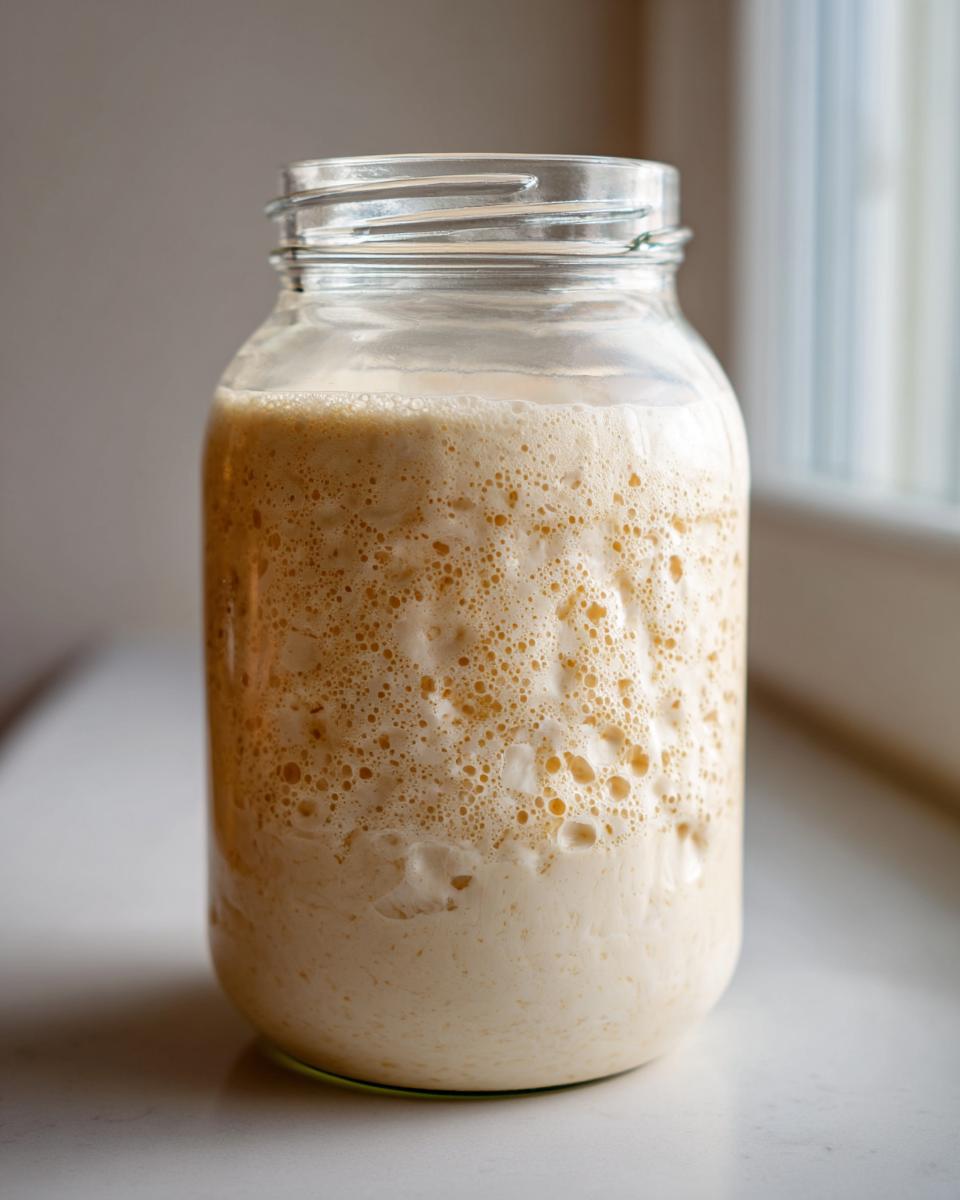
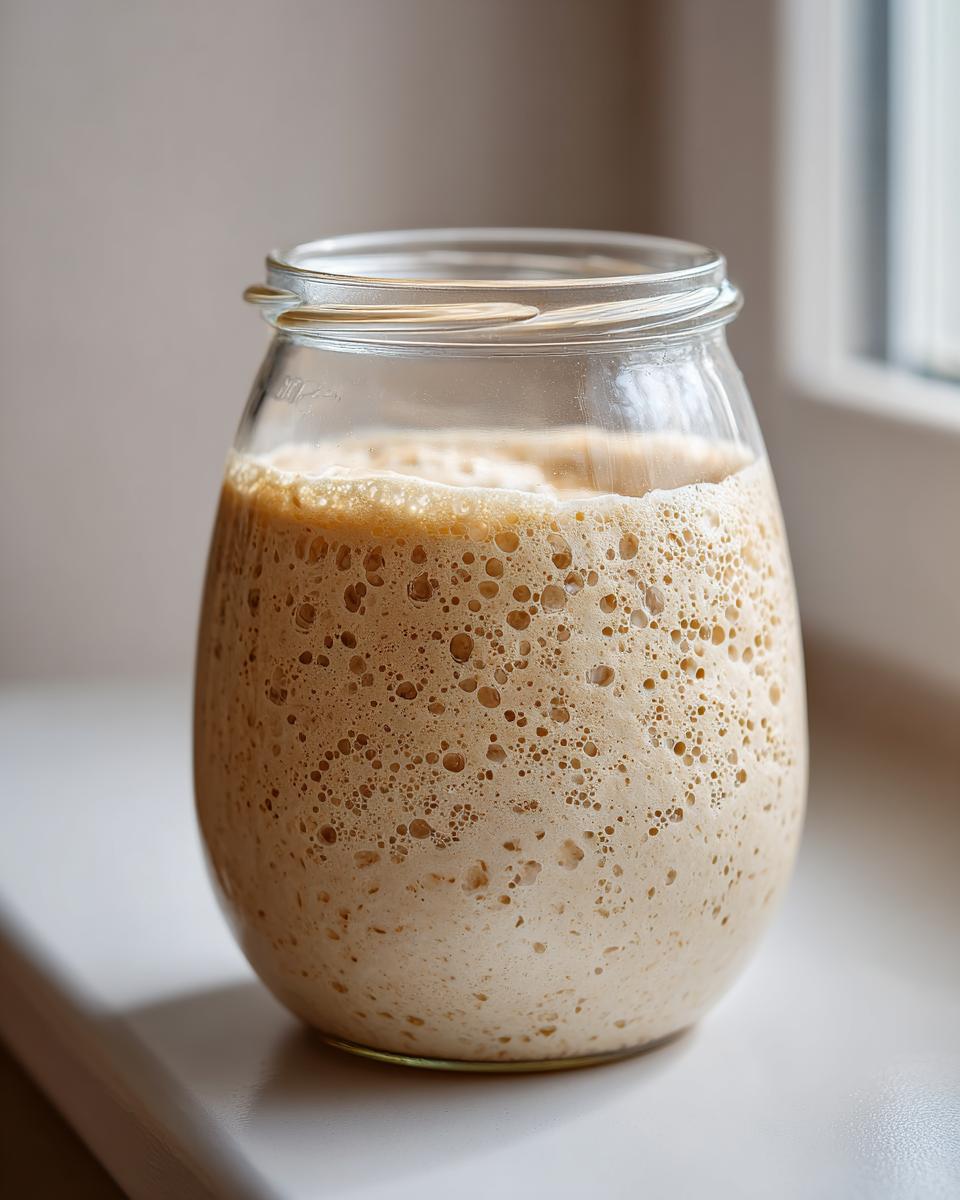
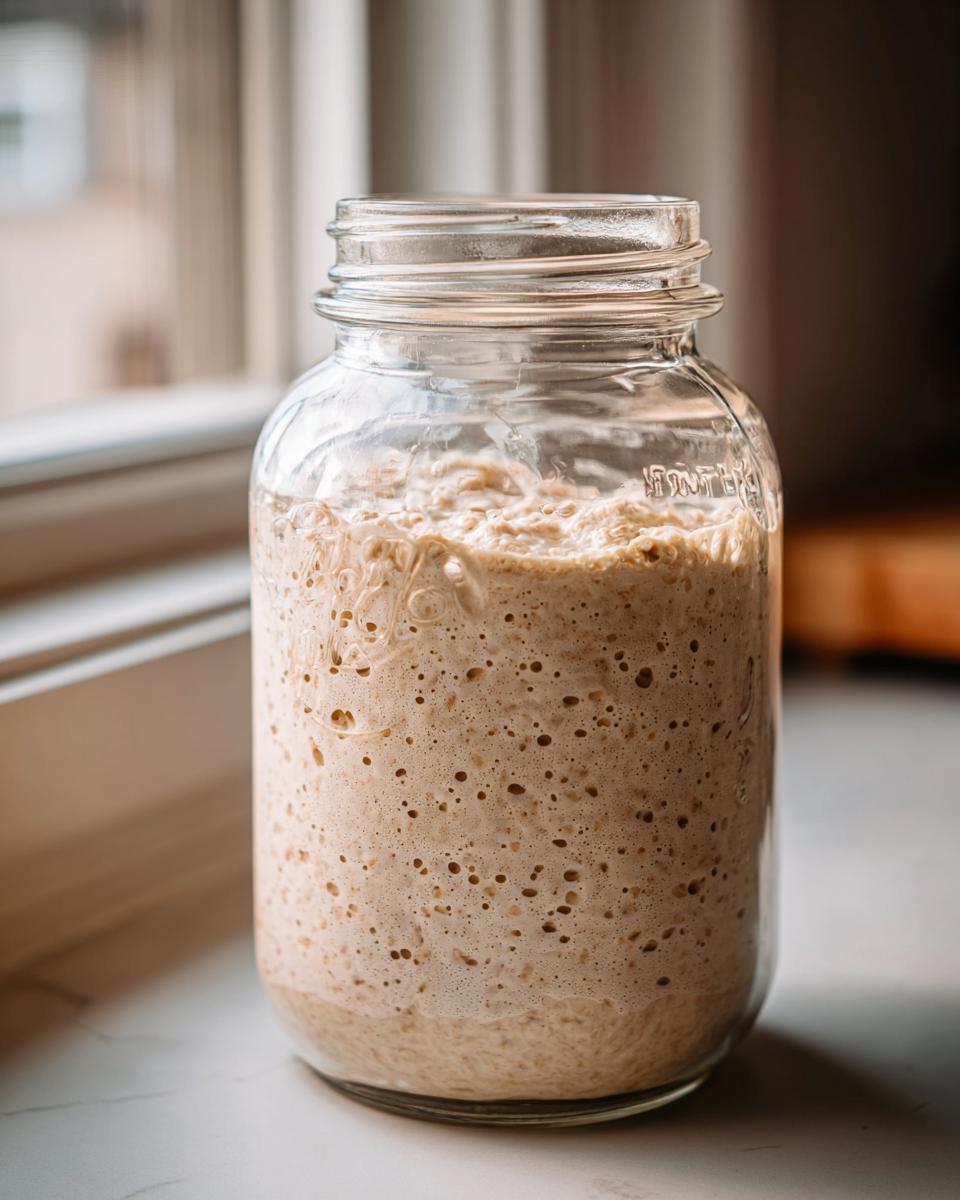
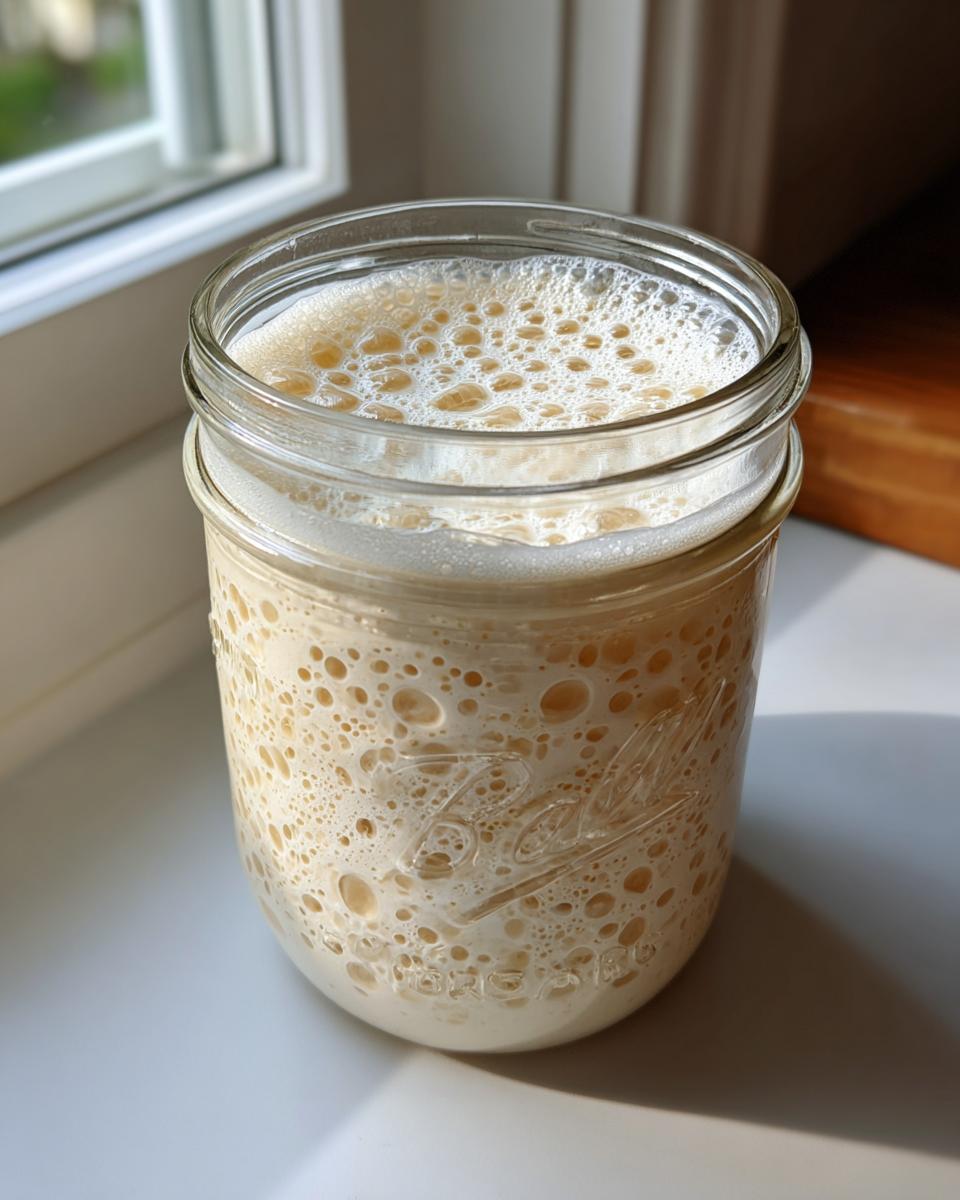
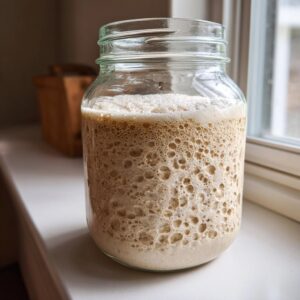
Okay, this is where the real fun—and the real patience—comes in! This whole process of cultivating your own robust day by day sourdough starter requires you to stop rushing things. You are inviting wild yeast to move into your home, and they operate on their own schedule, not mine! Resist the urge to look at the jar four times an hour. Just follow these simple steps, keep your jar in a consistently warm spot (around 70°F is great), and trust the process. I’ve laid out these first seven days using just my basic flour and water combo so you can see the small victories along the way.
For the actual steps, make sure you have a nice clear jar—preferably glass—so you can watch the magic happen from all angles. You absolutely need to see that rise and fall! This schedule is incredibly foolproof, perfect for any beginner baker who just needs a clear roadmap. If you want a detailed walkthrough comparing these steps to another straightforward method, you can check out some great resources like the one gathered here: Make Sourdough Starter From Scratch.
Days 1 & 2: Initial Mix and Rest
Day one is simple: we mix. Grab your jar and combine 50g of that whole grain flour (remember, rye or whole wheat for the best start!) with 50g of room-temperature, unchlorinated water. Stir it until it looks like thick pancake batter—absolutely no dry flour pockets visible. Now, cover it loosely. I just use a coffee filter held on with a rubber band, or the jar lid resting gently on top. It needs air! Place it somewhere cozy and forget about it for a full 24 hours.
Day two is my least favorite day because it involves doing absolutely nothing! That’s right, zero activity required from you. The mixture is just getting acquainted with its new environment. You might see a tiny bit of liquid separation on top (called ‘hooch,’ we’ll talk about that later if you do!), or you might see nothing at all. Either way, leave it be until Day 3.
Days 3 & 4: First Feedings and Early Activity
On Day 3, it’s time to make room for the new goodies. You must discard half of what’s in the jar. Be brave; it feels wasteful, but it’s essential to keep the starter manageable and feed the strongest bacteria. Weigh out about 50g of the existing mixture. To that, add 50g of all-purpose flour and 50g of fresh water. Mix it until it’s smooth again. Cover loosely and wait 24 hours.
You might see the first signs of success on Day 4—perhaps a faint scent of vinegar or a few tiny bubbles clinging to the side of the jar. If you see this, high-five yourself! Repeat the process exactly as you did on Day 3: discard half, then feed with 50g AP flour and 50g water. That little bit of bubbling is the natural leavening kicking into gear!
Days 5, 6, & 7: Building a Bubbly Starter Maintenance
Days 5 through 7 are about consistency and building strength. From Day 5 onward, we switch to feeding twice a day, essentially every 12 hours. This rapid feeding schedule helps the strong, beneficial yeasts outcompete any slower-growing bacteria. For each feeding, the routine is the same: discard down to about 50g, then feed with 50g AP flour and 50g water.
By Day 6, you should be noticing much stronger signs. We are looking for true doubling in size between feedings—it should look like a fluffy, airy sponge, not just a few bubbles. This stage confirms that your culture is establishing itself beautifully. By Day 7, if your starter reliably doubles in volume within 4 to 8 hours after a feeding, congratulations! You have achieved active, bubbly starter maintenance, and you are ready to bake. If it’s lagging, just stick to that twice-daily feeding schedule for a few more days. Don’t quit!
If you’re interested in troubleshooting or want more feeding advice, pop over and see my latest musings in the blog section.
How to Feed Sourdough Starter Once Established
Once you’ve navigated those first seven days and your wild yeast culture is doubling perfectly after feeding, you have graduated! Hooray! Creating that initial sourdough starter was the hardest part. Now we move into established care, which is much more forgiving, especially regarding how often you need to feed sourdough starter.
The maintenance routine shifts dramatically depending on how often you plan to bake. If you bake every day, you’ll keep it on the counter and feed it regularly, just like we did during the creation phase. But for most of us home bakers, the fridge becomes our best friend. Don’t worry; storing your starter doesn’t mean putting it to sleep forever! It just means we switch to a less frequent schedule. When you do get ready to bake again, you’ll nourish it back to health, just like preparing to make my favorite sourdough cornbread.
Determining When Your Sourdough Starter is Ready
How do you know for sure that your culture has enough power to lift a loaf of artisan bread making? Don’t rely just on sight, although a starter that’s visibly doubled in size is a great sign! I recommend using the simple float test—it sounds a little quirky, but it works wonders for giving you peace of mind.
Here is my tried-and-true method: Take a small, rested spoonful of your recently fed starter—say, about ten minutes after you see it peak. Gently drop it into a glass of room-temperature water. If it floats immediately, you are golden! It means the air pockets are strong and plentiful enough to support the structure of your dough. If it sinks right away, it means the yeast are either exhausted or haven’t fully peaked yet. In that case, I’d wait another hour, or if you are getting impatient, save that portion and give it just one more quick feeding before you start mixing your bread dough. This little test keeps me from wasting flour on a sluggish, underfed starter every single time!
If you want to see a great visual comparison of when to feed versus when to bake, check out this helpful resource on how to feed sourdough starter properly for baking days. It makes planning those weekend sourdough projects much easier!
Sourdough Starter Care: Storage and Revitalization
Now that you have this incredible, living, active sourdough starter, you have a responsibility—you have to keep it alive! I know it sounds dramatic, but this is your new fermentation pet. If you bake every day, you can keep it right on the counter following its regular feeding schedule. But for most of us, the beauty of a liquid starter is that we can put it away for a while when life gets busy.
The refrigerator is your best friend for long-term storage. It slows down all that microbial activity considerably. You aren’t killing it; you are just putting it gently to sleep for a bit. Knowing how to keep sourdough starter alive in the fridge is key to making this whole process sustainable!
Before it goes into the cold house, make sure you give it a good feed. I feed mine, let it sit on the counter for about an hour to get bubbly—just a little sign of life—and then seal the jar tight and tuck it in the back of the fridge. Cold temperatures actually preserve the flavor better, I find, making the eventual bread less aggressively sour.
The most important rule for keeping it healthy? Don’t ignore it for months and six days! You need to wake it up occasionally. I try to remember to take mine out once a week, give it a small feed (maybe half the normal amount of flour and water), let it bubble happily for a few hours on the counter, and then put it back to sleep. This little routine keeps the yeast happy and strong so when you decide you want to bake that gorgeous artisan bread, it’s ready to go!
When you’re ready to bake after a week or two in the fridge, you need to fully revitalize it. That means taking it out, discarding most of it, and feeding it twice a day at room temperature—just like we did during Days 5, 6, and 7 in the creation process. It might take a feeding or two for it to feel fully awake and reliably doubling, but that gentle revival ensures you get the best lift for your dough!
Troubleshooting Common Sourdough Starter Issues
Even with the best intentions and a perfect 7-day schedule, sometimes your little wild yeast pet throws a tantrum, right? Don’t panic! This is where people get scared and think their sourdough starter is ruined, but honestly, 99% of the time, it’s just asking for something simple. That yeasty smell, the lack of bubbles, or maybe some liquid on top—these are just clues telling you what environment it prefers. My goal here is to give you the confidence to read those clues instead of immediately throwing everything away. We want reliable results in our artisan bread making, and that comes from knowing how to nurture the culture through its weird phases.
What to Do About a Sluggish Sourdough Starter
If your starter is looking flat, refusing to rise, or just generally refusing to cooperate after Day 6, it’s likely sluggish. This usually happens when the temperature dips too low, or the meal wasn’t quite enough for the hungry microbes living inside. First, check your temperature. Is your kitchen too cold? Warmth is food for the yeast! Try moving your jar to the top of the fridge or inside your oven with just the light on—that soft warmth can make a world of difference.
If the temperature is fine, you need to increase the feeding frequency. If you were feeding once every 24 hours, push it to twice a day. And here is a little trick: use slightly warmer water for the next few feeds. Not hot, heaven forbid! But aim for water that feels a little warmer than room temperature—think bathwater for a baby, not hot tea. This little jolt of warmth encourages the yeast to wake up and start reproducing again. If you are still feeling unsure about your culture’s health after trying these fixes, you can always look at some excellent expert guides on starter care, like the resources shared by people who guide beginners through this process every day: Sourdough Starter Guide for Beginners.
Now, let’s talk about the pink stuff, because that is the one thing you cannot ignore. If you ever see pink, orange, or black streaks, that’s dangerous mold and you need to discard the whole thing and start over with fresh flour and water. It’s disappointing, but it’s safety first! If you just see grey or watery liquid—that’s ‘hooch,’ and that just means it’s hungry! Just pour it off (or stir it in for a tangier starter) and feed it a little more generously next time. See? Nothing to fear when you know what to look for!
Variations: Exploring the Amish Sourdough Starter Method
Once you master the basic technique using just flour and water, you might start hearing about different regional styles. People love to keep these traditions alive! You’ll hear folks talk about an Amish sourdough starter, or maybe a stiff starter versus our liquid culture. While these variations are wonderful for exploring different textures in your final bread, I want to assure you of one thing: the core magic is always the same.
Whether you’re working with a rye-heavy rustic mix or aiming for that specific, thicker consistency often associated with the Amish tradition, you are still just cultivating wild yeast using flour and water. The difference is usually in the hydration level—how much water relative to flour you use—or the type of flour you select for the long haul. Our method, designed to get you baking quickly with a reliable, bubbly starter, uses a slightly wetter ratio that is incredibly easy for newcomers.
If you’re curious about diving deeper into the home-style, almost nostalgic recipes you hear about, there are some lovely traditions out there. You can look into resources focused on those older methods, like the one I found here detailing the lovely Old-Fashioned Amish Sourdough Starter. But for now, keep nurturing the starter you have! It’s already got everything it needs to bring your loaves to life.
Frequently Asked Questions About Your Sourdough Starter
I saved some of the most common questions I get about making and keeping an sourdough starter right here. Navigating the initial week can bring up a few worries, but these quick answers should give you all the confidence you need to keep your wild yeast culture happy!
Can I use bread flour instead of all-purpose flour for my sourdough starter?
Oh, absolutely! If you have bread flour sitting around, go ahead and use it, especially for the maintenance feedings after Day 4. Bread flour has a higher protein content than standard all-purpose flour. This extra protein means a stronger gluten network can form, which is fantastic for building structure in your final artisan bread making. Think of rye flour as the sprint starter, and bread flour as the strong marathon runner. Either way, your starter will thrive, but I always suggest using AP for the bulk of its life once it’s established so you have plenty of strong bread flour left for the actual dough!
How long does it take until I can bake my first sourdough bread?
This is the question everyone asks, and I want to be honest with you: Don’t rush it, or your bread will be flat and sad! Generally, following this very day by day sourdough starter schedule, you need to wait until Day 7, or whenever your starter is consistently doubling in volume within six to eight hours after feeding. That indicates you have a truly active sourdough starter recipe that can reliably provide the lift needed for a beautiful loaf. For most beginners, that means you are ready to mix dough sometime between Day 8 and Day 10. Remember, the longer you wait until it’s truly vigorous, the less likely you are to experience that disappointing flat loaf!
If you ever decide you need help or just want to share your early successes (or perhaps ask about my favorite simple sourdough recipe), please don’t hesitate to reach out!
Next Steps in Your Artisan Bread Making Journey
Congratulations! You are officially the parent of a vibrant wild yeast culture. Now that your sourdough starter is waking up and bubbling happily, it’s time to put it to work. Don’t let that beautiful work go to waste! Think about starting a simple loaf this weekend, or maybe try making some rustic homemade bread bowls. Let me know how this journey has been for you—I always love hearing your feedback!
PrintThe Ultimate Beginner’s Guide: How to Make a Bubbly Sourdough Starter From Scratch in 7 Days
Learn how to create your own active, bubbly sourdough starter using only flour and water. This day-by-day guide provides simple steps for beginners to cultivate their own natural leavening culture for artisan bread making.
- Prep Time: 5 min daily
- Cook Time: 0 min
- Total Time: 7 days active maintenance
- Yield: 1 active wild yeast culture 1x
- Category: Baking Foundation
- Method: Fermentation
- Cuisine: Global
- Diet: Vegan
Ingredients
- 100g Whole Grain Flour (Rye or Whole Wheat recommended for initial activation)
- 100g Unbleached All-Purpose Flour
- 100g Unchlorinated Water (room temperature)
Instructions
- Day 1: Initial Mix. In a clean glass jar, combine 50g of whole grain flour and 50g of room temperature water. Stir well until no dry spots remain. Cover loosely (a coffee filter or loose lid works) and leave at room temperature (68-75°F) for 24 hours.
- Day 2: Rest. You may see little to no activity. Do nothing today. Keep the jar covered loosely at room temperature.
- Day 3: First Feed. Discard half of the mixture (about 50g). To the remaining starter, add 50g of all-purpose flour and 50g of water. Mix thoroughly. Cover loosely and let sit for 24 hours. You might see some small bubbles.
- Day 4: Increased Feeding. Discard half of the starter. Feed with 50g all-purpose flour and 50g water. You should see more consistent bubbling activity now.
- Day 5: Twice Daily Feeding Begins. Discard half of the starter. Feed with 50g all-purpose flour and 50g water. After 12 hours, repeat this feeding process (discard half, feed 50g flour, 50g water). Look for the starter to double in size between feedings.
- Day 6: Building Strength. Continue the twice-daily feeding schedule (discard half, feed 50g flour, 50g water every 12 hours). The starter should be very active, showing many bubbles, and smelling pleasantly sour.
- Day 7: Readiness Check. If your starter consistently doubles in volume within 4 to 8 hours after feeding, it is active and ready to bake with. If not, continue the twice-daily feeding until it shows this reliable rise and fall pattern.
Notes
- Use a clear jar so you can track the rise and fall of the culture.
- If you see mold or pink/orange streaks, discard everything and start over; this indicates bad bacteria growth.
- For long-term storage, place your established sourdough starter in the refrigerator after feeding it. Feed it once a week to keep it alive.
- To prepare a refrigerated starter for baking, take it out, discard most of it, and feed it twice a day at room temperature until it reliably doubles again.
Nutrition
- Serving Size: N/A (Culture)
- Calories: 0
- Sugar: 0
- Sodium: 0
- Fat: 0
- Saturated Fat: 0
- Unsaturated Fat: 0
- Trans Fat: 0
- Carbohydrates: 0
- Fiber: 0
- Protein: 0
- Cholesterol: 0