
When the summer heat is beating down and you want a dessert that feels utterly indulgent yet requires zero time wrestling with a hot oven, you need something truly special. That’s where my obsession with the perfect banana split cake began! It captures that iconic, nostalgic trio—banana, pineapple, and cherry—in a stunning, layered format that always steals the show at gatherings. When I first started Unfold Recipes, my goal was always to merge that elegant presentation I love with truly accessible methods for the home cook. This particular banana split cake recipe is one of my absolute favorites for effortless entertaining. It’s that beautiful balance of sophisticated flavor and simple, no-fuss assembly that I hope you find in all my home-tested recipes. I share more about my blending of culinary training and storytelling over on my About page. Trust me, this chilled wonder will become your go-to, easy summer staple.
- Why This No Bake Banana Split Cake Is Your New Summer Favorite
- Gathering Ingredients for Your Banana Split Cake
- Step-by-Step Instructions for the No Bake Banana Split Cake
- Tips for the Perfect Banana Split Cake Presentation
- Ingredient Notes and Substitutions for This Fruit Cream Dessert
- Serving Suggestions for Your Easy Party Dessert
- Storage and Make Ahead Dessert Instructions for the Banana Split Cake
- Frequently Asked Questions About Making Banana Split Cake
- Estimated Nutritional Data for One Serving of Banana Split Cake
Why This No Bake Banana Split Cake Is Your New Summer Favorite
Honestly, I think every summer menu needs one showstopper dessert that doesn’t require turning on the oven. This banana split cake is just that! It’s the definition of retro dessert recipes charm meeting absolute ease. I promise, once you see how simple it is, you’ll be whipping this up constantly. You can find more of my favorite sweets over on my Desserts page, but this one is special.
Effortless Assembly: The Ultimate No Bake Banana Split Cake
- Since this is a true no-oven situation, it keeps the kitchen cool—huge win in July!
- It’s such a fantastic make ahead dessert; in fact, it tastes better the longer the flavors meld together in the fridge.
- You get that desired rich, chilled dessert experience without any fuss.
A Crowd-Pleasing Potluck Desserts Star
If you are heading to a BBQ or family reunion, forget struggling with delicate pastries. This easy layered dessert holds up beautifully when kept cold. It’s robust enough to be transported easily and always disappears first when listed under potluck desserts. It’s simple, impressive, and satisfies everyone!
Gathering Ingredients for Your Banana Split Cake
Alright, let’s get organized! Since this banana split cake relies on distinct, cold layers, make sure everything is measured before you even think about mixing. I always lay everything out on the counter, almost like a little assembly line. It saves so much stress later! You can check out my tips for entertaining prep over on my Appetizers guide, but the principle is the same: prep everything first.
For the Graham Cracker Crust Desserts Base
This is the buttery foundation that holds everything together. You’ll need:
- 1 1/2 cups graham cracker crumbs
- 1/3 cup unsalted butter, melted
- 1/4 teaspoon salt
For the Creamy Layered Dessert Filling
This smooth, tangy layer is where that classic richness comes from. Make sure your star ingredient is ready!
- 8 ounces cream cheese, softened
- 1 cup powdered sugar
- 1 teaspoon vanilla extract
- About 1 cup (half) of the thawed whipped topping (that’s about 1 cup of that 8-ounce container!)
Fruit and Topping Components for the Banana Split Cake
The fruit needs careful prep—especially the pineapple! Liquid is the enemy of a firm icebox cake recipe.
- 2 large bananas, sliced
- 1 (8 ounce) can crushed pineapple, drained well (I mean really drained!)
- 1 (21 ounce) can cherry pie filling
- 1/4 cup chopped peanuts (if you’re feeling traditional!)
- Maraschino cherries for that final, perfect touch
Step-by-Step Instructions for the No Bake Banana Split Cake
Okay, getting this banana split cake assembled is super satisfying because you skip the oven entirely! It’s truly one of the best icebox cake recipe concepts out there. I learned so much about working elegantly with chilled desserts when I was perfecting recipes for the site—you can see some of my favorites here. We move fast through the mixing, and then we let the refrigerator do all the hard work holding those gorgeous layers in place. Just follow these steps, and you’ll have a perfect chilled dessert.
Creating and Chilling the Crust
First things first: the base! Snag that 9×13 dish—this recipe fills it up nicely. In a medium bowl, mix your graham cracker crumbs, the melted butter, and that tiny pinch of salt. Get it all incorporated until it looks like wet sand. Now, press that mixture firmly into the bottom of your dish. I use the bottom of a measuring cup to really pack it down tight! Pop it into the fridge right away while we tackle the dreamy middle layer.
Preparing the Cream Cheese and Whipped Topping Layer
Grab your big bowl! You need that cream cheese at room temperature so it beats up beautifully. Beat it until it’s totally smooth—no lumps allowed! Then, beat in your powdered sugar and vanilla until everything is just creamy and combined. Remember, we are only using half of the thawed whipped topping here! You need to gently fold in half of that whipped topping. Don’t use the electric mixer for this part; we want those air bubbles to stay put!
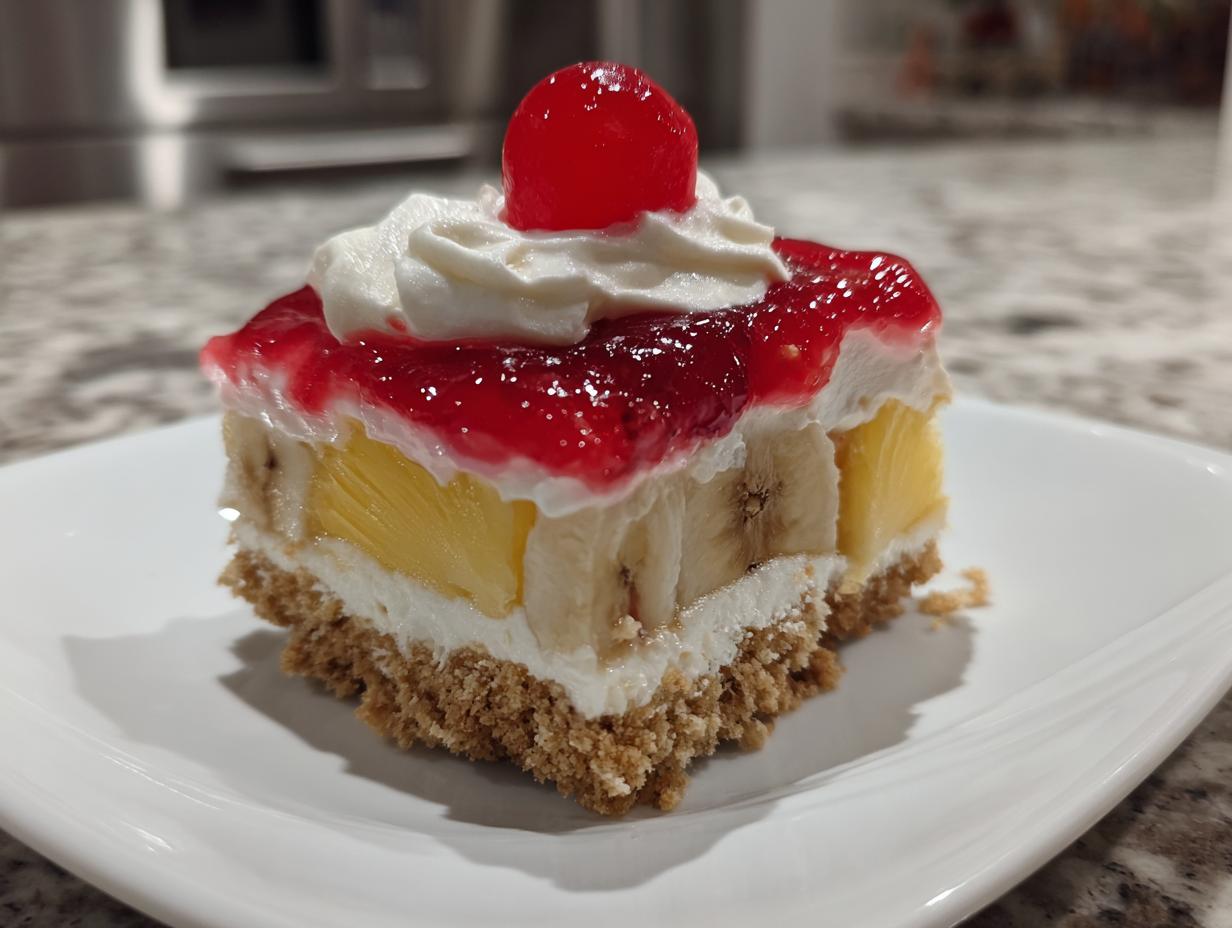
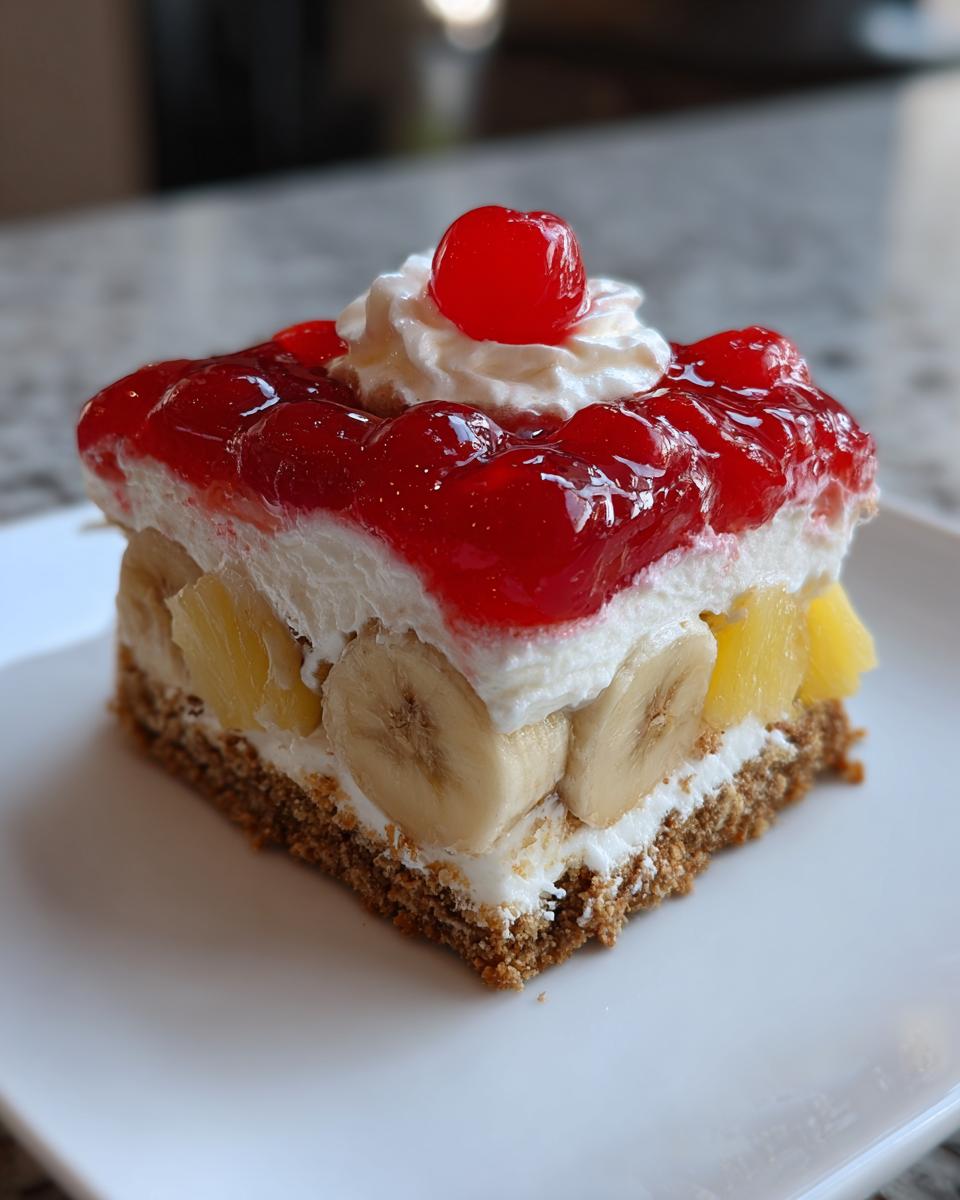
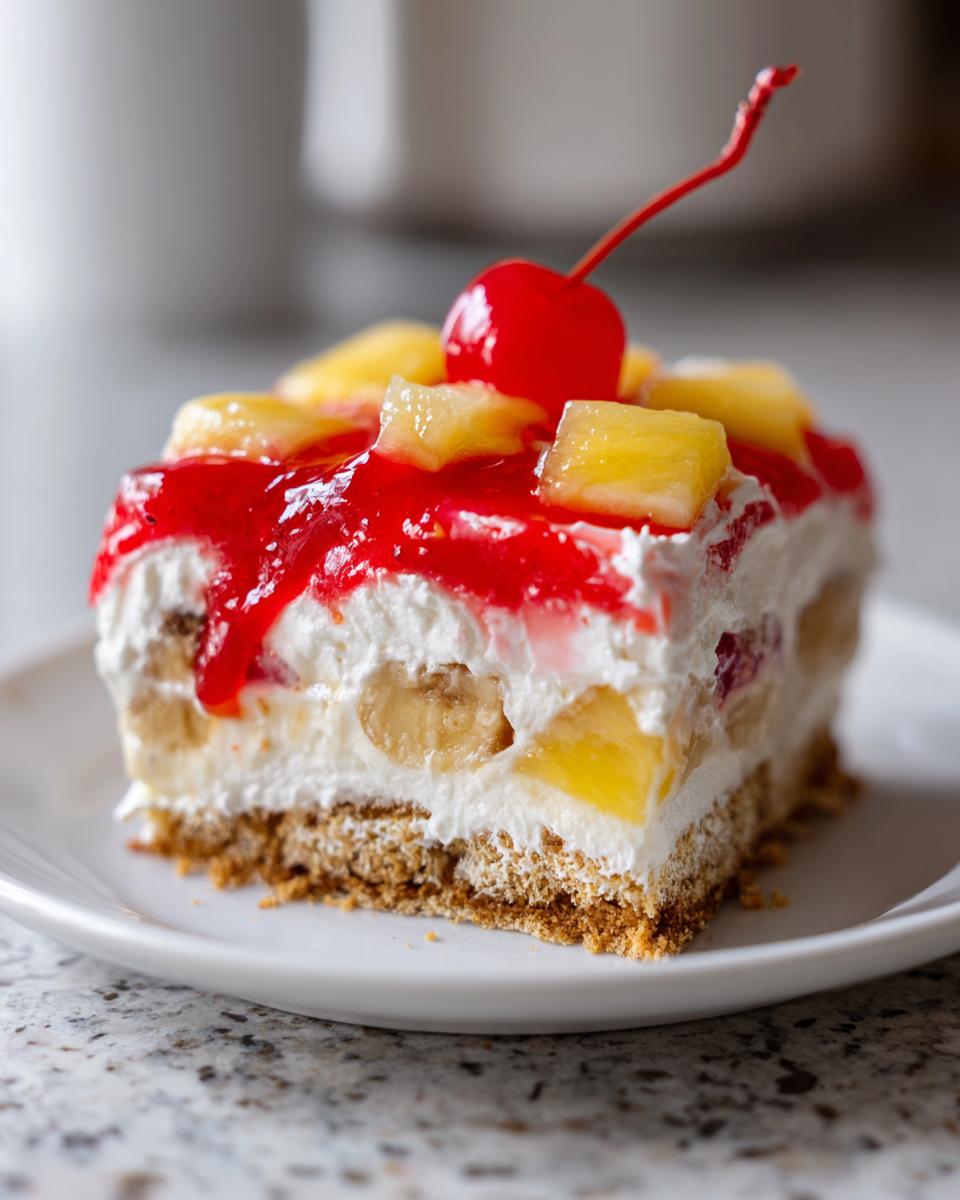
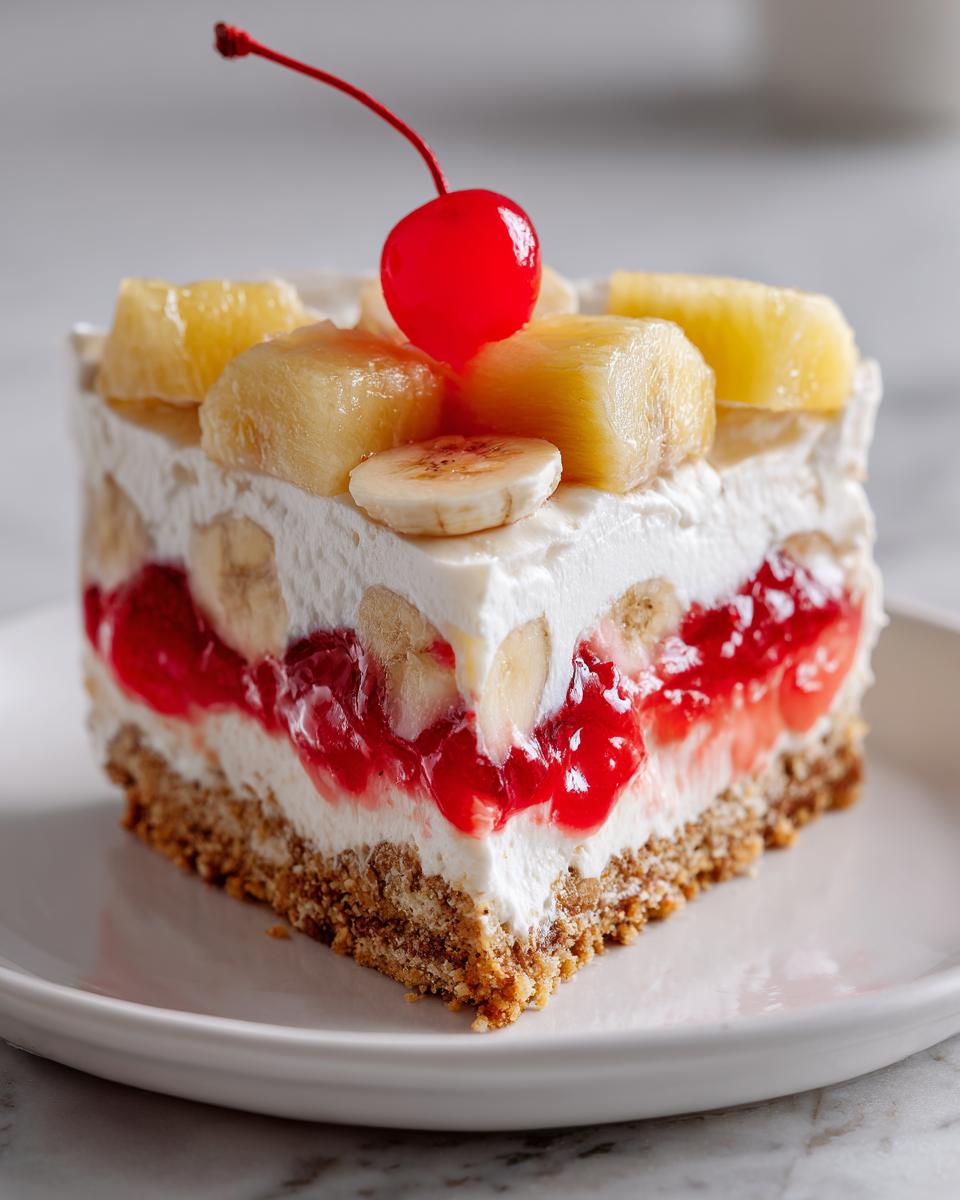
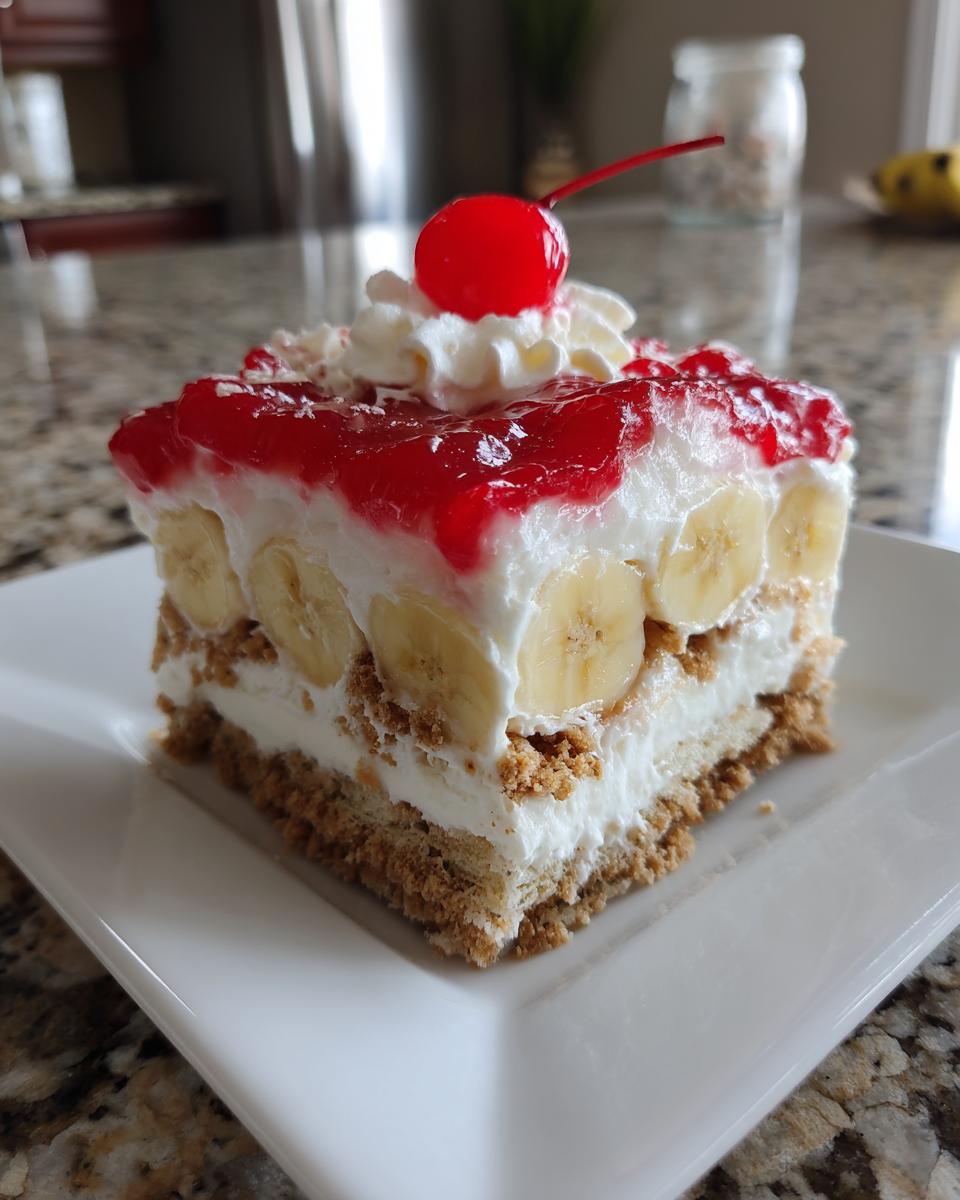
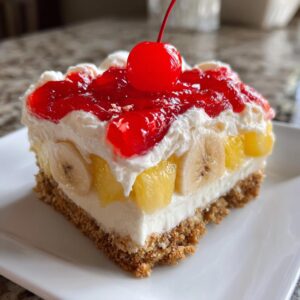
Layering the Banana Pineapple Dessert
Time to build! Spoon the cream cheese mixture onto that chilled crust and spread it evenly—this is your anchor layer. Next, arrange your sliced bananas right on top of that. Now, this is crucial: you must spread the well-drained crushed pineapple layer over the bananas. If you skip draining it well, the whole beautiful structure melts later, and we definitely don’t want that for our creamy layered dessert!
Setting the Banana Split Cake: The Essential Chill Time
Once the pineapple is settled, top it with the rest of your whipped topping. Cover the whole dish tightly. This step builds trust between you and the cake: you have to let it chill! We need a minimum of four hours, but honestly, I always aim for overnight. This long chill is what locks everything in so your slices look clean and stunning when you serve up this make ahead dessert.
Tips for the Perfect Banana Split Cake Presentation
Even though this banana split cake is super easy, we still want it to look gorgeous when you bring it out for guests, right? That’s the approachable elegance I always talk about here at Unfold Recipes! The key to keeping this stunning, creamy layered dessert looking pristine comes down to a couple of little things that make a huge difference. You can find more insight into hosting and plating right here on the Unfold Recipes Blog.
Handling Fruit Moisture in Your Banana Split Cake
Listen, I know I keep harping on this, but please, please, please drain that crushed pineapple until your arms ache! If you think it’s drained enough, drain it again. Any lingering liquid will seep down into that beautiful cream cheese layer and turn your dessert soupy overnight. We want layers, not leaks!
Elevating the Look of Your Chilled Dessert
When you get to the final whipped topping layer, you have an option. You can certainly just spread it evenly with an offset spatula—that looks lovely and rustic! But if you want that extra bit of polish that makes people think you spent hours on it, grab a piping bag fitted with a large star tip. Piping dollops of the topping instead of smoothing it out turns this simple summer treat into something really special for your potluck table.
Ingredient Notes and Substitutions for This Fruit Cream Dessert
Part of the joy in bringing a recipe into your own rotation is making little tweaks that suit your taste, and this fruit cream dessert is very receptive to small changes! While I absolutely love the classic graham cracker crust, because it is quick and complements the fruity filling so perfectly, you shouldn’t feel locked in. If you have some vanilla wafers or even shortbread cookies lying around, crush those up instead! They give a slightly different, but equally delicious, buttery base.
Now, about those fruits. We used bananas and pineapple, but if you want to bring in those bright red pops that make it look even more like a true banana split, I highly recommend adding thin slices of fresh strawberries right under the final whipped topping layer. Just make sure you slice them thin and pat them dry with a paper towel first—we don’t want soggy cake!
And don’t forget those peanuts! They are completely optional, but in my opinion, they provide that necessary textural crunch against all that smooth cream. A quick toast of the nuts before chopping them really wakes up their flavor before sprinkling them down. If someone has an allergy, black sesame seeds or even finely chopped pecans work nicely as a swap. You can always find delicious sides and entertaining help over on my Side Dishes page, but for this cake, keep those delicious textural elements in mind!
Serving Suggestions for Your Easy Party Dessert
Since we’re channeling that iconic ice cream sundae vibe with this banana split cake, the final garnishes are where you can really have fun and make it interactive! Right before you carry this beauty to the table, it’s time to unleash the classic toppings. Think of it like a DIY bar around the pan.
Always have a small drizzle of warm chocolate sauce ready to go. A light zigzag across the top of the cherry pie filling looks stunning and drives home that classic flavor. If you used the peanuts, maybe add a few extra for crunch. For an extra vibrant look, don’t forget those bright maraschino cherries crowning every slice!
This approach turns your finished banana split cake into the ultimate easy party dessert because everyone gets to admire the beautiful layers before diving into their personalized top layer. If you are looking for other spectacular sweets, have a peek at all my Dessert recipes!
Storage and Make Ahead Dessert Instructions for the Banana Split Cake
One of the reasons this banana split cake is such a lifesaver for entertaining is how wonderfully it handles storage. Remember, since this is a chilled dessert and relies on that delicate balance of cream cheese and whipped topping, we are never, ever talking about reheating this beauty! Pop it into the oven and you’ll just end up with a soupy mess, which is definitely not the elegant experience we’re going for.
Because this is an ideal make ahead dessert, I highly recommend assembling it completely, topping it with the final whipped layer (but hold off on the cherries and nuts!), covering it tightly with plastic wrap, and letting it set in the refrigerator. It really needs that minimum of four hours, but I find that chilling it for a full 8 hours, or even overnight, makes it slice up like a dream. Seriously, the cleaner the slice, the more impressive the final plate presentation!
When fully set, this refrigerator cake stays delicious for about two to three days in the fridge. Just make sure it’s in a good, tight covered dish—air is the enemy of creamy desserts! For the ultimate serving experience, pull it out about 15 minutes before you plan to cut it, add those final garnishes, and enjoy showing off those stunning layers. For more tips on prepping food ahead of time, check out my guide on make ahead dessert strategies.
Frequently Asked Questions About Making Banana Split Cake
It’s totally normal to have questions when trying a new layered treat, especially one that’s designed to be a perfect refrigerator cake! Since this banana split cake is a throwback to those wonderful retro dessert recipes, folks often wonder about keeping those layers crisp and clean. Don’t worry, I cover all the little things that make the difference between a stunning presentation and a sweet puddle. If you have any further specific issues, please don’t hesitate to reach out on my Contact page!
Can I use fresh strawberries in this banana split cake?
Oh, absolutely! Fresh strawberries elevate this dessert so beautifully and bring that bright pop we look for. However, because we are dealing with a no-bake structure, you must slice them thinly, and the real secret is to gently pat them dry with a paper towel before layering them in. We want flavor, not extra moisture seeping into the creamy layers. They make such a wonderful addition to this banana split inspired dessert!
How long does the no bake banana split cake need to chill?
This is where patience pays off! You absolutely need a minimum of four hours in the fridge for everything to firm up enough to hold a slice. But, if I’m being honest—and I always am—I strongly recommend making this the day before you plan to serve it. Overnight chilling allows this wonderful creamy layered dessert to set totally firm. You get the cleanest, most elegant slices when you let it sit for 6 to 8 hours.
What is the best way to slice this refrigerator cake cleanly?
This is a great question, especially since presentation matters! When you are ready to serve, don’t just hack at it with a room-temperature knife. The trick to getting those picture-perfect rows of layers is to use a very long, sharp knife. Dip the knife blade into a glass of hot water, wipe it completely dry, and then make your cut. Repeat this process—hot water, wipe dry—for every single cut you make. It sounds fussy, but it makes slicing this beautiful refrigerator cake a breeze!
Estimated Nutritional Data for One Serving of Banana Split Cake
Because this banana split cake relies on cream cheese and a buttery crust, as wonderfully decadent as it is, it certainly falls into the indulgence category! I always believe in knowing what’s in the food we eat, even when it’s a treat designed for celebration. Remember, since this recipe is assembled by hand and we aren’t using precise, commercially prepared mixes for every component, these figures are always our best guestimates—think of them as a guide for your entertaining planning!
Here is the estimated breakdown for one generous slice of this show-stopping no bake banana split cake:
- Serving Size: 1 slice
- Calories: 350
- Sugar: 30g
- Fat: 18g (Includes about 10g Saturated Fat)
- Carbohydrates: 45g
- Protein: 4g
- Sodium: 250mg
We’ve worked hard to keep this recipe simple, focusing on fresh fruit layers to balance out the richness of the cream cheese, making it a much lighter option than a true baked cake. Enjoy every bite!
PrintNo Bake Banana Split Cake: The Ultimate Easy Layered Summer Dessert
Capture the nostalgic flavor of a classic banana split in this stunning, chilled, layered dessert. This no bake banana split cake features a buttery graham cracker crust, a rich cream cheese filling, fresh fruit, and whipped topping. It is simple to assemble and perfect for summer parties or make-ahead entertaining.
- Prep Time: 20 min
- Cook Time: 0 min
- Total Time: 4 hours 20 min
- Yield: 12 servings 1x
- Category: Dessert
- Method: No Bake/Chilling
- Cuisine: American
- Diet: Vegetarian
Ingredients
- 1 1/2 cups graham cracker crumbs
- 1/3 cup unsalted butter, melted
- 1/4 teaspoon salt
- 8 ounces cream cheese, softened
- 1 cup powdered sugar
- 1 teaspoon vanilla extract
- 1 (8 ounce) container frozen whipped topping (like Cool Whip), thawed, divided
- 2 large bananas, sliced
- 1 (8 ounce) can crushed pineapple, drained well
- 1 (21 ounce) can cherry pie filling
- 1/4 cup chopped peanuts (optional)
- Maraschino cherries for topping
Instructions
- Prepare the crust: In a medium bowl, combine the graham cracker crumbs, melted butter, and salt. Press this mixture firmly into the bottom of a 9×13 inch baking dish. Place the dish in the refrigerator while you prepare the filling.
- Make the cream cheese layer: In a large bowl, beat the softened cream cheese until smooth. Gradually beat in the powdered sugar and vanilla extract until fully combined and creamy.
- Fold in half of the whipped topping: Gently fold in half (about 1 cup) of the thawed whipped topping into the cream cheese mixture until just combined. Do not overmix.
- Assemble the layers: Spread the cream cheese mixture evenly over the chilled graham cracker crust. Arrange the sliced bananas over the cream cheese layer. Spread the well-drained crushed pineapple over the bananas.
- Top the cake: Spread the remaining whipped topping over the pineapple layer. Cover the dish tightly with plastic wrap.
- Chill the dessert: Refrigerate the banana split cake for at least 4 hours, or preferably overnight, to allow it to set completely. This step is essential for clean slicing.
- Garnish and serve: Before serving, spread the cherry pie filling over the whipped topping. Sprinkle with chopped peanuts, if using. Place a maraschino cherry on top of each slice or across the top. Slice and serve cold.
Notes
- Drain the crushed pineapple very thoroughly; excess liquid will thin the layers.
- For an extra touch of elegance, use a piping bag to place dollops of whipped topping and cherries instead of spreading them flat.
- This is a fantastic make-ahead dessert; it tastes best when chilled for 6 to 8 hours.
Nutrition
- Serving Size: 1 slice
- Calories: 350
- Sugar: 30g
- Sodium: 250mg
- Fat: 18g
- Saturated Fat: 10g
- Unsaturated Fat: 8g
- Trans Fat: 0g
- Carbohydrates: 45g
- Fiber: 1g
- Protein: 4g
- Cholesterol: 45mg