
When game day rolls around, or you realize you need an impressive appetizer for a last-minute gathering, what is your immediate thought? It’s always about finding something that tastes incredible without demanding you spend all day chained to the stove, right? That’s exactly where these BBQ Chicken Sliders enter the story. As a trained chef who loves hosting but cherishes efficiency, I developed this particular baked method to capture that perfect balance of approachable elegance and maximum flavor payoff. Forget fussy assembly; this recipe ensures you get juicy, smoky satisfaction with minimal effort, letting you enjoy your guests! For more ideas on throwing stunning, stress-free entertaining, check out my guide to serving the very best easy party appetizers.
- Why These Baked BBQ Chicken Sliders Are Your New Go-To
- Gathering Ingredients for Perfect BBQ Chicken Sliders
- Mastering the Garlic Butter Slider Rolls for Cheesy BBQ Sliders Recipe
- Step-by-Step Instructions for Baked BBQ Chicken Sliders
- Expert Tips for Perfect BBQ Chicken Sliders Every Time
- Variations on Classic BBQ Chicken Sliders
- Serving Suggestions for Your BBQ Chicken Sliders
- Storage and Reheating Instructions for Leftover BBQ Chicken Sliders
- Frequently Asked Questions About BBQ Chicken Sliders
Why These Baked BBQ Chicken Sliders Are Your New Go-To
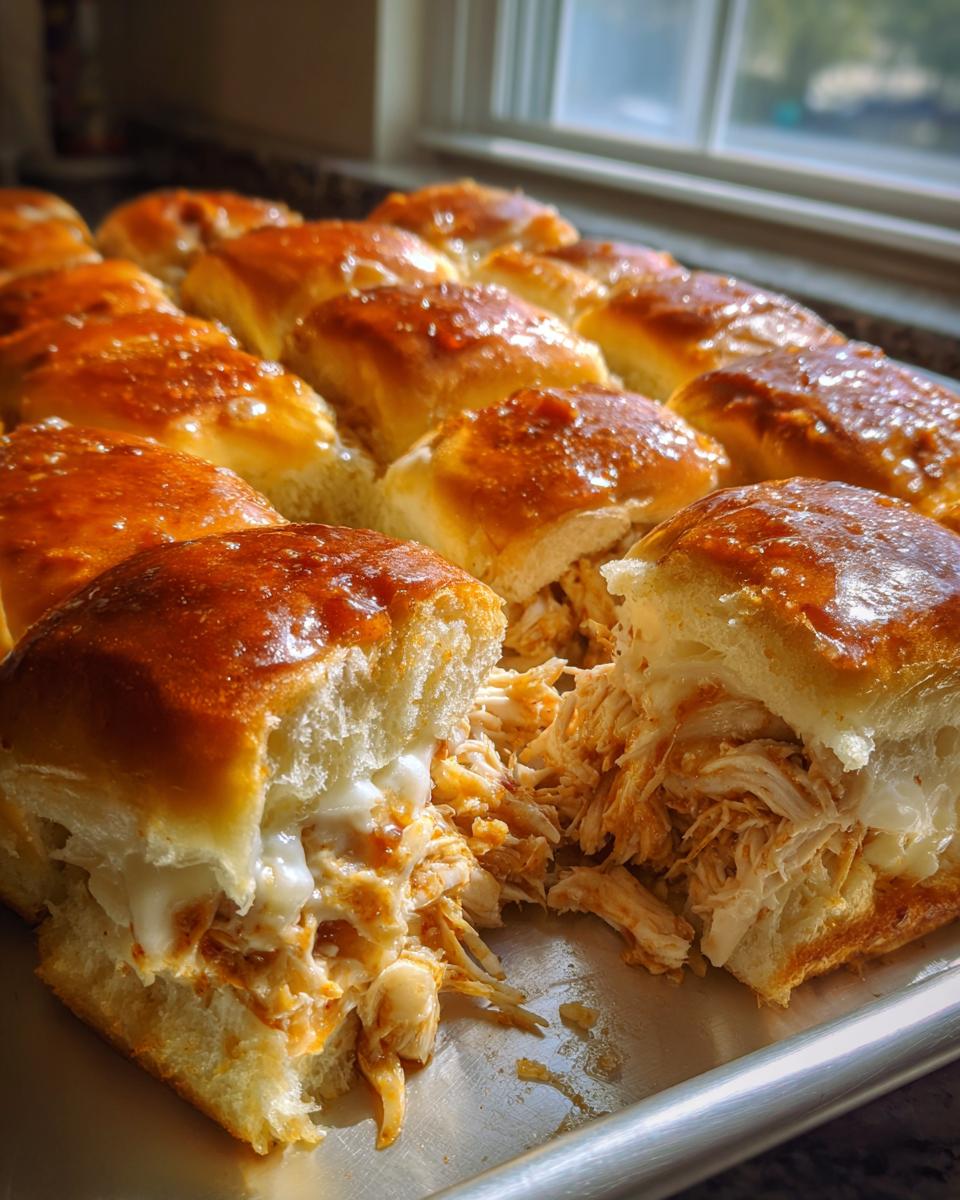
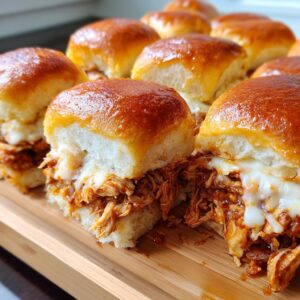
Honestly, when serving up a spread for a crowd, I always lean toward baking these bad boys. Stovetop methods can dry out the chicken if you aren’t constantly watching, and nobody has time for that! This baked approach delivers these incredible Easy BBQ Chicken Sliders that are impossibly juicy because they steam a little under the foil while they bake. They are truly designed for Sliders for a Crowd.
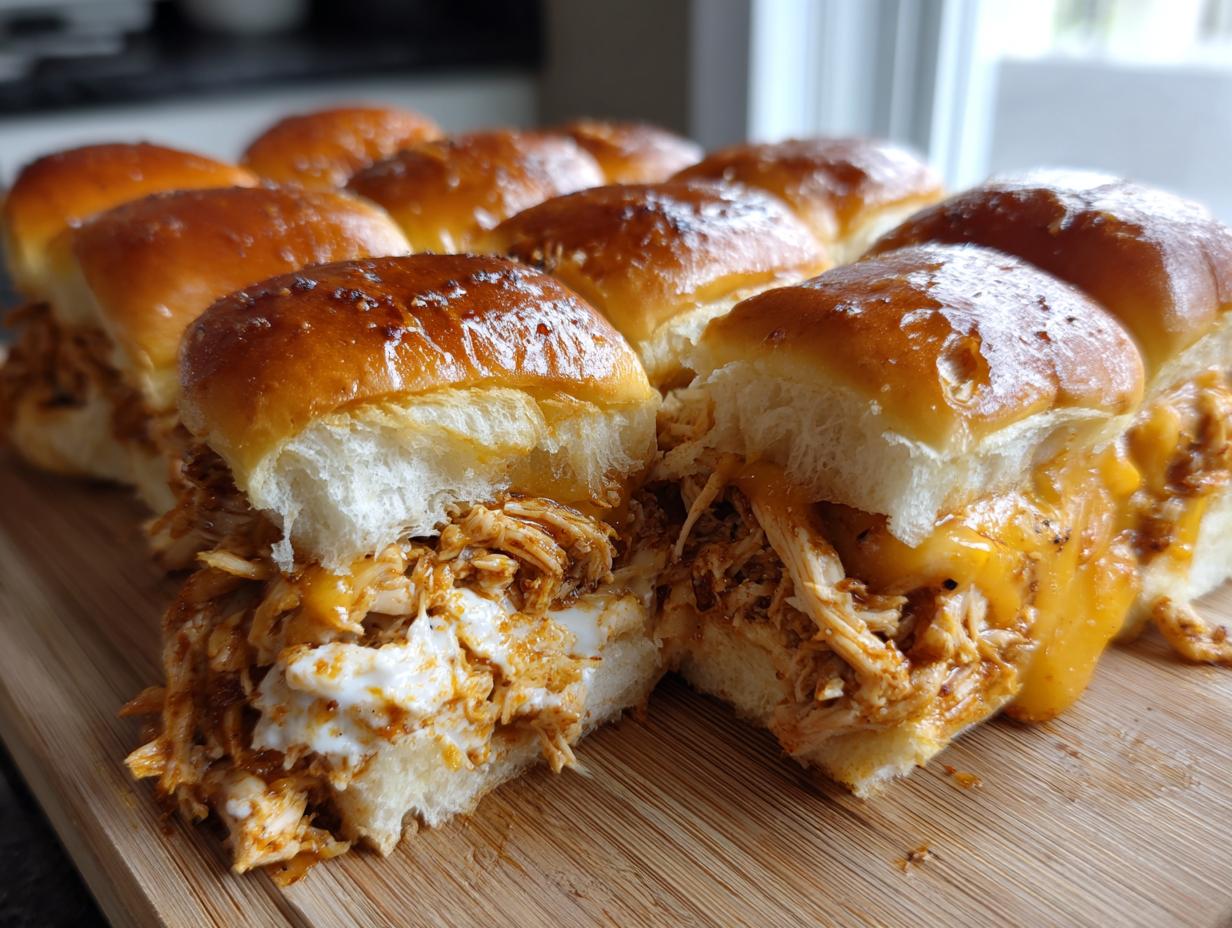
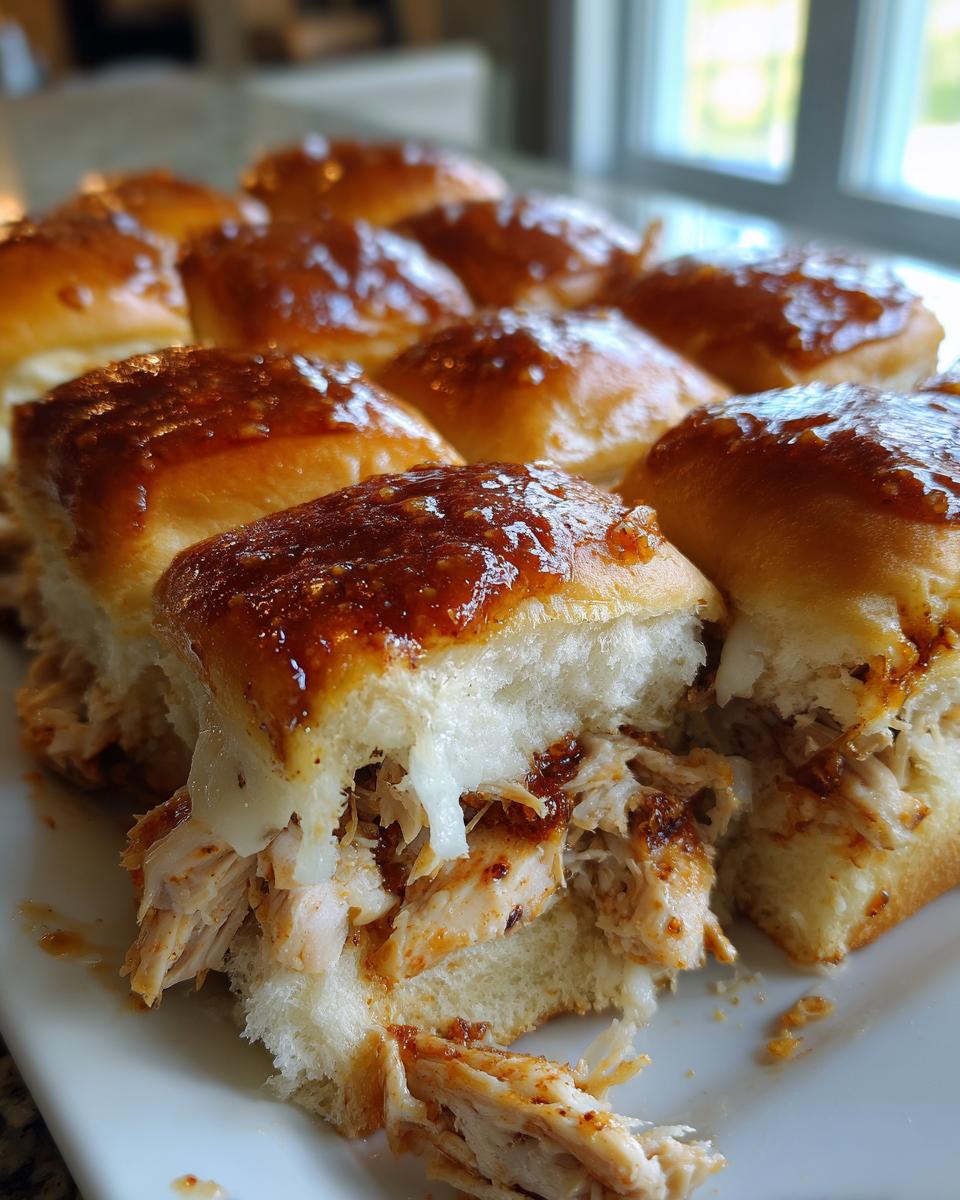
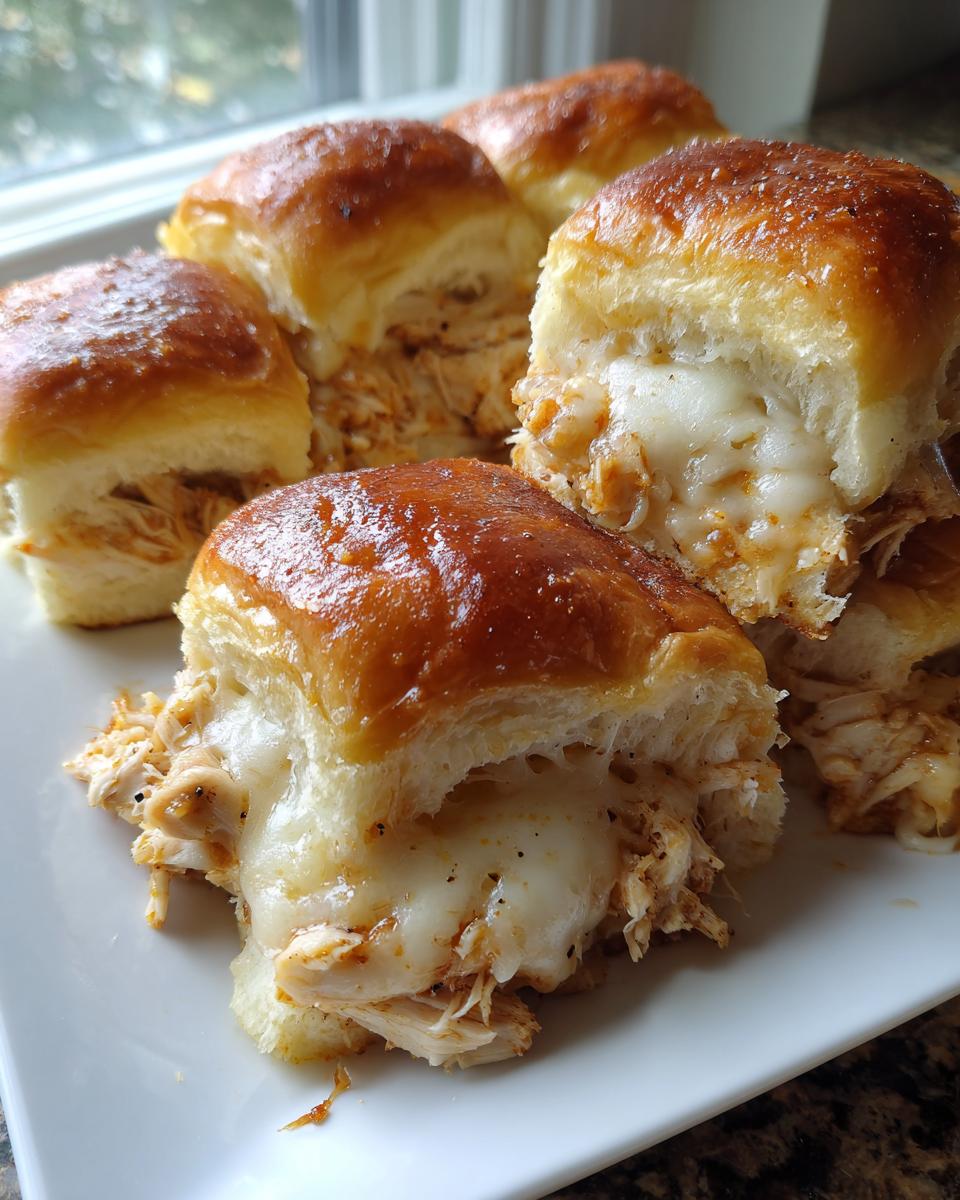
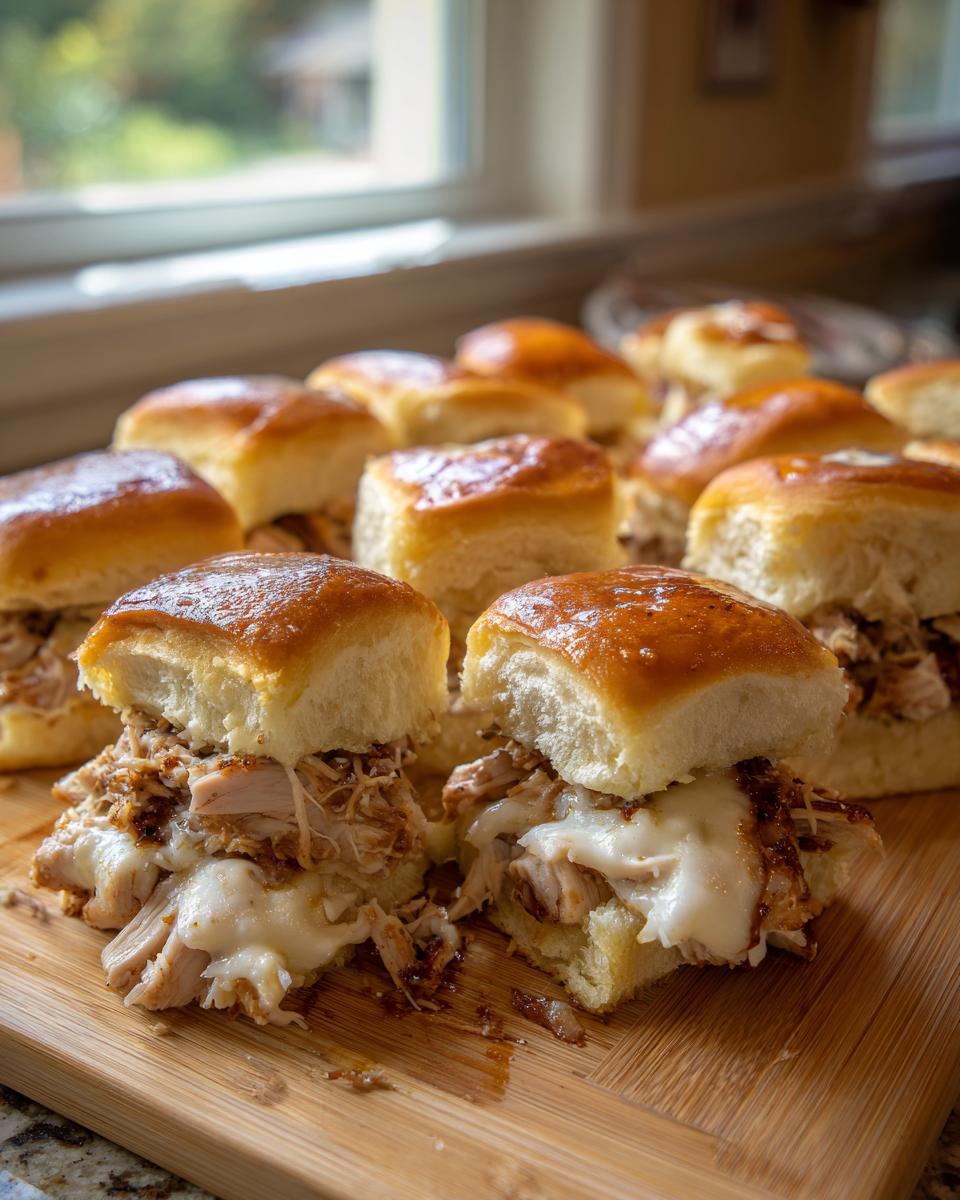
The final texture is always my favorite part. You get savory, gooey cheese and saucy chicken, sealed inside those sweet rolls that get wonderfully crisp on top thanks to that garlic butter. They are just superior!
Quick BBQ Chicken Sliders Recipe Ready in Minutes
The best part? The assembly takes maybe 10 minutes total. Since we rely on pre-cooked, shredded chicken—rotisserie is my secret weapon here—we drastically cut down the cooking time. With only 25 minutes in the oven, you are looking at a party-ready snack in under 35 minutes total. It’s truly magic for when you need something fast and fantastic.
The Ultimate Crowd Pleasing Slider Ideas
Because these cook all together in one pan, you get that amazing pull-apart factor. Guests can literally rip off exactly what they want! This makes clean-up a breeze, which is crucial when you’re hosting. These little bites always disappear first at any gathering—they are the peak of foolproof Pulled Chicken Sliders Game Day perfection. If you love the pull-apart concept, check out my recipe for ham and cheese sliders, too!
Gathering Ingredients for Perfect BBQ Chicken Sliders
When building a recipe that really shines, the quality of the ingredients matters, even for something quick! This is where we ensure those **BBQ Chicken Sliders** have the right foundation. We need soft, slightly sweet rolls—the classic 12-count package of Hawaiian sweet rolls is my absolute non-negotiable choice here; it makes all the difference in achieving that signature sweet-and-savory balance you look for in **Hawaiian Roll BBQ Chicken Sliders**.
You’ll need about two cups of cooked, shredded chicken—rotisserie is my shortcut champion! Then, it’s your favorite BBQ sauce to coat that beautifully. For the cheese, a good melting cheese like Gouda or sharp Cheddar works perfectly to keep things gooey. Don’t forget the simple elements for the topping, which we’ll chat about next, like real butter and fresh garlic. See my full take on cooking with chicken in my BBQ pulled chicken guide if you’re starting from scratch!
Mastering the Garlic Butter Slider Rolls for Cheesy BBQ Sliders Recipe
Okay, if the saucy chicken is the heart of these sliders, then this buttery topping is the dazzling outfit it wears to the party! This step is what takes these from ‘pretty good’ to ‘Oh my goodness, what is this?’ and it’s the key finisher for a truly spectacular Cheesy BBQ Sliders Recipe. Seriously, don’t skimp here; this is where the magic happens!
We’re keeping it super simple because the star should be the BBQ chicken, but we need flavor fortification. Melt down some lovely unsalted butter—you can taste the difference, trust me on this—and whisk in finely minced garlic. A little dried parsley and onion powder give it that classic savory lift. This combination creates our signature Garlic Butter Slider Rolls.
When you brush this on top of the Hawaiian rolls, you want to be generous! I use a pastry brush, but if you don’t have one, just use the back of a spoon. Make sure every roll top gets a good, even coating. This butter mixture doesn’t just add flavor; it toasts the tops beautifully, giving you that crispy exterior that contrasts perfectly with the soft, gooey cheese and saucy filling underneath. For more on how I use garlic butter in my baking, you might enjoy my post on easy oven-baked toast.
Step-by-Step Instructions for Baked BBQ Chicken Sliders
Now for the fun part—putting it all together! Because we are baking these, the process is wonderfully hands-off once the assembly is done. Remember, we are aiming for 350°F (175°C) for the oven temperature. I always start preheating right before I mix the chicken, just so it’s ready when I am. This recipe is designed to move fast, so have your 9×13 baking dish greased and ready to go!
Once baked, listen to me—you must cut the sliders right away before they cool down too much. The knife slides right through that gooey cheese and soft bread when they are fresh out of the oven. Trust me, waiting makes the knife drag!
Preparing the Chicken Filling and Assembling the Hawaiian Roll BBQ Chicken Sliders
First, grab a medium bowl and mix your shredded chicken right into your favorite barbecue sauce. You want every little piece coated well—no dry spots allowed! Next, take your entire package of Hawaiian rolls and slice them horizontally right across the middle, keeping the tops and bottoms attached to each other. Place that bottom layer into your prepared dish. Now layer things up: spread the saucy chicken goodness evenly over the bottom rolls, and then sprinkle that shredded Gouda or Cheddar generously all over the top of the chicken mixture.
Place the top half of the rolls gently back on, like putting a lid on a treasure box. Then, grab that lovely garlic butter mixture we made earlier and brush it all over the top surface. Be generous; this is what gives us that amazing golden crust for these Hawaiian Roll BBQ Chicken Sliders!
Baking and Achieving Golden Brown Perfection for BBQ Chicken Sliders
This is the two-stage baking process I rely on. First, cover the whole dish tightly with aluminum foil. We bake it like this for about 15 minutes. This initial covered phase is crucial because it steams everything just enough so the cheese gets completely gooey inside and the rolls soak up some of that wonderful flavor. After 15 minutes, pull that foil off! You want the tops to get beautiful now. Bake uncovered for another 5 to 10 minutes until you see that gorgeous golden-brown crust forming on those buttery tops. Once they look perfect, pull them out, let them sit for 30 seconds to settle, and then slice them apart with a sharp knife. Serve them hot! If you want more inspiration for oven-made mains, check out my main dishes page.
Expert Tips for Perfect BBQ Chicken Sliders Every Time
After making a gazillion batches of these—for birthdays, game nights, and just plain Tuesday dinners—I’ve learned a few tricks to elevate your amazing BBQ Chicken Sliders from great to unforgettable. You want them juicy, you want them cheesy, and you definitely don’t want soggy bottoms, right? That’s where precision helps!
My favorite little addition, which I’ve pulled from my entertaining notes, is adding texture. If you are feeling indulgent, try laying a very thin layer of sliced red onion right over the sauced chicken before you put the cheese on. The slight crispness and sharpness of the onion cut through the sweetness of the BBQ sauce perfectly. Another option? A thin layer of coleslaw right on top of the chicken, followed by the cheese, works wonders for a tangier bite!
Now, I know some of you prefer the set-it-and-forget-it approach. If you’re looking for a truly hands-off experience, you can certainly adapt this to use the slow cooker first. For true Slow Cooker BBQ Chicken Sliders, you’d cook the shredded chicken with the BBQ sauce on low in the crockpot for about 3–4 hours. Then, you transfer that saucy chicken mixture to the rolls, add the cheese, brush with the garlic butter, and bake just like instructed here to melt the cheese and crisp the tops. It works beautifully!
These tips ensure that whether you’re using the quick 35-minute bake method or the slow cooker approach, your sliders are guaranteed to disappear fast. For more incredible baked handhelds, you absolutely must check out my guide on BBQ pulled pork sliders—it uses a very similar technique!
Variations on Classic BBQ Chicken Sliders
Part of the fun of making a base recipe like this is experimenting! Once you nail the basic baked **BBQ Chicken Sliders** recipe, you can start thinking about those little flavor tweaks that make it *yours*. I love changing things up depending on what flavors I crave that week. It keeps things exciting for guests who might have tried the regular version before. It’s all about adding that touch of personalized flair!
If you’re looking for a bit of heat, throw in a tiny pinch of smoked paprika or a dash of your favorite hot sauce right into the chicken mixture. A few thinly sliced pickled jalapeños added right under the cheese layer provide a wonderful, sharp kick that cuts right through the richness. I promise they won’t make the sliders too spicy, just more interesting!
Cheese is another fantastic place to play. While Gouda melts like a dream and gives a lovely nutty flavor, if you want something sharper, an aged sharp cheddar really amps up the savoriness. For a fun, almost smoky depth, try using smoked Provolone—it gets beautifully tacky when melted. If you’ve ever tried my sausage cheese balls, you know how much I love a good cheese swap!
And finally, don’t get stuck on just one flavor of BBQ sauce. If you use a vinegar-based Carolina sauce instead of a sweet Kansas City style, you completely transform the whole slider! It keeps the same comforting roll and cheese structure, but the flavor profile shifts entirely. It’s such an easy way to keep this recipe feeling new.
Serving Suggestions for Your BBQ Chicken Sliders
We’ve got the main event covered, but honestly, no spread is truly complete without a few beautiful sides! Since these **BBQ Chicken Sliders** are rich, sweet, and savory, we need things that offer a little bit of crunch or tanginess to refresh the palate between those cheesy bites. These sandwiches are the star of any gathering, making them top-tier **Easy Party Appetizers**.
If you’re hosting a big game-day party or a casual Sunday lunch, I always recommend sides that don’t require a lot of last-minute fuss. You don’t want to be chopping vegetables while everyone else is mingling!
My absolute classic pairing right here is a bright, tangy slaw. It adds a cool crunch that contrasts brilliantly with the hot, soft rolls. If you want a showstopper side, you have to try my recipe for creamy, crunchy coleslaw salad—it has just the right amount of acidity to balance the BBQ sauce.
For something even simpler, consider pickle chips. Dill pickles, specifically! They give you that incredible sour blast that sings against the sweetness of the Hawaiian rolls. If you want a dip, a simple creamy ranch or a French onion dip served with sturdy potato chips goes over brilliantly. Everything tastes better when it’s easy, right?
Storage and Reheating Instructions for Leftover BBQ Chicken Sliders
If by some miracle you have any leftovers of these amazing **BBQ Chicken Sliders**, saving them for lunch the next day is essential for an easy **Weeknight Chicken Slider Dinner**! For storage, you’ll want to keep them in an airtight container in the fridge. Try not to leave them sitting out for more than two hours, especially with that cheese in there.
When you reheat, the oven is absolutely the way to go if you want to keep that gorgeous, slightly crisp top texture we worked so hard for. Just pop them on a baking sheet and heat at about 325°F for 8 to 10 minutes, or until the cheese is soft again. If you’re just reheating one or two, the microwave works in a pinch, but the rolls will get a little softer. For more great make-ahead mains and leftovers, take a peek at my chicken and rice casserole recipe!
Frequently Asked Questions About BBQ Chicken Sliders
It’s totally normal to have a few little questions when you try a new favorite recipe, especially one destined for a big party! I’ve gathered up the top things folks ask about making these BBQ Chicken Sliders because I want your experience to be absolutely flawless. We are all about building confidence in the kitchen here at Unfold Recipes!
Can I make these BBQ Chicken Sliders ahead of time?
Yes, you absolutely can, but you must separate the steps! I highly recommend assembling the chicken filling, putting it on the bottom rolls, and covering the whole thing tightly with plastic wrap. Keep it in the fridge for up to 24 hours. However, do not brush on the garlic butter or bake them until right before you want to serve them. If you bake them ahead of time, those gorgeous Hawaiian Roll BBQ Chicken Sliders will get soggy sitting around, and nobody wants that!
What is the best way to shred chicken for these sliders?
If you’re using pre-cooked chicken or even poaching your own breasts, shredding can sometimes be rough on the hands. My absolute favorite trick for achieving that perfect, fluffy texture that soaks up sauce beautifully is actually using my stand mixer! Yes, really! Put the warm cooked chicken in the bowl (no whisk attachment, use the paddle attachment) and let it run on low speed for about 30 seconds. It shreds the meat perfectly evenly. If you don’t have a mixer, two forks work just fine—just make sure you pull with the grain!
Can I use a different type of roll instead of Hawaiian rolls?
You can, but you’ll be changing the flavor profile slightly. The magic of the recipe relies on the sweetness of the Hawaiian rolls to balance the savory BBQ sauce. If you use standard white slider rolls or potato rolls, the slider will be less sweet—think more savory, classic BBQ sandwich flavor. Potato rolls are an excellent substitute because they are still quite soft. Just know that if you skip the Hawaiian rolls, you lose a bit of that necessary sweet contrast!
If you are looking for more quick ideas or want to dive into my thoughts on developing recipes, feel free to visit my main blog page!
PrintIrresistible Baked BBQ Chicken Sliders with Garlic Butter
Create crowd-pleasing mini sandwiches with these easy BBQ chicken sliders. Juicy shredded chicken, melted cheese, and a savory garlic butter topping on soft Hawaiian rolls make this a perfect party appetizer or weeknight dinner.
- Prep Time: 10 min
- Cook Time: 25 min
- Total Time: 35 min
- Yield: 12 sliders 1x
- Category: Appetizer
- Method: Baking
- Cuisine: American
- Diet: Vegetarian
Ingredients
- 1 (12 count) package Hawaiian sweet rolls
- 2 cups cooked, shredded chicken (rotisserie chicken works well)
- 1 cup favorite barbecue sauce
- 1 cup shredded Gouda or Cheddar cheese
- 1/2 cup unsalted butter, melted
- 2 cloves garlic, minced
- 1 teaspoon dried parsley
- 1/2 teaspoon onion powder
Instructions
- Preheat your oven to 350°F (175°C). Lightly grease a 9×13 inch baking dish.
- In a medium bowl, combine the shredded chicken and barbecue sauce. Mix until the chicken is fully coated.
- Slice the package of Hawaiian rolls horizontally, keeping the tops and bottoms connected. Place the bottom half of the rolls into the prepared baking dish.
- Distribute the BBQ chicken mixture evenly over the bottom layer of rolls.
- Sprinkle the shredded cheese evenly over the chicken mixture.
- Place the top half of the rolls over the cheese layer.
- In a small bowl, whisk together the melted butter, minced garlic, dried parsley, and onion powder to create the garlic butter topping.
- Brush the entire top surface of the slider rolls generously with the garlic butter mixture.
- Cover the baking dish tightly with aluminum foil. Bake for 15 minutes.
- Remove the foil and bake for an additional 5 to 10 minutes, or until the cheese is fully melted and the tops of the rolls are golden brown and slightly crisp.
- Carefully slice the sliders apart between the rolls before serving warm.
Notes
- For extra flavor, add a thin layer of thinly sliced red onion or a spoonful of coleslaw on top of the chicken before adding the cheese.
- If you prefer a slow cooker method, combine the chicken and BBQ sauce in the crockpot and cook on low for 3-4 hours, then proceed with assembly and baking.
- These sliders are excellent served with dill pickle chips on the side.
Nutrition
- Serving Size: 1 slider
- Calories: 350
- Sugar: 12
- Sodium: 650
- Fat: 15
- Saturated Fat: 7
- Unsaturated Fat: 8
- Trans Fat: 0.5
- Carbohydrates: 35
- Fiber: 1
- Protein: 20
- Cholesterol: 55