

Oh, that magical moment when creamy peanut butter meets rich, dark chocolate—there’s simply nothing better in the world of homemade candy, is there? I know precisely why this combination keeps calling us back. When I develop recipes here at Unfold Recipes, my goal is always approachable elegance, meaning maximum flavor with minimum fuss. And my darlings, this recipe delivers! We are transforming that beloved Buckeye flavor profile into the easiest, most decadent, no-bake buckeye fudge you can imagine. Forget dipping cookies; we’re layering perfection right in an 8×8 pan. It’s quick, it’s deeply satisfying, and frankly, it tastes like a special occasion. For more about my journey in bridging the gap between polished plating and home cooking comfort, you can always read more on my About Page.
- Why This No-Bake Buckeye Fudge is Your Next Favorite Sweet Indulgence Recipes
- Gathering Ingredients for Perfect Buckeye Fudge
- Step-by-Step Instructions for Buckeye Fudge
- Tips for Success Making Rich Homemade Candy
- Storage and Gifting Your Buckeye Fudge
- Variations on This No Bake Chocolate Peanut Butter Dessert
- Frequently Asked Questions About Buckeye Fudge
- Nutritional Estimates for This Decadent Chocolate Candy
- Share Your Buckeye Fudge Creations
Why This No-Bake Buckeye Fudge is Your Next Favorite Sweet Indulgence Recipes
I am passionate about creating recipes you can truly rely on, especially when it comes to holiday baking or just a sudden craving for something rich. You need results that are guaranteed beautiful, and this buckeye fudge absolutely delivers. Trust me, once you try this, it will become one of your go-to quick dessert squares.
Why should you grab your butter and powdered sugar right now? Here’s the simple truth:
- Zero Oven Time Required: As our recipe title says, this is blissfully no-bake! We skip the tricky oven temperatures and just rely on a little chilling time to set everything perfectly. It’s the simplest way to create stunning no bake chocolate peanut butter dessert layers.
- Incredible Speed: With about 20 minutes of active mixing, you can have this beauty chilling in the fridge. It saves so much time when you have a dozen other things to do during the holidays.
- The Classic Flavor Profile: This is pure comfort—that perfect balance of sweet, salty peanut butter base meeting that thick, glossy chocolate layer. It truly is melt in your mouth fudge perfection.
- Reliability Guaranteed: Because we use butter and sweetened condensed milk instead of relying on temperamental melted chocolate alone for the structure, this fudge sets up beautifully every single time. You get that impressive look without the stress.
- Perfect for Sharing: These squares cut neatly and look fantastic lined up on a platter. They make for the best fudge recipe for gifts because they hold up so well!
If you enjoy simple, dependable sweets like this, you absolutely must check out my recipe for No-Bake Chocolate Peanut Butter Cookies—they scratch a similar itch!
Gathering Ingredients for Perfect Buckeye Fudge
When we are making something as indulgent as buckeye fudge, the quality of the base ingredients really shines through. Since this is a no-bake recipe, there aren’t a lot of complicated steps to hide behind—what you put in is what you taste, so let’s make sure we have the best of everything! Specifically, make sure you grab that creamy peanut butter; we need that smooth texture for our base, setting us up perfectly for that decadent chocolate layer.
Don’t worry about having a huge pantry stocked; this list is delightfully short. Remember, simple ingredients handled with care create the most impressive results, which is a cornerstone of how I develop all my creamy peanut butter fudge recipes here.
For the Creamy Peanut Butter Base
This is where all the melt-in-your-mouth flavor comes from, so don’t skimp on making sure your butter is truly softened—not melted! You will need:
- 1 cup unsalted butter, softened
- 1 1/2 cups creamy peanut butter (I stress creamy here—no natural or oily style!)
- 3 1/2 cups powdered sugar, sifted (sifting is important! Trust me on this.)
- 1 teaspoon vanilla extract
For the Rich Chocolate Ganache Topping
The topping sets up glossy and rich, capturing that classic Buckeye look. When melting these ingredients, you must be patient.
- 7 ounces sweetened condensed milk (that’s usually about half of a standard 14-ounce can, so measure carefully!)
- 1 1/2 cups semi-sweet chocolate chips
- 2 tablespoons butter
A quick note on the chocolate: when you heat these together for the topping, you are aiming for a smooth melt, not a scramble. Keep that heat low and stir constantly. We want a lovely, glossy coat on our rich homemade candy, not burnt chocolate that got too hot!
Step-by-Step Instructions for Buckeye Fudge
Now we get to the fun part—assembling this gorgeous creation! Since this is an easy, no bake chocolate peanut butter dessert, the technique is all about gentle mixing and patience during the chill time. We aren’t looking for drama here, just delicious, straightforward assembly. I want you to feel confident that when you follow these steps, you will achieve the prettiest buckeye fudge squares.
Before we even touch the mixer, make sure your pan is ready. This simple preparation step saves headaches later when you try to lift it out! If you love deep, rich chocolate in your desserts, you should also check out my recipe for the Decadent Old-Fashioned Chocolate Fudge Pie.
Let’s get started on making these layers!
Preparing the Pan and Peanut Butter Layer
First things first, get your vessel ready for the peanut butter mixture:
- Line an 8×8 inch baking pan with parchment paper. I insist on this! You need an overhang on two sides—these will be your built-in handles for lifting the entire slab out later. This makes transfer and cutting so much cleaner.
- Grab a large bowl and bring out your softened butter and peanut butter. Beat them together until they look smooth and creamy. No lumps allowed!
- Now, we add the dry ingredients. Gradually add the sifted powdered sugar and the vanilla extract. Mix this on low speed. If you go high speed here, you’ll end up wearing half the sugar, which is messy and wastes good ingredients! Keep mixing until it looks like a thick, happy dough.
- Take that thick, wonderful peanut butter mixture and press it evenly into your prepared pan. Use the bottom of a measuring cup or your fingertips (lightly greased helps!) to get a nice, flat, compact base. Toss the pan in the refrigerator while we handle the chocolate layer.

Creating the Smooth Chocolate Ganache Topping
This chocolate layer is what seals the deal, giving it that classic, shiny finish. We are using sweetened condensed milk here, which gives it that lovely structure that makes it seem almost too easy.
- In a small saucepan, combine your sweetened condensed milk, your chocolate chips, and those last 2 tablespoons of butter. Set your heat to low.
- Stir this mixture constantly until everything is completely melted and velvety smooth. And here is my essential warning for all things chocolate layering: Do not let it boil! If it gets too hot, your topping will seize up and become hard instead of smooth. Keep it gentle!
Once smooth, take that lovely chocolate mixture and pour it right over the chilled peanut butter layer in the pan. Use an offset spatula to gently spread it all the way to the edges so you get full coverage on your decadent chocolate candy.
Chilling and Cutting Your Buckeye Fudge
Patience is the final ingredient here, my friends. The fudge needs time to firm up completely so we can slice it elegantly.
- Return the pan to the refrigerator. You must chill this for a minimum of 3 hours, though I always recommend aiming for 4 hours if you can wait that long. This time allows the whole structure to set up firmly.
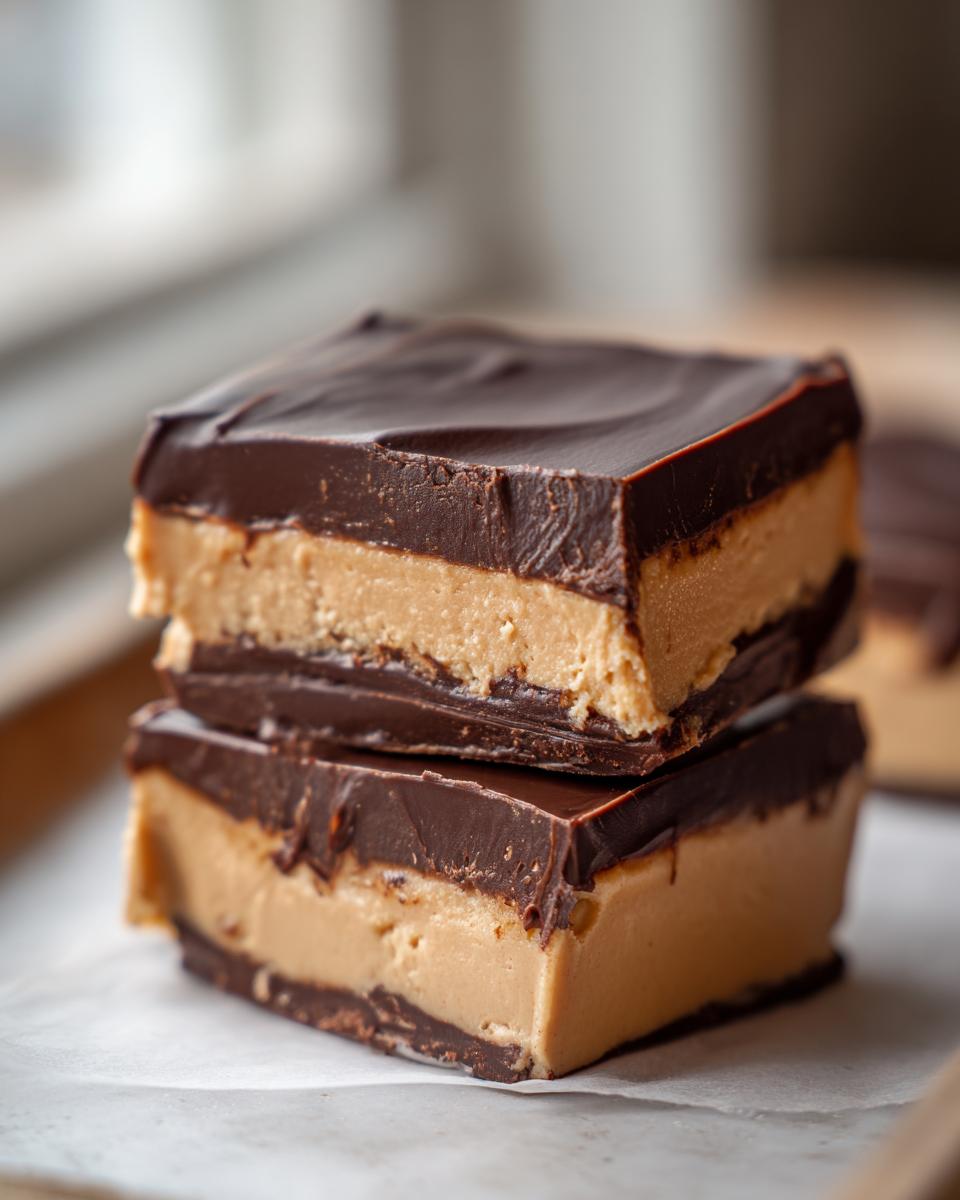
- Once it’s completely firm, use those parchment paper handles to lift the entire slab out onto a cutting board. Now you can slice your buckeye fudge into small, lovely squares.

Tips for Success Making Rich Homemade Candy
Making any rich homemade candy is wonderfully rewarding, but when dealing with layered fudge, small tricks make the difference between a beautiful square slice and a messy drizzle! I want every batch you make to look as polished as something from a professional chocolatier, even though we didn’t even turn on the oven. These few tips, rooted in what I learned testing this recipe, will ensure your buckeye fudge is perfectly structured.
We want those clean, defined lines between the peanut butter and chocolate, and we want edges that don’t stick to the knife! Let’s talk about timing the cut and what to do if you prefer a thinner chocolate layer. Speaking of simple indulgences, don’t forget to check out my recipe for Caramel Popcorn if you like sweet and salty crunch!
Achieving the Perfect Cut on Your Buckeye Fudge
This is perhaps my favorite piece of advice for any fudge recipe: don’t try to slice it when it’s rock hard straight from the fridge. If you try to cut that cold, stiff fudge, you risk cracking the topping or having the peanut butter layer tear out unevenly. It just won’t cooperate!
My secret for the cleanest possible squares—the ones that look ready for a photo shoot—is simple geometry and temperature control. Pull the entire slab out of the refrigerator and let it sit on the counter for about 10 minutes. That brief, gentle warming softens the edges just enough for the knife to glide through. Use a very sharp, long knife, wiping it clean between cuts. This simple step will give you the prettiest buckeye fudge pieces imaginable!
Adjusting Topping Consistency
While I love the texture the sweetened condensed milk gives the topping—making it incredibly creamy and almost chewy—I know some of you prefer a slightly thinner, snappier chocolate layer, more like what you find on traditional Buckeye Balls. If that’s you, you absolutely can adjust this part!
Instead of using the 7 ounces of sweetened condensed milk in the chocolate layer, try swapping that out for a slightly higher ratio of chocolate chips. If you want a firmer topping, you can use about 1 cup of semi-sweet chocolate chips combined with just 1 tablespoon of butter. You might need to stir a little longer to get it totally smooth, but this combination will set up a bit harder and less gooey than the recipe as written. Either way is delicious, it just depends on your preference for this rich chocolate peanut butter layers dessert!
Storage and Gifting Your Buckeye Fudge
One of the best parts about making a beautiful, creamy fudge like this is that it keeps wonderfully! Since this buckeye fudge relies on butter and fats rather than fresh dairy that spoils quickly, it lasts quite a while, making it a perfect companion for leftovers or for making ahead of a busy holiday event. It’s truly one of the easiest holiday fudge treats you can prepare in advance.
I find that the flavor actually deepens slightly after it’s rested for a day, so don’t feel the need to eat it all immediately! Here is my guidance on keeping your beautiful sweet indulgence recipes fresh.
Storage Instructions:
- Keep your fudge stored in an airtight container. This is key to preventing it from drying out or absorbing any odors from the fridge.
- Refrigeration is absolutely the best place for it. It keeps those chocolate and peanut butter layers firm and clean when you slice into them.
- If kept well-sealed in the refrigerator, this fudge will stay absolutely luscious for at least 10 to 14 days. I haven’t pushed it much past two weeks, but honestly, the squares rarely last that long in my house!
If you are worried about it getting too firm after a few days in the fridge, just remember the tip from last section: let the square sit on the counter for 5 to 10 minutes before serving. That tiny bit of warming brings back that perfect soft texture we love!
Making This The Perfect Fudge Recipe for Gifts
Because this recipe is so reliable and frankly, so universally loved, I often find myself doubling or tripling the batch just to have treats ready for friends, teachers, or neighbors. This is where the buckeye fudge really shines as a gift!
The trick to making it look professional is presentation. Once you cut the fudge into neat squares (remembering to let it warm up slightly first!), wrap each individual piece in a small square of cellophane or a small sandwich baggie. Tie the top with a pretty ribbon.
These individualized, wrapped squares of decadent chocolate candy look so thoughtful, but they require almost zero effort on your part beyond the initial mixing. They travel beautifully and show everyone you truly put love into your holiday baking. Seriously, these are the best last-minute potluck dessert ideas too, because everyone recognizes and adores that chocolate and peanut butter combination!
Variations on This No Bake Chocolate Peanut Butter Dessert
While I truly believe this classic version of buckeye fudge—creamy peanut butter foundation with a semi-sweet chocolate top—is pure perfection, I also know that once you master a technique, you want to play with it! Creating beautiful food is about finding joy in the process, and that often means personalizing things just a little bit.
The great news is that because this recipe is so simple and relies on pantry staples, it’s incredibly adaptable. We’re keeping it firmly in the no bake chocolate peanut butter dessert category, so no tricky baking involved, promising ease and elegance every time.
If you’re looking to jazz up your next batch of rich, creamy fudge squares, here are a few simple twists that maintain the structure but introduce a new layer of flavor complexity. For more fun no-bake ideas, you absolutely have to see how I transform Oreos into chocolatey little bites over on my Halloween Oreo Balls post!
Turning Up the Chocolate Intensity
If semi-sweet chocolate chips just aren’t cutting it for your chocolate craving, try mixing up the chips in the topping! You could use half semi-sweet and half dark chocolate chips for a deeper, almost bittersweet counterpoint to the rich peanut butter. Alternatively, if you’re feeling decadent, swap in some milk chocolate chips for a sweeter, milder finish—though I always warn most people that milk chocolate can sometimes make the topping a bit softer.
Another fantastic addition to the top layer: fold in one teaspoon of instant espresso powder along with your chocolate chips for melting. It won’t make the fudge taste like coffee, trust me! Instead, it simply amplifies the depth and richness of the chocolate flavor. It’s a culinary trick that makes everything taste “fancier.”
A Salty Surprise in the Base Layer
We all know that salt is the secret weapon in baking, balancing sweetness and bringing out inherent flavors. While our recipe uses what you already have, sometimes we need more pop!
For the peanut butter base, try swapping out just half of the regular salt you might use in other baking for flaky sea salt. Or, better yet, sprinkle a very light layer of flaky sea salt right over the melted chocolate *before* it sets up in the fridge. Those little crunchy crystals of sea salt catching the light on top of the dark chocolate? Gorgeous! It’s a simple garnish that elevates this from a homey treat to something truly special.
Adding Texture with Mix-Ins
If you want to turn these quick dessert squares into something with a little more bite, you can incorporate some mix-ins right into the peanut butter layer before you press it into the pan. Just make sure whatever you add isn’t too wet, or it could interfere with the fudge setting correctly.
I’ve successfully mixed in about half a cup of finely chopped salted peanuts for an extra layer of nutty crunch. You could also toss in some miniature peanut butter chips or even some finely crushed pretzels if you love that salty/sweet contrast. Remember to press these additions firmly into the peanut butter mixture when spreading it in the pan so they don’t pop out when you cut the final squares.
Frequently Asked Questions About Buckeye Fudge
Even the simplest of easy fudge recipes can sometimes leave us with little lingering questions before we dive in. I totally get it! When something is as beloved as the classic Ohio treat, we want to make sure our homemade version—this beautiful buckeye fudge—is absolutely spot on. I’ve gathered the most common hesitations I hear from people who are new to making these peanut butter dessert bars, so you can approach your mixing bowl with total confidence.
If you’ve made it this far, you’re clearly dedicated to making something incredible! For even more inspiration and kitchen thoughts, you can always browse my main Blog Index.
Can I use natural peanut butter in this buckeye fudge?
Oh, please don’t! I know natural peanut butter is lovely for a thousand other things, but for this recipe—and honestly, for most stable fudge recipes—we really need the commercial, stabilized creamy kind. Natural peanut butter is wonderful because it separates easily, but that oil separation is the enemy of a thick, stable fudge base! If you use it, your peanut butter layer will likely be too greasy, too soft, and it won’t set up properly. Stick to the creamy stuff; it’s the key to that perfect, dense, satisfying layer.
How long does this easy fudge recipe stay fresh?
This is one of the wonderful aspects of a rich, high-fat fudge like this one. Because we aren’t dealing with large amounts of perishable fresh dairy, it holds up beautifully. When stored correctly in an airtight container in the refrigerator, this easy fudge recipe stays fresh and perfectly delicious for up to two weeks. I slice mine, put parchment paper between the layers once they are firm, and pop them in a container. It’s great for making ahead for parties!
Is this considered a good holiday fudge treat?
It is, without a doubt, one of the best! The buckeye flavor recipe is intrinsically linked to holidays, celebrations, and gift-giving in the Midwest, and this fudge gives you all that wonderful flavor without the fussy step of rolling and dipping individual balls. It’s essentially a shortcut to holiday perfection! It looks beautiful on a platter and makes a fantastic addition to any seasonal tray of cookies and sweets. It’s definitely one of my favorite holiday fudge treats to rely on.

Nutritional Estimates for This Decadent Chocolate Candy
As much as I adore that rich, satisfying taste of chocolate and peanut butter in our buckeye fudge, it’s important to be mindful of what we are indulging in! When you are creating something this decadent, it’s certainly a sweet treat rather than an everyday snack. I have tallied up the estimates based on the ingredients listed so you have a general idea of what you’re enjoying.
Remember, this is a rich dessert, and these values are based precisely on the ingredients listed in the recipe card, assuming 36 small squares are cut from the batch. As always with homemade recipes, if you use different types of chocolate chips or peanut butter brands, your final numbers in this decadent chocolate candy might shift slightly! Here is the guideline:
- Serving Size: 1 square
- Calories: 180
- Sugar: 18g (It’s candy, after all!)
- Sodium: 95mg
- Fat: 11g
- Saturated Fat: 5g
- Unsaturated Fat: 6g
- Trans Fat: 0g
- Carbohydrates: 19g
- Fiber: 1g
- Protein: 4g
- Cholesterol: 15mg
See? It’s certainly worthy of an occasional treat! I always encourage my readers to enjoy these sweets without guilt—they are made with love, after all. Remember, these delightful squares also store beautifully in the fridge, ready whenever you need a little pick-me-up!
Share Your Buckeye Fudge Creations
And just like that, you have transformed simple ingredients into the most indulgent, perfectly layered buckeye fudge! Honestly, I hope you are already eyeing that pan in the fridge, waiting for those last 30 minutes to pass so you can slice into what I know is a true triumph of no bake chocolate peanut butter dessert.
Here on Unfold Recipes, the story doesn’t end when you cut the final square. It truly begins when you bring these treats to your table, share them with a loved one, or stack them up beautifully on a plate for a gathering. I live to hear how these recipes unfold in your own kitchens!
I would be absolutely thrilled if you took a moment after enjoying this wonderful candy to leave a rating and a little note in the comments below. Hearing what you loved—maybe it was the incredibly creamy peanut butter base or the glossy chocolate topping—helps everyone else feel confident in making this decadent chocolate candy.
Did you tweak the topping? Did you add sea salt? Please tell me all about it! And if you share photos of your gorgeous, glossy buckeye fudge squares on social media, please remember to tag me! I love seeing your beautiful results. If you’re ever having trouble or need to reach out directly, my contact page is always waiting for you here: Get in Touch.
And if you want to see how others have approached this classic flavor, you can always take a peek at how another wonderful creator approached this challenge right here. Now, go enjoy your reward—you absolutely earned it!
PrintEasy No-Bake Buckeye Fudge with Chocolate Ganache

Create rich, decadent Buckeye Fudge easily. This no-bake recipe combines creamy peanut butter and a smooth chocolate topping for a simple, satisfying homemade candy perfect for holidays or gatherings.
- Prep Time: 15 min
- Cook Time: 5 min
- Total Time: 35 min
- Yield: 36 small squares 1x
- Category: Dessert
- Method: No-Bake
- Cuisine: American
- Diet: Vegetarian
Ingredients
- 1 cup unsalted butter, softened
- 1 1/2 cups creamy peanut butter
- 3 1/2 cups powdered sugar, sifted
- 1 teaspoon vanilla extract
- 7 ounces sweetened condensed milk (about half of a 14-ounce can)
- 1 1/2 cups semi-sweet chocolate chips
- 2 tablespoons butter
Instructions
- Line an 8×8 inch baking pan with parchment paper, leaving an overhang for easy removal.
- In a large bowl, beat the softened butter and peanut butter together until smooth.
- Gradually add the sifted powdered sugar and vanilla extract, mixing on low speed until fully combined and a thick dough forms.
- Press the peanut butter mixture evenly into the prepared pan. Place the pan in the refrigerator while you prepare the topping.
- In a small saucepan over low heat, combine the sweetened condensed milk, chocolate chips, and 2 tablespoons of butter. Stir constantly until the chocolate is completely melted and the mixture is smooth. Do not let it boil.
- Pour the melted chocolate mixture evenly over the peanut butter layer in the pan. Spread gently to cover the entire surface.
- Refrigerate the fudge for at least 3 hours, or until firm.
- Use the parchment overhang to lift the fudge from the pan. Cut into small squares. Store leftovers in an airtight container in the refrigerator.
Notes
- For a cleaner cut, let the fudge sit at room temperature for 10 minutes before slicing.
- If you prefer a slightly firmer topping, use 1 cup of chocolate chips and 1 tablespoon of butter instead of the sweetened condensed milk ratio listed.
- This fudge makes an excellent gift; wrap individual squares in small cellophane bags.
Nutrition
- Serving Size: 1 square
- Calories: 180
- Sugar: 18
- Sodium: 95
- Fat: 11
- Saturated Fat: 5
- Unsaturated Fat: 6
- Trans Fat: 0
- Carbohydrates: 19
- Fiber: 1
- Protein: 4
- Cholesterol: 15