
When I think about traditions, especially as we head into the festive season, my mind always drifts back to the simplest yet most satisfying bakes. These Classic Buttery Thumbprint Cookies are pure nostalgia on a plate. They aren’t fussy, they don’t require fancy tools—just a tender, buttery shortbread cookie dough that cradles the brightest splash of raspberry jam you can imagine. I grew up watching my mother pull trays of these homemade jam cookies from the oven, and they became synonymous with calm, happy weekends. If you’re looking for an approachable elegance in your holiday baking, these are the ones that truly deliver.

- Why These Classic Thumbprint Cookies Are Your New Favorite Holiday Cookie Recipes
- Gathering Ingredients for Your Raspberry Jam Thumbprint Cookies
- Mastering the Buttery Cookie Dough for Perfect Thumbprint Cookies
- Assembling and Filling Your Easy Thumbprint Cookie Recipe
- Baking Time and Temperature for Golden-Edged Thumbprint Cookies
- Thumbprint Cookie Variations: Beyond Raspberry Jam Thumbprint Cookies
- Storage & Serving Suggestions for Your Homemade Jam Cookies
- Frequently Asked Questions About Making Thumbprint Cookies
- Sharing Your Beautifully Baked Thumbprint Cookies
Why These Classic Thumbprint Cookies Are Your New Favorite Holiday Cookie Recipes
I am telling you, if you make only one batch of cookies for your next cookie swap or festive gathering, make these! They are the epitome of old-fashioned charm but come together so quickly, which is why I always suggest them for beginners. They look so impressive nestled on a tray, yet the process requires such little fuss.
- They are ideal for sharing; these treats travel beautifully and hold up well on a platter—perfect to take to any party.
- You can easily substitute fillings; they are delightful as a simple sweet tea cookie or dressed up for the holidays.
- They require no fancy chilling techniques before shaping, making whipping up a batch incredibly fast!
Buttery Shortbread Cookies Base
The foundation is everything, right? Our dough falls firmly into the rich, crumbly, buttery shortbread category. We aren’t looking for a chewy cookie here; we want that melt-in-your-mouth tenderness that makes them wonderfully decadent. It’s this rich texture that truly sets the best thumbprint cookies apart.
Simple Thumbprint Treats for Cookie Baking for Beginners
Honestly, these are some of the most trustworthy cookies I make. Once you cream your ingredients, the process is just rolling balls, giving them a little push in the center, and filling them up. If you’re just starting out your baking journey, you need a win, and these easy thumbprint cookie recipe supplies that confidence boost instantly, which is why I love sharing them.
Gathering Ingredients for Your Raspberry Jam Thumbprint Cookies
To make sure we get that melt-in-your-mouth texture that defines the best thumbprint cookies, precision with the ingredients really matters. I’ve listed everything you need below, but pay close attention to two things: the butter must be perfectly softened—not melted!—and we need that extra sugar reserved specifically for coating the dough balls.
We rely on a very simple, classic foundation here. Remember, the quality of your jam drastically affects the final flavor of these homemade jam cookies. For the freshest taste, always go for a high-quality preserve. We will also need just the single egg yolk, which contributes richness without adding too much moisture that would compromise our buttery cookie dough.
Here is exactly what you need to pull together a batch of these delightful treats for your next holiday cookie recipes assortment:
- 1 cup unsalted butter, softened
- 1/2 cup granulated sugar
- 1 large egg yolk
- 1 teaspoon vanilla extract
- 2 1/2 cups all-purpose flour
- 1/4 teaspoon salt
- 1/2 cup raspberry jam
- 1/4 cup granulated sugar for rolling
Mastering the Buttery Cookie Dough for Perfect Thumbprint Cookies
Okay, now for the real fun: bringing this buttery shortbread cookie dough to life! When I went to culinary school, I learned that the creaming step isn’t just about mixing; it’s about aerating the fats to create structure. This is where we earn our tenderness. Start by taking your softened butter and the main half-cup of sugar and beat them together. Don’t rush this! I look for the mixture to become visibly lighter in color—almost pale yellow—and fluffy in texture. That means air is getting trapped inside, which prevents a dense final product.
Once you’ve achieved that beautiful, whipped appearance, you carefully mix in the egg yolk and vanilla. Then, gently introduce the flour and salt, mixing on the very lowest speed. And please, listen to me on this: Do not overmix! Once you see just a few streaks of flour disappear, stop the mixer. Overmixing develops gluten, and we want tender, not tough, cookies here. That soft dough is what promises us those delicate classic thumbprint cookies later.
The Secret to Perfectly Indented Cookies: Chilling the Dough
I know, I know, waiting is the hardest part of baking, especially when you have warm, sweet dough staring at you! But trust me here; chilling is non-negotiable for these treats. The recipe notes suggest chilling the dough for about 30 minutes before you even start rolling. This step is vital because it firms up that high butter content. When the dough is slightly firmer, you can press down to create that perfect, deep well for your jam without the edges completely collapsing or spreading wildly in the oven. A well-held indent means more raspberry jam in every single bite!
Assembling and Filling Your Easy Thumbprint Cookie Recipe
Now that our dough is perfectly chilled, it’s time for the fun—and slightly messy—part: the shaping! First, divide that dough into small, even balls. Aim for about one inch in diameter; consistency is key so they all bake at the same rate. Next, get your prepared sugar ready in a shallow dish. Roll each dough ball thoroughly in the exterior sugar until it’s completely coated. This sugary exterior becomes a gorgeous, slightly crisp crust when baked.

Here’s where the magic happens for our Classic Thumbprint Cookies. You need a deep indentation, but you don’t want the walls to crack! I find using my actual thumb works best after a little practice, but if you’re worried about sticky fingers, the back of a tiny measuring spoon (like a 1/4 teaspoon) works wonders. Press down firmly enough to create a good well—deep enough to cradle the jam—but stop *before* the dough naturally starts to tear or fracture. A good, firm push holds the shape beautifully.
Finally, we fill them up! Spoon a small amount—about half a teaspoon—of that bright raspberry jam right into the center of each nest you’ve made. Don’t overfill, or it will bubble over the sides! Arrange these perfectly indented cookies on your parchment-lined sheets, ready for the oven.
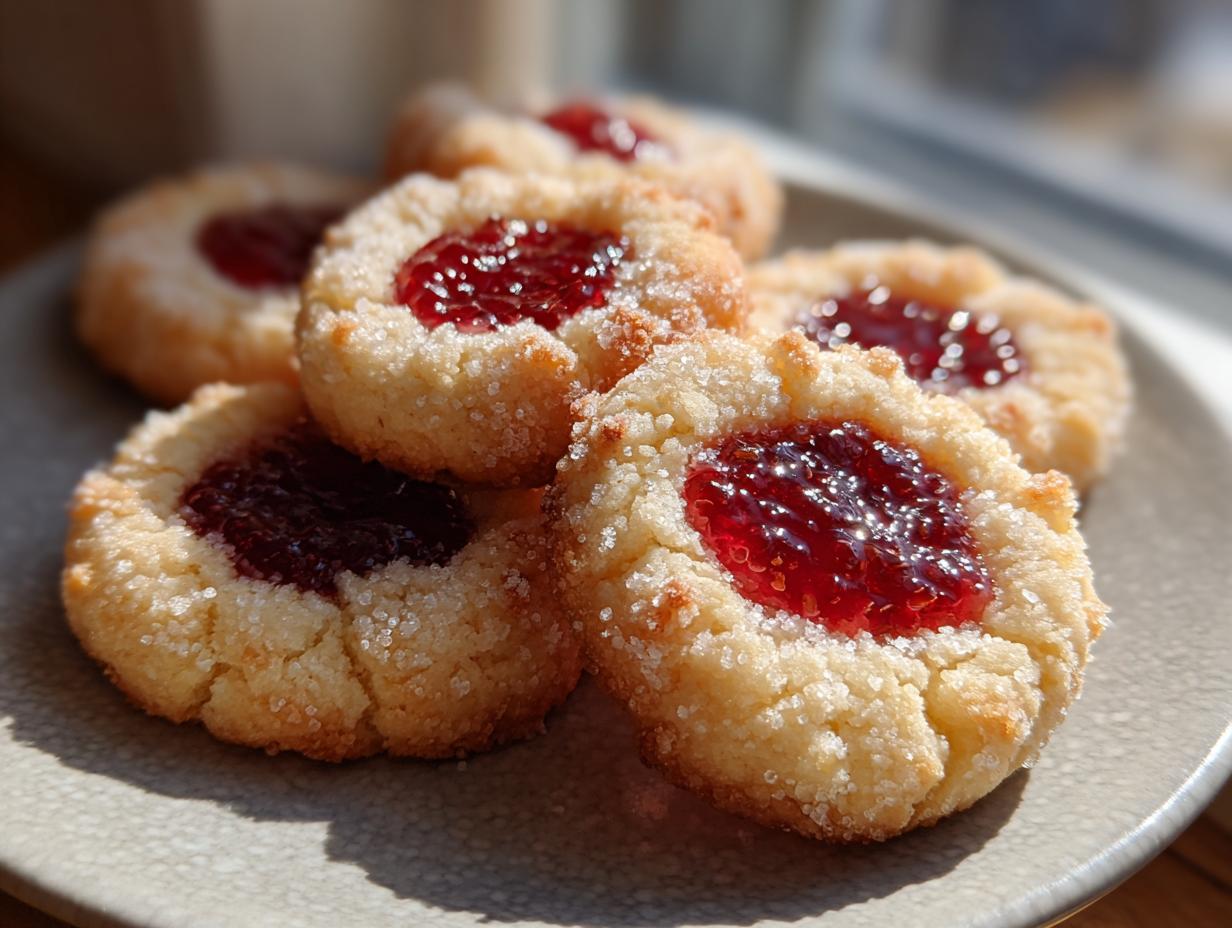
Baking Time and Temperature for Golden-Edged Thumbprint Cookies
We are so close to tasting these magnificent treats! For the best results with our buttery shortbread recipe, make sure your oven is fully preheated to 350°F (175°C). This consistent heat is what helps the cookie set firmly while the edges turn just that perfect shade of light gold we are aiming for. Don’t let them get too dark; we want tender, not crispy!

Bake them for about 12 to 15 minutes total. Keep a close eye on them, especially around the 12-minute mark! Once you see those sweet little golden edges appear, it’s time to pull them out. Another critical step I learned early on is patience during the cool-down. Leave the cookies right there on the baking sheet for about five minutes after they come out. They are very delicate while hot, and this rest allows the structure to firm up beautifully before you carefully move them over to a wire rack to finish cooling completely.
Thumbprint Cookie Variations: Beyond Raspberry Jam Thumbprint Cookies
While raspberry jam makes these my absolute go-to and fits perfectly into our Classic Thumbprint Cookies mold, don’t feel obligated to stop there! These buttery bases are brilliant canvases for all sorts of flavors. If you’re looking for something really decadent instead of fruity, you can easily adapt this recipe for a different center. And if you want pretty decorations, a simple dusting of powdered sugar or a light drizzle of vanilla icing can turn them into lovely iced thumbprint cookies.
Making Old Fashioned Thumbprint Cookies with Different Fillings
If you prefer chocolate over fruit, you absolutely can make chocolate filled thumbprint cookies! The trick here, as detailed, is timing. You must wait until the cookies are completely cool—and I mean completely cool—before filling the indentations. If you try to spoon in ganache or melted chocolate when they are even slightly warm, the butter in the cookie base will melt and the whole center will look messy instead of neat.
To make the chocolate version, just whip up your favorite thick chocolate ganache or use a good quality chocolate frosting. You only need about half a teaspoon per cookie. While the raspberry jam bakes beautifully inside, any thick filling added *after* baking keeps the dough’s shortbread texture pristine. Feel free to experiment with salted caramel or lemon curd too, just remember to add it only after they’ve cooled down from the oven!
Storage & Serving Suggestions for Your Homemade Jam Cookies
These little buttery treasures keep so well, which is wonderful when you bake a big batch for guests! For the best results, store your Homemade Shortbread Thumbprint Cookies in a single layer or very gentle layers inside an airtight container. They happily stay fresh and tender at room temperature for up to a full week—no refrigeration needed!

As for serving, they melt right into any setting. They are lovely on their own for an afternoon treat with a cup of tea, but if you want to elevate the moment, serve them alongside a warm beverage. I find a perfectly steeped cup of tea, like the chai latte I love, complements the buttery shortbread base beautifully. They are truly the perfect companion for a civilized afternoon break.
Frequently Asked Questions About Making Thumbprint Cookies
I always hear the same few things when people try these for the first time, especially when aiming for the very best thumbprint cookies to bring to a holiday party. Don’t hesitate to reach out through my contact page if you have a question not covered here, but these usually clear everything up!
Can I use store-bought jam in my thumbprint cookies?
Absolutely, yes! You should never feel obligated to make your own jam just for this recipe. However, since the jam is the star center of our Classic Thumbprint Cookies, use the best quality you can find. If it’s very thin, let it simmer gently in a tiny saucepan for a few minutes to thicken slightly before filling the indentations. Thicker jam holds its shape better during baking.
Why did my thumbprint cookies spread too much?
This is almost always down to two culprits when baking shortbread-style dough. First, if your butter was too soft or even slightly melted when you creamed it, the dough won’t hold its beautiful shape when it hits the oven heat. Second, if you overmixed the dough after adding the flour, you developed too much gluten, which causes puffing and spreading instead of that nice, dense cookie structure we love. Be gentle when mixing the dry ingredients!
Sharing Your Beautifully Baked Thumbprint Cookies
I truly hope you enjoyed the process of making these beautiful, buttery thumbprint cookies. Once you’ve had a chance to taste them, please leave a rating right here on the recipe! It helps me know what’s working best for all of you. And if you share a photo on social media, please tag me—I absolutely adore seeing your creations come to life!
PrintClassic Buttery Thumbprint Cookies with Raspberry Jam Filling

These classic thumbprint cookies use a buttery shortbread dough, making them tender and perfect for holiday trays or simple afternoon treats. You create a small well in the center and fill it with sweet raspberry jam.
- Prep Time: 20 min
- Cook Time: 15 min
- Total Time: 50 min
- Yield: 24 cookies 1x
- Category: Dessert
- Method: Baking
- Cuisine: American
- Diet: Vegetarian
Ingredients
- 1 cup unsalted butter, softened
- 1/2 cup granulated sugar
- 1 large egg yolk
- 1 teaspoon vanilla extract
- 2 1/2 cups all-purpose flour
- 1/4 teaspoon salt
- 1/2 cup raspberry jam
- 1/4 cup granulated sugar for rolling
Instructions
- In a large bowl, cream the softened butter and 1/2 cup sugar together until light and fluffy.
- Beat in the egg yolk and vanilla extract until just combined.
- In a separate bowl, whisk together the flour and salt. Gradually add the dry ingredients to the wet ingredients, mixing on low speed until a soft dough forms. Do not overmix.
- Divide the dough into small balls, about 1 inch in diameter.
- Place the 1/4 cup of sugar for rolling in a shallow dish. Roll each dough ball in the sugar until coated.
- Place the sugared balls on baking sheets lined with parchment paper.
- Use your thumb or the back of a small measuring spoon to press a deep indentation into the center of each cookie.
- Spoon about 1/2 teaspoon of raspberry jam into each indentation.
- Bake in a preheated oven at 350°F (175°C) for 12 to 15 minutes, or until the edges are lightly golden.
- Let the cookies cool on the baking sheet for 5 minutes before transferring them to a wire rack to cool completely.
Notes
- For a perfect indentation that holds the jam, chill the dough for 30 minutes before rolling and filling.
- If you want to make chocolate filled thumbprint cookies, substitute the raspberry jam with your favorite chocolate ganache after the cookies have cooled completely.
- These cookies store well in an airtight container at room temperature for up to one week.
Nutrition
- Serving Size: 1 cookie
- Calories: 130
- Sugar: 10g
- Sodium: 45mg
- Fat: 7g
- Saturated Fat: 4g
- Unsaturated Fat: 3g
- Trans Fat: 0g
- Carbohydrates: 16g
- Fiber: 0g
- Protein: 2g
- Cholesterol: 25mg