
There is simply nothing more satisfying than opening the refrigerator on a hot afternoon and pulling out a jar of bright, snappy pickles. It’s the taste of summer preserved just for you. If you’ve ever felt intimidated by the idea of going through a full water bath canning process, don’t worry—I have the most elegant solution. We are diving into making incredibly crisp and tangy dilly beans using a quick refrigerator method. This means you get that perfect crunchy vegetable snack experience without any complicated sealing steps, making it ideal for those of us who are beginners or simply need that fresh produce preservation done fast. Think vibrant green beans, bursting with garlic and dill flavor. It’s an effortless way to celebrate the garden’s generosity and keep those zesty side dishes ready to go all week long. You can explore more of our kitchen stories and tips right here on the blog.
- Why You Will Love These Crisp Refrigerator Dilly Beans
- Ingredients Needed for Perfect Dilly Beans
- Step-by-Step Instructions for Making Dilly Beans
- Canning Option: Turning Refrigerator Dilly Beans into Shelf-Stable Preserves
- Tips for Perfect Homemade Pickles and Dilly Beans
- Serving Suggestions for Your Tangy Snack Ideas
- Storage and Shelf Life of Refrigerator Dilly Beans
- Frequently Asked Questions About Dilly Beans
- Nutritional Snapshot for Dilly Beans
Why You Will Love These Crisp Refrigerator Dilly Beans
I developed this refrigerator method because sometimes you just need a delicious, tangy snack now, not next month! These dilly beans deliver on texture and flavor immediately. Here’s why they are already my favorite way to use up a fresh haul of beans:
- Ready in Less Than 24 Hours: Seriously! True quick pickles mean minimal waiting. They mature beautifully, but you can sample them almost instantly.
- Incredibly Crunchy Texture: We focus heavily on technique to ensure these beans snap beautifully. No soft, sad pickles here—only that satisfying crunch you crave.
- No Canning Required: If you don’t have a canner or are nervous about the process, this method is perfect. It’s the easiest path to homemade pickles.
- Vibrant, Tangy Flavor: The brine is perfectly balanced with salt and vinegar, giving you that classic, zesty side dish flavor that pairs well with everything.
- Easy to Customize Spice Levels: Want heat? You control it! Adding chile flakes makes for fantastic spicy pickled beans without altering the core vinegar brine recipes.
Ingredients Needed for Perfect Dilly Beans
The beauty of these dilly beans is that they rely on simple, quality components. Since this is a refrigerator pickle, the focus is all on the freshness so we can enjoy that vibrant flavor quickly. We need to be very precise with the brine ingredients, though, as that’s where all the tang and preservation power lives.
Here is what you’ll need for two pint jars:
- 2 lbs fresh green beans, trimmed
- 4 cups water
- 2 cups white vinegar (it absolutely must be 5% acidity—don’t compromise here! If it’s weaker, the pickles might not be safe long-term),
- 2 tablespoons pickling salt (this is important for true clean flavor),
- 1 tablespoon granulated sugar (just a touch to balance the vinegar),
- 16 cloves garlic, peeled and halved,
- 8 fresh dill heads or 4 tablespoons fresh dill seed,
- 1 teaspoon red chile flakes (optional, but this is how we make those amazing spicy pickled beans),
- 1/2 teaspoon whole black peppercorns (optional, for a nice subtle background spice).
Make sure you have your clean jars ready to go before you even start heating the brine because these move quickly once the liquid gets hot!
Ingredient Notes for Crunchy Dilly Beans
To guarantee that wonderful, audible crunch—which is the entire point of a great pickle—you must pay attention to your produce. Choose the youngest, firmest green beans you can find. If the beans are limp or look dull, they will stay limp in the jar, no matter how great your brine is. I always tell people to snap one—it should break cleanly. Also, please remember to use proper pickling salt. Table salt has anti-caking agents that can make your brine cloudy and sometimes gives an off-flavor, which we absolutely want to avoid in our homemade pickles.
Step-by-Step Instructions for Making Dilly Beans
Making these refrigerator dilly beans is truly straightforward—it’s mostly assembly once you have the brine ready. Think of it as a very elegant method of giving vegetables an instant flavor upgrade! We are moving fast here, so have your jars wiped clean and ready to go before the salt dissolves.
- First things first: Wash those green beans thoroughly. Give them a quick trim on the ends. You want them neat and tidy for packing!
- Now for the brine. In a medium saucepan, combine your water, white vinegar, pickling salt, and sugar. Set this over medium-high heat. We just need to bring it to a soft boil, stirring constantly until you see that the salt and sugar are completely dissolved. That’s it—don’t overcook this step!
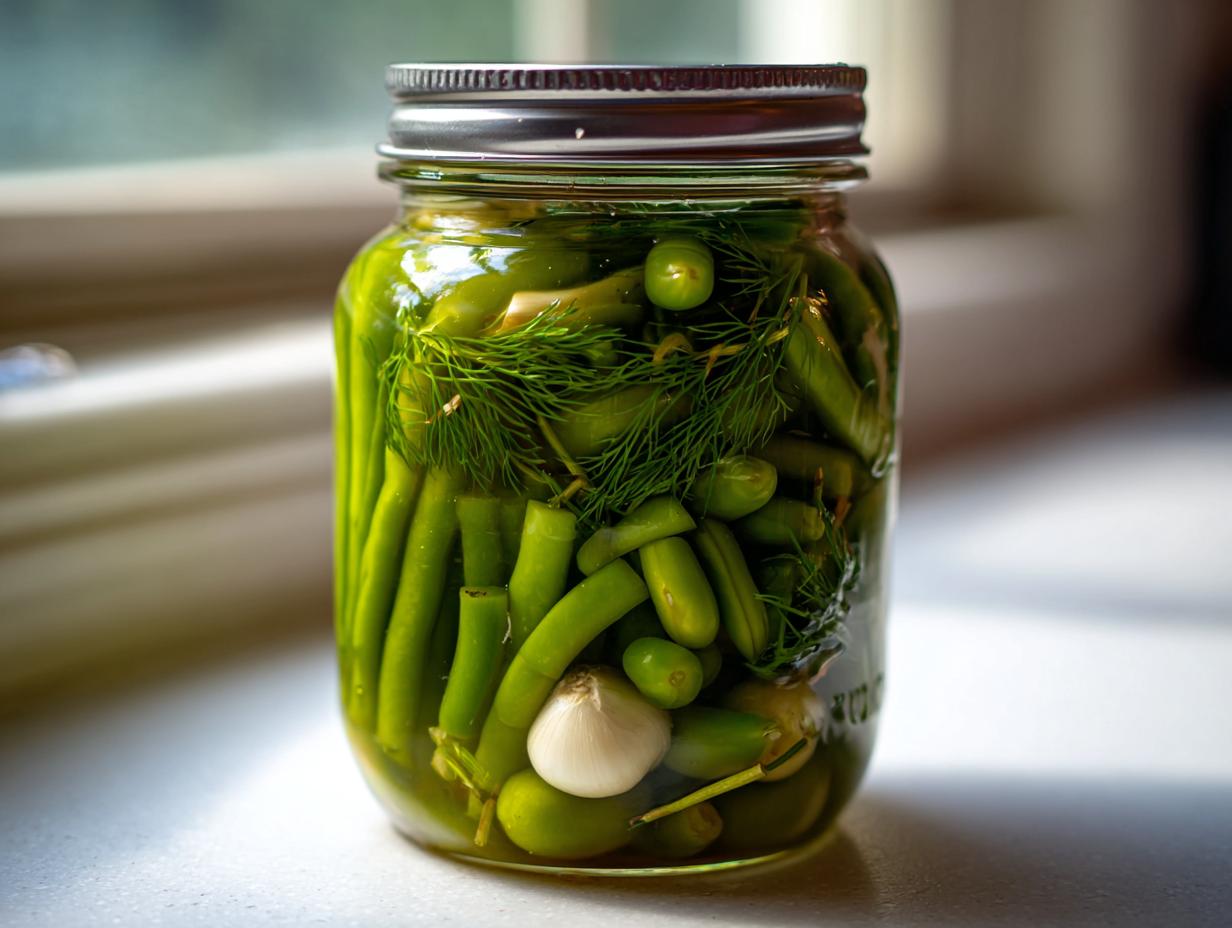
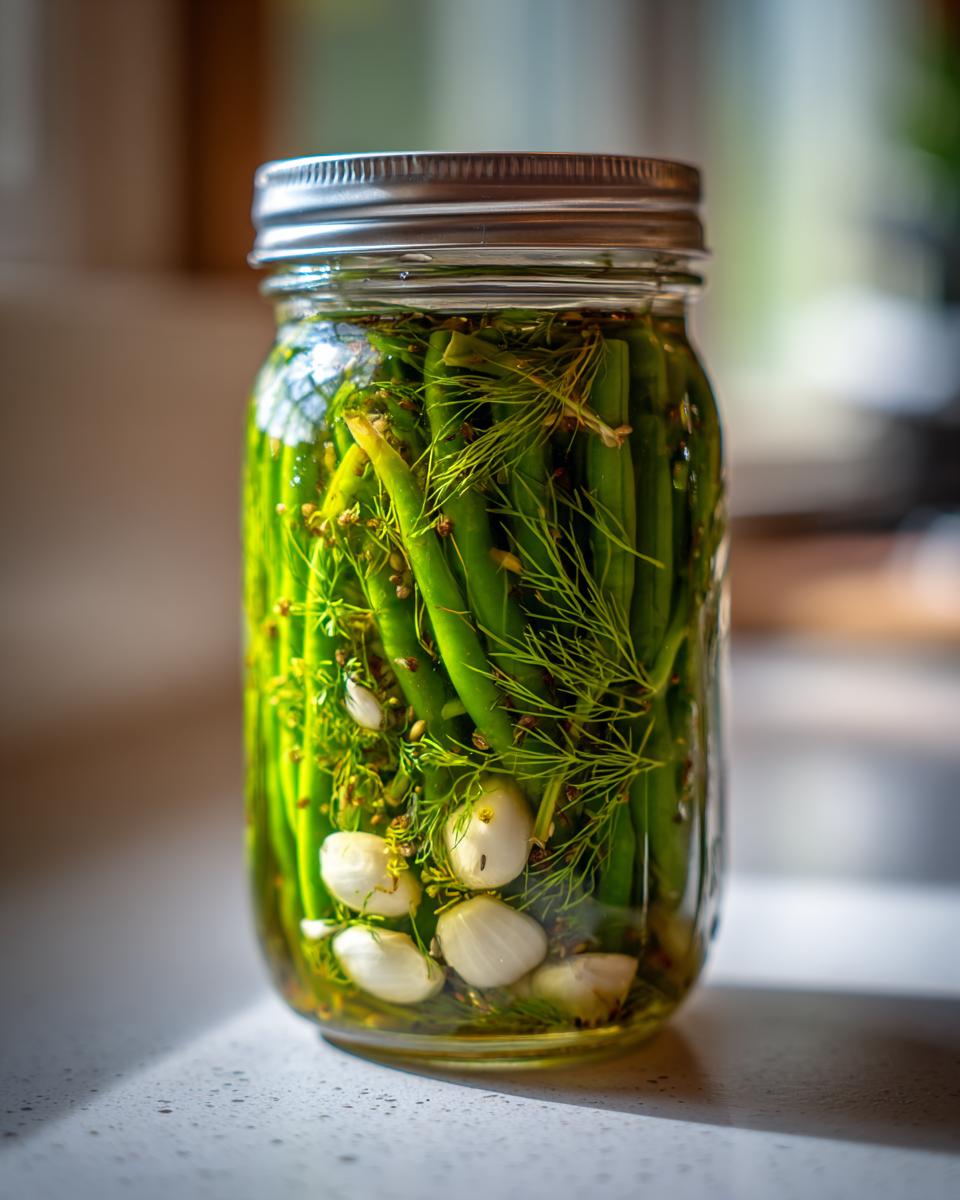
- While that’s heating, get your flavorings divided into your two clean pint jars. You’ll want to split up the garlic cloves, dill heads (or seeds), chile flakes (if you’re making them spicy!), and any peppercorns evenly between the jars.
- Time to pack! Firmly press your trimmed green beans into the jars. Try to stand them upright so they fit snugly; we want to get as many of these amazing dilly beans in there as possible.

- Carefully ladle that hot brine over the packed beans in each jar. Make sure every single bean is completely submerged under the liquid. You should stop pouring when you have about a half-inch of space left at the very top—that’s called headspace.
- Gently tap those jars down on your counter a couple of times. Listen for the bubbles escaping! If the brine level drops below that half-inch mark, just top it off with a little more hot brine.
- Wipe the rims super clean—any vinegar residue can stop the lids from sealing nicely, though for refrigerator pickles, this is less critical than for long-term canning. Put the lids on tight.
- Let them sit on the counter to cool down completely to room temperature. Once they are cool, tuck them right into the refrigerator. Patience now! Find another quick pickle recipe to keep you busy while these rest up.
Achieving Maximum Crunch in Your Dilly Beans
The crunch is non-negotiable, isn’t it? A soft pickle is just sad. For these refrigerator dilly beans to be truly snappy, you need to respect three things. First, use those young, firm beans—I cannot stress this enough. Second, when making your brine, you are only heating it long enough for the salt and sugar to disappear. Stop the heat immediately! If you boil the brine for five minutes, you start cooking the beans before they even hit the jar, which softens them. Third, they need time to sit properly submerged in the cold brine in the fridge. Wait that full 24 hours, but honestly? They are worlds better after three to five days resting in that tangy bath.
How to Make Spicy Dilly Beans Variations
If you love a little kick with your crunch, making spicy pickled beans is as easy as adding the heat right into the jar alongside the garlic and dill. When you are dividing your aromatics in Step 3, this is your moment! Toss in that teaspoon (or more!) of red chile flakes. If you have some fresh jalapeños lying around—maybe they are a little too wrinkly for a fresh salad—slice them thinly and add those right in with the beans. That spicy oil leaches right into the brine, giving the entire batch a wonderful, zesty warmth that makes them so addictive as a crunchy vegetable snack.
Canning Option: Turning Refrigerator Dilly Beans into Shelf-Stable Preserves
Now, while my heart genuinely belongs to the speedy refrigerator dilly beans, I absolutely understand the desire for something you can store in the pantry all winter long. My father always preferred shelf-stable preserves, and my goal here at Unfold Recipes is to give you the confidence to do whatever style of preservation feels right for you. This is where the concept of easy canning recipes comes in. It’s elegant simplicity, just like we aim for!
Here’s the exciting part: the brine and the flavor structure are already perfect for canning! If you followed all the steps above—using clean jars, packing the beans firmly, and topping them with the hot brine—you are 90% of the way there. The only difference between our quick snack and a true canned shelf-stable product is the heat processing step. This step uses a boiling water bath to kill potential bacteria and create that vacuum seal, letting you enjoy your pickles far beyond four weeks.
To make your refrigerator dilly beans shelf-stable, you need to process the sealed jars in a boiling water bath. Bring a large pot of water to a rolling boil, carefully lower the filled and sealed jars into the water (making sure the water covers them by at least an inch), and process them for exactly 10 minutes. Remember to always check and adjust that time based on altitude if you live high up in the mountains, just to be safe!
It’s a little more active than the quick pickle method, but knowing you can enjoy those crunchy, tangy beans months later is such a wonderful feeling. If you are new to this, I highly recommend checking out this great resource on how to can dilly beans for more guidance before you start the water bath. It’s mastering fresh produce preservation with beautiful results!

Tips for Perfect Homemade Pickles and Dilly Beans
Whether you are making these for immediate snacking or preparing them for long-term canning, the foundation of any great pickle—and that includes our fantastic dilly beans—is cleanliness and precision. This is where we move beyond just a recipe and into the art of thoughtful preservation. Always, always start with pristine jars. Wash them thoroughly, even if they look clean, and make sure your lids and rings are spotless before you begin packing. This small step prevents any off-flavors from creeping in.
When you pour in that beautiful brine, remember the headspace rule, even for refrigerator pickles; that half-inch gap is important for allowing flavors to meld without the jar overflowing. And finally, if you are processing for canning, remember that altitude adjusts everything! If you live high up, you must add extra minutes to your processing time for safety. It’s all part of making sure your vinegar brine recipes yield perfect results. Once they are ready, I love to serve mine as part of a beautiful antipasto spread, which you can see ideas for over in my appetizers section.
Serving Suggestions for Your Tangy Snack Ideas
Honestly, once you pull these bright, tangy dilly beans from the fridge, you will constantly be looking for excuses to eat them! They are far too good to just sit on the shelf. While they are certainly a dynamite standalone crunchy vegetable snack—perfect for munching while I’m cleaning up the kitchen, if I’m being totally honest—they truly shine when paired with other simple, elegant foods.
Think about balancing that sharp, salty flavor with something rich or creamy. I adore serving them straight up as part of a casual appetizer platter. They look so beautiful tucked next to some good quality olives, creamy cheeses, and maybe some marinated artichokes. It elevates a simple charcuterie board into something really special without any extra effort on your part!

For lunch or a cozy dinner, these make the perfect zesty side dish. Swap out boring pickles for these next time you have a burger or a rich pulled pork sandwich; the dill and vinegar just cut through the fat perfectly. They are also fantastic chopped up and tossed into a potato salad or even a scoop of creamy tuna salad! It adds such a bright pop of flavor. If you are looking for other ways to bring fresh, vibrant sides to your table, you should definitely check out my ideas for delicious side dishes.
It’s funny, the simpler our meals are, the more impact these intensely flavored, homemade pickles have. They turn a standard sandwich into something truly memorable. If you need inspiration on how to feature pickles dramatically, I love how Sandy Oliver features them on her platter—it’s really beautiful inspiration for how to serve these great snacks, check out her presentation here.
Storage and Shelf Life of Refrigerator Dilly Beans
This is the part where we talk about how long we can keep these treasures hidden away in the back of the fridge! Since these are specifically refrigerator pickles—meaning no canning required in this initial recipe—they are not intended for long-term pantry storage. They are designed to be eaten fresh, retaining that glorious, immediate crunch.
For the best texture and flavor, you should plan to consume your batch of dilly beans within about four weeks. Once they pass that mark, while they are generally still safe to eat (since the high vinegar content preserves them), the texture starts to soften slightly. They lose that initial, snappy bite that makes them so special. So, my advice is to batch-make small quantities frequently rather than trying to process a massive amount all at once.
Now, if you took the extra step and processed your jars using the boiling water bath method we discussed earlier, you open up a whole new world of storage! Those shelf-stable jars—which have been sealed properly—can easily sit safely in a cool, dark pantry for up to a year before opening. Once you open a traditionally canned jar of pickled green beans recipe style beans, however, it then acts just like a refrigerator pickle and needs to be consumed within that same four-week window.
It’s all about balancing the ease of the quick pickles with the patience required for long-term preservation. For these quick results, a steady residence in the cold section of your fridge is the only way to go. They’ll be waiting there, cold and tangy, whenever you need a fantastic healthy snack alternative!
Frequently Asked Questions About Dilly Beans
We covered a lot of ground on achieving the perfect crunch and whether you should pickle or refrigerate, but I always find folks still have a few lingering curiosities when dealing with beautiful ingredients like these! Here are the questions I get asked most often about making fantastic dilly beans at home.
Can I use fresh dill sprigs instead of whole dill heads?
Absolutely, yes! You certainly can. If you can’t find those lovely, mature dill heads—which carry that concentrated aroma—using fresh dill sprigs is a wonderful substitute. The whole dill head offers a hint of an anise-like flavor that some people love, but fresh sprigs are fantastic too. Generally, I swap them on a 1:1 basis, or maybe throw in just a little extra sprig if the dill flavor feels too subtle for your taste. This is very common in many garlic dill green bean preparations.
Why aren’t my refrigerator dill beans crunchy, even after waiting 24 hours?
Oh, the inevitable soggy bean mystery! This usually comes down to one of three things. First, as we discussed, using less-than-fresh beans that are already starting to go limp. Second, if you boiled your brine for too long, you cooked the beans slightly before they even went into the jar. Third, if you added any ingredient that wasn’t perfectly clean or contained impurities, it can sometimes affect the cell structure. Remember, for these, the absolute key is using the freshest {keyword to avoid} possible and keeping that brine boiling time to a minimum!
I like bold flavors—how can I make these into truly spicy pickled green beans?
I love that you want to lean into the heat! This is where you get to experiment with your vinegar brine recipes to create the perfect spicy pickled beans. While I put red chile flakes right in the jar, for an intense heat that permeates the entire jar, try adding a few thin slices of a powerful pepper, like a Thai chili or a bird’s eye pepper, right into the jar with the garlic. Be warned, though: the hotter you make it, the faster you’ll eat them, which means you’ll be making another batch sooner!
Is it safe to reduce the amount of vinegar in the brine?
This is a very important safety question, and my answer leans heavily on caution, especially since we are making no canning required pickles here. For refrigerator pickles, cutting back just slightly might be fine for short-term storage (a week or so), but the ratio of vinegar (acid) to water is crucial for safety, even when just refrigerating. Vinegar provides the acidity necessary to inhibit bacteria growth. If you cut this ratio significantly, you risk creating an unsafe environment, even in the fridge. For the best, safest results, stick to that 2:1 ratio of vinegar to water for your homemade pickles!
If you ever have more specific questions about technique or want to share your results, please don’t hesitate to reach out to me directly via my contact page. I love hearing from fellow cooks!
Nutritional Snapshot for Dilly Beans
I always try to keep things light and fresh here at Unfold Recipes, and happily, these dilly beans fit right into that philosophy! Since they are primarily water and green beans, they are a wonderfully low-calorie way to enjoy a vegetable snack. If you’re looking for a delicious, tangy, and low-calorie addition to your meals, these fit the bill beautifully.
Here is the approximate nutritional information based on one serving (about 1/2 cup) of the standard recipe:
- Serving Size: 1/2 cup
- Calories: 25
- Sugar: 1g
- Sodium: 350mg (This will vary based on your specific pickling salt measurement!)
- Fat: 0g
- Carbohydrates: 5g
- Fiber: 2g
- Protein: 1g
- Cholesterol: 0mg
It is important to remember that these are just estimates, my dears! The sodium content, in particular, can fluctuate wildly based on the brand of pickling salt you choose and how much brine you end up using in your specific jars. But overall, these make for a truly superior, healthy snack alternative compared to processed junk food snacks. Enjoy them knowing they are bursting with vegetable goodness!
PrintCrisp Refrigerator Dilly Beans: Tangy Snack Ready in 24 Hours

Make these crunchy, tangy dilly beans without canning. This quick pickle recipe uses fresh green beans, dill, and garlic for a satisfying snack ready fast.
- Prep Time: 20 min
- Cook Time: 10 min
- Total Time: 30 min
- Yield: 2 pints 1x
- Category: Snack
- Method: Quick Pickling
- Cuisine: American
- Diet: Vegetarian
Ingredients
- 2 lbs fresh green beans, trimmed
- 4 cups water
- 2 cups white vinegar (5% acidity)
- 2 tablespoons pickling salt
- 1 tablespoon granulated sugar
- 16 cloves garlic, peeled and halved
- 8 fresh dill heads or 4 tablespoons fresh dill seed
- 1 teaspoon red chile flakes (optional, for spicy dilly beans)
- 1/2 teaspoon whole black peppercorns (optional)
Instructions
- Wash the green beans thoroughly. Trim the ends off the beans.
- In a medium saucepan, combine the water, vinegar, pickling salt, and sugar. Bring the mixture to a boil over medium-high heat, stirring until the salt and sugar dissolve completely. This is your brine.
- While the brine heats, prepare your jars. Use two clean pint-sized canning jars (or similar glass containers).
- Divide the garlic cloves, dill heads (or seed), chile flakes, and peppercorns (if using) evenly between the two jars.
- Pack the trimmed green beans tightly into the jars, standing them upright if possible. Pack them firmly to fit as many as you can while keeping them submerged.
- Carefully pour the hot brine over the beans in each jar, ensuring the beans are completely covered. Leave about 1/2 inch of headspace at the top.
- Gently tap the jars on the counter to release any trapped air bubbles. Add more brine if necessary to maintain the 1/2 inch headspace.
- Wipe the rims of the jars clean. Seal the jars with lids and bands.
- Let the jars cool to room temperature on the counter. Once cool, place the jars in the refrigerator.
- Wait at least 24 hours before eating. These refrigerator pickles develop their best tangy flavor after 3 to 5 days. Store in the refrigerator and consume within 4 weeks.
Notes
- For the crispest texture, choose young, firm green beans. Do not use old or limp beans.
- If you prefer a shelf-stable product, process these jars using a boiling water bath method for 10 minutes after sealing, adjusting for altitude if needed.
- To make a spicy pickled green beans variation, increase the red chile flakes or add thin slices of jalapeño to the jar.
Nutrition
- Serving Size: 1/2 cup
- Calories: 25
- Sugar: 1
- Sodium: 350
- Fat: 0
- Saturated Fat: 0
- Unsaturated Fat: 0
- Trans Fat: 0
- Carbohydrates: 5
- Fiber: 2
- Protein: 1
- Cholesterol: 0