

You know how much I adore hosting—it’s practically in my DNA with my background balancing my mother’s sunny California style and my father’s Spanish roots! There’s nothing quite like seeing a platter land on the table and watching everyone instantly gather. For those moments, you need an appetizer that screams celebration without demanding you spend all your time stirring a pot. That’s where this recipe comes in. This classic seven-layer dip is the ultimate crowd-pleaser, truly earning its title as the best appetizer dip for any fiesta or game day. Its visual appeal is just as important as its zesty, creamy flavor, making it a signature centerpiece!
- Why This Classic Seven Layer Dip Is Your Ultimate Crowd Pleaser Dip
- Essential Ingredients for the Perfect Layer Dip
- Step-by-Step Instructions for Assembling Your Layered Dip Recipes
- Expert Tips for the Best Tex Mex Dip Experience
- Serving Suggestions for Your Simple Layered Appetizer
- Storage and Make Ahead Dip Planning
- Frequently Asked Questions About This Layer Dip
- Estimated Nutritional Information for This Appetizer Dip
- Share Your Seven Layer Dip Creations
Why This Classic Seven Layer Dip Is Your Ultimate Crowd Pleaser Dip
I am telling you, this is the recipe you pull out of your back pocket when hosting suddenly becomes mandatory! This Seven Layer Dip is truly the definition of a Crowd Pleaser Dip because it requires zero time near the oven. I remember one particularly chaotic afternoon when the main course fell through—total disaster! I whipped this Dip up in under twenty minutes using ingredients I already had, and it saved the party. Its appeal lies in how easily those distinct flavors stack up.
Key Features of This Layer Dip Recipe
- It’s completely no-bake, simplifying your hosting workload immensely.
- The distinct layers make for stunning visual presentation.
- It’s designed to be mostly a Make Ahead Dip; just leave off the lettuce until serving!
- It’s delightfully vegetarian, though easily customizable.
Essential Ingredients for the Perfect Layer Dip
When we’re making a spectacular Seven Layer Dip, the ingredient quality really matters because there’s no cooking heat to hide behind! This list focuses on the creamy, spicy, vegetarian base layers that make this the best Mexican Layer Dip imaginable. Remember, we are building texture here, so pay attention to those specifics! If you wanted to make this heartier for a Super Bowl spread, you could always toss in some nicely browned ground beef seasoned with extra taco spice right over the bean layer, but for now, we’re keeping it streamlined.
Ingredient Notes and Simple Substitutions
A few little secrets here to ensure your dip doesn’t turn into soup! You absolutely must use the salsa that has been well drained. If you use watery salsa, it seeps down and ruins the beautiful separation of the cream cheese and sour cream layers—we want distinct lines!
Also, if you don’t have the standard Mexican blend cheese, feel free to swap in sharp cheddar and Monterey Jack. For that beautiful green layer, while this recipe doesn’t use it, you can easily use your favorite homemade guacamole right under the sour cream or right above it! Just make sure you have some crisp homemade salsa to balance the richness.
Step-by-Step Instructions for Assembling Your Layered Dip Recipes
Alright—the ingredients are prepped; now for the fun part! Assembling this layer dip is less like cooking and more like painting. The whole key to success is making sure each layer is perfectly smooth before you introduce the next one. Remember, we are aiming for visual impact here, so keep those layers distinct. If you’re making this ahead, focus only on the first few steps and keep the lettuce and tomatoes off until game time—trust me on this one!
Creating the Creamy Base Layers of This Layer Dip
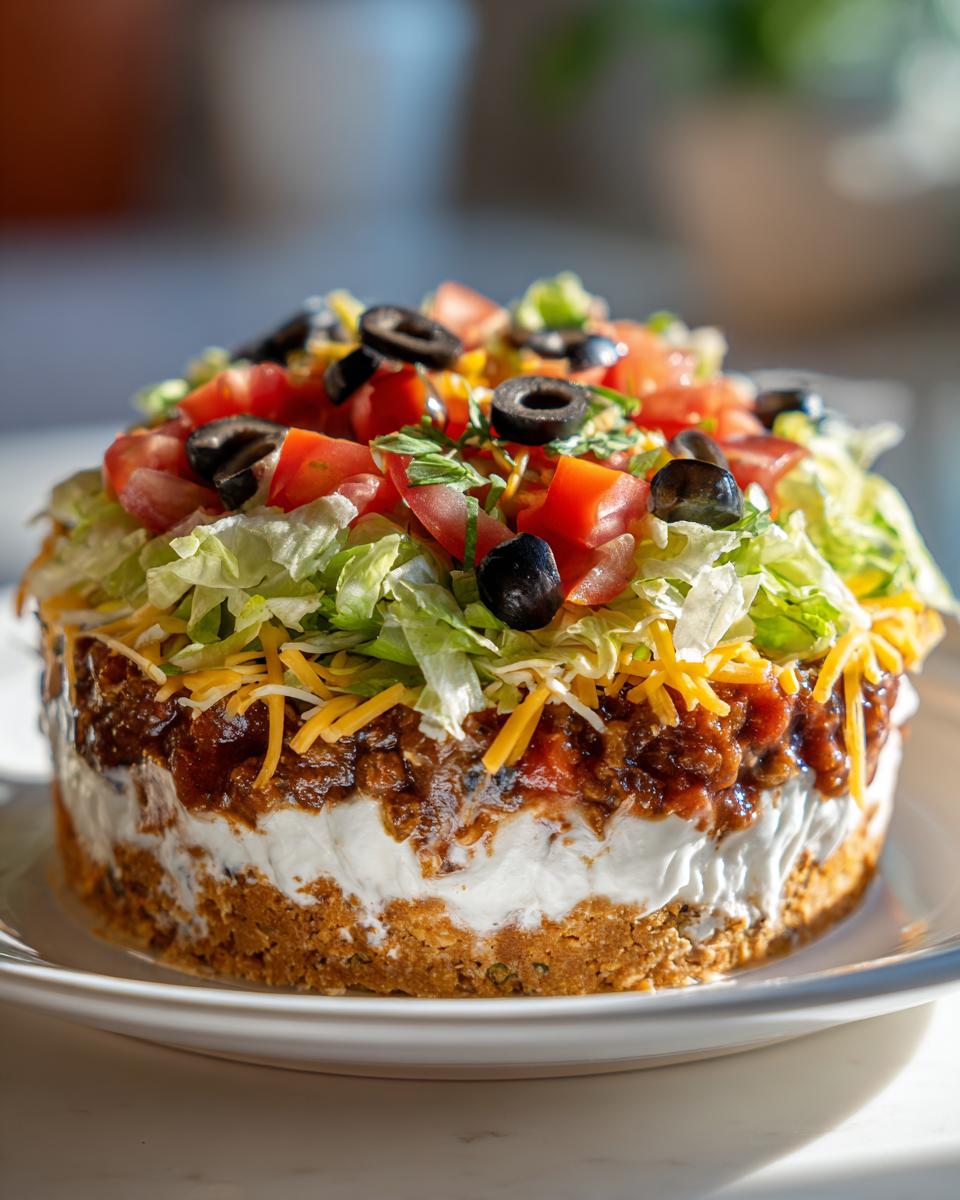
First things first: we need that seasoned cream cheese! Take your softened cream cheese—it needs to be yielding, not melty—and mix it vigorously in a small bowl with that entire packet of taco seasoning until it’s completely uniform. That’s your flavor bomb layer. Next, take your serving dish, which should be nice and wide, and spread your refried beans evenly across the bottom. Don’t press too hard, or you’ll have a dense base! Then, gently spread that seasoned cream cheese mixture right over the beans. Smooth out the sour cream next; this third step requires a gentle hand so you don’t drag up any of the preceding layers. Perfection happens when each layer lays gently on the last.
Layering Fresh Toppings for Visual Appeal
Once your creamy base is set, we move to the vibrant colors! Spoon your drained salsa over that sour cream layer. It can be tricky to spread salsa without messing things up, so I like to gently dab it across the top rather than using a back-and-forth spreading motion. Next, sprinkle your shredded Mexican cheese blend evenly over the salsa. Now for the freshest part! You want those final toppings—the shredded lettuce, diced tomatoes, and black olives—to look neat. Take your time arranging these last three toppings in their own distinct sections, or gently sprinkle them evenly across the top for that beautiful, colorful finish. Chill it down now, and get ready for compliments!

Expert Tips for the Best Tex Mex Dip Experience
Making a good Tex Mex Dip is easy, but making it *unforgettable* takes a few professional tricks. The biggest thing I’ve learned over the years is timing the fresh components. As much as I love our recipe note about keeping the first four layers ready ahead of time, the lettuce and tomatoes absolutely have to wait until the very last minute. If they sit wet with condensation or cheese for too long, they get soggy and compromise the crisp texture you want!
And speaking of texture, if you opt to add any avocado or guacamole layer (which I highly recommend!), you must give it a quick spritz of lemon or lime juice right before spreading it. It helps stave off that disappointing browning that happens when avocados get exposed to air. This attention to those small, fresh details is what separates a simple dip from a showstopper!
Serving Suggestions for Your Simple Layered Appetizer
This is meant to be a truly Simple Layered Appetizer, right? So, give your guests options beyond the basic tortilla chip! While sturdy chips are certainly a must-have for scooping up all those rich layers, I always like to pull out some fresh veggies too. Think crisp bell pepper strips or sturdy cucumber slices for something lighter. For a real treat, especially if you’re hosting a fancier gathering, I sometimes serve small slices of toasted baguette—maybe warmed up with a little garlic oil like my garlic bread recipe—instead of chips.

Since this is a classic Cold Dip Recipe, make sure the dish has been thoroughly chilled for at least an hour. You want that cool, refreshing contrast against the spicy taco seasoning!
Storage and Make Ahead Dip Planning
This is seriously the best part about this whole great Make Ahead Dip—you can do major work the day before! If you are planning a big event, you can absolutely assemble those first four layers—the beans, the seasoned cream cheese, the sour cream, and even the salsa—the day before you need it. Just cover that dish tightly with plastic wrap and tuck it into the back of the fridge. It chills beautifully and the flavors actually marry together wonderfully overnight.
However, you have to promise me you won’t add the fresh stuff too early! The moment you add the cheese, the shredded lettuce, the diced tomatoes, and those olives, you introduce moisture and texture that degrades fast. Wait until about 30 minutes before your guests arrive to layer those final toppings on. If you add the lettuce too soon, it gets wilted and sad, and honestly, limp lettuce ruins the joy of a crunchy dip! Keep those fresh components separate and only assemble them right before serving.
What about leftovers? Well, if you’re lucky enough to have any remaining, store it layered in the fridge. It keeps quite well for about three days, though the texture might soften slightly. If you only have a little bit left, I usually scoop it out into smaller containers and just keep the vegetable toppings separate until I plan to eat it next. It’s still delicious, even if it loses that picture-perfect height!
Frequently Asked Questions About This Layer Dip
I know we covered a lot of delicious details for this ultimate layer dip, but sometimes the best recipes spark the most questions! It’s totally normal when you’re making something for a big crowd; you want it to be perfect. Here are a few things folks often ask me when they are planning their party food menu.
Can I substitute the refried beans in this layer dip?
That’s an excellent question about the foundation of our dip! The traditional recipe calls for refried pinto beans because they spread so smoothly, but you can certainly pivot if you need to. If you want to keep it utterly vegetarian but want a different flavor, try using seasoned black beans instead—just mash them up slightly with a fork first so they aren’t too chunky. Or, if you are worried about keeping it light, you can absolutely follow my suggestion from the notes and swap that bean layer out entirely for cooked ground beef seasoned with half a packet of taco mix. That turns it into a heartier, meat-lover’s dream dip!
Do the layers *have* to stay separate?
Oh, I know it’s temping to just mix everything together for simplicity, but honestly, the fun of a great Layered Dip Recipes is seeing those colors! The key is temperature and gentleness. Make sure your cream cheese and sour cream layers are spread with a light hand right over the layer beneath them. Chilling after the first few creamy layers helps them firm up so the toppings don’t sink in too badly. They don’t need to be ruler-straight, but distinct bands make it so much prettier.
What if I only want a 5-layer dip for a smaller group?
If you’re serving a smaller crowd, you absolutely do not need seven layers weighing you down! To make a streamlined 5-layer version, I would simply skip the shredded lettuce and diced tomatoes. You still get all those fantastic creamy, zesty flavors with the layers: beans, seasoned cream cheese, sour cream, salsa, and cheese. Top that with the olives, bake it slightly if you want it warm, or chill it if you prefer a Cold Dip Recipe, and it’s still a total winner!
Which chips work best for scooping up a thick dip like this?
Because this dip is dense and thick—certainly not a thin, runny dip—you need serious scooping power! Standard, thin tortilla chips often snap right when you hit that thick bean layer. I always go for the thicker, sturdier restaurant-style tortilla chips. If you’re looking for something different, sturdy vegetables like carrot sticks or the thick inner side of Belgian endive leaves work beautifully if you want a lighter option.
Is this dip good if I make the guacamole layer at home?
If you decide to add a homemade guacamole layer, you are aiming for the stars! But since you’re asking me, Catherine, my advice is this: if you include guac, you *must* only assemble the dip immediately before serving. Guacamole, even with lime, oxidizes quickly and will turn brown spots into your beautiful layers. If you’re making it ahead, keep the guac separate and put it on right before the final toppings go on, maybe 15 minutes before serving.
Estimated Nutritional Information for This Appetizer Dip
Now, I have to give you the practical scoop, because while we are focused on flavor and fun when creating this centerpiece Appetizer Dip, knowing what’s in it is important, right? People always want to know where they stand when they’re loading up their chip. Here is the nutritional breakdown based on serving ten people, using the exact ingredients listed in the recipe. Please remember that since we are using store-bought components like seasoning mix and cheese blends, these numbers are always going to be a good *estimate* based on standard product labeling.
It’s rich, it’s decadent, and it’s worth every bite for game day!
- Serving Size: 1/10 of dip
- Calories: 250
- Total Fat: 18g
- Saturated Fat: 9g
- Carbohydrates: 15g
- Protein: 9g
- Sodium: 550mg
- Fiber: 3g
Because this is a fantastic Simple Layered Appetizer, the sodium content does jump up because of the processed cheese, canned beans, and taco mix. If you’re watching sodium, you can easily cut that number down by using low-sodium beans, a reduced-sodium taco seasoning, and dabbing some plain sour cream instead of using the full amount of already seasoned cream cheese mixture. Little tweaks always help!
Share Your Seven Layer Dip Creations
Now that you’ve got the blueprint for what I consider the pinnacle of party dips, I truly hope you make this for your next gathering! When I invite friends over, this is the very first thing to disappear, and I always get asked about the secret to keeping the layers so neat.
I would be absolutely thrilled if you gave this Seven Layer Dip a try. Please, please leave a rating and a comment below letting me know how it went! Did you stick strictly to the seven layers, or did you venture off into eight or nine? I’m always curious which layer my readers simply cannot live without—is it the creamy seasoned cheese, or are you a strict bean-lover?
If you snap a photo of your beautifully stacked dip before everyone dives in, tag Unfold Recipes on social media! Seeing your culinary stories unfold in your own kitchens is honestly the greatest part of my job. If you have any lingering questions about hosting or need help planning your next menu, don’t hesitate to reach out via my contact page. Happy dipping!
Print
Classic Seven Layer Taco Dip: An Easy Party Appetizer

Create this classic, visually appealing Seven Layer Taco Dip. It features distinct, flavorful layers perfect for game days or any gathering, and you can make it ahead of time.
- Prep Time: 20 min
- Cook Time: 0 min
- Total Time: 20 min
- Yield: 10 servings 1x
- Category: Appetizer
- Method: Chilling/No-Bake
- Cuisine: Tex-Mex
- Diet: Vegetarian
Ingredients
- 1 (16 ounce) can refried beans
- 1 cup cream cheese, softened
- 1 packet (1 ounce) taco seasoning mix
- 1 cup sour cream
- 1 cup salsa, drained
- 2 cups shredded Mexican cheese blend
- 1 cup shredded lettuce
- 1 cup diced tomatoes
- 1/2 cup sliced black olives
Instructions
- In a medium bowl, mix the softened cream cheese and taco seasoning until smooth. This creates your seasoned cream cheese layer.
- Spread the refried beans evenly over the bottom of a 9×13 inch serving dish. This forms the first layer.
- Carefully spread the seasoned cream cheese mixture over the bean layer.
- In a separate bowl, mix the sour cream until smooth. Spread the sour cream over the cream cheese layer.
- Spoon the drained salsa evenly over the sour cream layer.
- Sprinkle the shredded Mexican cheese blend over the salsa layer.
- Top the cheese with shredded lettuce, diced tomatoes, and sliced black olives in distinct layers.
- Cover the dip and chill in the refrigerator for at least one hour before serving. This allows the flavors to meld.
- Serve cold with tortilla chips or your preferred dippers.
Notes
- You can prepare the first four layers (beans, cream cheese, sour cream, and salsa) a day in advance. Keep it covered in the refrigerator. Add the fresh toppings (lettuce, tomato, olives, and cheese) just before serving for the best texture.
- For an extra layer of flavor, brown 1/2 pound of ground beef with half a packet of taco seasoning and use it as the layer between the beans and the cream cheese mixture.
- If you want a slightly tangier flavor in the sour cream layer, mix 1/4 cup of mayonnaise into the sour cream before spreading.
Nutrition
- Serving Size: 1/10 of dip
- Calories: 250
- Sugar: 4
- Sodium: 550
- Fat: 18
- Saturated Fat: 9
- Unsaturated Fat: 9
- Trans Fat: 0
- Carbohydrates: 15
- Fiber: 3
- Protein: 9
- Cholesterol: 40