
As the air turns crisp and the calendar fills up with gatherings, hosting should feel joyful, not stressful. That’s where approachable elegance comes into play! If a dish could perfectly embody the spirit of fall entertaining—breathtakingly festive yet incredibly simple—it would be this pumpkin cheese ball. I’m Catherine Valdès, and I want to take the pressure off your holiday spread. This savory, sharp cheddar-based delight requires no baking, looks absolutely stunning shaped like a miniature pumpkin, and can be entirely prepared ahead of time. It’s the crowd-pleasing centerpiece you need for both Halloween parties and elegant Thanksgiving spreads, proving that wow-factor doesn’t require complication.
- Why This Easy Pumpkin Cheese Ball Recipe is Your Go-To Fall Appetizer Recipe
- Ingredients for the Perfect Pumpkin Cheese Ball
- How to Make a Cheese Ball Look Like a Pumpkin
- Tips for Success with Your Creamy Savory Appetizer
- Serving Suggestions for This Festive Cheese Spread
- Storing and Reheating the Pumpkin Cheese Ball
- Frequently Asked Questions About the Pumpkin Cheese Ball Recipe
- Nutritional Estimates for This Crowd Pleaser Appetizer
- Share Your Festive Pumpkin Cheese Ball Creation
Why This Easy Pumpkin Cheese Ball Recipe is Your Go-To Fall Appetizer Recipe
Honestly, when the holidays roll around, I want my snacks to work as hard as I do, but look like I barely tried! That’s why this Easy Pumpkin Cheese Ball Recipe is my absolute champion for autumn. It’s a complete no-bake fall treat, which means more time for sipping wine and less time sweating over the stove. The flavor profile—using sharp cheddar and that secret hint of ranch seasoning—is just incredible; it’s a creamy savory appetizer that truly everyone loves. Plus, the visual impact of serving something so perfectly pumpkin shaped makes it feel luxurious.
Make Ahead Cheese Ball: Stress-Free Entertaining
This is the detail that sold me on making this my main Thanksgiving Cheese Dip strategy! As someone who loves hosting but hates last-minute chaos, knowing this can be assembled and chilled days in advance is a lifesaver. You can wrap this beauty tightly and let it firm up for up to two full days in the refrigerator. That’s right, it’s a fantastic make ahead cheese ball! Think about it: all the flavor sets in perfectly, and you aren’t scrambling to put out the snacks right before everyone walks in the door. It’s truly the magic behind effortless entertaining I always aim for here at Unfold Recipes.
Ingredients for the Perfect Pumpkin Cheese Ball
Creating this gorgeous centerpiece means getting the base flavor just right. For a truly smooth texture that holds that perfect pumpkin shape, the temperature of your cheese absolutely matters. I’ve listed everything you need below to create this stunning Cheddar Cheese Ball, but take note: always use cream cheese that is fully softened to room temperature. Trying to mix cold cheese just leads to lumps, and we want creamy elegance, not kitchen frustration!
Ingredient List for the Savory Pumpkin Cheese Ball
For the base mixture, you will need:
- 16 ounces cream cheese, softened
- 3 cups sharp cheddar cheese, finely shredded, divided
- 1/2 cup green onion, finely chopped
- 1 teaspoon ranch seasoning mix (This is the flavor secret!)
- 1/4 teaspoon garlic powder
- 1/4 teaspoon onion powder
- 1/4 teaspoon black pepper
And for the look and coating:
- 1/2 cup chopped pecans or extra shredded cheddar (for coating the outside)
- 1 small bell pepper (this becomes our tiny, perfect pumpkin stem)
- Kitchen twine (don’t worry, we remove all of this before serving!)
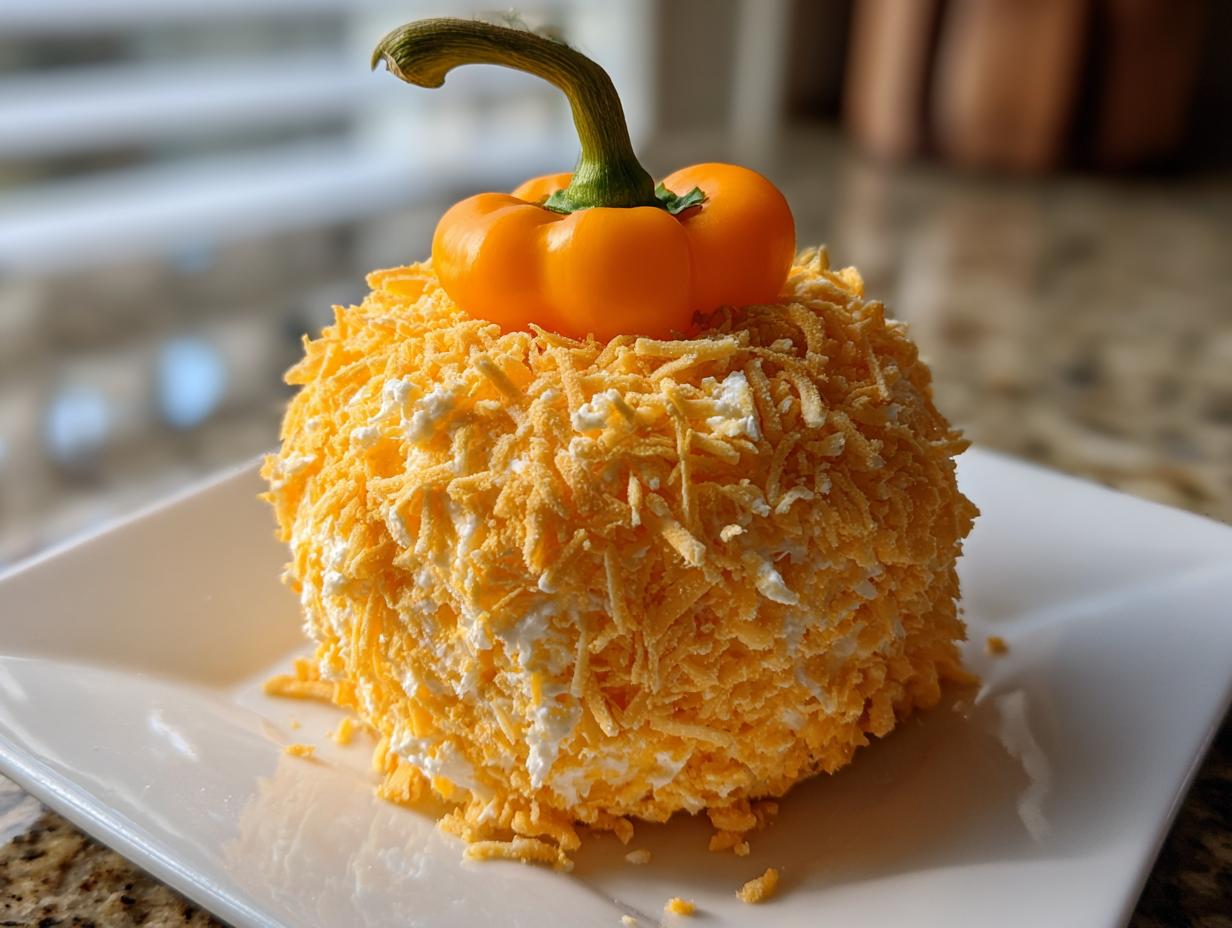
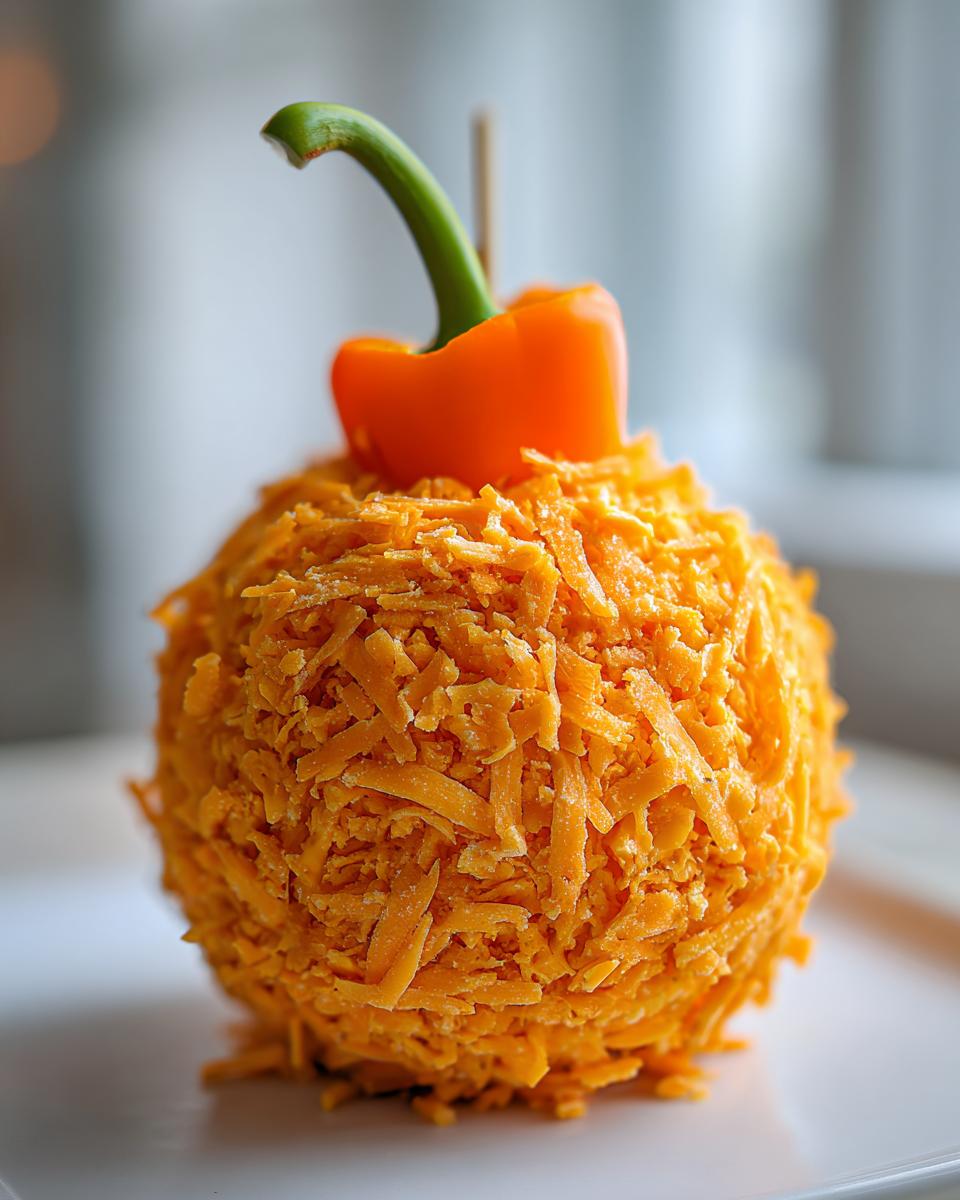
How to Make a Cheese Ball Look Like a Pumpkin
This is the fun part, honestly! Having visited so many parties, I know that people want a fantastic Halloween Party Snack that stops people in their tracks. Making this look like an actual pumpkin is surprisingly easy, and it’s all about using simple household items—specifically twine—to create those classic grooves. Once you nail the shape, you’ve got a stunning centerpiece that screams autumn elegance without having to bake a thing.

Step-by-Step Instructions for the Pumpkin Shaped Food
Once your creamy base is mixed and ready to go (remember, that cream cheese needs to be perfectly blended!), it’s time to bring this pumpkin-shaped food to life. Follow these steps closely, especially when we get to the twine, as that’s where the magic happens.
- First, in a large bowl, thoroughly combine all the filling ingredients: the softened cream cheese, 1 1/2 cups of that glorious sharp cheddar, green onion, ranch mix, garlic powder, onion powder, and pepper. Mix it until it’s utterly uniform and smooth. There should be no streaks of plain cream cheese left!
- Gently shape this entire mixture into a traditional round ball. Don’t overwork it, but make sure it’s firm enough to handle.
- Now, prepare your coating on a shallow plate—use the remaining 1 1/2 cups of shredded cheddar, or perhaps some chopped pecans for a nice crunch. Roll the cheese ball firmly in the coating until every surface is covered. This coating helps define those lines later!
- Here’s the trick for the ribs: Take four long pieces of kitchen twine. Wrap them around the ball both vertically and horizontally. You need to pull these pieces snug—not so tight they break the cheese, but tight enough that they start making nice indentations. Think of how you’d wrap a gift, but evenly spaced all the way around.
- Wrap that created pumpkin shape tightly in plastic wrap. It must rest in the refrigerator for at least two hours. This chilling time is non-negotiable; it lets the fats solidify so your shape stays put. You can keep it like this for up to two days.
- When you are ready to serve, carefully unwrap the plastic and gently snip and remove all the twine. You should see those beautiful, deep pumpkin lines!
- For the stem, you’ll need your little piece of bell pepper. Just slice off a small, sturdy piece from the top end of the pepper and push it right into the center top of the cheese ball. Instant, edible stem!

- Place it on a beautiful platter surrounded by crackers and enjoy watching your guests admire this fantastic Festive Cheese Spread before they devour it. Isn’t that impressive for such little effort?
Tips for Success with Your Creamy Savory Appetizer
I’ve made this Cheddar Ranch Cheese Ball more times than I can count over the years, which means I’ve also learned exactly what *not* to do! When you are working with a base this rich, a few simple rules will ensure you get that perfect, spreadable yet firm texture for shaping.
First, let’s talk temperature again, because it’s crucial for achieving that truly smooth texture we want in a Creamy Savory Appetizer. If your cream cheese is too cold when you mix it, you end up wrestling with hard lumps trying to incorporate with the soft cheddar. The trick is letting the cream cheese sit out for at least an hour. You want it spreadable, but not sloppy or greasy. If you accidentally leave it out too long, or your kitchen runs hot, you can salvage it quickly!
I learned this the hard way last year when a rogue oven blast warmed up my kitchen just as I was about to shape the ball. It looked destined for the serving bowl as a dip rather than a sculpture! My fix? I threw the entire cheesy mass into the freezer for about twenty minutes, just until the surface was firm enough to handle again, then I immediately wrapped it and refrigerated it for the two hours required for setting.
When it comes to coating, think about maximizing surface area. If you are using pecans, make sure they are finely chopped; large chunks make it harder for the twine to create those deep, even pumpkin ribs. If you’re coating in extra cheddar, make sure the cheese you roll it in is freshly shredded right off the block. Pre-shredded cheese often has anti-caking agents that don’t adhere as nicely, and we want every inch of this appetizer looking gorgeous for your fall potluck!
Serving Suggestions for This Festive Cheese Spread
When you present this gorgeous creation, you want the perfect supporting cast for dipping! While plain crackers are always fine, this rich, savory pumpkin cheese ball frankly deserves better accompaniments. It’s all part of creating that tailored hosting experience I just adore sharing with you all.
Since this appetizer features such a bold, creamy profile—thanks largely to that cheddar and ranch combination—you need something with true texture to cut through the richness. Forget flimsy potato chips; they’ll just crumble under the weight of this dip.
I always place small bowls of these alongside the main platter. You absolutely must try:
- Pretzel Crisps: These offer that necessary snap and a touch of salt that complements the savory cheese perfectly. They hold up beautifully without snapping every time someone scoops a big dollop.
- Sturdy Vegetable Sticks: A mix of crisp celery sticks, thick-cut carrots, and perhaps some vibrant bell pepper strips (used for dipping, not the stem!) brings freshness and crunch. This is also a great way to offer lighter options for guests watching their carb intake.
- Rye or Pumpernickel Bread: If you are leaning into the heartier, earthy flavors of autumn, thin slices of dark rye or pumpernickel bread are phenomenal with this spread. They contrast so nicely with the creamy texture, giving you a sophisticated, almost gourmet experience.
And speaking of elevating the whole event, you know I can’t talk about hosting without mentioning what goes in your guest’s glass! Because this cheese ball is so savory and rich, it calls for a wine that can handle that fat content without getting lost. I often pair something slightly crisp but still fruit-forward. You might look for a slightly oaked Chardonnay, or even a dry Rosé if the weather is still warm. If you are hosting closer to Thanksgiving, check out my recipe for Mulled Wine; the spices in that drink echo beautifully against the cheese ball base!
No matter what you pair it with, a beautifully presented platter of crackers and veggies makes this already impressive snack feel complete.
Storing and Reheating the Pumpkin Cheese Ball
One of the best things about making this appetizer is that it truly thrives on patience! Because we have to chill it so thoroughly to get those perfect pumpkin lines from the twine, it’s naturally a perfect **make ahead cheese ball**. How you store it directly impacts how well it looks when it’s time to parade it out for the guests.
Once you’ve shaped the ball, coated it in your pecans or cheddar, and wrapped it snugly with the twine to create those ribs—wrap the entire thing again in plastic wrap. I always use two layers of plastic and then maybe even tuck it into a zip-top bag if I plan on leaving it for more than 24 hours. This dual wrapping technique prevents it from absorbing any weird smells from your fridge, which can happen easily with high-fat contents.
The sweet spot for flavor development and structure maintenance is chilling for at least two hours, but honestly, testing it out, I’ve found it tastes even richer and is much firmer after 24 hours. You can safely keep this fantastic **fall appetizer recipe** tucked away for up to two full days. Don’t try to keep it longer than that; the cream cheese starts to weep a little, and you risk losing that pristine shape.
Now, here’s a tiny detail for serving time: When you pull it out of the fridge to serve, don’t slice off the twine and immediately toss it on the platter if it’s rock hard. If it’s straight from a cold fridge, it might seem a bit too firm to scoop with a cracker. I always let my **festive cheese spread** sit out on the counter for about 15 to 20 minutes before I remove the twine and add the bell pepper stem. This short tempering period softens it just enough to make scooping a pleasure, ensuring it’s perfectly scoopable without compromising its shape or the wonderful texture of this **simple party dip**.
And no, you absolutely should not try to reheat this! This is a no-bake situation through and through. If it starts to look less than perfect, just use a damp paper towel to gently smooth out any wrinkles after the twine comes off, but heat is definitely not our friend here.
Frequently Asked Questions About the Pumpkin Cheese Ball Recipe
I always find people have such wonderful ideas and questions once they start thinking about customizing these recipes! Before you dive into making your own spread, let me tackle a few common thoughts I see popping up about this delicious **Savory Pumpkin Appetizer**.
Can I substitute the cream cheese in this pumpkin cheese ball?
That’s a great question if you’re dealing with dietary needs or just ran out! The cream cheese is the backbone for this whole sculpture, dear reader. It’s what allows us to manipulate the mixture into that perfect **pumpkin shaped food** and keep it firm when chilled. You can certainly try substituting about half of the cream cheese with Neufchâtel cheese—it’s almost identical but slightly lighter. If you use the lighter cheese entirely, you might find you need to chill it longer and coat it immediately, as the mixture will be a bit softer. I always stick to full-fat cream cheese because it gives the structure I rely on for stress-free hosting.
What coating works best for a Halloween Party Snack pumpkin cheese ball?
While I chose shredded cheddar in the main recipe for that beautiful, seamless look, you absolutely have room to play here for maximizing your visual impact on your **Halloween Party Snack** platter! If you want something dramatically autumnal, skip the cheese coating and roll the chilled ball lightly in sweet, smoky paprika. It gives the cheese ball this wonderful, deep orange hue, making it look unbelievably realistic! Another fantastic option to add texture and flavor is finely chopped toasted pecans—the crunch against the creamy interior is heavenly.

For a slightly funkier take, some people love using crushed, seasoned tortilla chips! Whatever you choose, make sure you do the coating *before* you wrap it with the twine, otherwise, the twine will stick to the plastic wrap instead of making those pretty lines in the cheese!
If you are looking for more creamy inspiration after you finish this, you must check out my recipe for French Onion Dip next—it’s superb with those sturdy crackers!
Nutritional Estimates for This Crowd Pleaser Appetizer
As much as I adore talking about flavor, presentation, and stress-free hosting, I know many of you are also mindful of the nutritional facts of the beautiful dishes you serve. Transparency is key here on Unfold Recipes, which is why I’ve listed the estimates for this crowd pleasing appetizer below.
Please remember these are just helpful guidelines! The exact numbers will shift slightly depending on the specific brands of cream cheese or cheddar you purchase, or if you opt for pecans versus extra cheese for the coating. This information is based on the recipe yielding 12 generous servings, as detailed in the recipe card. Since this is a rich, savory dish, moderation is best enjoyed with a crisp vegetable pairing!
| Nutrient | Amount Per Serving (Estimate) |
|---|---|
| Serving Size | 1/12 of ball |
| Calories | 180 |
| Fat | 16g |
| Saturated Fat | 10g |
| Trans Fat | 0.5g |
| Cholesterol | 50mg |
| Sodium | 350mg |
| Carbohydrates | 3g |
| Fiber | 0g |
| Sugar | 2g |
| Protein | 8g |
This is a wonderfully satisfying snack for your holiday table! Pair it with some beautiful celery sticks or whole-grain crackers, and you’ve got a balanced start to any festive gathering. Enjoy every bite!
Share Your Festive Pumpkin Cheese Ball Creation
And there you have it! From a simple block of cream cheese to a stunning centerpiece that everyone simply raves about—that’s the magic of making something approachable look elegant. I truly hope this pumpkin cheese ball becomes a staple at your autumn celebrations, whether it’s a casual Halloween get-together or the main event on your Thanksgiving table.
Your journey in the kitchen inspires me every day. Once you’ve tried this recipe—maybe you decided to use paprika instead of cheddar for the coating, or perhaps you found the most perfect little stem for the top—please come back here and let me know how it went! Leaving a star rating helps other home cooks gain the confidence to try this impressive dish. Don’t keep all that festive fun to yourself!
I absolutely love seeing your creations pop up on social media; tag me so I can share in your success! And if you’re looking for more foolproof, elegant inspiration for your next gathering, feel free to browse the rest of my recipes right here on the Unfold Recipes blog. For more ideas on festive appetizers, I highly recommend checking out the resources over at Savory Orchard, too; their take on a festive appetizer is always lovely (Easy Pumpkin Cheese Ball Recipe).
Thank you for letting me share my kitchen secrets with you. Now go forth and enjoy the season!
PrintClassic Creamy Pumpkin Cheese Ball Recipe (Make-Ahead, Perfectly Shaped)

Create an impressive, festive appetizer for your fall gatherings with this easy, make-ahead Pumpkin Cheese Ball. It uses sharp cheddar and ranch seasoning for a creamy, savory flavor everyone enjoys.
- Prep Time: 20 min
- Cook Time: 0 min
- Total Time: 2 hr 20 min
- Yield: 12 servings 1x
- Category: Appetizer
- Method: No Bake
- Cuisine: American
- Diet: Vegetarian
Ingredients
- 16 ounces cream cheese, softened
- 3 cups sharp cheddar cheese, finely shredded, divided
- 1/2 cup green onion, finely chopped
- 1 teaspoon ranch seasoning mix
- 1/4 teaspoon garlic powder
- 1/4 teaspoon onion powder
- 1/4 teaspoon black pepper
- 1/2 cup chopped pecans or extra shredded cheddar (for coating)
- 1 small bell pepper (for the stem)
- Kitchen twine (for shaping)
Instructions
- In a large bowl, combine the softened cream cheese, 1 1/2 cups of the shredded cheddar cheese, green onion, ranch seasoning, garlic powder, onion powder, and black pepper. Mix until completely smooth and well combined.
- Shape the cheese mixture into a round ball.
- Place the remaining 1 1/2 cups of shredded cheddar cheese and your chosen coating (pecans or extra cheese) on a shallow plate. Roll the cheese ball in the coating until it is completely covered.
- Wrap the cheese ball tightly in plastic wrap. Use four long pieces of kitchen twine to wrap around the ball vertically and horizontally, pulling them snug to create indentations that mimic pumpkin ribs.
- Refrigerate the cheese ball for at least 2 hours, or up to 2 days, to allow it to firm up and hold its shape.
- Before serving, carefully remove the plastic wrap and the kitchen twine.
- Cut a small piece from the top of the bell pepper to create a small, sturdy stem piece. Insert the bell pepper piece into the top center of the cheese ball.
- Serve immediately with crackers, pretzels, or fresh vegetables.
Notes
- For a make-ahead option, complete steps 1 through 4, then refrigerate. Remove the twine just before serving.
- If you prefer a less savory flavor, omit the ranch seasoning and increase the cheddar cheese slightly.
- Serve this crowd-pleasing appetizer with whole-grain crackers or vegetable sticks for a balanced bite.
Nutrition
- Serving Size: 1/12 of ball
- Calories: 180
- Sugar: 2
- Sodium: 350
- Fat: 16
- Saturated Fat: 10
- Unsaturated Fat: 6
- Trans Fat: 0.5
- Carbohydrates: 3
- Fiber: 0
- Protein: 8
- Cholesterol: 50