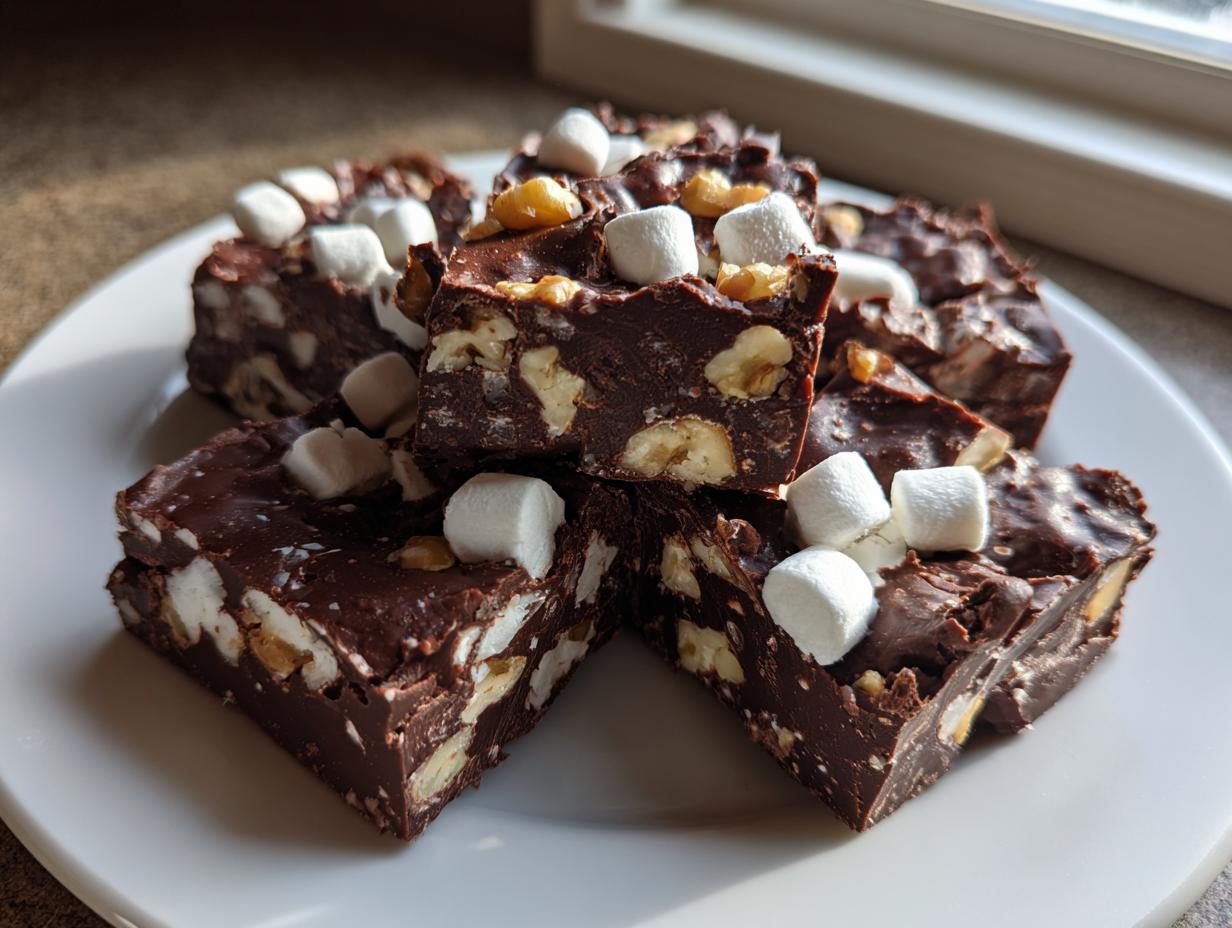

Oh, my dears, when the craving for something deeply decadent hits—that rich, dark chocolate hug—I have the ultimate answer that doesn’t require turning on the oven. Forget complicated candy thermometers and hours of stirring! This, right here, is the absolute easiest, no-bake rocky road fudge recipe you will ever make. In my world, where hosting means juggling a thousand things at once, having an impressive, velvety fudge ready to go is a lifesaver, especially for last-minute gifting. This recipe uses just five ingredients to deliver that perfect chewiness from the marshmallows and crunch from the nuts. It’s pure textural joy tucked into a simple square. Trust me, once you see how fast this comes together, it will live permanently in your recipe rotation. If you love simple indulgence, exploring all our wonderful dessert magic just might spark something!
- Why This Easy No-Bake rocky road fudge is Your New Favorite Treat
- Gathering Ingredients for Velvety rocky road fudge
- Step-by-Step Instructions for Perfect rocky road fudge
- Tips for Success with No Bake Desserts rocky road fudge
- Making your rocky road fudge the ultimate Holiday Fudge
- Storage and Serving Suggestions for your Decadent Chocolate Squares
- Frequently Asked Questions about Simple Microwave Fudge
- Estimated Nutritional Snapshot of this Marshmallow Nut Fudge
- Share Your Rocky Road Fudge Creations
Why This Easy No-Bake rocky road fudge is Your New Favorite Treat
When I say easy, I truly mean it. This is the kind of recipe that makes you feel like a baking goddess without any of the fuss. Forget scrubbing pots and pans; we keep the mess localized! This simple recipe is incredibly reliable, which is why it succeeds every time, even when you’re short on time.

- It’s lightning fast—ready to melt in about five minutes.
- Zero oven time makes it perfect for hot days or last-minute needs.
- It’s a foolproof way to create a stunning **Quick Chocolate Candy** for celebrations.
- The texture is consistently rich and wonderfully decadent.
If you adore simple, stress-free sweets, you absolutely need to check out our collection of other no-bake ideas too!
Gathering Ingredients for Velvety rocky road fudge
With only five main players, gathering ingredients for this treat is a breeze! We rely on the quality of these simple items to create that unbelievable texture. Don’t skimp on the chocolate; it really is the star here. You’ll need a can of sweetened condensed milk, chocolate chips, vanilla, those essential marshmallows, and your favorite crunchy nut.
Since this is a no-bake recipe, these components do all the heavy lifting to create the ultimate **Easy Fudge Recipe**.
Ingredient Notes and Simple Substitutions
Because we aren’t relying on butter and sugar cooking, the quality of the chocolate you choose really shows through. I highly recommend good quality semi-sweet chips, though you can use chopped baking bars if you prefer an even richer depth of chocolate flavor. Just ensure whatever you choose melts smoothly!
Under no circumstances should you substitute the sweetened condensed milk for evaporated milk—that’s a recipe for soup, not fudge! The high sugar content in the condensed milk is necessary for the fudge to set up properly in the fridge, guaranteeing that firm, velvety texture we want.
For nuts, pecans and walnuts are classic, but if someone in your family has an allergy, good old roasted almonds or even salted peanuts can make a fantastic base for your sweet and salty flavor explosion.
Step-by-Step Instructions for Perfect rocky road fudge
This is where the magic happens, and honestly, it is almost too easy to feel right! First, get your 8×8 pan lined with parchment paper. That overhang is your best friend later for lifting this glorious slab out later, so don’t skip it. We need to melt our chocolate and condensed milk together until they are silky smooth.
Once melted, we stir in the vanilla extract quickly before we fold in the big, wonderful surprises. Try not to overmix at this stage; we want everything happily suspended in that rich chocolate without breaking down the marshmallows too much. Pour it right into your prepared pan and spread it evenly. Seriously, don’t wait around—get it spread before it starts to set up! If you love impressive baked goods too, you should absolutely explore our chocolate cupcake recipes while you wait for this fudge to chill.
Melting the Chocolate Base: Microwave vs. Stovetop
If you use the microwave, remember low and slow is the way to go. Use 30-second bursts, stirring thoroughly between each one. If you see even a little bit left that isn’t melted, give it another zap. Stop heating just before it seems completely liquid; the residual heat will finish the job. Never overheat, or you will end up with thick, seized chocolate!
Folding in the Mix-Ins for classic rocky road fudge
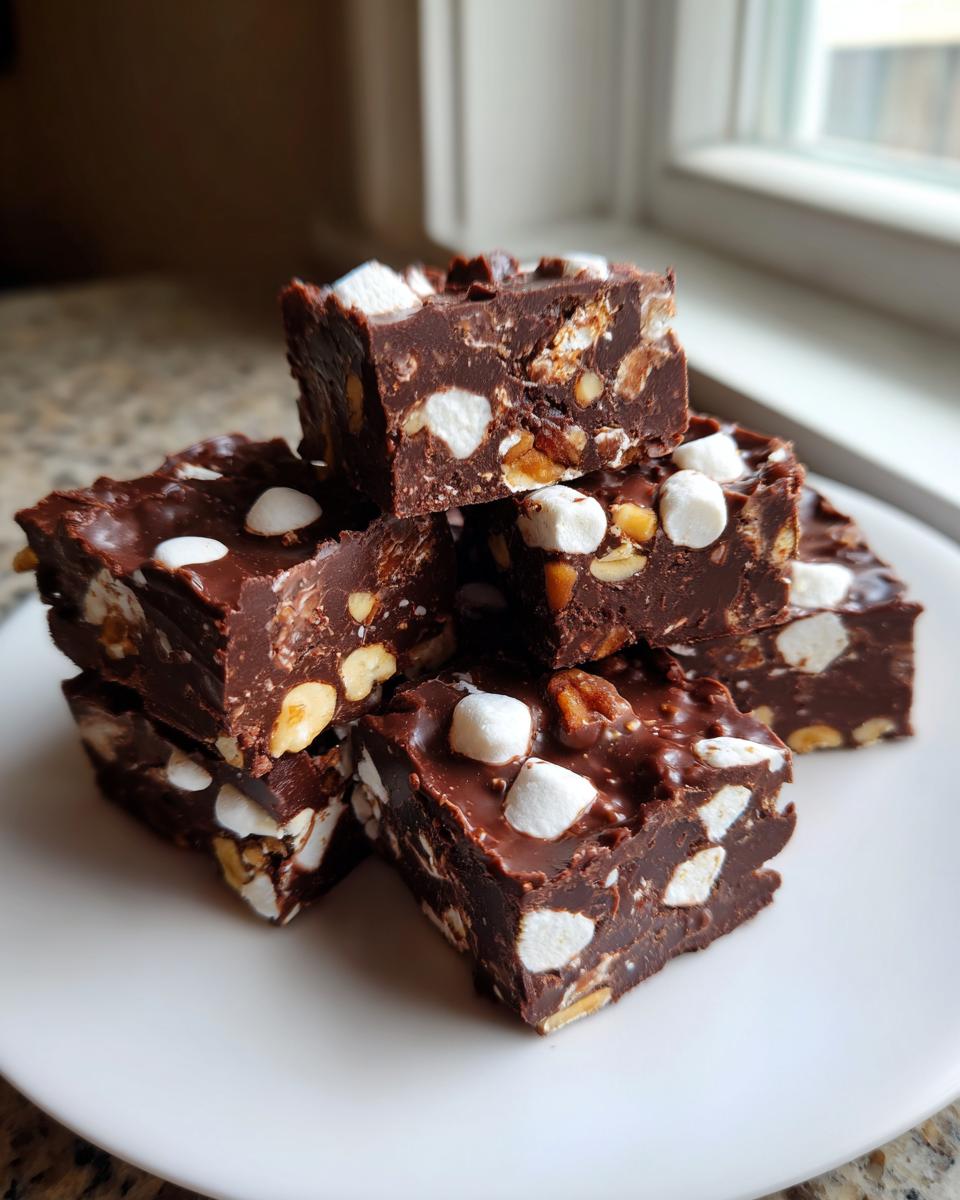
This is the fun part! Gently fold in your marshmallows and your chopped nuts. I mean gentle—we are incorporating, not whipping. You should see bright white spots and nutty pieces peeking through the chocolate mix. When the ingredients look evenly scattered—it’s ready to go into the pan. Stop stirring the second everything looks distributed!

Tips for Success with No Bake Desserts rocky road fudge
Getting this rocky road fudge absolutely perfect really just comes down to timing and presentation at this final stage. I have a trick I picked up from watching my aunt make her famous chocolate bark: always reserve just a handful of your chocolate chips before melting everything else. Melt those extras separately—a quick 20 seconds in the microwave does the trick—and drizzle them artfully over the top before the fudge goes into the fridge.
This little drizzle hardens into a beautiful, glossy topcoat! Next is patience! While you *can* cut this after an hour, I truly advise waiting the full two hours, or even longer. Chilling completely ensures that when you use the parchment overhang to lift it out, every slice is clean and those marshmallows don’t squish out the sides. If you’re planning on gifting this glorious homemade treat, chilling overnight always results in the sharpest edges.
Making your rocky road fudge the ultimate Holiday Fudge
When it comes to gifting, nothing beats something made by hand, and honestly, this rocky road fudge screams holiday spirit! Because it sets up so perfectly, it’s one of my go-to recipes when I need beautiful, ready-to-go **Homemade Christmas Treats**. They look so impressive, yet they take hardly any effort, which is the balance I always try to strike.
To make these truly festive, try cutting the cooled squares into smaller, bite-sized pieces. You can line small cupcake tins with festive paper liners before pouring the warm fudge in—this makes them look instantly professional for cookie exchanges. They travel beautifully this way! If you’re looking for more gorgeous ideas for neighbors and friends, you must see my tips on making fuss-free holiday sweets.
Plus, since this recipe is so popular online, you can find endless inspiration, like the wonderful version over at Shugary Sweets, for presentation ideas when wrapping them up as lovely **Chocolate Candy Gifts**!
Storage and Serving Suggestions for your Decadent Chocolate Squares
Once your chocolate squares are perfectly firm, handling storage is simple, which is another beautiful aspect of these **No Bake Desserts**! I usually keep mine in a single layer inside a truly airtight container. Remember, since this fudge sets beautifully without baking, simple refrigeration is your friend.
While they hold up well at room temperature for a day, I always recommend keeping them chilled, especially if your kitchen runs warm, to maintain that perfect, dense texture. Before you slice them, though, pull the pan out and let the fudge sit on the counter for about 15 minutes. This slight tempering ensures the cleanest cuts possible for your **Decadent Chocolate Squares**. Trying slicing them right out of the deep chill, and you might rush the process! If you’re looking for other easy bar recipes that cut beautifully, check out my favorite chocolate chip cookie brownie bars!

Frequently Asked Questions about Simple Microwave Fudge
It’s completely natural to have a few questions pop up when we dive into **Simple Microwave Fudge**! Even though this is one of my most fuss-free recipes, I want to make sure your **rocky road fudge** turns out absolutely picture-perfect, whether you are making it for a party or just a Tuesday night treat.
Can I make this rocky road fudge without nuts?
Absolutely, you can! My father is not a huge fan of walnuts, so we often make a nut-free batch just for him. If you skip the nuts, you instantly have a wonderful **Quick Chocolate Candy** that’s safer for more people. To keep the texture interesting—because we definitely don’t want flat chocolate!—I recommend keeping or even slightly increasing the amount of marshmallows. For a different kind of texture, try stirring in chopped dried cherries or even some crushed pretzels right at the end. That adds a lovely salty crunch!
How long does this no bake dessert need to set?
This is where patience pays off! If you are desperate for a taste—and who wouldn’t be?—you can cut this **no bake dessert** after about 90 minutes in the refrigerator. However, I truly recommend letting it chill for a minimum of 2 hours. Why? Because the fudge will be much firmer, allowing you to get those beautiful, clean squares you see in the photos, rather than a gooey mess. For the best results and perfect **decadent chocolate squares**, leave it in the fridge overnight if you can!
What is the best chocolate to use for this recipe?
This is such an important question because it dictates how velvety your result will be! I stick with standard semi-sweet chocolate chips, because they are designed to hold their shape somewhat, making the microwaving process safer against scorching. However, if you want that extra rich, smooth melt, you can certainly use chopped chocolate bars—like Ghirardelli or Ghirardelli melting wafers—instead of chips. Just be extra diligent stirring when using bars, as they can sometimes melt too quickly and get grainy. For the best flavor in your **Marshmallow Nut Fudge**, just ensure you use good quality chocolate, whatever form it takes!
If you are ever curious about other fantastic, quick sweets, I have a great recipe for apple dump cake that needs almost no fuss, too!
For another great take on making this treat, take a peek at the brilliant recipe found over at Simple Joy. They have some wonderful tips concentrated around the baking process.
Estimated Nutritional Snapshot of this Marshmallow Nut Fudge
Now, I always say that when we are making rich, decadent treats like this **Marshmallow Nut Fudge**, tracking every single calorie isn’t the main goal—enjoyment is! However, because transparency is so important here at Unfold Recipes, I want to give you a general idea of what one delicious square provides.
Please keep in mind that because this is a simple combination of standard ingredients, these numbers are an estimate based on the outlined recipe and should be treated as a guideline only. They can change based on the exact brand of chocolate chips or the specific type of nuts you choose to use in your **rocky road fudge**!
If you are looking for more wonderful ideas for comforting desserts that feel warm and satisfying, you might enjoy my recipe for pumpkin bread pudding!
- Serving Size: 1 square
- Calories: 185
- Sugar: 22g
- Total Fat: 10g
- Protein: 3g
- Carbohydrates: 23g
We see a bit of sugar here, which is to be expected in any wonderful candy, but look at that minimal sodium! It’s truly a **quick chocolate candy** that satisfies that deep craving without too much fuss elsewhere.
Share Your Rocky Road Fudge Creations
I truly hope this **rocky road fudge** recipe has made its way from my kitchen to yours! Honestly, sharing these simple, elegant sweets is the best part of what I do here at Unfold Recipes. Once you’ve had a chance to make these **decadent chocolate squares** and tasted that perfect mix of gooey marshmallow and crunchy nut, I would be absolutely thrilled if you came back and left a rating.
Your feedback tells me that the recipe is reliable, and more importantly, it lets me know which mix-ins you all love the most! Are you team pecans, or did you try almonds? Did you drizzle extra chocolate on top for that glossy finish? Please let me know in the comments below!
If you managed to snap a beautiful photo of your final tray of **Holiday Fudge**—especially if you’ve boxed them up for gifts—please tag me on social media! Seeing your creations is the greatest reward. For more inspiration on beautiful, approachable cooking, wander over to my general blog page. And if you’re looking for other amazing takes on this classic, I always love seeing what others create, like the beautiful version shared by the team over at Recipes With Us. Now go enjoy that chocolate!
PrintEasy No-Bake Rocky Road Fudge

Create rich, velvety Rocky Road Fudge quickly. This simple, no-bake recipe combines chocolate, marshmallows, and nuts for a decadent treat perfect for holiday gifting or satisfying a sweet craving.
- Prep Time: 10 min
- Cook Time: 5 min
- Total Time: 2 hours 15 min
- Yield: About 36 squares 1x
- Category: Dessert
- Method: No-Bake
- Cuisine: American
- Diet: Vegetarian
Ingredients
- 1 (14 ounce) can sweetened condensed milk
- 2 cups semi-sweet chocolate chips
- 1 teaspoon vanilla extract
- 1 cup miniature marshmallows
- 1 cup chopped walnuts or pecans
Instructions
- Line an 8×8 inch baking pan with parchment paper, leaving an overhang on the sides for easy removal. Lightly grease the paper.
- In a microwave-safe bowl, combine the sweetened condensed milk and chocolate chips. Microwave in 30-second intervals, stirring well after each interval, until the chocolate is completely melted and smooth. This usually takes 1 to 2 minutes total. Alternatively, melt the mixture in a saucepan over low heat, stirring constantly.
- Remove the chocolate mixture from the heat. Stir in the vanilla extract.
- Gently fold in the miniature marshmallows and the chopped nuts until they are evenly distributed throughout the fudge base.
- Pour the mixture into the prepared baking pan. Spread it evenly using an offset spatula.
- Refrigerate the fudge for at least 2 hours, or until firm enough to cut.
- Use the parchment overhang to lift the fudge from the pan. Cut the fudge into 1-inch squares.
Notes
- For a glossy finish, reserve a small amount of chocolate chips and melt them separately to drizzle over the top before chilling.
- If you prefer a different nut, almonds or peanuts work well in this recipe.
- This fudge sets best in the refrigerator. Allow it to sit at room temperature for about 15 minutes before slicing for the best texture.
Nutrition
- Serving Size: 1 square
- Calories: 185
- Sugar: 22
- Sodium: 35
- Fat: 10
- Saturated Fat: 5
- Unsaturated Fat: 5
- Trans Fat: 0
- Carbohydrates: 23
- Fiber: 1
- Protein: 3
- Cholesterol: 15