

There is truly nothing that compares to the smell of yeast dough rising, followed by warm cinnamon swirling through your kitchen. It’s pure comfort, isn’t it? I know how frustrating it is when you set out to bake special breakfast treats only to end up with dry, dense rolls. Fear not! With this recipe for homemade cinnamon buns, I promise you’ll achieve the ultra-soft, fluffy, and wonderfully gooey texture you’re dreaming of, and we’ll get them from scratch to the table in under two hours!
I’m Catherine Valdès, and after years dedicated to both telling stories professionally and mastering techniques in culinary school, my greatest joy now is creating reliable recipes just like this one for you. I’ve spent countless hours testing dough hydration levels and filling ratios so you don’t have to. This method ensures you get bakery style cinnamon rolls that truly melt in your mouth every single time. Are you ready to start creating new memories around the breakfast table? You can find more of my favorite brunch necessities right here.
- Why These Are the BEST Homemade Cinnamon Rolls Recipe
- Gathering Ingredients for Your Fluffy Cinnamon Bread
- Step-by-Step Instructions for Quick Cinnamon Rolls
- Tips for Bakery Style Cinnamon Rolls Success
- Variations on Classic Cinnamon Buns
- Storage and Reheating Instructions for Soft Homemade Rolls
- Frequently Asked Questions About Yeasted Sweet Rolls
- Serving Suggestions for Sweet Breakfast Treats
- Nutritional Estimates for These Cinnamon Buns
- Share Your Experience Making These Melt In Your Mouth Desserts
Why These Are the BEST Homemade Cinnamon Rolls Recipe
I call this the absolute best cinnamon rolls recipe because it nails the trifecta: incredibly soft homemade rolls, maximum gooeyness, and it’s so much faster than traditional recipes! I finally perfected this dough after struggling for months to get that pillow-soft texture people crave. The breakthrough? Committing to the full kneading time, even when the dough felt sticky at first. If you want deep dives into technique, check out my guide on how to make cinnamon rolls soft.

We use a single rise method here, which is fantastic for a weekend morning when you want those sweet breakfast treats without waiting half the day. It seriously cuts down on your total time, making these a rare find for such a rich, yeasted sweet rolls recipe.
Achieving Ultra-Soft Cinnamon Buns Texture
The softness hinges on two things: the milk and the mixer. You must warm your milk to that perfect temperature—around 110°F. Too cold and the yeast sleeps; too hot and you kill it! Once the milk is activated, don’t rush the kneading. We are developing gluten here. I let the stand mixer run for a solid seven or eight minutes until the dough pulls away completely from the sides and feels like velvet. That stretchiness is what traps the gases and gives you that beautiful rise.
The Secret to Gooey Cinnamon Buns Filling
The filling is where the magic happens for that melt-in-your-mouth experience. Forget hard butter! You need your filling butter to be perfectly softened—almost spreadable—so it mixes seamlessly with the brown sugar and cinnamon. When you roll this mixture up tightly, that soft butter mixture melts down into the layers during baking. This creates those luscious rivers of cinnamon caramel that ooze out when you pull them apart. It’s the essential step for truly gooey cinnamon buns.
Gathering Ingredients for Your Fluffy Cinnamon Bread
For baking that turns out perfectly—the kind that really lives up to the promises of being soft and delightful—you simply cannot substitute ingredients haphazardly. I’ve listed everything out here, grouped by component, just as I do right before I start mixing up my dough. Good preparation makes these yeasted sweet rolls feel so easy! If you already have fabulous biscuits on your mind, you can check out my recipe for fluffy biscuits and gravy while you gather these supplies.
Ingredients for the Yeasted Sweet Rolls Dough
This is the foundation for your famously soft texture. Accuracy here matters enormously!
- 1 cup whole milk, warm (about 110°F—this is crucial for the yeast!)
- 2 ¼ teaspoons active dry yeast (that’s one standard packet, easy!)
- ½ cup granulated sugar, plus 1 teaspoon reserved for activating the yeast
- 2 large eggs, make sure they are at room temperature
- ½ cup unsalted butter, you need this melted and then cooled slightly
- 4 cups all-purpose flour, plus more if you need to dust your surface
- 1 teaspoon salt
Ingredients for the Gooey Cinnamon Filling
This mixture is what gives you those incredible bursts of flavor in every bite.
- ¾ cup unsalted butter, must be softened to spread easily
- 1 cup packed light brown sugar (don’t skimp on packing it in!)
- 2 tablespoons ground cinnamon
Ingredients for Cream Cheese Icing Recipe
You want this thick, rich, and tangy to cut through the sweetness of the rolls. Remember, the fats must be softened!
- 8 ounces cream cheese, thoroughly softened
- ½ cup unsalted butter, also softened—it needs to blend beautifully
- 3 cups powdered sugar, please sift this for a smooth icing
- 1 teaspoon vanilla extract
- 2 tablespoons milk or heavy cream
Step-by-Step Instructions for Quick Cinnamon Rolls
Now that we have our beautiful ingredients ready, let’s dive into the process. Because we are using active dry yeast and skipping a long cold proof, these quick cinnamon rolls come together faster than you might think! If you are looking for other fast bread options, my guide on easy yeast rolls is a great place to start. Pay close attention to the timing here; it’s what guarantees that soft, pillowy outcome.
Making and Kneading the Dough (The Foundation)
First things first: wake up that yeast! In your mixer bowl, whisk the warm milk, the pinch of sugar, and the yeast together. Let it bubble away for about 5 to 10 minutes until it’s frothy—that means it’s happy and ready to work its magic. Once you see those lovely foam bubbles, add everything else: the rest of the sugar, the room-temperature eggs, melted butter, flour, and salt. Use the dough hook attachment and mix slowly until it just comes together. Then, increase the speed just a bit and knead for a full 6 to 8 minutes. Believe me, that full kneading time is essential for developing the structure that makes these rolls so lofty!
Single Rise and Filling Preparation
After kneading, lightly oil a clean bowl, turn the dough in it to coat, cover it up, and leave it somewhere warm to rise for 45 to 60 minutes. That’s right, just one rise needed—that’s the beauty of this recipe for sweet breakfast treats! While the dough is puffing up, take the time to mix your softened filling butter with the brown sugar and cinnamon until it’s completely uniform. Having this filling ready to go means as soon as the dough is proofed, we move straight into rolling and shaping.
Rolling, Shaping, and Second Rest
Gently punch down that beautiful, risen dough and turn it out onto a floured surface. You want to roll it into a neat rectangle measuring about 12 by 18 inches. Be even with your rolling! Now, spread that gorgeous, buttery cinnamon filling right across the surface, but leave a small half-inch border on only one of the long sides—this border helps seal the deal! Start rolling very tightly from the opposite long edge to create a snug log. Pinch that seam closed firmly. Use some helpful tools, like unflavored dental floss or a very sharp knife, to cut the log into 12 equal pieces. Arrange your cut rolls snugly in your greased baking dish. Cover them lightly and just let them sit there for another short rest—about 20 to 30 minutes—while you get your oven heated up to 375°F (190°C).
Baking and Crafting the Cream Cheese Icing Recipe
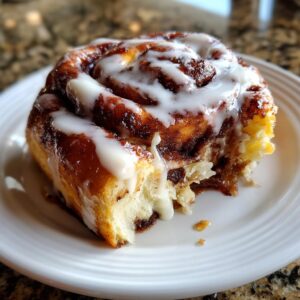
Pop those rolls into the preheated oven and let them bake for 20 to 25 minutes, watching until the tops look beautifully golden brown. While they are baking, you should absolutely be whipping up the topping! For that perfect cream cheese icing recipe, beat your softened cream cheese and butter until they look like whipped clouds. Then stream in the sifted powdered sugar, followed by the vanilla and milk, until it’s perfectly pourable but still thick. The absolute key to that gooey texture that everyone raves about? Pull the rolls out of the oven and dump that icing right on top while they are still piping hot! You can see how I make other comforting gooey caramel cinnamon treats here if you get inspired!

Tips for Bakery Style Cinnamon Rolls Success
Achieving those legendary bakery style cinnamon rolls at home is all about respect for the process, especially when you are aiming for that incredibly soft texture everyone adores. I know getting perfectly soft homemade rolls sometimes feels like guesswork, but I promise you it’s not!
If your filling seems grainy or dry, you rushed softening your butter—it needs to be pliable enough to smear everywhere, not chunky. Secondly, for true melt-in-your-mouth results, resist the temptation to overbake! Pull them out right when the edges are golden; the residual heat will carry them through to perfect doneness. If you ever worry about dry bakes, take a peek at my tips for moist banana bread, as the science of keeping things tender is similar here: keeping moistness locked in is always the goal!
Variations on Classic Cinnamon Buns
While I adore this classic version—it is truly the foundation for the best breakfast brunch recipes—sometimes you just want to get creative! Baking is about expression, and these cinnamon buns are a wonderful canvas for flavor exploration. Once you master the base dough, which, as you know, is already pretty fast thanks to that single rise, customization is simple and fun. It’s all about building flavor upon that soft, fluffy base we created.
If you’re feeling adventurous, you might want to try recreating some of those famous flavors you see in bakeries across the country. You can peek at an amazing inspiration for one of these twists, the banana bread version, over on my friend Aria’s site here: Banana Bread Cinnamon Buns.
Making Copycat Cinnabon Recipe Style Rolls
So, you want that unmistakable flavor profile of the famous mall rolls? It comes down to two things: spice saturation and icing density. For the filling, try bumping up the cinnamon just a touch—maybe 2 ½ tablespoons instead of two—and increase the brown sugar slightly too, making sure that butter is beautifully incorporated. For the cream cheese icing, you need to go heavier on the fat content. We use a 1:2 ratio of cream cheese to butter in this recipe, but for that truly thick, almost pound-cake-layer icing, I suggest moving closer to a 1:1 ratio. Also, make sure you add a tiny splash of lemon juice to the icing; that subtle tang really mimics the richness we associate with that perfect copycat cinnabon recipe!
Adding Nuts or Fruit to Your Cinnamon Buns
This is one of my favorite ways to get creative with these sweet breakfast treats! If you choose to add chopped pecans or walnuts, or even dried fruit like golden raisins or small dried cranberries, you must treat them first. If you toss them directly into the filling mixture, you risk them not distributing evenly or even sinking to the bottom during the bake. My recommendation is to mix your nuts or dried fruit into the soft butter and sugar filling *after* the cinnamon is added. This coats them in fat, which helps them stick beautifully to the dough when you roll it. They will stay distributed nicely throughout the spiral, giving you a pleasant texture contrast in every single bite, whether you are making a standard roll or aiming for a sticky buns recipe feel.

Storage and Reheating Instructions for Soft Homemade Rolls
These soft homemade rolls are honestly best eaten the day they are baked, but thankfully, they store beautifully—we want to preserve every bit of that fluffy tenderness!
If you have leftovers, store the un-iced rolls simply by covering them tightly in plastic wrap, or place them in an airtight container at room temperature for up to two days. If you iced them already, that’s fine too, just cover them well so the icing doesn’t dry out.
To reheat, I highly recommend the microwave! Place one or two rolls on a plate and zap them for about 15 to 20 seconds—just until they are warm. That little bit of steaming will bring back that just-out-of-the-oven, soft quality. For a larger batch, a quick trip in a 325°F oven wrapped in foil works wonders. If you’re ever wondering what to do with leftovers, a quick transformation into a delicious pumpkin bread pudding style dessert is divine!
Frequently Asked Questions About Yeasted Sweet Rolls
I get so many messages about how to tweak this recipe, which is wonderful! It means you’re already thinking like a baker. Since this version is geared toward quicker baking using active dry yeast, some questions naturally come up about time and texture. Let’s tackle those common queries about these yeasted sweet rolls so you have total confidence!
Can I make these cinnamon buns overnight?
That’s a great question, particularly if you’re hoping to wake up to fresh buns with minimal morning effort! This specific recipe is built around what a single, warm rise accomplishes in about an hour and a half—it makes them wonderfully fluffy cinnamon bread. If you want true overnight cinnamon rolls, you absolutely can do a cold proof! After you cut and place the rolls in the pan (Step 9), cover them tightly and place them in the refrigerator for up to 18 hours. When you wake up, let them sit at room temp for about an hour while the oven heats, and then bake as directed. Just be aware that the texture will be slightly less lofty than the quick-rise version, but still delicious!
What is the best way to get a truly gooey cinnamon buns result?
If gooeyness is your main goal, you must remember this rule: Ice them HOT! The high heat of the rolls melts the cream cheese icing just enough so it seeps right down between the layers. If you let them cool for even 15 minutes, that icing will just sit on top. Also, check your filling ratio—I stress using a full 1 cup of packed light brown sugar and ensuring that butter is completely softened. That buttery, sugary mixture pools perfectly at the bottom of the pan as they bake, creating that irresistible, sticky layer.
Can I use instant yeast instead of active dry yeast?
Yes, you certainly can! Instant yeast is very forgiving on that first step. If you are using instant yeast, you can skip the whole step of proofing it in the warm milk for 10 minutes. Just mix the instant yeast directly into your flour mixture along with the salt and the remaining sugar. Then, add the liquids (milk, eggs, melted butter) and mix as normal. Since instant yeast is ready to go, you might find your first rise is a touch faster as well, so keep an eye on that dough! If you ever want more ideas along these lines, my recipe for an overnight cinnamon roll casserole is another wonderful option.
Serving Suggestions for Sweet Breakfast Treats
There is nothing quite like pulling these gooey cinnamon buns straight from the oven to serve immediately. They truly are the centerpiece of any wonderful morning, making them a top contender for your best breakfast brunch recipes lineup! They pair so beautifully with strong, hot coffee—I love a deep, dark roast myself!
If you are serving these as part of a larger spread, keep the sides simple so the rolls can shine. Think fresh, slightly tart fruit salad to cut through the richness, or maybe some savory sausage links on the side. For a truly indulgent experience, try pairing them with a spiced drink like my warm Chai Latte. Or! If you need another baked good idea, my recipe for pumpkin coffee cake is always a crowd-pleaser.
Nutritional Estimates for These Cinnamon Buns
Now, let’s talk about the fuel for that morning joy! Because these cinnamon buns are rich with butter and that lovely cream cheese icing, they are certainly a magnificent, indulgent treat. Here are the estimated nutritional values per serving, based on my recipe breakdown. Remember, this is just a guide, and what you use—especially the type of butter or sugar you prefer—will make a small difference!
- Serving Size: 1 roll
- Calories: 550
- Sugar: 55g (That gooey filling adds up!)
- Fat: 30g
- Protein: 8g
- Carbohydrates: 70g
- Cholesterol: 85mg
I always caution my readers that these are just estimates compiled based on standard ingredient sourcing. If you use lower-fat cream cheese in the icing, for instance, those numbers will drift slightly. But honestly, when they taste this good and are this soft, I try not to get too bogged down in the details! Just bake them with love and enjoy every bite of those melt in your mouth desserts.

Share Your Experience Making These Melt In Your Mouth Desserts
I truly poured my heart into making sure these cinnamon buns deliver that incredible, soft, and truly gooey result we all dream about. When you pull them out, steaming hot, and cover them in that rich cream cheese icing, I want to see the results!
Creating these melts in your mouth desserts is all about the texture, so please, don’t hesitate to leave a comment below. Tell me how soft your dough felt, if the single rise worked perfectly for your kitchen temperature, or if the rolls stayed moist overnight. Knowing what worked for you helps me continue to refine and trust this recipe for everyone else who visits Unfold Recipes.
Did you snap a picture of the beautiful swirls before you devoured them? I would absolutely love to see your successful creations! You can share your photos on Instagram and tag me—seeing your baking success is the highlight of my day. And if you’ve already bookmarked this recipe, be sure to give it a rating right here on the page so others know that this is, indeed, the best way to bake sweet breakfast treats.
If you are looking for more inspiration for delicious things to bake, always feel free to browse through my whole collection of recipes here. Happy baking!
PrintThe BEST Homemade Cinnamon Rolls: Ultra Soft, Fluffy, and Gooey with Cream Cheese Icing
Create bakery-style cinnamon rolls that are incredibly soft, fluffy, and packed with a gooey cinnamon filling. This recipe delivers melt-in-your-mouth texture and is topped with a rich cream cheese icing, making it the best homemade cinnamon rolls you will ever eat.
- Prep Time: 30 min
- Cook Time: 25 min
- Total Time: 1 hour 55 min
- Yield: 12 servings 1x
- Category: Breakfast
- Method: Baking
- Cuisine: American
- Diet: Vegetarian
Ingredients
- 1 cup whole milk, warm (about 110°F)
- 2 ¼ teaspoons active dry yeast (one standard packet)
- ½ cup granulated sugar, plus 1 teaspoon for yeast
- 2 large eggs, room temperature
- ½ cup unsalted butter, melted and cooled slightly
- 4 cups all-purpose flour, plus more for dusting
- 1 teaspoon salt
- For the Filling:
- ¾ cup unsalted butter, softened
- 1 cup packed light brown sugar
- 2 tablespoons ground cinnamon
- For the Cream Cheese Icing:
- 8 ounces cream cheese, softened
- ½ cup unsalted butter, softened
- 3 cups powdered sugar, sifted
- 1 teaspoon vanilla extract
- 2 tablespoons milk or heavy cream
Instructions
- Activate the Yeast: In a large bowl or the bowl of a stand mixer, combine the warm milk, 1 teaspoon of sugar, and the yeast. Let stand for 5 to 10 minutes until foamy.
- Mix Dough: Add the remaining ½ cup of sugar, eggs, melted butter, flour, and salt to the yeast mixture. Mix with a dough hook on low speed until a shaggy dough forms. Increase speed to medium-low and knead for 6 to 8 minutes until the dough is smooth and elastic.
- First Rise (Quick Rise): Place the dough in a lightly oiled bowl, turning to coat. Cover the bowl with plastic wrap or a clean towel. Let the dough rise in a warm spot for 45 to 60 minutes, or until doubled in size. This single rise method keeps the process quick.
- Prepare Filling: While the dough rises, mix the softened butter, brown sugar, and cinnamon together in a small bowl until well combined. Set aside.
- Roll Out Dough: Gently punch down the risen dough. Turn it out onto a lightly floured surface. Roll the dough into a large rectangle, approximately 12×18 inches.
- Spread Filling: Spread the cinnamon-sugar filling evenly over the entire surface of the dough, leaving a small half-inch border on one long edge.
- Shape Rolls: Starting from the long edge opposite the border, tightly roll the dough into a log. Pinch the seam closed.
- Cut Rolls: Use unflavored dental floss or a sharp knife to cut the log into 12 equal pieces, about 1.5 inches thick.
- Second Rise: Arrange the cut rolls in a greased 9×13 inch baking dish. Cover loosely and let them rest for 20 to 30 minutes while you preheat the oven to 375°F (190°C).
- Bake: Bake for 20 to 25 minutes, or until the tops are golden brown.
- Make Icing: While the rolls bake, beat the softened cream cheese and butter together until smooth. Gradually add the powdered sugar, then mix in the vanilla extract and milk until the icing is creamy and spreadable.
- Frost and Serve: Remove the rolls from the oven. Immediately spread the warm cream cheese icing generously over the hot cinnamon buns. Serve warm for the best gooey texture.
Notes
- For extra soft homemade rolls, cover the baked rolls with foil for 5 minutes after removing them from the oven before icing. This traps steam and keeps them moist.
- If you prefer a stickier, more decadent result, slightly increase the butter in the filling mixture.
- This recipe uses active dry yeast for a quick rise, making it an easy yeast rolls recipe ready in under 2 hours total time.
Nutrition
- Serving Size: 1 roll
- Calories: 550
- Sugar: 55g
- Sodium: 350mg
- Fat: 30g
- Saturated Fat: 18g
- Unsaturated Fat: 12g
- Trans Fat: 0.5g
- Carbohydrates: 70g
- Fiber: 2g
- Protein: 8g
- Cholesterol: 85mg