
If you’re staring down a holiday baking list and feeling totally overwhelmed, I’ve got your secret weapon right here. Forget turning on the oven! We are going straight to the easiest, sweetest little indulgence that tastes exactly like biting into a soft sugar cookie, slightly frosted: these incredible sugar cookie truffles. Trust me, I know how complex baking can get, but my goal here at Unfold Recipes is to bring approachable elegance to your kitchen. Whether I’m putting my culinary school training to use or just telling a simple food story, the easiest recipes often end up being the most loved. These truffles are pure magic, minimal effort, maximum impact.
- Why You Will Love Making These Sugar Cookie Truffles
- Essential Ingredients for Perfect Sugar Cookie Truffles
- Step-by-Step Guide to Making No-Bake Sugar Cookie Truffles
- Tips for Success When Making Sugar Cookie Truffles
- Variations for Your Sugar Cookie Truffles
- Storage and Making Ahead of Sugar Cookie Truffles
- Serving Suggestions for Festive Sugar Cookie Truffles
- Frequently Asked Questions About Sugar Cookie Truffles
- Understanding the Nutrition in Your Sugar Cookie Truffles
Why You Will Love Making These Sugar Cookie Truffles
Seriously, these little bites are the answer to every last-minute party or cookie swap emergency. They require zero actual baking, which is my favorite kind of kitchen magic, especially when life gets busy. If you’re looking for fantastic no-bake dessert recipes, stop scrolling—you found it!
- No Oven Required! That’s right, these are completely no-bake. Pull out your food processor (or a sturdy zip-top bag and rolling pin!) and you’re halfway there.
- Maximum Flavor, Minimum Fuss: They taste just like those soft, slightly sweet frosted sugar cookies, but in a perfect, rich little ball.
- The Ultimate Make-Ahead Treat: You can whip these up days before an event, which is a lifesaver for entertaining with grace.
- Perfect for Gifting: Pack them up in little cellophane bags, tie a ribbon on them, and you instantly have an edible gifts idea ready to go!
- Party Platter Perfection: They are truly ideal bite sized desserts—easy for guests to grab without needing a fork or making a mess.
- Super Simple Base: We rely on store-bought cookies here because why make things harder than they need to be? It keeps this an easy truffles recipe through and through.
Essential Ingredients for Perfect Sugar Cookie Truffles
When developing these simple *sugar cookie truffles*, I focused on keeping the ingredient list short but mighty. We want that familiar, buttery sweetness without complication. You’ll notice we’re leaning heavily on store-bought cookies, and there’s absolutely no shame in that when it leads to such tasty results! Good quality cream cheese and smooth melting wafers make all the difference here, so don’t skimp on those.
- 1 (16 ounce) package store-bought sugar cookies (that’s about 24 cookies, crushed finely).
- 4 ounces cream cheese, making sure it is softened to room temperature—this helps it mix evenly!
- 1 teaspoon vanilla extract for that classic background flavor.
- 12 ounces white chocolate melting wafers or candy coating (my preference by far for a smooth dip).
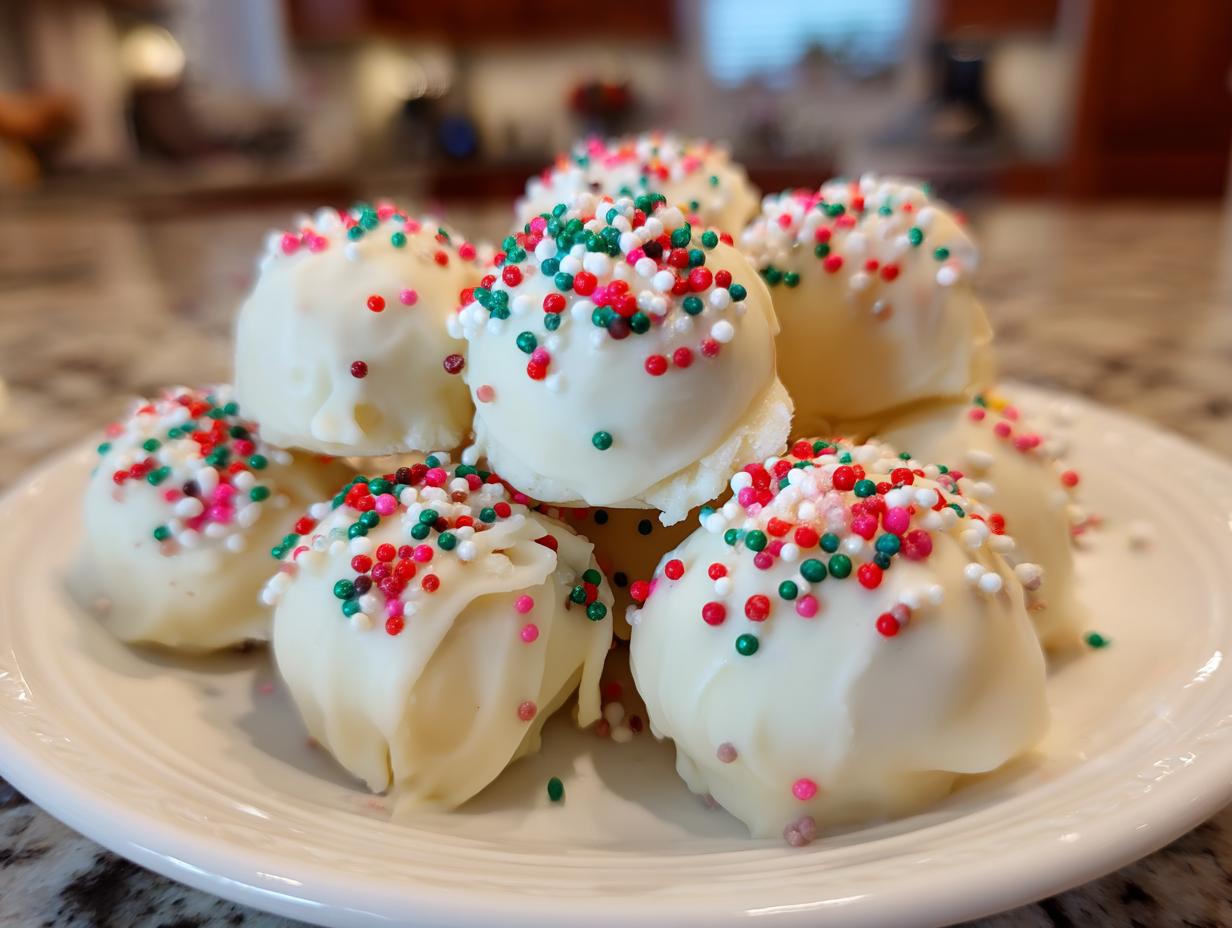
- 2 tablespoons festive sprinkles for decoration, if you’re feeling colorful!
Step-by-Step Guide to Making No-Bake Sugar Cookie Truffles
Okay, now for the fun part! This recipe really shines because it fits perfectly into my philosophy of creating beautiful food effortlessly. If you are hunting down some truly fantastic no bake dessert recipes, look no further. We’re dividing this into two main phases: making the sweet, dense ‘dough’ and then getting that gorgeous chocolate shell on top. Remember, chilling time is your friend here; don’t rush the steps where we tell you to chill!
Preparing the Sugar Cookie Truffles Base
First things first, we need those cookies pulverized! My preference is the food processor because it gives you those rock-hard crumbs that mimic real cookie dough perfectly. If you don’t have one, grab a big, heavy zip-top bag and let out some frustration with a rolling pin—it works just as well, promise!
Once you have those fine crumbs, toss them into a bowl with your softened cream cheese and the vanilla. Now, here’s my personal tip, Catherine’s test for perfection: when you start mixing this with your spatula, it will feel a little sandy, but keep going! You need to mix until it genuinely sticks together when you pinch a small piece between your fingers. If it’s still crumbly, you need a tiny bit more cream cheese, or you need to mix longer until the fat helps bind everything. Don’t overmix once it comes together, or they get sticky!
Once combined, grab a small spoon and roll the mixture into uniform balls—I shoot for about one inch across. Uniformity matters because it helps them chill evenly. Line them up on parchment paper. Seriously, don’t skip the 30 minutes in the fridge; these must be firm before they hit that warm chocolate!
Coating and Decorating Your Sugar Cookie Truffles
Time for the stunning finish! Melt your white chocolate wafers according to the directions, usually in short blasts (30 seconds max) in the microwave. You have to stir between every single interval. If you melt them too fast, white chocolate seizes up and looks awful, and we worked too hard on that base to have gritty chocolate!
When your chocolate is smooth as silk, grab those chilled balls. Dip them one by one, using a fork to gently lower it in and then lift it out. Jiggle the fork slightly to let that luxurious excess chocolate drip away. This is where you build confidence in your simple candy making skills!
If you’re using those gorgeous festive sprinkles, you have to add them *immediately* after dipping, before the chocolate sets. Place the decorated truffle right back onto that parchment paper. Let them sit at room temperature to fully harden, or if you’re impatient like me, pop them back into the fridge for 15 minutes. They are ready when the chocolate coating is totally firm to the touch!

Tips for Success When Making Sugar Cookie Truffles
Listen, even with an easy recipe like these *sugar cookie truffles*, a few little secrets make the difference between good and absolutely show-stopping. The most common issue I see when people try these is the consistency of the dough. If your mixture feels too wet or sticky after adding the cream cheese, don’t panic! Just swap in a few extra crushed cookie crumbs until it holds its shape perfectly. If it seems too dry, a tiny half-teaspoon of cream cheese will bring it back together.
When it comes to the chocolate coating, please use good quality melting wafers. The good ones stay smooth and glossy, which makes your truffles look professional. If you use regular chocolate chips sometimes they can seize up or have a dull finish. Also, remember that chilling step before dipping is non-negotiable; it keeps those little balls from falling apart in the warm chocolate. For more inspiration on getting perfect results, check out what other bakers are doing over at Flavorspire!

Variations for Your Sugar Cookie Truffles
I absolutely love that these *cookie truffles* are so forgiving! Once you master the basic mix-and-roll technique, you can start playing around with flavors. This is how you turn a basic treat into a signature party food recipes showstopper!
The easiest adjustment is the coating, of course. If white chocolate isn’t your favorite—maybe you prefer richer flavors—go ahead and use milk chocolate melting wafers or even a dark chocolate coating. Milk chocolates give you a familiar sweet contrast, while dark chocolate cuts through the sweetness of the cookie base beautifully. Dip them, let them set, and you have a whole new truffle!
You can also jazz up the interior mix before you roll those balls. Have you ever thought about adding a little something extra to the cookie crumb and cream cheese mix? A tiny splash of almond extract instead of vanilla makes them taste almost like wedding cake! Or, if you want to lean into lemon, use lemon zest and a hint of lemon extract—wow, that is bright and unexpected.
For texture lovers, try stirring in small additions right before you chill the dough. Mini chocolate chips are a natural fit—who doesn’t love hidden chocolate? Or, if you want that true “cookie dough” vibe, add some mini rainbow sprinkles directly into the base mix. Just be careful not to add too much; we still need that mixture to roll nicely!

Storage and Making Ahead of Sugar Cookie Truffles
This might be my favorite part about these little *sugar cookie truffles*—they are the ultimate make ahead desserts! If you host parties often, you know relief is having a gorgeous platter of make ahead desserts ready to go. These are perfect for preparing a big batch for holiday cookie boxes or gifting well in advance.
For short-term storage, the refrigerator is the best place for them. Just make sure you put them in a truly airtight container. I usually layer them in a shallow dish separated by a sheet of parchment paper so they don’t stick together. They stay wonderfully fresh and firm in the fridge for about a week. I actually think the flavor deepens just a tiny bit after 24 hours!
If you need them to last longer, the freezer is your friend! These freeze beautifully because of the cream cheese and high chocolate content. Place your finished, set truffles on a baking sheet and flash freeze them until they are solid—this prevents them from sticking together in a big frozen blob. Once they are hard, transfer them into a heavy-duty, freezer-safe container or zip-top bag.
When you need them for that last-minute gathering or just a sudden craving (we all have those!), pull out what you need and let them thaw slowly in the refrigerator overnight. If you are in a rush, they’ll be fine on the counter for about 30 minutes, but the slow thaw keeps that chocolate shell from sweating or cracking. These are fantastic for planning ahead because when the rush hits, you already have your dessert done!
Serving Suggestions for Festive Sugar Cookie Truffles
Now that you have this spectacular batch of *sugar cookie truffles*, the real fun begins: showing them off! Because these are such perfect bite sized desserts, they have so many wonderful serving possibilities, especially once the holiday season rolls around. You want them to look as good as they taste, right?
The absolute, can’t-miss way to present these is piled high on a big, beautiful platter alongside other cookies and candies. If you are setting up a dessert bar, these little gems stand out because they have height and that wonderful pop of color from the sprinkles. For Christmas, I always mix the white chocolate ones with some dipped in milk chocolate for visual contrast. It just looks intentional and abundant!
If you are taking these to a party or using them as homemade favors, packaging is key. I put three or four truffles into one of those small, clear cellophane bags—the kind you buy for candy making—and I tie the top with a nice piece of baker’s twine or a fun, colorful ribbon. Instantly, you have a thoughtful, gorgeous gift that tastes homemade and incredible.

When it comes to drinks, these crowd-pleasing *sweet Christmas treats* are just begging to be paired with something warm. They are intensely sweet, so they cut through the richness of a strong cup of coffee beautifully. Or, if you are serving them after dinner, a hot chocolate bar with these on the side? Honestly, people will rave about that simple combination. They are so rich and complete, you don’t need much else!
Frequently Asked Questions About Sugar Cookie Truffles
I get so many questions about these little treasures! It’s exciting to see so many of you reaching for these when you need quick dessert ideas. Since they are so simple, people often wonder if they can skip a small step. Let’s clear up the most common hangups so your *sugar cookie truffles* turn out perfect every single time.
What happens if I skip chilling the truffle balls?
Oh, please don’t skip the chill! I know waiting is the hardest part, especially when you’re excited to eat them, but chilling is vital. If you try to dip those soft, room-temperature balls into the warm chocolate, they will start to soften too quickly, maybe start to crumble, or worse—fall right off your fork and into the melted chocolate bowl. A good 30 minutes in the fridge makes them firm enough to hold their shape nicely while you dip and decorate. They essentially become sturdy little *cream cheese truffles* at that point!
I don’t have a food processor. How fine should my cookie crumbs be?
Don’t worry one bit if you aren’t a fan of kitchen gadgetry! Just like my early days, a heavy-duty zip-top bag and a rolling pin work beautifully. The key is to get them as fine as possible. We aren’t looking for chunky bits; we want powdery crumbs. This ensures that when you mix in the cream cheese, the mixture binds into a cohesive dough instead of staying sandy. If you see large chunks of cookie, the final truffle might feel dry or brittle rather than that soft, melt-in-your-mouth texture we are aiming for.
Can I use my own homemade sugar cookies instead of store-bought ones?
Absolutely! If you have leftover homemade cookies, this is a fantastic way to use them up. However, you need to keep the flavor profile in mind. If your homemade sugar cookies are very soft and cake-like, you might need slightly less cream cheese because they will already have more moisture. If your homemade cookies are baked until crispy, you might need a touch more cream cheese to make it bind. For the best, most reliable results, like the method detailed over at Together as Family, I usually stick to those dense, frosted store-bought ones, as they have a consistent texture that works perfectly with the cream cheese every time.
How long do these truffles last in the refrigerator?
Because they are covered in chocolate and use cream cheese, they hold up incredibly well! You can safely store them in an airtight container in the refrigerator for up to a week. I honestly feel they are *best* around day two or three, once the moisture from the cream cheese has fully saturated the cookie crumbs. They are truly an excellent make-ahead option.
Understanding the Nutrition in Your Sugar Cookie Truffles
I always want to be upfront with you about what goes into my fun recipes! These *sugar cookie truffles* are an indulgence, pure and simple, but that doesn’t mean we can’t keep an eye on what we are enjoying. Understanding the approximate nutritional breakdown helps you decide when and how often to share these wonderful sweets. While these are a delightful treat, effective meal planning can help balance indulgence with your overall goals, especially if you’re focusing on healthy eating most nights.
Here is a quick look at the estimated nutritional content for one of these perfect little bites. Remember, because we rely on specific brands of cookies and chocolate melting wafers, your results might shift a little from what I have listed here. It’s just a guideline, not a strict law!
- Serving Size: 1 truffle
- Calories: Approx. 180
- Fat: Approx. 11g (with about 7g saturated fat)
- Carbohydrates: Approx. 19g
- Protein: Approx. 2g
- Sugar: Approx. 18g (Yes, they are sweet, but oh so worth it!)
We are skipping the complex details on cholesterol and sodium for now, but you get the gist—these are sweet treats meant for celebrations and special occasions, not every Tuesday! The good news is they are small, so portion control is naturally built in. If you want to try making these fit better into a specific eating plan, you could explore using dark chocolate for higher antioxidant levels, though that changes that classic sugar cookie taste just a bit.
PrintNo-Bake Sugar Cookie Truffles with White Chocolate

Make simple, no-bake sugar cookie truffles that taste like soft sugar cookies, coated in white chocolate and festive sprinkles. These are perfect for holiday gifting or quick party treats.
- Prep Time: 20 min
- Cook Time: 5 min
- Total Time: 25 min
- Yield: 22 servings 1x
- Category: Dessert
- Method: No-Bake
- Cuisine: American
- Diet: Vegetarian
Ingredients
- 1 (16 ounce) package store-bought sugar cookies (about 24 cookies)
- 4 ounces cream cheese, softened
- 1 teaspoon vanilla extract
- 12 ounces white chocolate melting wafers or white candy coating
- 2 tablespoons festive sprinkles (optional)
Instructions
- Place the sugar cookies in a food processor and pulse until fine crumbs form. If you do not have a food processor, place cookies in a large zip-top bag and crush them with a rolling pin until fine crumbs remain.
- Transfer the cookie crumbs to a medium mixing bowl.
- Add the softened cream cheese and vanilla extract to the crumbs. Mix with a rubber spatula or clean hands until the mixture is fully combined and holds together when pressed.
- Roll the mixture into small balls, about 1 inch in diameter. You should get about 20 to 24 truffles. Place the rolled balls on a baking sheet lined with parchment paper.
- Chill the truffles in the refrigerator for at least 30 minutes to firm them up. This step is important before dipping.
- Melt the white chocolate wafers according to package directions, usually in a microwave-safe bowl in 30-second intervals, stirring well between each interval until smooth.
- Dip each chilled truffle into the melted white chocolate, ensuring it is fully coated. Use a fork or a dipping tool to lift the truffle out, allowing excess chocolate to drip off.
- Immediately place the coated truffle back onto the parchment-lined baking sheet. If using sprinkles, add them to the top of the wet chocolate coating right away.
- Allow the chocolate to set completely at room temperature, or speed up the process by chilling them for another 15 minutes.
- Store the finished truffles in an airtight container in the refrigerator.
Notes
- For a different flavor, substitute milk chocolate or dark chocolate for the white chocolate coating.
- These truffles freeze well. Place them in a freezer-safe container and freeze for up to one month. Thaw in the refrigerator before serving.
- If you are planning a large event, consider using a meal planning approach to track your ingredient needs.
Nutrition
- Serving Size: 1 truffle
- Calories: 180
- Sugar: 18
- Sodium: 85
- Fat: 11
- Saturated Fat: 7
- Unsaturated Fat: 3
- Trans Fat: 0.1
- Carbohydrates: 19
- Fiber: 0.5
- Protein: 2
- Cholesterol: 15