
There is something truly magical about a dessert mashup, isn’t there? When two beloved classics unite, you get something that feels both familiar and utterly new. That’s exactly what we have created here with this stunning tiramisu cheesecake. Forget the stress of baking; this version is luxuriously creamy, completely no-bake, and layers the intense coffee notes of Italy’s favorite dessert right into a plush cheesecake filling. It is approachable elegance on a platter. Trust me when I say, creating a showstopper for your next gathering doesn’t need a hot oven—just a little patience while this beauty chills.
- Why This No Bake Tiramisu Cheesecake is Your New Favorite Coffee Dessert Recipe
- Gathering Ingredients for Your Tiramisu Cheesecake Recipe
- Step-by-Step Instructions for the No Bake Tiramisu Cheesecake
- Tips for Success with Your Tiramisu Cheesecake
- Variations on the Classic Tiramisu Cheesecake Fusion
- Serving Suggestions for This Party Dessert Idea
- Storage and Reheating Instructions for Leftover Tiramisu Cheesecake
- Frequently Asked Questions About Tiramisu Cheesecake
- Share Your Decadent Coffee Desserts Creation
Why This No Bake Tiramisu Cheesecake is Your New Favorite Coffee Dessert Recipe
When you need a dessert that delivers big on flavor but keeps your kitchen cool, this is the one. This tiramisu cheesecake really hits all the right notes for effortless entertaining. We promise impressive results without the fuss of water baths or cracks!
- It’s truly a wonderful make ahead dessert—it actually tastes better pulled from the fridge the next day.
- The texture is unbelievably silky and rich, thanks to that perfect blend of cheeses.
- It fuses the iconic coffee and cocoa of Tiramisu with the satisfying structure of cheesecake.
The Appeal of a No Bake Tiramisu Cheesecake
Honestly, skipping the oven is my favorite move for summer parties! Since this is a no-bake version, you automatically guarantee that unbelievably smooth, melt-in-your-mouth texture. While a Baked Tiramisu Cheesecake has its merits, the chilled version is just pure, unadulterated creaminess, which is perfect for slicing cleanly for guests. It’s simple, it sets beautifully, and it lets you focus on enjoying your company rather than babysitting the oven.

Gathering Ingredients for Your Tiramisu Cheesecake Recipe
Creating something this decadent requires precision, but don’t worry, the ingredient list is straightforward! Flavor depth is everything here—we need those bold, bitter coffee notes to play against the sweet, rich dairy. Before you even touch your mixer, please remember my one big rule for all cheesecakes: your cream cheese and mascarpone *must* be fully softened to room temperature. No shortcuts here, or you’ll end up with lumps, and we want a beautiful, smooth Mascarpone Cheesecake!
Chocolate Crust Cheesecake Components
We’re starting with a sturdy, dark base to honor the chocolate notes in the dessert. You’ll need about 1 3/4 cups of chocolate cookie crumbs—I always use Oreos but remember to scrape out that white filling first! Mix those crumbs really well with 6 tablespoons of melted, unsalted butter until it looks like wet sand. That’s your perfect consistency for pressing into the pan.
Mascarpone Cream Dessert Filling Elements
This is where the magic happens! You’ll need 16 ounces of softened full-fat cream cheese and 8 ounces of softened mascarpone. Cream those together with 1 cup of granulated sugar and 1 teaspoon of vanilla until it’s unbelievably light. Separately, you must whip 1 1/2 cups of cold heavy whipping cream with 1/2 cup of powdered sugar until you get respectable stiff peaks. Gently folding those two together is what gives us that incredible rich and creamy dessert outcome.
Coffee Soak and Finishing Touches for the Tiramisu Cheesecake
For the coffee infusion, you need 1/4 cup of strong, cooled espresso. If you’re feeling traditional, add 2 tablespoons of coffee liqueur—it really pushes that Espresso Flavored Cheesecake taste over the top. You’ll also grab your ladyfingers (about 18 to 24, depending on how thick you layer) and the final dusting for presentation: plain, unsweetened cocoa powder. Use the best espresso you can find; it makes a huge difference!
Step-by-Step Instructions for the No Bake Tiramisu Cheesecake
Alright, time to put it all together! Because this is a no-bake Tiramisu Cheesecake, the assembly goes quickly until we hit the chilling phase. Just move with confidence, and you’ll have this incredibly impressive dessert ready for the fridge in under 30 minutes. It’s all about building those distinct layers that make this Italian fusion so wonderful.
Building the Chocolate Crust Cheesecake Base
First things first: grab that crumb mixture we prepared. Press it firmly and evenly into the bottom of your 9-inch springform pan. I like to use the bottom of a flat measuring cup to really pack it down tight! Once it’s solid, pop that crust into the fridge to chill while we work on the filling. That short chill time keeps the chocolate crust from getting soggy later. If you ever need a fun bar idea while you wait, check out my Sopapilla Cheesecake Bars!
Creating the Rich and Creamy Tiramisu Cheesecake Filling
In your big mixer bowl, beat those softened cream cheese, mascarpone, and sugar until it’s totally smooth—no lumps allowed! Then, in a separate bowl, get that heavy cream and powdered sugar whipped until you have beautiful stiff peaks. This is important: only gently fold the whipped cream into the cheese mixture. Seriously, fold! We want to keep all that air in there; this is our secret to a true Creamy Tiramisu Dessert.

Assembling the Layered Cheesecake Dessert
Take your shallow dish of espresso soak and your chilled crust. Dip each ladyfinger into that liquid quickly—I mean a one-second dunk on each side! If you soak them too long, they’ll just turn to mush later. Arrange one layer of those dipped cookies over the crust. Then, spread half the filling over top. Repeat that layer: dipped ladyfingers, then the rest of the filling. You’ve just built your amazing Layered Cheesecake Dessert structure!
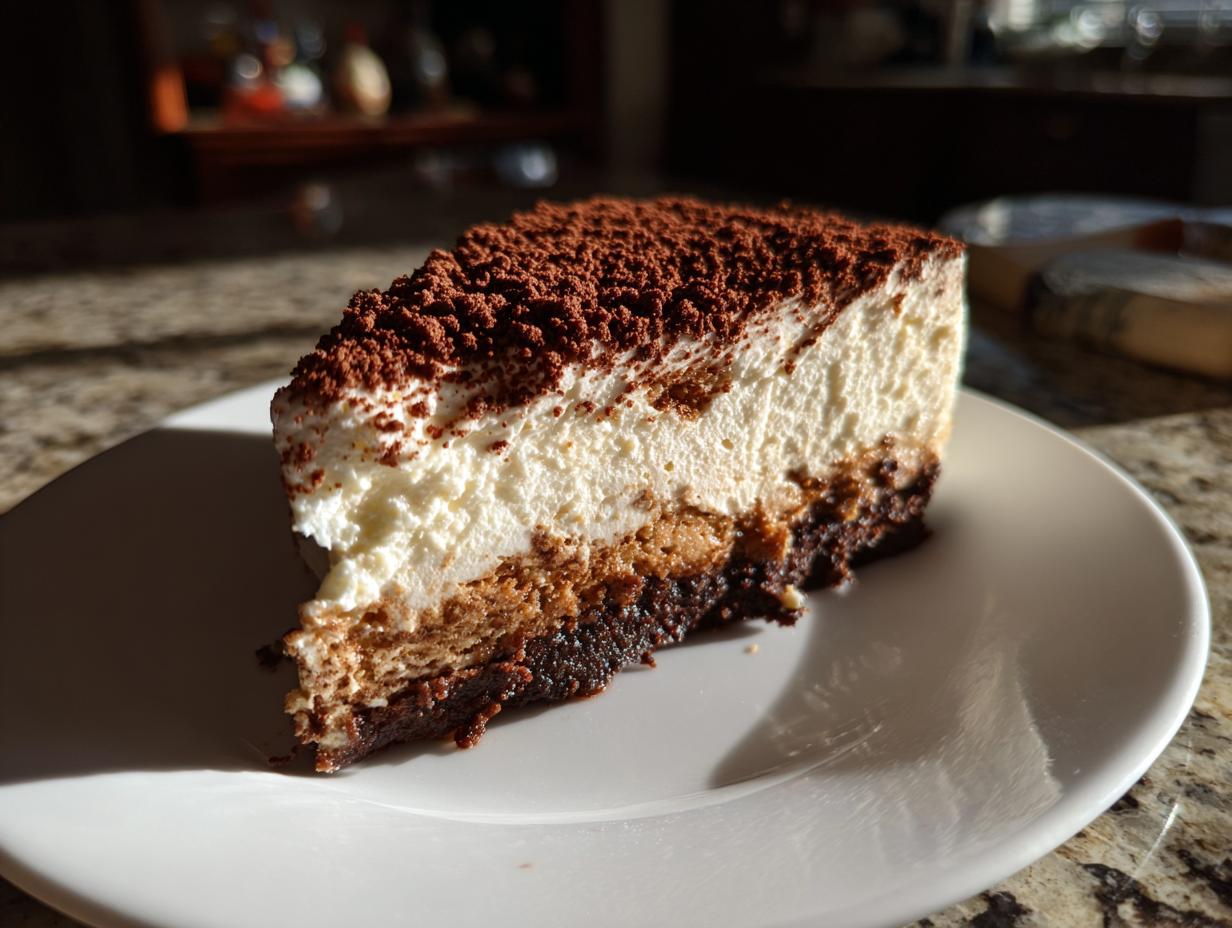
Setting and Dusting the Final Tiramisu Cheesecake
Cover the pan tightly with plastic wrap. Now comes the hardest part: waiting! We need this to chill for a minimum of 6 hours, but truly, overnight is where this tiramisu cheesecake hits its peak flavor and stability. Once it’s completely firm, remove the springform ring very carefully. Finally, grab your fine-mesh sieve and dust that entire surface generously with unsweetened cocoa powder. That final dusting is the classic Tiramisu touch!

Tips for Success with Your Tiramisu Cheesecake
When you’re tackling a dessert that blends two heavy hitters like this, a few quick pointers can take it from good to absolutely stellar. I’ve learned these tricks over perfecting this mascarpone cheesecake for family events. Following these small steps ensures you get that luxurious, even texture we are aiming for. If you love keeping up with what’s new in the kitchen, be sure to check out my blog for more fun culinary adventures!
Achieving Silky Texture in Your Mascarpone Cheesecake
I cannot stress this enough: your cream cheese and mascarpone need to be totally relaxed when you start mixing! If they are even slightly cold, you’ll end up trying to hand-mix a lumpy mess, and we want silky smooth perfection. Also, for springform pans, always wrap the outside completely in a layer or two of heavy-duty aluminum foil. Even though this is a no-bake recipe, it helps keep condensation away from the crust, preventing any sloppy leaks down the sides.
Make Ahead Dessert Planning for Your Tiramisu Cheesecake
This truly is the ultimate make ahead dessert. Seriously, plan to make this the day before you serve it! At least 12 hours in the fridge lets those espresso flavors fully bloom and lets the filling firm up completely. My one non-negotiable rule for presentation is that you must wait until the absolute last minute—literally 10 minutes before serving—to dust on that cocoa powder. If you put the cocoa on the night before, it absorbs moisture and turns into a dark, wet smudge instead of that glorious dusty topping you want!
Variations on the Classic Tiramisu Cheesecake Fusion
While I stand by this no-bake version—it’s just so easy!—I love hearing how you all adapt recipes. Since this dessert is such a fun dessert mashup idea, there are fantastic ways to twist the flavors if you want something slightly different next time. You can certainly take this concept into the oven if you are craving a denser bite, or you can play around with the supporting flavors.
Exploring a Baked Tiramisu Cheesecake Option
If you prefer that slightly more structured, custard-like mouthfeel, you can absolutely bake this tiramisu cheesecake. When you bake it (around 325°F for about 50 minutes), the texture tightens up significantly. We still use the mascarpone, but the baked result is definitely richer and thicker than our current creamy showstopper. Keep the ladyfinger layers, though—those are essential!
Crust and Flavor Swaps for Your Coffee Dessert Recipe
Don’t feel locked into the chocolate cookie crust! For a slightly lighter take on this coffee dessert recipe, try swapping to a classic graham cracker base. Another simple swap is playing with the liquor—instead of Kahlua or coffee liqueur, a tiny dash of Amaretto adds a gorgeous almond note that complements the cocoa really nicely. It’s all about personalization, right?
Serving Suggestions for This Party Dessert Idea
When you present a dessert this luxurious, you want it to look the part! This tiramisu cheesecake is perfect for any dinner party because it’s practically begging to be dressed up. We already have that beautiful dusty cocoa layer when it comes out of the fridge, but we can elevate it even more. Remember, hosting should feel effortless, and gorgeous food presentation helps tremendously! If you successfully made this, you definitely deserve to show it off!
Elegant Presentation of the Tiramisu Cheesecake
If you want an extra touch of drama, use a vegetable peeler to create delicate, thin curls of high-quality dark chocolate right over the top of the cocoa powder. Sometimes, just a whisper of cinnamon dusted over one side of the cake adds a beautiful color contrast that screams elegance. When it comes time to slice, let the cake sit at room temperature for just 10 minutes before cutting, and use a long, thin knife dipped briefly in hot water between each cut. Clean slices mean happy guests! For other party appetizer ideas while you wait for the main event, remember presentation is key.

Storage and Reheating Instructions for Leftover Tiramisu Cheesecake
Since this tiramisu cheesecake is packed with fresh dairy and those lovely espresso-soaked ladyfingers, proper storage is essential for keeping that creamy texture intact. Always store any leftovers tightly sealed in the refrigerator; it should hold beautifully for up to four or five days. Because this is a no-bake dessert, you absolutely do not want to reheat it! It’s designed to be served chilled, so just keep it cold until serving time, and it will maintain that amazing structure.
Frequently Asked Questions About Tiramisu Cheesecake
I know you might still have a few questions before you jump into making this tiramisu cheesecake—it’s a fancy-sounding dessert, after all! But trust me, once you get the hang of the few key steps, it truly is one of the easiest Italian Cheesecake Fusion desserts you’ll ever make. Here are a few things I hear often in the comments section!
Can I use regular coffee instead of espresso in the tiramisu cheesecake?
You absolutely can, dear reader! If you don’t have an espresso machine, just brew some very strong coffee—like a double-strength French press or Moka pot brew. You need that concentrated coffee flavor to shine through all that creamy dairy. If you use standard drip coffee, you might find the flavor gets a little lost, so brew it extra strong to get that signature espresso flavored cheesecake kick!
What is the best way to remove the springform ring from the no bake tiramisu cheesecake?
Getting that clean release is crucial if you want that beautiful presentation! The absolute best thing you can do is chill this no bake Tiramisu Cheesecake until it’s rock solid—overnight really is the magic number here. When you’re ready to serve, take a thin, offset metal spatula, dip it quickly into a tall glass of very hot water, wipe it dry, and run it carefully around the inside edge between the cake and the metal ring. Then, release the clasp. It should pop right off!
Can I substitute the ladyfingers in this Italian Cheesecake Fusion?
Yes, you certainly can! If you can’t find good quality Savoiardi (ladyfingers), you have options. Thin slices of a sturdy pound cake work beautifully, or even some plain vanilla wafer cookies can work in a pinch for soaking. However, I always love the ladyfingers best because they absorb the espresso liquid just right, giving you that distinct, soft, airy contrast to our rich, creamy tiramisu dessert filling. For even more ideas, don’t hesitate to reach out via my contact page!
Share Your Decadent Coffee Desserts Creation
Now, the best part of telling food stories is hearing yours! I truly hope you take the plunge and make this tiramisu cheesecake. It’s such a rewarding dessert to serve because everyone assumes it took you ages, and only you will know the secret of how easy and fuss-free it actually was. I am genuinely eager to see your results and hear what you thought of the process. If you share a photo, tag me—I always look for fellow creators making these decadent coffee desserts!
Tell Me What Layer Made Your Day
When you leave a comment below, please tell me which part of the fusion was your absolute favorite. Was it the rich, dark chocolate crust hugging the bottom of the pan? Or perhaps the intense burst of coffee flavor from briefly dipping those ladyfingers? Or maybe, like me, you just dream about that cloud-like, luxurious mascarpone filling? Your feedback helps me know what part of this dessert mashup idea resonated most with you. Don’t forget to rate the recipe once you’ve given it a taste! If you have any lingering questions after trying it out, feel free to reach out through my contact page anytime.
PrintNo-Bake Tiramisu Cheesecake: A Creamy Italian Fusion

Create a luxurious dessert that merges the creamy texture of cheesecake with the iconic coffee and cocoa flavors of classic tiramisu. This no-bake recipe is simple to prepare and perfect for making ahead for special occasions.
- Prep Time: 30 min
- Cook Time: 0 min
- Total Time: 6 hr 30 min
- Yield: 10 servings 1x
- Category: Dessert
- Method: No-Bake
- Cuisine: Italian Fusion
- Diet: Vegetarian
Ingredients
- 1 3/4 cups chocolate cookie crumbs (like Oreos, filling removed)
- 6 tablespoons unsalted butter, melted
- 1/4 cup strong brewed espresso, cooled
- 2 tablespoons coffee liqueur (optional)
- 16 ounces cream cheese, softened
- 8 ounces mascarpone cheese, softened
- 1 cup granulated sugar
- 1 teaspoon vanilla extract
- 1 1/2 cups heavy whipping cream, cold
- 1/2 cup powdered sugar
- Ladyfingers, for layering (about 18-24 cookies)
- Unsweetened cocoa powder, for dusting
Instructions
- Prepare the crust: Combine the chocolate cookie crumbs and melted butter in a bowl. Press the mixture firmly into the bottom of a 9-inch springform pan. Chill the crust while you prepare the filling.
- Prepare the coffee soak: In a shallow dish, mix the cooled espresso and coffee liqueur, if using. Set aside.
- Make the cheesecake filling: In a large bowl, beat the softened cream cheese, mascarpone cheese, and granulated sugar with an electric mixer until smooth. Beat in the vanilla extract.
- In a separate bowl, whip the cold heavy whipping cream and powdered sugar until stiff peaks form. Gently fold the whipped cream into the cream cheese mixture until just combined. Do not overmix.
- Assemble the cheesecake: Dip each ladyfinger quickly into the espresso mixture—do not let them soak too long or they will become soggy. Arrange a single layer of soaked ladyfingers over the chilled crust.
- Spread half of the cheesecake filling over the ladyfinger layer. Top with a second layer of dipped ladyfingers. Spread the remaining filling over the top.
- Cover the pan tightly with plastic wrap. Chill the tiramisu cheesecake in the refrigerator for at least 6 hours, or preferably overnight, to allow it to set completely.
- Before serving, carefully remove the springform ring. Dust the top generously with unsweetened cocoa powder using a fine-mesh sieve. Slice and serve this decadent coffee dessert recipe.
Notes
- For the creamiest texture, ensure both the cream cheese and mascarpone are fully softened to room temperature before mixing.
- This is an excellent make ahead dessert; it tastes best when chilled for a full 12 hours.
- If you prefer a baked tiramisu cheesecake, bake at 325°F (160°C) for 50-60 minutes, then cool slowly. This recipe focuses on the no-bake method for maximum ease.
Nutrition
- Serving Size: 1 slice
- Calories: 450
- Sugar: 35g
- Sodium: 250mg
- Fat: 30g
- Saturated Fat: 18g
- Unsaturated Fat: 12g
- Trans Fat: 0g
- Carbohydrates: 40g
- Fiber: 2g
- Protein: 8g
- Cholesterol: 95mg