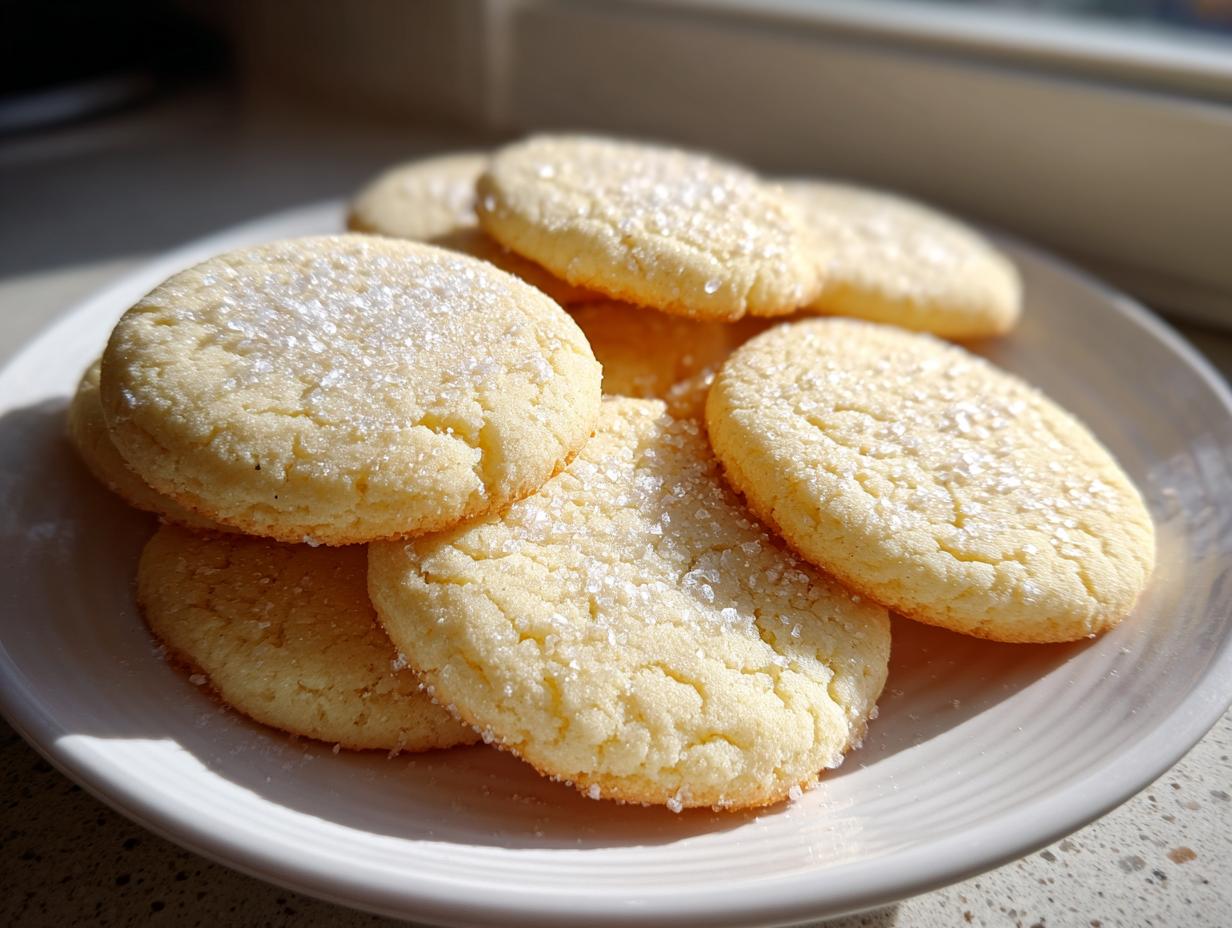

When the holidays roll around—or frankly, any time I decide it’s a good day for sprinkles—my thoughts immediately go to the perfect cut-out cookie. I’ve spent years testing recipes, trying to solve the conundrum that plagues so many bakers: how do you get a beautiful, intricate shape that holds up but still tastes soft and rich? After countless batches, I’m thrilled to share what I truly believe is the ultimate batch of vegan sugar cookies. These aren’t those dry, brittle things you sometimes get stuck with. No, these are tender, delightfully chewy inside, and they stand their ground perfectly when you use your favorite cookie cutters. Creating reliable recipes is what I do here at Unfold Recipes. If you want to see more of my tested favorites, you can always check out the main blog. I guarantee you can trust this method for your next round of festive baking!

- Why These are the Best Vegan Sugar Cookies for Cut-Outs
- Gathering Ingredients for Your Vegan Sugar Cookies
- Step-by-Step Instructions for Perfect Vegan Sugar Cookies
- Mastering the Vegan Royal Icing for Decorating
- Tips for Successful Vegan Holiday Cookies Baking
- Storage and Keeping Your Vegan Sugar Cookies Fresh
- Variations on These Easy Vegan Cut Out Cookies
- Frequently Asked Questions About Plant Based Cookie Recipes for Decorating
- Nutritional Estimate for Homemade Vegan Treats
- Nutritional Estimate for Homemade Vegan Treats
Why These are the Best Vegan Sugar Cookies for Cut-Outs
I know you’ve tried other recipes for dairy free sugar cookies that look great on the tray but turn into sad puddles after five minutes in the oven. That’s the worst! But this recipe is different. I put serious time into developing the best vegan sugar cookie recipe that balances structure and flavor. We use a little cornstarch and a very specific chilling process, which prevents those delicate shapes from spreading out. Trust me, you want vegan cookies that don’t spread when you are using fancy cutters for the holidays.
The secret blend of ingredients gives you that perfect bite: crisp edges, yes, but that wonderful, soft, and chewy middle that makes you want to eat ten of them before they are even iced. Speaking of icing, if you’re looking for the perfect topping, I have a post dedicated to my favorite vegan royal icing recipe to match these beauties.
Gathering Ingredients for Your Vegan Sugar Cookies
Getting the right ingredients ready before you start mixing is one of those kitchen principles I learned early on—it makes the whole process feel calmer and more elegant. Since we are working with vegan sugar cookies, the quality of your substitutions really matters. Make sure your vegan butter is good quality; it acts like the backbone of the cookie structure here! When everything is measured out and waiting, you’re basically guaranteed success.
For the Vegan Sugar Cookies Dough
We keep this list short and sweet! Remember, the plant milk we call for should be unsweetened—I find soy or almond milk provides the best neutral flavor and consistency for these cut-outs:
- 1 cup vegan butter, softened
- 1 cup granulated sugar
- 2 tablespoons unsweetened plant milk (soy or almond work well)
- 1 tablespoon cornstarch
- 2 teaspoons vanilla extract
- 1/2 teaspoon almond extract
- 3 cups all-purpose flour, plus more for dusting
- 1 teaspoon baking powder
- 1/2 teaspoon salt
For the Simple Vegan Royal Icing
This icing sets up beautifully, which is exactly what we need for decorating those intricate cut-outs we worked so hard to chill and roll out. It’s magic, truly! You only need three core things:
- 3 cups powdered sugar
- 3 tablespoons aquafaba (that’s the liquid from a can of chickpeas—don’t worry, you won’t taste it!)
- 1 teaspoon vanilla extract
Step-by-Step Instructions for Perfect Vegan Sugar Cookies
Alright, let’s get into the fun part—the making! I always tell people that while the ingredients are important, the technique is what turns a batch of flour and sugar into truly amazing vegan sugar cookies. Pay close attention during the mixing stages, especially regarding speed and time. It’s easy to overdo it, especially when you’re excited, but trust me, a gentle hand is what delivers that signature soft texture.
Mixing the Dough Base
We start with creaming the fat and sugar. This isn’t just about mixing; it’s about aeration! Put your softened vegan butter and the granulated sugar in your largest bowl. I use my stand mixer on medium speed, but you can absolutely do this by hand with a sturdy whisk or wooden spoon—it just takes a bit more elbow grease. Beat these together until the color lightens significantly, turning pale yellow, and the texture becomes noticeably fluffy. This builds the structure that helps these cookies stay perfectly round or hold that tiny star shape you cut out.
Next, we gently bring in the liquids: the plant milk, vanilla, and almond extract. Mix just until they incorporate. Then, in a separate bowl, give your dry ingredients—the flour, baking powder, and salt—a quick whisk. This ensures the baking powder is evenly distributed.
Now for the crucial part where you need restraint. Add the dry mixture to the wet mixture gradually, mixing slowly on low speed. As soon as you see the last streaks of flour disappear, STOP! Seriously, stop mixing. Overmixing develops gluten, and that will give you tough cookies, not the soft and chewy ones we are aiming for. That’s my biggest piece of advice for any reliable easy vegan cut out cookies recipe.
Chilling and Rolling Out the Vegan Sugar Cookies
You must chill this dough. I know, waiting is the worst when you want cookies *now*, but this step is non-negotiable if you want your vegan sugar cookies to hold their shape. Divide the dough into two equal disks. Wrap them tightly—I mean really tightly—in plastic wrap. They need a minimum of two hours in the refrigerator. If your kitchen is warm, or if you are making these during the summer, four hours is even better. This firmness is what creates those wonderful vegan cookies that don’t spread.
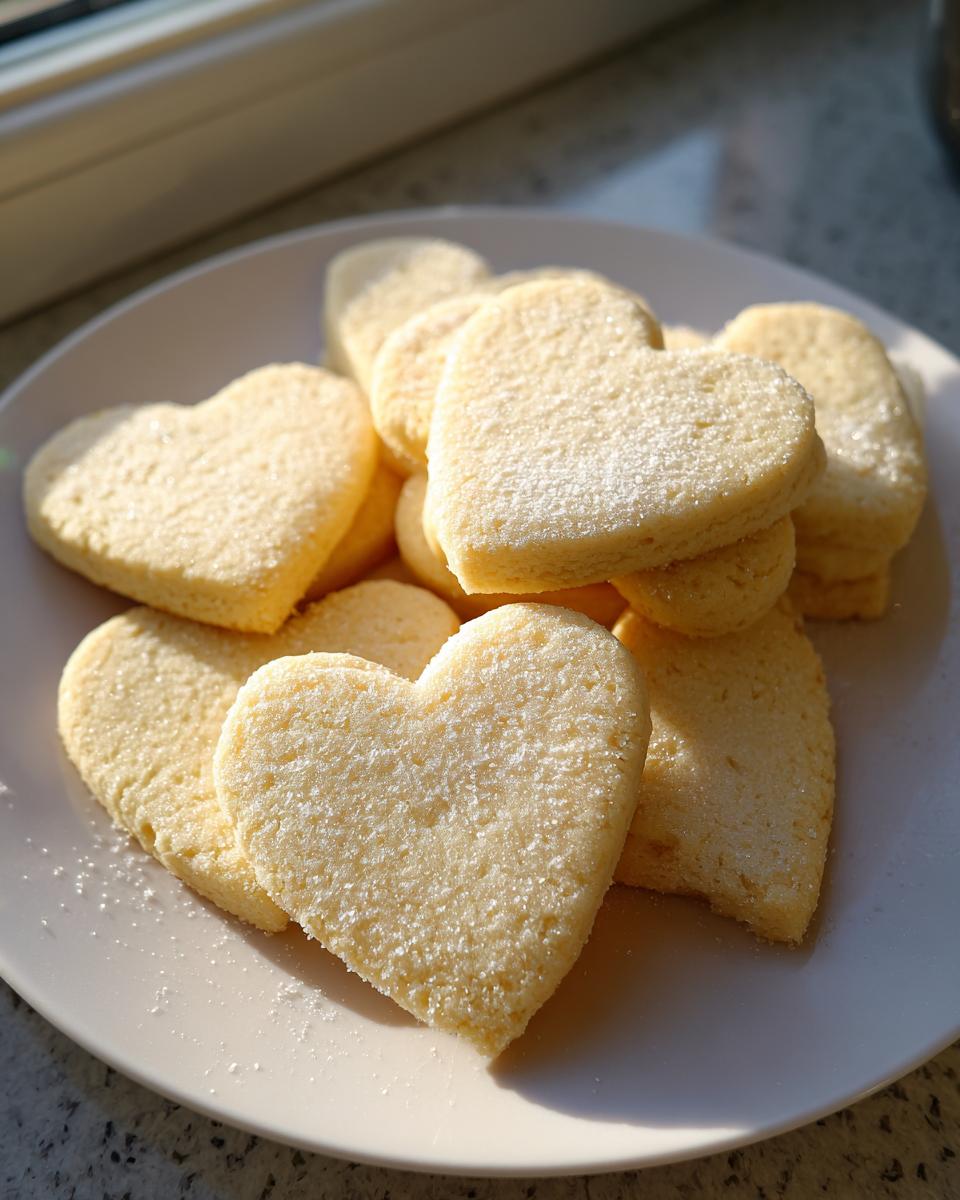
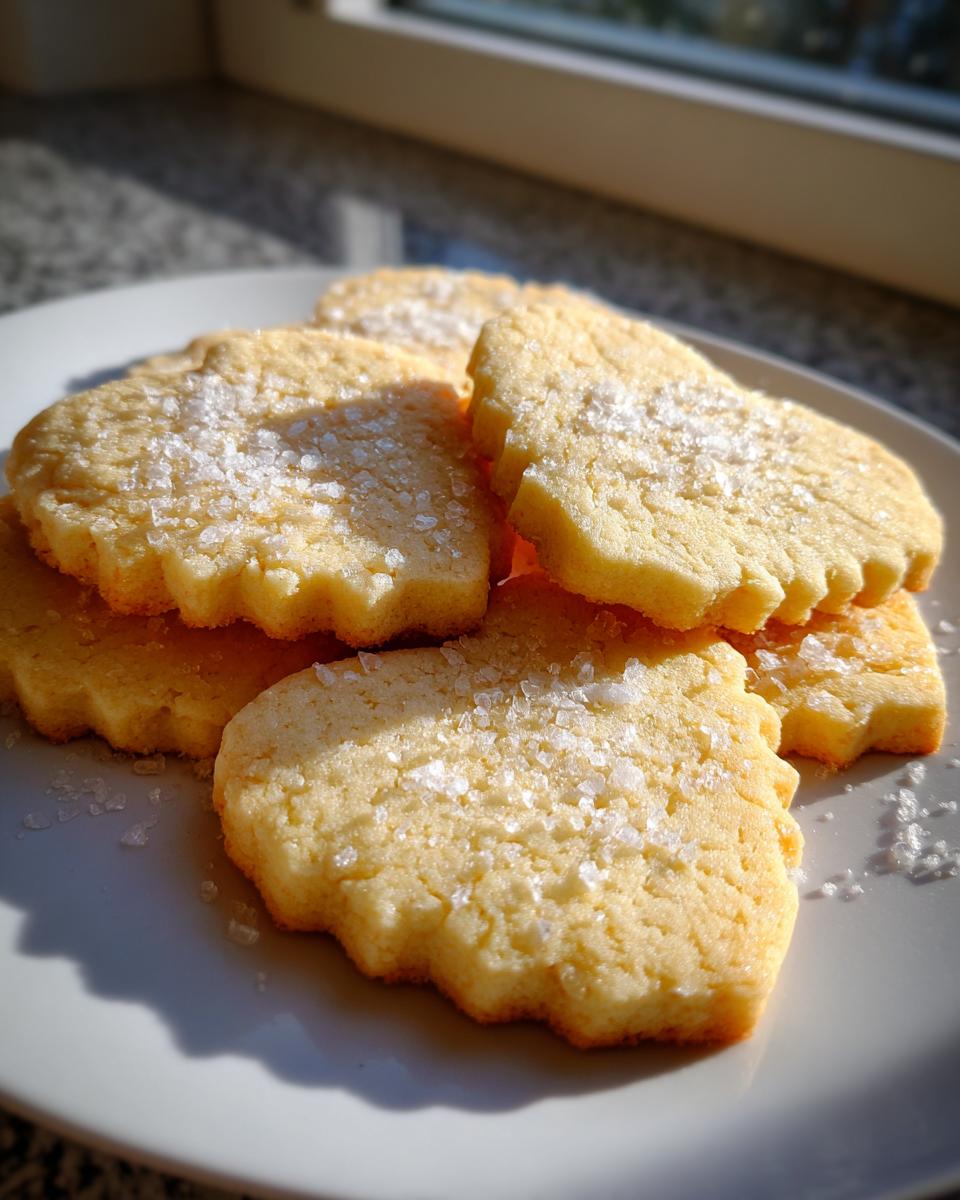
Once chilled, flour your workspace lightly. Roll out one disk at a time to a uniform thickness of about 1/4 inch. Rolling evenly ensures they all bake at the same rate—no burnt edges next to doughy centers! Use your fanciest cookie cutters and transfer them gently onto parchment-lined baking sheets. Gather the scraps, give them a very quick knead back into a disk, and pop them back in the fridge for just 10 minutes before re-rolling, just to firm them up again.
Baking and Cooling Your Vegan Sugar Cookies
Preheat your oven to 350°F (175°C). Pop those prepared sheets into the preheated oven. This generally takes between 8 to 10 minutes. Here’s another personal preference: for the softest result, I pull them out around the 8-minute mark. You want the edges to just be showing a *hint* of golden color, but the centers should still look pale. They will firm up a bit more as they cool.
Don’t try to peel them off the cookie sheet immediately; they are far too delicate! Let them rest right there on the sheet for about five minutes. Then, use a thin spatula to carefully move them onto a wire rack. They absolutely must be completely cool before you even think about touching them with icing. If you rush the cooling process, you face a sticky, melted mess that defeats the purpose of all that careful chilling!
Mastering the Vegan Royal Icing for Decorating
You’ve done the hard work, and those vegan sugar cookies are perfectly cooled. Now comes the true artistry: the icing! Since these are designed to be cut-outs, you need an icing that looks glossy and holds those tight lines you draw, but we still need to keep it completely plant-based. The recipe I shared in the notes—which uses aquafaba—is my absolute go-to for achieving that classic royal icing texture without any egg whites.
The magic here, just like with any good baking project, is consistency. You have to adjust it based on what you’re trying to do. If you’re just flooding a whole cookie surface with one solid color, you want it thin enough to flow smoothly off the spoon but thick enough that it doesn’t run right off the edge of the cookie onto your counter. That usually means it should drop off the spoon in a slow, steady ribbon, disappearing back into the bowl after about ten seconds.
If you need that stiff peak consistency—perfect for piping borders or writing little details—you just need to keep whisking in more powdered sugar, a tablespoon at a time, until it looks thick and holds its shape when you lift the whisk. If, oops, you added too much sugar and it turns into cement, don’t panic! Just whisk in a few drops of water or maybe a tiny splash more aquafaba until it loosens up again. This icing hardens beautifully; just let it sit overnight or for several hours at room temperature. You can find more advanced decorating tips and techniques in my guide on making cookie icing that hardens, which is essential for stacking or shipping your beautiful treats!

Tips for Successful Vegan Holiday Cookies Baking
Baking vegan holiday cookies is meant to be joyful, not stressful! These cookies are usually made during busy times, so I want to pass along a few tricks that ensure your dough behaves perfectly, especially when you’re working with non-traditional ingredients. It’s all about managing temperature and knowing when to pivot the recipe slightly.
First, let’s talk vegan butter again. You need it to be truly softened—like, barely holding its shape—but it should *never* look oily or melted when you start creaming it. If it’s too cold, the sugar won’t incorporate those essential air bubbles. If it’s too warm, you lose the structure required for clean cut-outs. I usually take mine out about an hour before mixing, depending on how warm my kitchen is. Remember, this butter is crucial for that soft-yet-sturdy result!
My next big tip focuses on the flour. Because all-purpose flour varies so much, it’s smart to reserve about half a cup of the total amount and only add it if the dough feels sticky after the first incorporation. If your dough feels slightly tacky, dust your hands lightly rather than dumping in more flour. Adding too much flour is the fastest way to turn these beautifully intended soft cookies into something hard and crumbly.
Now, a quick note if you decided you don’t have time for rolling and cutting—maybe you just want a quick batch of homemade vegan treats. You can absolutely skip the chilling time mentioned earlier! Just scoop the dough out by the tablespoon, flatten them just a little bit with the bottom of a glass (like a classic thumbprint press), and bake them as drop cookies. They will spread a bit more, giving you a thicker, chewier result that you can still frost. Different shapes, same delicious dough!
Finally, when decorating for the holidays, sometimes condensation is the enemy of hardened icing. If you need to stack or package your cookies right away, place the decorated ones on a rack in front of a small, **very low-speed** fan for about 30 minutes. This helps the icing skin over quickly without baking the cookie underneath. It’s a little trick I picked up trying to ship baked goods without them getting messy in transit!
If you’re looking for a bar-style option that’s just as tender and uses similar ingredients, definitely check out my recipe for Christmas sugar cookie bars!
Storage and Keeping Your Vegan Sugar Cookies Fresh
I always try to bake these vegan sugar cookies a day or two ahead of any big event, especially if I plan on decorating them. It saves so much stress on the day of the party! How you store them depends entirely on whether or not you’ve applied that beautiful icing yet, so let’s talk about both scenarios for keeping these homemade vegan treats in top shape.
For undecorated cookies—the plain, naked rounds waiting for their artistic makeover—storage is super simple. Once they are completely cool (and I mean stone cold!), place them in a single layer in an airtight container. If you have a lot, you can layer them, but put a piece of parchment paper between each layer so they don’t stick together. Left like this at cool room temperature, they stay perfectly soft and chewy for a good four to five days. Don’t bother with the fridge unless your kitchen is extremely hot, as the cold can sometimes dry out the starches and make them a little firmer than we want.
Now, once they are iced, things change a bit, especially with royal icing. If you used the aquafaba icing mentioned earlier, it sets up hard and dry at room temperature, which is great for stacking. Store your decorated dairy free sugar cookies in a single layer in an airtight container, again using parchment or wax paper between them to protect the beautiful designs. They will hold up wonderfully for about three days at room temperature. If you wait too long, the icing might start to absorb moisture from the cookie itself, which can soften the shell slightly.
If you have more cookies than you can possibly eat in a week (which hardly ever happens in my house!), you can absolutely freeze them. For the un-iced cookies, wrap them tightly in plastic wrap, then tuck them into a freezer bag. They handle freezing really well for up to three months. When you’re ready to bake or decorate, just let them thaw overnight in the fridge first, then bring them to room temperature before decorating. If you freeze them *after* they are iced, just be aware that condensation might form when they thaw, which can slightly compromise the icing’s finish. I always recommend icing them fresh after thawing if you are worried about presentation!
Variations on These Easy Vegan Cut Out Cookies
While the classic vanilla flavor of these vegan sugar cookies is truly perfect—it lets the frosting shine, after all—sometimes you just need that extra little something, especially when you’re leaning into festive flavors. Since the base dough is so sturdy, thanks to that essential chilling time, we can play around with the extracts and zest without worrying about sad, spread-out shapes. These small additions can transform them into the perfect eggless Christmas cookies without losing their ability to hold those sharp edges.
I look at this recipe like a blank canvas. You don’t need to change the structure at all—no need to add more liquid or adjust the flour—just tweak the aromas! If you want something bright and clean for the spring, try adding the zest of one whole lemon right into the creamed butter and sugar step. That little burst of citrus really wakes up the dough. I find that using a bit more of the almond extract, maybe bumping it up to a full teaspoon, also gives it a lovely, almost marzipan-like depth that feels very special.
For those deep winter holidays, leaning into spice is always a win. You can turn these into subtly spiced vegan holiday cookies by reducing the vanilla extract slightly and incorporating a small amount of spice blend when you add the dry ingredients. I’m talking about maybe 1/2 teaspoon of cinnamon, a pinch of nutmeg, and a tiny whisper of ground cloves. It won’t compromise the color or the texture, but it adds that warm, cozy scent as they bake. In fact, if you love that warm spice profile, you might want to check out my full recipe for chai spice sugar cookies sometime, though that dough is slightly different and meant to be softer!
The key with all these variations on my easy vegan cut out cookies is the extraction. Whether you are using zest or spices, make sure you are incorporating those dry additions during the creaming/mixing stage so they distribute evenly throughout the dough. This layering of subtle flavor ensures every single cookie, no matter how small the shape, tastes incredible!
Frequently Asked Questions About Plant Based Cookie Recipes for Decorating
It’s natural to have questions when working with new ingredients, especially when you are trying to achieve that perfect holiday cookie result! Making vegan sugar cookies involves a few points that can trip up even seasoned bakers. I’ve gathered the questions I hear most often about these plant based cookie recipes for decorating right here, so you can bake with total confidence.
Can I use a different flour for these vegan sugar cookies?
This is a great question, especially if you need to avoid gluten! For this specific cut-out recipe, I strongly advise sticking to all-purpose flour as written. The structure of the cookie relies on the specific protein content in wheat flour, which is what keeps the dough from spreading and allows it to be rolled thin. If you substitute with a gluten-free blend, you will certainly lose the ability to roll and cut intricate shapes neatly. If you must go gluten-free, I highly recommend looking for a specific, dedicated recipe designed for gluten-free vegan cut-outs, as they usually require specialty binders like xanthan gum that aren’t in this formula.
How do I prevent my vegan sugar cookies from getting hard?
This usually happens for two reasons, so we tackle both! First, don’t overbake them! I can’t stress this enough: pull them from the oven when they look *slightly* underdone in the center. They firm up as they cool. Second, check your cooling process. If you leave them too long on the hot baking sheet, they continue to bake off residual heat. Make sure you transfer them to a wire rack within about five minutes of pulling them out so air can circulate underneath them. When stored correctly in an airtight container, these cookies stay soft and chewy for days.
Can I freeze the dough?
Yes, absolutely! This is one of my favorite time-saving tricks for holiday prep. Once you’ve made the dough and divided it into disks, wrap each disk tightly in plastic wrap and then tuck them into a freezer-safe bag or container. They freeze beautifully for up to three months. When you’re ready to bake, just move the disk over to the refrigerator and let it chill overnight, or for at least 6 hours, before rolling. Do NOT try to roll or cut the dough while it’s still frozen or semi-frozen; you’ll just end up with crumbs!
What exactly is aquafaba, and why is it in the icing?
Aquafaba is just the fancy term for the liquid drained from a can of chickpeas—seriously! It’s truly an amazing ingredient in dairy free sugar cookies decorating because the protein structure in that liquid mimics egg whites perfectly when beaten. We use it in the royal icing recipe note because it whips up stiff, helps the icing dry hard enough to protect your designs, and it’s completely flavorless in this quantity. It’s magic for making beautiful, stand-up icing!
If you are looking for other ways to use aquafaba in softer homemade vegan treats, you might enjoy my recipe for pumpkin whoopie pies, where I use it for a fluffy filling!
Nutritional Estimate for Homemade Vegan Treats
As a disclaimer, please know that these numbers are an estimate based on the standard ingredients I listed and the yield of 24 cookies. If you use a different type of vegan butter or add other mix-ins, your totals will change! But for a baseline estimate of these incredibly delicious homemade vegan treats, here is the breakdown per one cookie:
- Serving Size: 1 cookie
- Calories: 180
- Sugar: 15g
- Sodium: 110mg
- Fat: 9g
- Saturated Fat: 3g
- Unsaturated Fat: 6g
- Trans Fat: 0g
- Carbohydrates: 24g
- Fiber: 0g
- Protein: 2g
- Cholesterol: 0mg
The Ultimate Vegan Cut-Out Sugar Cookies for Decorating
Create beautiful, soft, and chewy vegan sugar cookies that hold their shape perfectly for intricate decorating. This recipe uses simple plant-based ingredients for festive holiday baking or any special occasion.
- Prep Time: 30 min
- Cook Time: 10 min
- Total Time: 160 min
- Yield: 24 cookies 1x
- Category: Dessert
- Method: Baking
- Cuisine: American
- Diet: Vegan
Ingredients
- 1 cup vegan butter, softened
- 1 cup granulated sugar
- 2 tablespoons unsweetened plant milk (soy or almond work well)
- 1 tablespoon cornstarch
- 2 teaspoons vanilla extract
- 1/2 teaspoon almond extract
- 3 cups all-purpose flour, plus more for dusting
- 1 teaspoon baking powder
- 1/2 teaspoon salt
Instructions
- In a large bowl, cream together the softened vegan butter and granulated sugar until light and fluffy. This step builds the cookie’s structure.
- Beat in the plant milk, vanilla extract, and almond extract until just combined.
- In a separate medium bowl, whisk together the flour, baking powder, and salt.
- Gradually add the dry ingredients to the wet ingredients, mixing on low speed until a soft dough forms. Do not overmix.
- Divide the dough in half, flatten each half into a disk, wrap tightly in plastic wrap, and chill in the refrigerator for at least 2 hours. Chilling is key for cut-out cookies that do not spread.
- Preheat your oven to 350°F (175°C). Line baking sheets with parchment paper.
- On a lightly floured surface, roll out one disk of dough to about 1/4 inch thickness. Use your favorite cookie cutters to cut out shapes.
- Carefully transfer the cut-out cookies to the prepared baking sheets. Gather and re-roll scraps as needed.
- Bake for 8 to 10 minutes, or until the edges are just beginning to turn light golden. For softer cookies, err on the side of underbaking slightly.
- Let the cookies cool on the baking sheet for 5 minutes before moving them to a wire rack to cool completely before decorating.
Notes
- For the best vegan royal icing for decorating, whisk together 3 cups powdered sugar, 3 tablespoons aquafaba (chickpea liquid), and 1 teaspoon vanilla extract until smooth. Add more powdered sugar for a thicker consistency or a few drops of water for a thinner glaze.
- If you prefer a drop-style vegan sugar cookie, skip chilling and drop rounded tablespoons of dough onto the sheet, flattening slightly with the bottom of a glass. Bake for 10-12 minutes.
- For a richer flavor, use a high-quality vegan butter substitute.
Nutrition
- Serving Size: 1 cookie
- Calories: 180
- Sugar: 15g
- Sodium: 110mg
- Fat: 9g
- Saturated Fat: 3g
- Unsaturated Fat: 6g
- Trans Fat: 0g
- Carbohydrates: 24g
- Fiber: 0g
- Protein: 2g
- Cholesterol: 0mg