

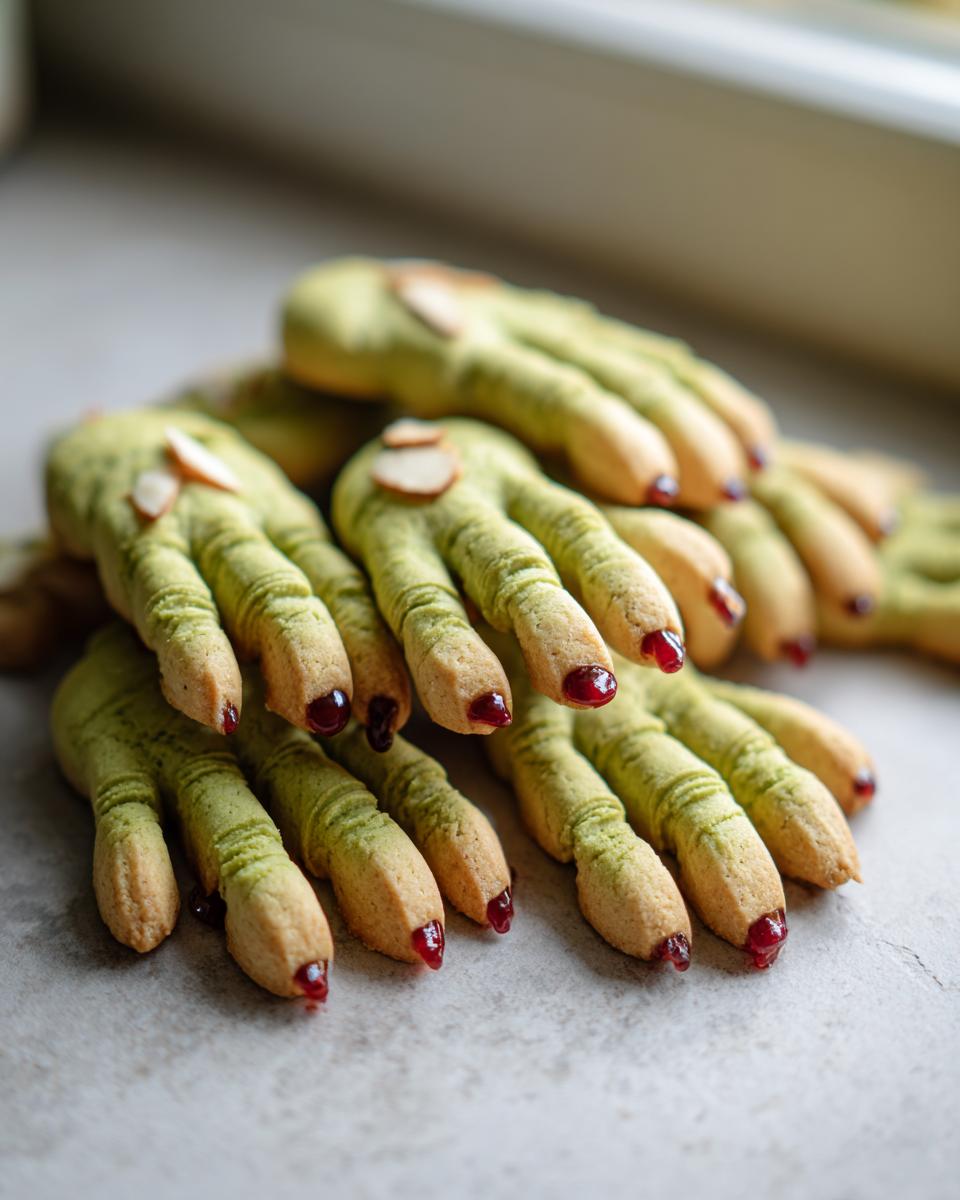
Oh, Halloween! For me, it’s not just about the candy or the costumes, it’s about the sheer *fun* of making things look super spooky and totally delicious. And let me tell you, nothing screams Halloween quite like a batch of my homemade witch finger cookies! These aren’t just any cookies; they’re like mini edible works of art – buttery shortbread turned into creepy, green, gnarled fingers, complete with almond nails and a little dab of jam for that oh-so-realistic blood effect. I remember making these for my niece’s first big Halloween party, and watching her eyes light up at these surprisingly simple but *so* creepy treats was just the best! Crafting these has become a little tradition for me, a way to put that special Halloween magic into every bite.
- Why You'll Love These Witch Finger Cookies
- Ingredients for Your Spooky Witch Finger Cookies
- Crafting Perfect Witch Finger Cookies: Step-by-Step
- Tips for Success with Witch Finger Cookies
- Variations and Creative Ideas for Your Witch Finger Cookies
- Make Ahead and Storage for Your Witch Finger Cookies
- Frequently Asked Questions about Witch Finger Cookies
- Nutritional Information for Witch Finger Cookies
- Share Your Spooky Creations!
Why You’ll Love These Witch Finger Cookies
Seriously, who wouldn’t love these? They’re:
- Spooktacularly spooky: The green color, knobbly shape, and bloody nails are just perfect for Halloween!
- Buttery bliss: They’re made with simple shortbread dough, so they’re melt-in-your-mouth delicious.
- Totally customizable: Want brighter green? Add more food coloring! Different jam? Go for it!
- Party perfection: They look amazing on a dessert table and always get people talking.
Ingredients for Your Spooky Witch Finger Cookies
Alright, let’s get our witchy ingredients together! You’ll need the basics for a really fantastic shortbread, which as you know, is my go-to when I want something that tastes super buttery and holds its shape beautifully. For our spooky fingers, here’s what you’ll want:
- 2 cups all-purpose flour – just your regular baking flour, nothing fancy needed here.
- 1 cup unsalted butter, softened – it’s super important that this is softened, not melted. We want it nice and creamy.
- 1/2 cup powdered sugar – for that lovely tender crumb and a touch of sweetness.
- 1 large egg yolk – this adds richness and helps bind everything together.
- 1 teaspoon vanilla extract – always a good splash of flavor!
- 1/4 teaspoon salt – just to balance out all that sweetness.
- Green food coloring – now, I *really* prefer gel coloring here. It gives you that intense, spooky green without adding extra liquid that could mess with the dough.
- 1/2 cup blanched slivered almonds – these are our creepy fingernails! Make sure they’re blanched, meaning the skins are already off.
- 2 tablespoons strawberry or raspberry jam, warmed – we’ll warm this just a tiny bit so it’s easy to dab on like blood. Strawberry or raspberry gives the best color, in my opinion!
Crafting Perfect Witch Finger Cookies: Step-by-Step
Alright, team, let’s get our witchy hands busy! Making these witch finger cookies is honestly one of my favorite parts of Halloween baking because they just look SO creepy and cool. It’s like a little edible sculpture project! Don’t worry, it’s not complicated at all, just a few fun steps.
Preparing the Dough for Witch Finger Cookies
First things first, we need to get this dough just right. Grab your softened butter and that powdered sugar. Cream them together until they look pale and fluffy – this is where we build that lovely tender texture. Then, mix in the egg yolk and vanilla. Dump in your flour and salt, and mix it up until it *just* comes together. Now for the fun part: the green coloring! Add it a little at a time. Remember, gel coloring is your friend here for a really vibrant, spooky shade without making the dough watery.
Chilling and Shaping Your Witch Finger Cookies
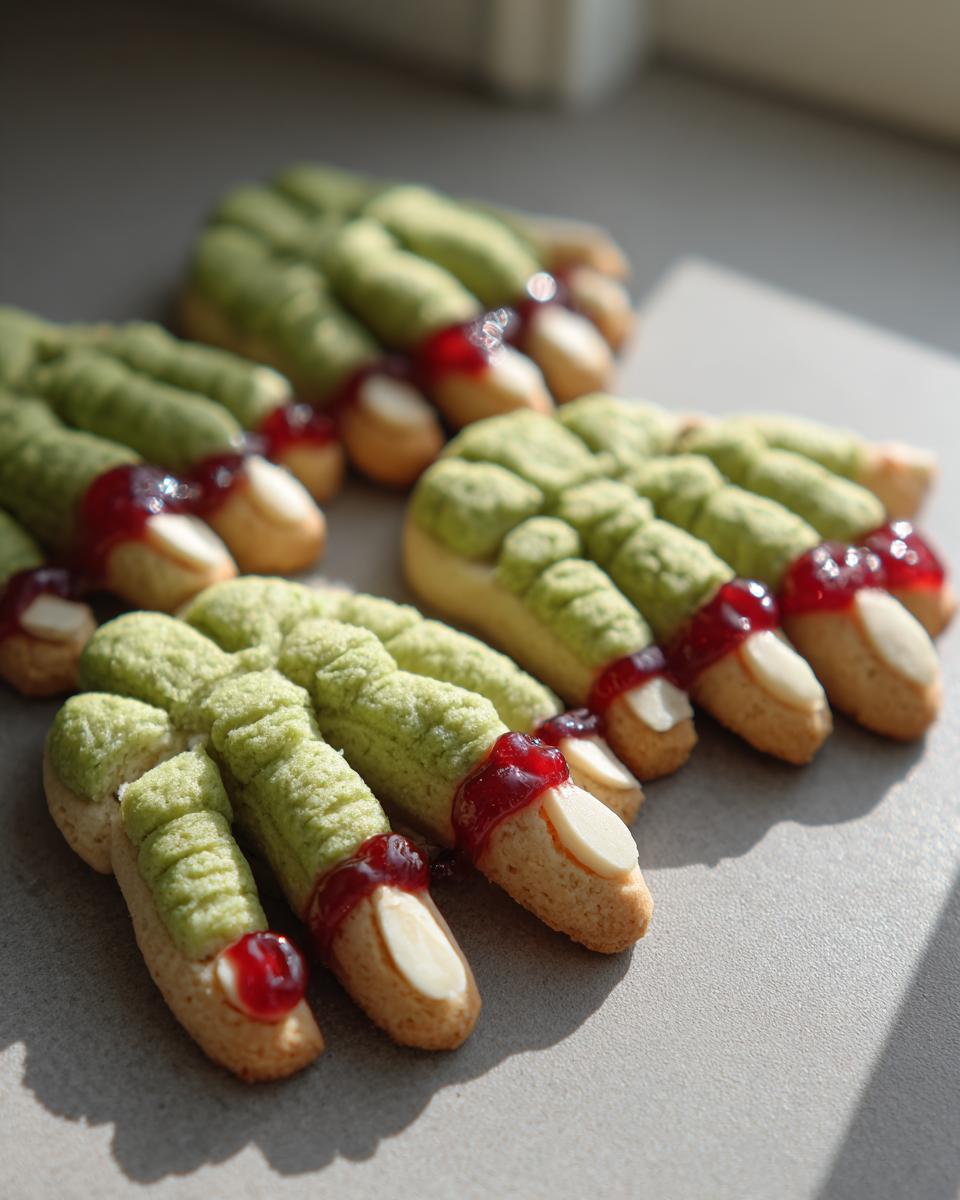
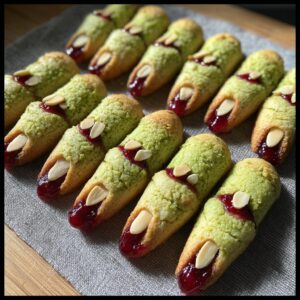
This step is crucial, trust me! Wrap that green dough up tight in plastic wrap and pop it in the fridge for at least 30 minutes. This makes it firm up, and oh-so-much easier to shape without getting sticky everywhere. While it’s chilling, preheat your oven to 350°F (175°C) and line a baking sheet with parchment paper – this is key to keeping them from spreading too much. Once chilled, scoop about two tablespoons of dough. Roll it into a finger shape, tapering one end and flattening the other. Use a knife or even a toothpick to score those knobbly knuckle lines. Then, gently press a slivered almond onto the tapered end. It’s going to be your witch’s creepy nail! Make sure to place them a good couple of inches apart on the baking sheet, they do spread a *little*. You can peek at my blog for visual guides if you need them!

Baking and Cooling Your Creepy Cookies
Into the oven they go for about 12 to 15 minutes. Keep an eye on them! You want the edges to be just *lightly* golden. If they get too brown, they’ll be dry and might spread more. Once they’re out, let them hang out on the baking sheet for about 5 minutes. This lets them set up a bit. Then, carefully transfer them to a wire rack to cool completely. Patience here is rewarded with perfectly shaped, creepy fingers!
Decorating Your Witch Finger Cookies with ‘Blood’
Okay, the grand finale! Grab that strawberry or raspberry jam and just give it a quick gentle warm-up – you can pop it in the microwave for like, 10 seconds, or just put it in a little bowl next to the warm oven. You don’t want it hot, just easier to swirl. Take a toothpick, dip the tip into the warmed jam, and then dab it around the almond “nail” and maybe add a little drip down the finger. It looks so realistic! You can go as subtle or as gory as you like with this part.
Tips for Success with Witch Finger Cookies
Okay, wanna make sure your witch finger cookies turn out perfectly creepy and delicious every single time? I’ve picked up a few tricks along the way! Sometimes shortbread can be a little… temperamental, but these little tips will save you from any baking disasters and get you those Insta-worthy spooky cookies fast. You know, like how my pumpkin pancakes always hold their shape perfectly, or my amazing pumpkin spice cake stays so moist, it’s all in the technique!
How to Keep Shortbread Cookies from Spreading
The number one thing people worry about with shortbread is it spreading into sad, flat blobs instead of fabulous fingers. The secret? Make sure your butter is *softened*, not melted! If it’s too soft, the cookies will spread like crazy. Also, a good 30-minute chill time in the fridge for your dough is non-negotiable. It firms everything up so the shape stays put. And try not to overmix the dough once you add the flour; you want to keep that buttery structure intact.
Achieving the Best ‘Bloody’ Effect
For that truly gruesome, realistic look, skip the artificial dyes and go for a good quality strawberry or raspberry jam. Warming it up *very gently* is key – just a few seconds in the microwave or a warm water bath. You want it fluid enough to dab easily but not hot. Use a thin toothpick to carefully apply the jam around the almond “nail” and maybe add a little drip or two down the finger. It really makes them pop and look super extra!

Variations and Creative Ideas for Your Witch Finger Cookies
You know, the basic witch finger cookie recipe is fantastic, but sometimes it’s fun to get a little wild with it, right? Halloween is the perfect time for spooky cookie ideas, and these fingers are such a great canvas! You could try different food coloring shades – maybe a dusty purple or a deep black for a more sinister look? Or how about dusting them with a little edible glitter after baking for some eerie sparkle? Instead of almonds, maybe try pepitas for a different nail shape or even a slivered Brazil nut! If you’re feeling really adventurous, you could even press a tiny bit of green candy melt into the knuckle lines before baking for extra dimension. They’re such a fun base for any edible Halloween crafts! Check out my monster cookie recipefor more fun Halloween baking inspiration!
Make Ahead and Storage for Your Witch Finger Cookies
The best part? You can totally get these spooky little guys ready ahead of time! If you want to make make ahead halloween cookies that are already shaped and baked, just let them cool completely. Then, store them in an airtight container at room temperature. They stay wonderfully fresh and delicious for up to 5 days, which is perfect for busy Halloween week! If you’re feeling super organized, you can even mix and chill the dough a day in advance, just make sure it’s wrapped really well so it doesn’t dry out. We do this with my freezer breakfast burritos all the time!
Frequently Asked Questions about Witch Finger Cookies
You know, baking is a bit of a science, but it’s also about feeling your way through it. People always have questions about these witch finger cookies, especially when they’re trying to nail that super creepy look! Here are some of the things folks usually ask me, and my best advice based on my own baking adventures.
Can I use regular food coloring instead of gel for witch finger cookies?
You totally can! Just be aware that regular liquid food coloring adds more moisture to the dough. You might need to add just a smidge more flour to get the right consistency back. Gel colors are usually better because they’re so concentrated, you use less, and they don’t mess with the dough’s texture as much, giving you that vibrant, spooky green without all the fuss!
What kind of jam is best for the ‘blood’ effect?
For that perfectly gruesome, natural red jam for Halloween cookies, I always reach for raspberry or strawberry jam. They have a lovely vibrant red color that looks just like blood! Plus, their texture is usually pretty smooth once warmed, making it easy to dab and drip. Just make sure it’s seedless if you prefer a cleaner look, or leave the seeds in for a bit more texture!
How do I get the knuckle lines to show up clearly?
This is all about the scoring! Before you bake your almond nail jam blood cookies, grab a butter knife or even a clean toothpick. Gently press lines into the dough where the knuckles would be. Press firmly enough to make a clear indentation, but not so hard that you cut all the way through the dough. It’s amazing how much detail that adds to the final creepy-cute finger!
Nutritional Information for Witch Finger Cookies
Okay, so you’re wondering about the nitty-gritty of what’s in these creepy little guys! Here’s a general idea of what you’re looking at for one of these yummy witch finger cookies. Keep in mind this is just an estimate, as it really can vary a bit depending on your exact ingredients – like if you use a different jam or a slightly different brand of butter. Baking is an art, right? But this should give you a good ballpark!
Share Your Spooky Creations!
I absolutely LOVE seeing your baking creations! If you make these creepy-crawly witch finger cookies, please, please share them with me! Tag me on social media or leave a comment below – I’d be thrilled to see your spooky masterpieces. You can even reach out directly through my contact page! And hey, if you loved them, a quick rating is always super appreciated!
PrintWitch Finger Cookies
Create spooky and delicious witch finger cookies for Halloween. These buttery shortbread cookies are shaped like fingers, tinted green, and decorated with almond nails and jam ‘blood’ for a creepy, photo-worthy treat.
- Prep Time: 30 min
- Cook Time: 15 min
- Total Time: 45 min
- Yield: 18-24 cookies 1x
- Category: Dessert
- Method: Baking
- Cuisine: American
- Diet: Vegetarian
Ingredients
- 2 cups all-purpose flour
- 1 cup unsalted butter, softened
- 1/2 cup powdered sugar
- 1 large egg yolk
- 1 teaspoon vanilla extract
- 1/4 teaspoon salt
- Green food coloring (gel preferred for intensity)
- 1/2 cup blanched slivered almonds
- 2 tablespoons strawberry or raspberry jam, warmed
Instructions
- In a large bowl, cream together the softened butter and powdered sugar until light and fluffy.
- Beat in the egg yolk and vanilla extract until well combined.
- In a separate bowl, whisk together the flour and salt.
- Gradually add the dry ingredients to the wet ingredients, mixing until just combined.
- Add green food coloring, a little at a time, until you achieve your desired spooky green hue. Mix until the color is uniform.
- Wrap the dough in plastic wrap and chill for at least 30 minutes to make it easier to handle.
- Preheat your oven to 350°F (175°C). Line baking sheets with parchment paper.
- Take about 2 tablespoons of dough and shape it into a finger shape on the prepared baking sheet. Gently taper one end for the knuckle and flatten the other end for the palm.
- Use a knife or toothpick to score lines for knuckles.
- Press a slivered almond onto the tapered end for a fingernail.
- Repeat with the remaining dough, placing cookies about 2 inches apart.
- Bake for 12-15 minutes, or until the edges are lightly golden. Do not overbake, as this will make them spread.
- Let the cookies cool on the baking sheet for 5 minutes before transferring them to a wire rack to cool completely.
- Once cooled, gently insert a toothpick into the almond ‘nail’ and dip it into the warmed jam. Dab the jam around the nail and on the cookie to create a ‘bloody’ effect.
Notes
- For best results and to prevent spreading, ensure your butter is softened but not melted.
- Chilling the dough thoroughly will help the cookies hold their shape.
- Gel food coloring provides a more vibrant color without altering the dough consistency.
- If almonds are not sticking, you can use a tiny bit of the warmed jam as ‘glue’.
- For a more realistic bloody effect, use a toothpick to carefully apply the jam.
- These cookies can be made ahead and stored in an airtight container at room temperature for up to 5 days.
Nutrition
- Serving Size: 1 cookie
- Calories: 150
- Sugar: 8g
- Sodium: 30mg
- Fat: 9g
- Saturated Fat: 5g
- Unsaturated Fat: 4g
- Trans Fat: 0g
- Carbohydrates: 15g
- Fiber: 1g
- Protein: 2g
- Cholesterol: 30mg