
When I think about the absolutely perfect Sunday roast dinner, it’s not just the glistening beef or the rich gravy that comes to mind—it’s the towering, golden majesty of a perfectly executed Yorkshire pudding. For years, I struggled! I got flat, sad little discs instead of those magnificent puffs. It took a few failed holiday roasts and a lot of research into *traditional English recipes* before I cracked the code. Now, I’m sharing my best secret: The Ultimate Foolproof Yorkshire Pudding Recipe, designed specifically for maximum puff and those wonderfully crispy edges you dream about. Trust me, this technique is a game-changer for any host.
- Why This Yorkshire Pudding Recipe Guarantees Maximum Puff
- Gathering Ingredients for Perfect Yorkshire Pudding
- Step-by-Step Instructions for Your Yorkshire Pudding
- Serving Your Yorkshire Pudding: A Classic Roast Dinner Accompaniment
- Tips for Making Authentic Yorkshire Pudding Every Time
- Variations on the Classic Yorkshire Pudding
- Storage and Reheating Instructions for Yorkshire Pudding
- Frequently Asked Questions About Yorkshire Pudding
- Estimated Nutritional Profile for Yorkshire Pudding
- Estimated Nutritional Profile for Yorkshire Pudding
Why This Yorkshire Pudding Recipe Guarantees Maximum Puff
Look, making a truly puffy pudding—one that stands tall and proud like a little edible castle—isn’t about magic; it’s about thermal shock and preparation. When I first tried this, thinking I could just whip up the batter five minutes before dinner, I ended up with thin, greasy bases. Yikes! I realized that achieving those tall sides and crispy edges, which is the mark of a brilliant *British side dish*, requires respect for the science.
The three things that separate a disaster from a triumph are simple: your oven must be screaming hot, the fat has to be smoking, and your batter needs time to think about what it’s about to do. If you manage those three things, I promise you’ll master *how to make puffy puddings* without breaking a sweat.
The Power of Resting Your Yorkshire Pudding Batter
This is the non-negotiable secret, truly. You absolutely must let the batter rest. I usually aim for at least 30 minutes on the counter, but if I plan ahead the night before—which is better for any serious *classic roast dinner accompaniment*—I chill it overnight. Why? When the flour sits in the liquid, the starch fully hydrates, it swells up, and the gluten chains relax. When that relaxed, well-fed batter hits the searing-hot oil, that stored energy translates directly into a massive, beautiful rise. It’s one of the most important *batter resting techniques* you can use in the kitchen. You can see how the experts handle it over at Serious Eats, but honestly, trust your home kitchen confidence and let it rest!
If you want to dive deeper into the science behind comforting bakes, feel free to explore some of my thoughts on technique over on the Unfold Recipes blog.

Gathering Ingredients for Perfect Yorkshire Pudding
Right, let’s talk about what you actually need to make these show-stoppers. Don’t be intimidated by the ingredient list; it’s wonderfully short! For 12 medium puddings, you need four large eggs, one cup of flour, one cup of milk, a half teaspoon of salt, and, critically, your fat. Remember, these simple components are what make a classic *yorkshire pudding* so brilliant.
I always use room temperature eggs; it just helps everything emulsify smoothly. And please gather everything before you turn the oven on—timing is everything here.
Ingredient Notes and Fat Selection for Yorkshire Pudding
The fat is arguably more important than anything else if you’re aiming for that incredible rise. You need something that can handle intense heat without smoking out your kitchen prematurely. Traditionally, beef dripping (or beef tallow) is the absolute best choice for authentic flavor; it’s what gives the deep, savory note that pairs so well with roast beef.
However, if you prefer not to use dripping, use a high smoke point oil like canola or vegetable. That searing, smoking heat is what creates the dramatic puff in your batter. If you follow these exact measurements and temperature rules, you’ll find this works beautifully as a homemade popovers recipe base, too!
Step-by-Step Instructions for Your Yorkshire Pudding
Okay, deep breath! This is where the action happens, and following these steps precisely is how we guarantee you get that impressive lift in your Yorkshire pudding. First, make sure your oven is preheated to a scorching 450°F (232°C). While that’s heating up, get your batter ready and place your muffin tin or roasting pan right inside so it gets thoroughly warmed up. We need everything screaming hot!
The mixing part is fast, but don’t rush the resting! Once rested, the preparation continues. You carefully take out the piping hot tin—use good mitts!—and immediately drop in that teaspoon of beef dripping or oil into each cup. You’ll know it’s ready when the fat is shimmering and just starting to smoke. That smoke is the key!
Achieving the Perfect Batter Consistency for Yorkshire Pudding
When you mix, remember I mentioned just getting it smooth? That’s because we don’t want to develop too much gluten, which makes things tough instead of light. Grab your whisk and combine the eggs, flour, and salt first. Then stream in that milk slowly. It should look thin—thinner than pancake batter, almost watery. Seriously, if you see one or two tiny lumps remaining, just leave them be! Overmixing kills the air we trap in there, and that trapped air is what makes for the beautiful *airy baked batter*.
The Crucial Step: Heating the Fat for Yorkshire Pudding
This moment cannot be rushed, and it’s why speed is important once the batter is ready. Drop the fat into the preheated tin inside the hot oven. You must let it sit there for a solid five to ten minutes while the batter is waiting nearby. We are looking for the fat to be fiercely, wickedly hot—smoking, honestly. When you pour the room-temperature batter into that smoking oil, the immediate sizzle causes the water content in the batter to turn instantly to steam, and *that* is what forces the puddings sky-high, creating those lovely, *crispy savory bakes*. As soon as they are filled, back into the oven they go. Whatever you do, keep that oven door shut for the first 20 minutes!
If you want more guidance on timing and troubleshooting successful bakes, check out this great resource on pudding recipes like this one here.

Serving Your Yorkshire Pudding: A Classic Roast Dinner Accompaniment
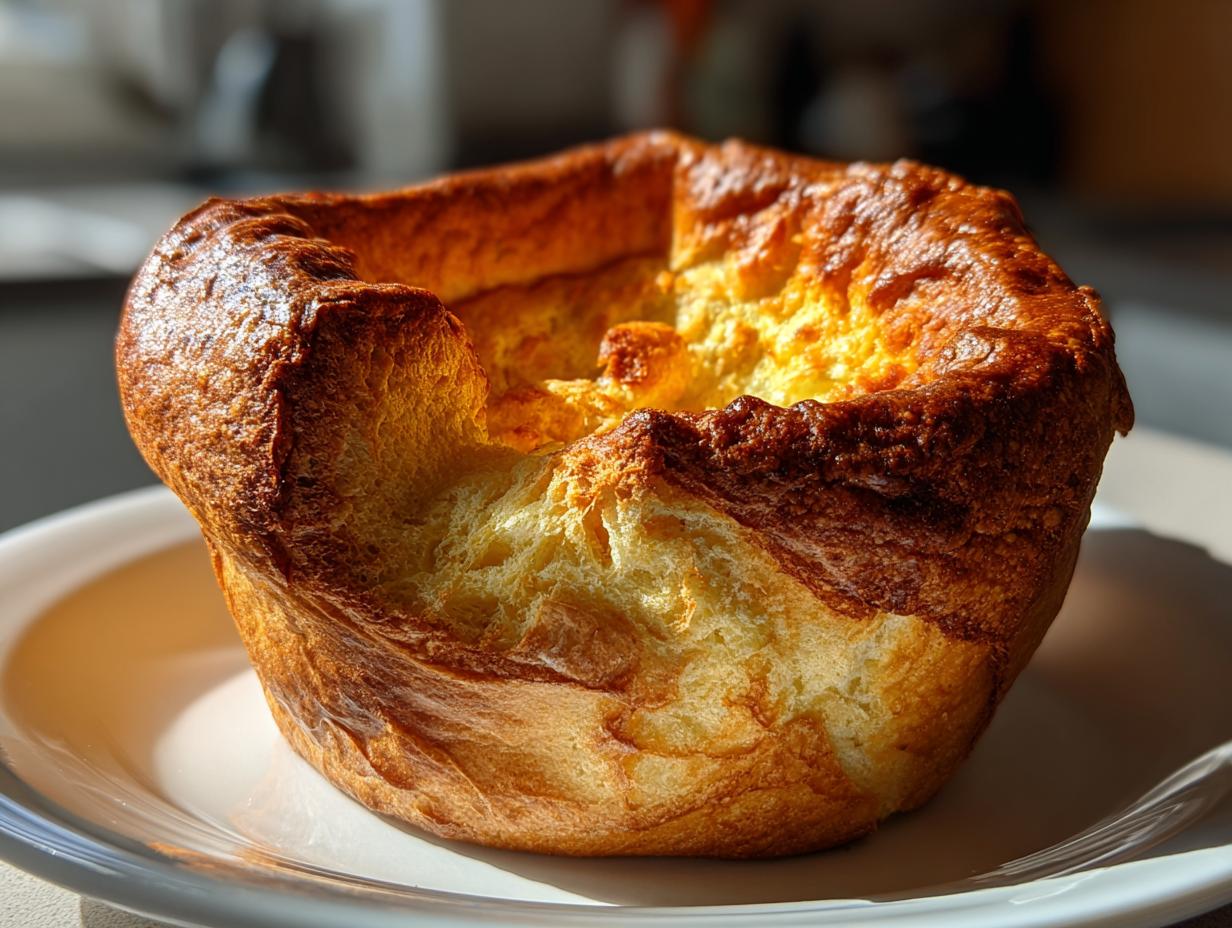
The moment of truth! Your Yorkshire puddings have emerged from the oven—tall, deeply golden, and unbelievably crispy around the edges. Seriously, take a moment to admire them; they deserve it! These right here are the pinnacle of *Sunday roast essentials* and deserve center stage next to your main course.
The absolute best way to enjoy a proper *yorkshire pudding* is straight out of the oven. They deflate faster than a sad balloon once they cool down, losing that amazing height we worked so hard for. They must be piping hot when they hit the plate!
This is why they are such an incredible *classic roast dinner accompaniment*. They are literally designed as *best gravy soaking sides*. Don’t be shy; make sure you have plenty of rich, savory gravy ready to pour liberally inside that beautiful cavity they form. If you’re looking for a pot roast recipe that demands an excellent side like this, check out my ideas for a slow cooker pot roast.
Tips for Making Authentic Yorkshire Pudding Every Time
Mastering this classic dish, one of my favorite *traditional English recipes*, really boils down to respecting the heat. I know I sound like a broken record, but if your oven isn’t accurate, your pudding won’t rise, no matter how well you rested that batter!
First, never check your oven temperature with a cheap thermometer; invest in a reliable oven gauge. If the recipe calls for 450°F, you need 450°F when that tin goes in. Secondly, and this is hard for us eager home bakers to do, you absolutely cannot open the oven door for the first 20 minutes. That rush of cooler air acts like a blast of cold water on a soufflé—it makes the towering structure collapse instantly. We want that beautiful, high rise in our *yorkshire pudding*!
If you’ve followed the resting rules and the hot fat rule, you should get fantastic results every time. For more insight into British baking history and technique, check out my notes on traditional English recipes, or have a look at this great guide on getting perfect results here.

Variations on the Classic Yorkshire Pudding
Once you have mastered the foolproof method above, you unlock a whole playground of savory possibilities! The base recipe for the *yorkshire pudding* is incredibly versatile, moving far beyond just a *classic roast dinner accompaniment*. It really showcases the breadth of simple, delicious *British side dishes* you can create with minimal fuss.
I love experimenting by spiking the batter just before it goes into the hot fat. It keeps the structural integrity but makes something completely new. Think of them less as puddings and more as mini savory baked cups, perfect for creative hosting!
Savory Additions to Your Yorkshire Pudding Batter
The easiest pivot is adding flavor directly into the batter. Try grating a little sharp cheddar cheese—I mean, who doesn’t love cheese?—right in. A tablespoon of finely chopped fresh herbs like thyme or chives also marries beautifully with that rich beef dripping flavor. Make sure whatever you add is finely chopped so it doesn’t weigh down the batter and prevent that crucial rise.
If you’re hosting a full appetizer spread instead of a roast, these mini savory cups are fantastic for filling later. You can find some of my favorite appetizer ideas, which often borrow from these savory bake concepts, over on my appetizers page.
Changing the Shape: From Muffin Tin to Specialty Bakes
While the classic muffin tin shape is iconic, don’t feel constrained! If you use a loaf tin, you get those wonderful deep trenches perfect for holding gravy—much more dramatic than the smaller versions. Or, you can use a popover pan, which is designed exactly for this kind of tall rise, though the standard muffin tin works just fine.
If you want a giant, show-stopping single Yorkshire pudding for your roast, use a large, shallow baking pan filled with hot fat. Pour the entire batch of batter in one go and bake it. You end up with one massive, crispy savory bake that you can slice at the table. It’s dramatic and fun!
Storage and Reheating Instructions for Yorkshire Pudding
Now, look, I’m going to be totally honest with you: a Yorkshire pudding is at its absolute peak five minutes after it comes out of the oven. That initial, glorious puff is sadly temporary! Gravity and cooling air are not our friends once we stop baking.
If you have leftovers—because sometimes we all make too many, right?—you want to store them immediately. Don’t let them sit on the counter sweating; that’s how they get soggy fast. The best way is to place them on a wire rack set over a baking sheet and let them cool completely before storing them in an airtight container at room temperature for maybe a day, or in the fridge for up to three days.
Reheating is the trickiest part because we need to evaporate any residual moisture trapped inside without burning the delicate exterior. Forget the microwave; that is guaranteed mush! To restore that crispy, airy center, you must use dry, high heat. Pop them directly back onto a baking sheet and heat them in a very hot oven—around 400°F (200°C)—for about four to six minutes.
Keep an eye on them! They will puff up again slightly, and you’ll know they are ready when they feel light and sound crisp when tapped. This trick works wonders for reviving your *crispy savory bakes* and ensuring your leftovers are still worthy of your fantastic gravy.

Frequently Asked Questions About Yorkshire Pudding
It’s completely normal to have questions when mastering a classic dish! Even with my tested recipe, people often wonder about slight adjustments for their specific oven or pantry situation. I’ve gathered the most common things that come up when making these *British side dishes* so you can bake with confidence every single time.
Why did my Yorkshire puddings not rise?
This is the million-dollar question, isn’t it? If they look flat, 99% of the time it comes down to two culprits: either your oven wasn’t hot enough (which means the fat wasn’t hot enough), or perhaps you peeked! Opening that oven door before the 20-minute mark lets in cold air and stops the steam mechanism that forces the pudding skyward. Resist temptation! A low oven temperature stops the moisture from instantly turning to steam, which is the real driver for that amazing puff.
Can I use different types of flour in my Yorkshire Pudding?
For that classic, towering shape and slightly chewy texture, all-purpose flour is truly the best option. It has the right balance of protein to create structure without becoming too dense. I wouldn’t recommend using heavy bread flour because it has too much protein and can make them heavy. If you are looking for gluten-free options, you might need to use a specialized blend designed for baking, as regular gluten-free flours tend to absorb moisture differently, making it harder to achieve that signature light texture we associate with authentic UK recipes.
Can I make Yorkshire Pudding batter the day before?
Yes, and I highly recommend it! As we discussed in the main steps, letting the batter do its thing undisturbed is essential. Resting the batter is one of the foundational *batter resting techniques*. Chilling the batter overnight allows the gluten to relax fully and the starch to completely saturate. When you pull that cold batter out and pour it into screaming-hot fat, the reaction is spectacular. This preparation step is key for the best *yorkshire pudding* rise you’ve ever seen.
Can I make these ahead for a holiday roast?
While the *best gravy soaking sides* are served immediately, you can certainly make them partially ahead. I advise against baking them fully the day before unless you plan to reheat them carefully in a very hot oven later. If you are making them for a big *holiday roast* feast, mix the batter the day before, let it rest in the fridge, and then bake them right before the meat comes out of the oven. That way, they are fresh, light, and still singing when you serve them!
Are Yorkshire Puddings healthy?
Let’s be real, they are a delicious, comforting bake, not a health food! They are fantastic when paired with lean roast meats, but thanks to the eggs, milk, and fat used, they are higher in fats and calories than, say, steamed vegetables. They are perfectly fine as part of a balanced meal, especially for a weekend *Sunday roast* celebration. Consider them a flavorful indulgence!
If you still have questions about specific measurements or techniques, please don’t hesitate to reach out to me directly through my contact page!
Estimated Nutritional Profile for Yorkshire Pudding
I always like to provide a rough guide to what’s in these beautiful bakes, although please remember that since these are homemade and depend heavily on the brand of oil or fat you choose, these figures are estimates only.
- Serving Size: 1 pudding
- Calories: 120
- Fat: 7g
- Carbohydrates: 11g
- Protein: 4g
I find that when they are balanced with lean roast beef and lots of vegetables, this *easy side dish for roast beef* fits perfectly into a beautiful, wholesome meal. Enjoy every crispy bite!
PrintThe Ultimate Foolproof Yorkshire Pudding Recipe: Achieving Maximum Puff and Crispy Edges

Learn the technique to make classic Yorkshire puddings that rise high, feature crispy edges, and have soft centers. This reliable recipe is an essential British side dish for any roast dinner.
- Prep Time: 10 min
- Cook Time: 25 min
- Total Time: 35 min
- Yield: 12 medium puddings 1x
- Category: Side Dish
- Method: Baking
- Cuisine: British
- Diet: Vegetarian
Ingredients
- 4 large eggs
- 1 cup all-purpose flour
- 1 cup whole milk
- 1/2 teaspoon salt
- 1/4 cup beef dripping or vegetable oil (for high smoke point)
Instructions
- Combine the eggs, flour, and salt in a large bowl. Whisk until just smooth.
- Gradually whisk in the milk until you have a thin, smooth batter, similar to heavy cream. Do not overmix; a few small lumps are acceptable.
- Cover the bowl and let the batter rest at room temperature for at least 30 minutes, or ideally, chill it in the refrigerator for several hours or overnight. This resting period is key for a good rise.
- Preheat your oven to 450°F (232°C). Place a 12-cup muffin tin or a shallow roasting pan into the oven while it preheats.
- Once the oven is hot, carefully remove the hot tin. Immediately place about 1 teaspoon of beef dripping or oil into each cup. The fat must be smoking hot before adding the batter.
- Quickly and carefully pour the batter into the hot fat, filling each cup about one-third full. Work fast to maintain the fat’s temperature.
- Immediately place the tin back into the hot oven. Do not open the oven door for the first 20 minutes of baking.
- Bake for 20 to 25 minutes, or until the puddings are deeply golden brown, puffed high, and the edges are crisp.
- Serve immediately with your roast beef and gravy.
Notes
- For the highest rise, ensure your oven temperature is accurate and the fat is smoking hot before you pour in the batter.
- If you are serving these with roast beef, use beef dripping (tallow) for the most authentic flavor.
- This recipe makes excellent homemade popovers; use it as a base for savory pastry creations.
Nutrition
- Serving Size: 1 pudding
- Calories: 120
- Sugar: 1
- Sodium: 150
- Fat: 7
- Saturated Fat: 2
- Unsaturated Fat: 5
- Trans Fat: 0
- Carbohydrates: 11
- Fiber: 0
- Protein: 4
- Cholesterol: 65