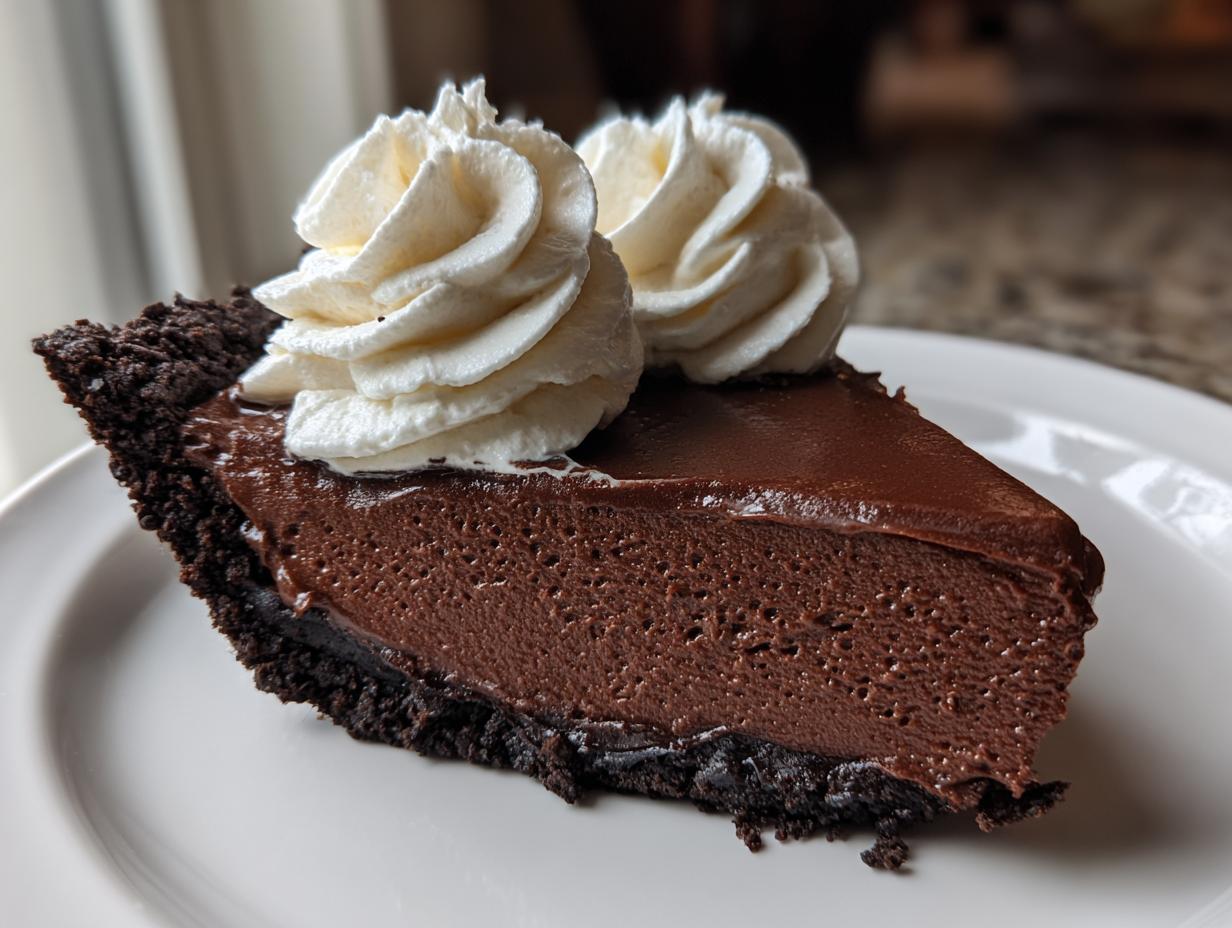

Oh, let’s talk about dessert, shall we? Sometimes you just crave that intensely decadent, melt-in-your-mouth experience without having to wrestle with your oven in the summer heat—or, honestly, just wanting to keep things simple for a big dinner party. That’s where this chocolate mousse pie comes in! After relying on my culinary training to master French techniques, I realized the most impressive desserts are often the ones that sneak in maximum flavor with minimal fuss. This recipe truly delivers that approachable elegance I always aim for: a truly rich, unbelievably creamy, and perfectly silky filling that sets up beautifully, all without turning the oven on once. It’s such a fantastic addition to any collection of desserts. Trust me, this no-bake wonder is about to become your favorite showstopper.
- Why This No Bake Chocolate Mousse Pie Recipe Stands Out
- Gathering Ingredients for Your Decadent Chocolate Mousse Pie
- Step-by-Step Instructions for the No Bake Chocolate Pie
- Tips for the Best Silky Chocolate Filling in Your Chocolate Mousse Pie
- Ingredient Notes and Substitutions for Your Chocolate Mousse Pie
- Serving Suggestions for This Impressive Dessert Recipes
- Storage and Make Ahead Dessert Tips for Your Chocolate Mousse Pie
- Frequently Asked Questions About Making a Chocolate Mousse Pie
- Sharing Your Beautiful Chocolate Mousse Pie Creation
Why This No Bake Chocolate Mousse Pie Recipe Stands Out
When you need that ‘wow factor’ without the commitment of baking, this chocolate mousse pie is unbeatable. I developed this specific structure to ensure absolute success for every home cook. You get the luxurious texture you dream of, but with none of the anxiety that comes from oven temperatures.
- Incredible Texture: The filling is intensely silky and creamy—pure chocolate heaven.
- Zero Sweat Factor: It’s entirely no-bake, which is a lifesaver during warmer months!
- Effortless Elegance: It looks like it took hours, making it one of my favorite impressive dessert recipes.
Gathering Ingredients for Your Decadent Chocolate Mousse Pie
Building this incredible chocolate mousse pie starts with quality ingredients—and you’ll be happy to see just how few components we actually need! Because this is a no-bake recipe, the texture really relies on the quality of what goes in, especially that glorious chocolate. When you gather your supplies, pay attention to those little details I mention, like making sure your chocolate isn’t piping hot when it hits the cream cheese base. We want silky, not scrambled! You can find more tips on achieving that perfect homemade chocolate mousse right here on the blog.
For the Oreo Crust Pie Base
This is where we build our foundation. The key here is making those cookies into fine crumbs so the crust presses together tightly and evenly.
- 1 3/4 cups Oreo cookie crumbs (that’s about 25 cookies, folks!)
- 6 tablespoons unsalted butter, melted
For the Silky Chocolate Filling
This is the heart of the dessert! Remember: the cream cheese must be softened, and that melted chocolate needs a few minutes to cool down so it doesn’t melt your cream cheese base.
- 1 package (8 ounces) cream cheese, softened
- 1 cup powdered sugar
- 1 teaspoon vanilla extract
- 1 cup heavy cream, cold (for whipping into the mousse)
- 8 ounces semi-sweet chocolate, melted and slightly cooled
For the Whipped Cream Topping Pie Finish
We finish with a light, cloud-like topping. Make sure this heavy cream is straight from the fridge for the best volume!
- 1 cup heavy cream, cold (for topping)
- 2 tablespoons powdered sugar (for topping)
- 1 teaspoon vanilla extract (for topping)
Step-by-Step Instructions for the No Bake Chocolate Pie
This is where the magic happens, and I promise, it’s so straightforward! Since this is a no bake chocolate pie, timing is critical, particularly when it comes to temperature differences. We need to build layers of texture—the crunch of the crust, the smooth cream cheese layer, and finally, that dreamy mousse. Follow these steps exactly, and you’ll have the most luxurious bite without ever turning on the stove or oven. I always tell people that folding that whipped cream in gently is the secret weapon here; don’t deflate your air!
Creating and Chilling the Oreo Crust Pie
First things first, we lock in that base. Take your combined Oreo crumbs and melted butter—it should look like wet sand, by the way—and press that mixture firmly into your 9-inch pie plate. I mean *firmly*! Use the bottom of a measuring cup to really pack it against the bottom and up the sides. This prevents crumbly edges later. Once it’s packed tight, pop that crust right into the freezer for 15 minutes. That quick chill helps it set up beautifully before we add any wet filling.
Assembling the Creamy Chocolate Filling
While that crust is chilling, we get the base going. In a large bowl—and this is important—beat your softened cream cheese until it’s luxurious and smooth. Mix in the powdered sugar and that first teaspoon of vanilla. Then, gently fold in the slightly cooled, melted semi-sweet chocolate until it’s just uniform. Next, grab a separate, very clean bowl and whip that first cup of cold heavy cream until you get those stiff peaks. Using a clean bowl ensures your cream whips up perfectly without any grease interfering!

Finalizing and Setting the Chocolate Mousse Pie
Now for the blending that creates that amazing airiness! Take your stiff whipped cream and fold it gently into the chocolate mixture in two batches. You want to see streaks disappear, but stop just before it’s totally one color—that signifies you’ve kept the air in. Pour all that beautiful, creamy chocolate filling right into your chilled crust and smooth the top. This needs a good long rest, so slide the whole chocolate mousse pie into the refrigerator for at least 4 hours. For the topping, just whip the remaining cream, sugar, and vanilla until you have soft peaks, and dollop it on right before serving!

Tips for the Best Silky Chocolate Filling in Your Chocolate Mousse Pie
Achieving that truly silky chocolate filling is all about technique, especially since we aren’t using any gelatin here! The biggest pitfall anyone runs into with a homemade mousse is deflated cream or, worse, weeping filling. I remember one disastrous Valentine’s dessert where I rushed folding the whipped cream—oops! The top looked shiny but the texture underneath was oddly dense.
The key I learned in culinary school is patience in two areas: first, use the best quality semi-sweet chocolate you can find; it really matters! Second, when folding the whipped cream into your chocolate-cream cheese base, use a large rubber spatula and adopt a gentle ‘cut down the middle and sweep up the side’ motion. Do it slowly, in maybe three additions. This preserves all those beautiful, tiny air bubbles we whipped into the cream, guaranteeing a light, airy result every single time. If you want more on pure mousse texture, check out my dedicated silky chocolate mousse guide.
Ingredient Notes and Substitutions for Your Chocolate Mousse Pie
I always want you to feel confident adjusting recipes, especially when you’re running low on one thing or another! This chocolate mousse pie is brilliantly flexible, but a few swaps can really alter the final result, so choose wisely. If Oreos aren’t your jam, absolutely go for a classic graham cracker crust pie base—just make sure you adjust the butter slightly if the crumbs seem drier.
When it comes to the chocolate, don’t be shy about mixing it up! I recommend using semi-sweet as the base because it pairs flawlessly with the sweetness of the cream cheese and that Oreo crust. But if you’re feeling bold, swap out half of the semi-sweet for a good quality bittersweet chocolate. That little bit of extra depth makes this creamy chocolate pie taste phenomenal. Just remember that if you go all bittersweet, you might want to bump up that powdered sugar in the topping just a touch!
Serving Suggestions for This Impressive Dessert Recipes
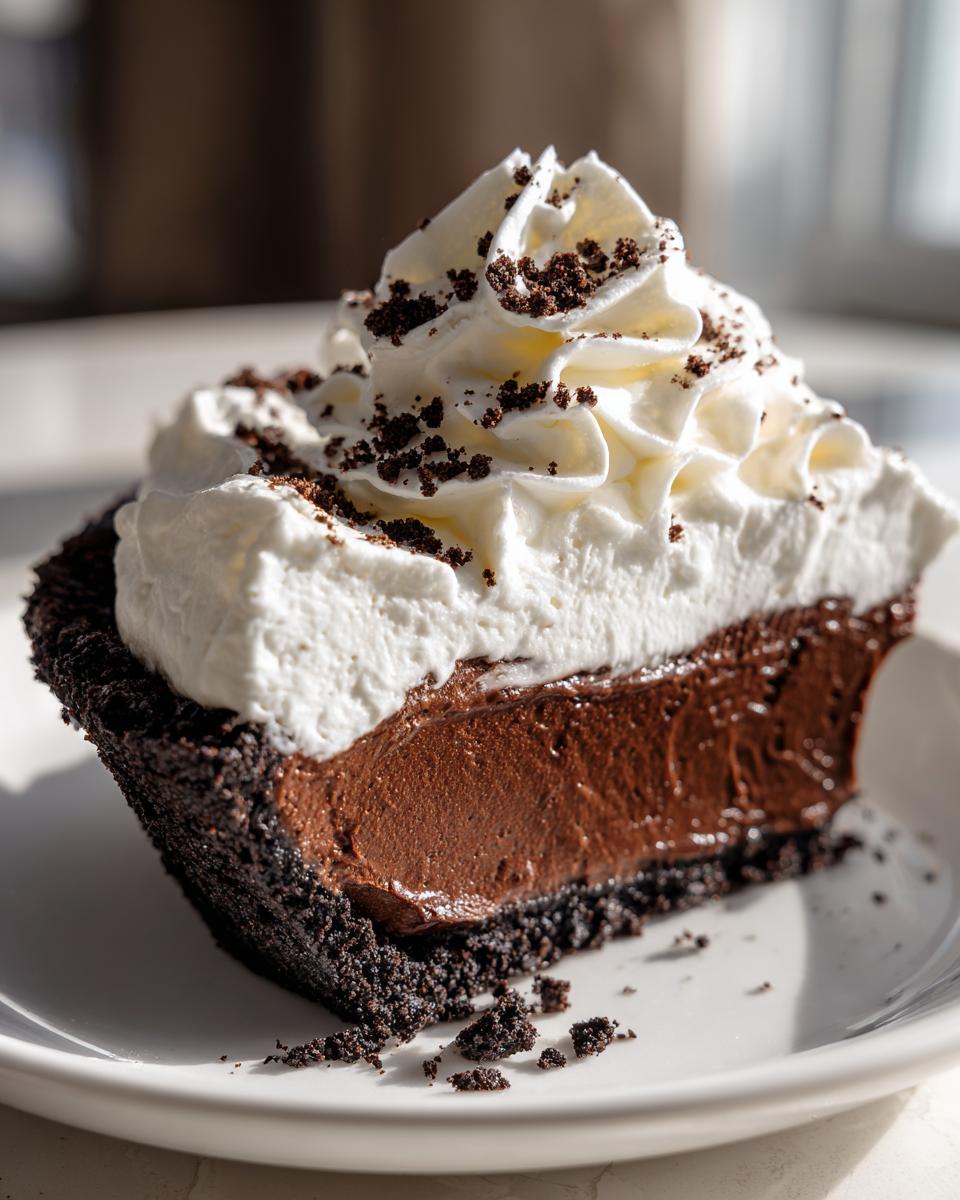
This chocolate mousse pie is already stunning, but a little flair on the serving plate always elevates an impressive dessert recipes moment. Because the filling is so rich, I love pairing it with something bright and acidic to cut through the richness. A handful of fresh raspberries or a scattering of thinly sliced strawberries on the side brightens everything up beautifully.
A simple dusting of high-quality unsweetened cocoa powder just before serving also looks gorgeous. If you are serving this after a rich meal, considering a lighter pairing is key. I often reach for a slightly chilled, lower-tannin red like a Beaujolais; its bright cherry notes are just heavenly against dark chocolate!

Storage and Make Ahead Dessert Tips for Your Chocolate Mousse Pie
The best part about this dreamy chocolate mousse pie is that it is a fantastic make ahead dessert! Don’t stress about last-minute prep. Once the whipped cream topping is on, cover the pie gently with plastic wrap but make sure it isn’t touching the cream. It holds up wonderfully in the refrigerator for about two full days. If you need more time, you can freeze it! Wrap it tightly before freezing, and let it thaw slowly in the fridge for about 6-8 hours before you want to serve it for the perfect texture.
Frequently Asked Questions About Making a Chocolate Mousse Pie
I know when you’re aiming for a showstopper like this chocolate mousse pie, you might have a few lingering questions about texture or timing. That’s totally fair! I’ve pulled together the most common things people ask me when trying to achieve this perfectly creamy chocolate pie without needing an oven. Getting this recipe right makes it the easiest easy chocolate dessert you will ever whip up.
Can I use a pre-made crust for this No Bake Chocolate Pie?
Absolutely, yes! If you are really strapped for time, grab one of those pre-made 9-inch graham cracker crusts. They work wonderfully and save you 15 minutes of pressing cookie crumbs. Just make sure the crust you choose doesn’t have any heavy liners or fillings already in it. A plain, simple graham cracker shell lets that rich chocolate mousse flavor truly shine through.
How do I ensure my filling is light and fluffy, not dense?
This is the make-or-break moment for any mousse! The key is twofold: first, your heavy cream needs to be very cold when you whip it so it achieves stiff peaks easily. Second, and this is crucial, you must fold that whipped cream in *gently* and in stages. Don’t stir vigorously; use a rubber spatula to lift the chocolate mixture up and over the cream. We are trying to keep all that lovely air you just whipped in there!
Is this recipe suitable for a large party or gathering?
Oh, 100%! This is one of my go-to impressive dessert recipes for entertaining. It holds up beautifully in the fridge, and since it requires no last-minute baking, you can have the entire thing ready the day before. It always gets rave reviews because it looks so professional but requires such humble effort!
Sharing Your Beautiful Chocolate Mousse Pie Creation
Now that you’ve successfully navigated creating this show-stopping chocolate mousse pie, I truly want to see what you’ve made! It brings me so much joy knowing my recipes are living in your kitchens and making your gatherings special.
Did you stick with the crunch of the Oreo crust, or did you try a Graham Cracker Crust Pie variation? Did you add a few extra shavings of dark chocolate on top like I suggested? Please hop down to the comments below and leave a star rating for the recipe so I know how it went for you!
If you shared a picture of your gorgeous, silky result on Instagram or Facebook, please tag me! I love seeing your creativity shine. Don’t forget, you can always browse all my latest creations and entertaining tips over on the Unfold Recipes blog. Happy baking—or should I say, happy chilling!
PrintDecadent No-Bake Chocolate Mousse Pie with Oreo Crust

This recipe creates a rich, creamy, and impressive chocolate mousse pie using a simple Oreo crust. It requires no oven time, making it an easy yet elegant dessert perfect for special occasions.
- Prep Time: 25 min
- Cook Time: 0 min
- Total Time: 4 hr 25 min
- Yield: 8 servings 1x
- Category: Dessert
- Method: No-Bake
- Cuisine: American
- Diet: Vegetarian
Ingredients
- 1 3/4 cups Oreo cookie crumbs (about 25 cookies)
- 6 tablespoons unsalted butter, melted
- 1 package (8 ounces) cream cheese, softened
- 1 cup powdered sugar
- 1 teaspoon vanilla extract
- 1 cup heavy cream, cold
- 8 ounces semi-sweet chocolate, melted and slightly cooled
- 1 cup heavy cream, cold (for topping)
- 2 tablespoons powdered sugar (for topping)
- 1 teaspoon vanilla extract (for topping)
Instructions
- Prepare the crust: Combine the Oreo crumbs and melted butter in a bowl. Press the mixture firmly and evenly into the bottom and up the sides of a 9-inch pie plate. Chill the crust in the freezer for 15 minutes while you prepare the filling.
- Make the cream cheese base: In a large bowl, beat the softened cream cheese, 1 cup of powdered sugar, and 1 teaspoon of vanilla extract until the mixture is smooth and creamy.
- Fold in chocolate: Gently fold the slightly cooled, melted semi-sweet chocolate into the cream cheese mixture until just combined. Do not overmix.
- Whip the cream: In a separate, clean bowl, beat 1 cup of cold heavy cream until stiff peaks form.
- Combine mousse: Gently fold the whipped cream into the chocolate mixture in two additions until the mousse is uniform and airy.
- Fill the pie: Pour the chocolate mousse filling into the chilled Oreo crust and smooth the top with a spatula. Refrigerate the pie for at least 4 hours, or until the filling is firm.
- Prepare the topping: Before serving, beat the remaining 1 cup of cold heavy cream, 2 tablespoons of powdered sugar, and 1 teaspoon of vanilla extract until soft peaks form.
- Garnish and serve: Spread or pipe the whipped cream topping over the chilled pie. Slice and serve immediately.
Notes
- For an even richer flavor, use dark chocolate or a mix of semi-sweet and bittersweet chocolate for the filling.
- If you prefer a graham cracker crust, substitute the Oreo crumbs with 1 1/2 cups of finely ground graham cracker crumbs.
- This is a fantastic make ahead dessert; it holds well in the refrigerator for up to two days.
Nutrition
- Serving Size: 1 slice
- Calories: 450
- Sugar: 35
- Sodium: 250
- Fat: 30
- Saturated Fat: 18
- Unsaturated Fat: 12
- Trans Fat: 0
- Carbohydrates: 40
- Fiber: 2
- Protein: 6
- Cholesterol: 90